When we want a dessert that is rich, creamy, crunchy, and irresistibly satisfying, this Oreo Delight Recipe stands above the rest. It combines layers of crushed cookies, velvety cream filling, smooth pudding, and whipped topping into one unforgettable no-bake dessert. Perfect for parties, birthdays, family dinners, or weekend treats, this recipe delivers bakery-quality flavor with simple ingredients and easy preparation.
This complete guide walks through every step to help us create the most delicious Oreo Delight possible.
Ingredients You’ll Need
To prepare the perfect Oreo Delight dessert, gather the following ingredients.
For the Cookie Crust Layer
- 36 Oreo cookies, crushed
- 6 tablespoons melted butter
For the Cream Cheese Layer
- 8 oz cream cheese, softened
- 1 cup powdered sugar
- 1 teaspoon vanilla extract
- 1 container whipped topping (8 oz), divided
For the Pudding Layer
- 2 packages instant vanilla pudding mix (3.4 oz each)
- 3 cups cold milk
For the Topping Layer
- Remaining whipped topping
- Extra crushed Oreo cookies
- Chocolate shavings (optional)
- Mini chocolate chips (optional)
Kitchen Tools Required
To make preparation smooth and efficient, we recommend:
- 9×13 inch baking dish
- Mixing bowls
- Electric hand mixer
- Food processor or rolling pin
- Spatula
- Measuring cups
- Refrigerator space for chilling
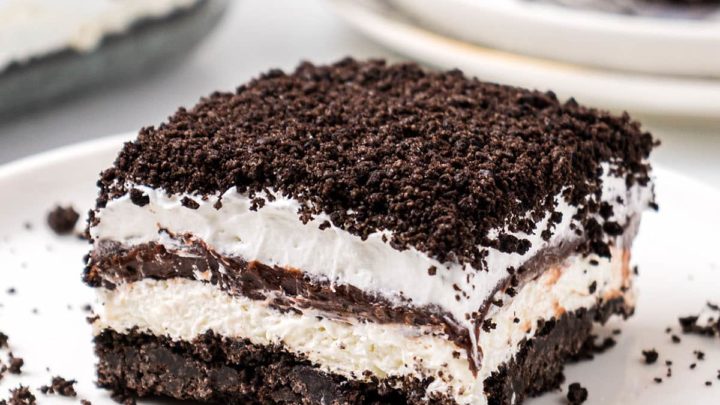
Step-by-Step Guide for Oreo Delight
1. Prepare the Oreo Crust
Crush Oreo cookies into fine crumbs. Mix them with melted butter until well combined. Press the mixture firmly into the bottom of a baking dish or serving tray. Chill in the refrigerator for about 15 minutes to set.
2. Make the Cream Cheese Layer
In a bowl, beat softened cream cheese with powdered sugar until smooth. Fold in whipped topping or whipped cream until light and fluffy. Spread this mixture evenly over the chilled Oreo crust.
3. Add the Chocolate Pudding Layer
Prepare instant chocolate pudding according to the package directions using cold milk. Let it thicken for a few minutes, then spread it carefully over the cream cheese layer.
4. Top with Whipped Cream and Oreos
Spread a generous layer of whipped topping over the pudding layer. Sprinkle crushed Oreo cookies or cookie crumbs on top for extra flavor and crunch.
5. Chill and Serve
Refrigerate the Oreo Delight for at least 2 to 4 hours so the layers can set properly. Slice into squares and serve cold for the best taste and texture.
How to Serve Oreo Delight
Use a sharp knife or dessert spatula to cut squares.
Serve chilled straight from the refrigerator.
This dessert pairs wonderfully with:
- Fresh strawberries
- Hot coffee
- Cold milk
- Vanilla ice cream
- Chocolate drizzle
Expert Tips for Perfect Results
Use Softened Cream Cheese
Cold cream cheese creates lumps. Let it sit at room temperature for 30 minutes before mixing.
Press the Crust Firmly
A tightly packed crust holds together better when sliced.
Chill Between Layers
Short chilling times between steps help create neat, distinct layers.
Use Cold Milk for Pudding
Cold milk helps instant pudding thicken quickly and smoothly.
Overnight Chill for Best Flavor
The cookie crumbs soften slightly overnight, creating a richer texture.
Delicious Variations
Chocolate Oreo Delight
Use chocolate pudding instead of vanilla pudding for an extra rich dessert.
Peanut Butter Oreo Delight
Add ½ cup creamy peanut butter into the cream cheese layer.
Mint Oreo Delight
Use mint-flavored Oreo cookies and chocolate pudding.
Strawberry Oreo Delight
Top with sliced strawberries and use cheesecake pudding mix.
Cookies and Cream Oreo Delight
Mix extra crushed cookies into every layer for maximum cookie flavor.
Storage Instructions
Refrigerator
Store covered in the refrigerator for up to 4 days.
Freezer
Freeze tightly wrapped for up to 1 month.
Thaw in the refrigerator before serving.
Why This Oreo Delight Recipe Works
This dessert succeeds because every layer adds something special:
- Crunchy crust for texture
- Cream cheese filling for richness
- Smooth pudding for softness
- Whipped topping for lightness
- Cookie crumbs for bold flavor
The balance of textures creates a dessert everyone loves.
Common Mistakes to Avoid
Using Warm Butter Excessively
Too much butter makes the crust greasy.
Skipping Chill Time
Warm layers can blend together and lose definition.
Overmixing Whipped Topping
Fold gently to maintain volume.
Thin Pudding
Always allow pudding to set before spreading.
Best Occasions to Make Oreo Delight
This dessert is perfect for:
- Birthday celebrations
- Family gatherings
- Holiday dinners
- Potluck parties
- Summer cookouts
- Weekend desserts
- Special occasions
Because it is no-bake, it is especially convenient during warm weather.
FAQs about Oreo Delight Recipe
1. What is Oreo Delight?
Oreo Delight is a creamy, no-bake dessert made with layers of crushed Oreo cookies, cream cheese, whipped topping, and often chocolate pudding. It is rich, smooth, and easy to prepare.
2. Do I need to bake Oreo Delight?
No, Oreo Delight is usually a no-bake dessert. The crust and layers are chilled in the refrigerator until firm and ready to serve.
3. Can I make Oreo Delight ahead of time?
Yes, Oreo Delight is a great make-ahead dessert. It actually tastes better after chilling for several hours, which helps the layers set properly.
4. How should I store Oreo Delight?
Store Oreo Delight in a covered container in the refrigerator for up to 3 to 4 days. Keep it chilled until serving for the best texture.
5. Can I customize Oreo Delight?
Yes, you can easily customize it by adding chocolate chips, peanut butter, caramel, or extra crushed Oreos on top. Some people also use different pudding flavors for variety.
Final Thoughts
This Oreo Delight Recipe is the perfect combination of creamy, crunchy, sweet, and satisfying. With simple ingredients, no baking required, and stunning layered presentation, it becomes a dependable dessert for any event. Follow this step-by-step guide for flawless results every time, and enjoy a rich homemade treat that always impresses.


