Leftover Chicken Croquettes Recipe: We transform simple leftovers into a crispy, golden, and irresistible dish with this expertly crafted Leftover Chicken Croquettes Recipe. This method ensures that every bite delivers rich flavor, perfect texture, and maximum satisfaction, making it an ideal way to elevate cooked chicken into a gourmet experience.
Croquettes are known for their crispy exterior and creamy, savory interior, and when prepared correctly, they become a versatile meal suitable for snacks, appetizers, or even a full dinner. Our approach guarantees a balanced blend of seasoning, texture, and aroma that stands out.
Ingredients You’ll Need
To achieve perfect chicken croquettes, we carefully select ingredients that enhance both taste and structure:
- 2 cups cooked chicken (shredded or finely chopped)
- 2 tablespoons butter
- 1 small onion (finely diced)
- 2 cloves garlic (minced)
- 2 tablespoons all-purpose flour
- 1 cup milk
- ½ cup breadcrumbs (plus extra for coating)
- 1 egg
- ¼ cup fresh parsley (chopped)
- Salt and black pepper (to taste)
- ½ teaspoon paprika
- ½ teaspoon dried thyme (optional)
- Vegetable oil (for frying)
These ingredients combine to create a smooth, flavorful filling that holds together beautifully while frying.
Step-by-Step Guide to Perfect Chicken Croquettes
Step 1 – Prepare the Flavor Base
We begin by melting butter in a pan over medium heat. Add the finely diced onion and cook until soft and translucent. Stir in the minced garlic and sauté briefly until fragrant.
This step builds a deep aromatic foundation, ensuring the croquettes are rich in flavor from the inside out.
Step 2 – Create a Creamy Binding Mixture
Sprinkle the flour into the pan and stir continuously to form a smooth roux. Gradually pour in the milk while stirring to avoid lumps. Cook until the mixture thickens into a creamy, cohesive sauce.
This binding mixture is essential for achieving the signature soft interior of croquettes.
Step 3 – Combine Chicken and Seasonings
Add the shredded chicken into the creamy mixture. Stir thoroughly to ensure even coating. Season with salt, black pepper, paprika, thyme, and parsley.
At this stage, the mixture should be thick, well-seasoned, and slightly sticky, making it easy to shape later.
Step 4 – Chill the Mixture
Transfer the mixture into a bowl and allow it to cool. Refrigerate for at least 1–2 hours until firm.
Chilling ensures the mixture becomes compact and easy to mold, preventing it from falling apart during frying.
Step 5 – Shape the Croquettes
Once chilled, scoop small portions and shape them into oval or cylindrical forms. Keep the sizes uniform for even cooking.
Consistency in size guarantees a professional appearance and balanced texture.
Step 6 – Coat for Crispiness
Prepare a coating station:
- Beat the egg in one bowl
- Place breadcrumbs in another
Dip each croquette into the egg, then coat thoroughly with breadcrumbs. Repeat for a double coating if a thicker crust is desired.
This step ensures a crispy, golden exterior that contrasts beautifully with the creamy filling.
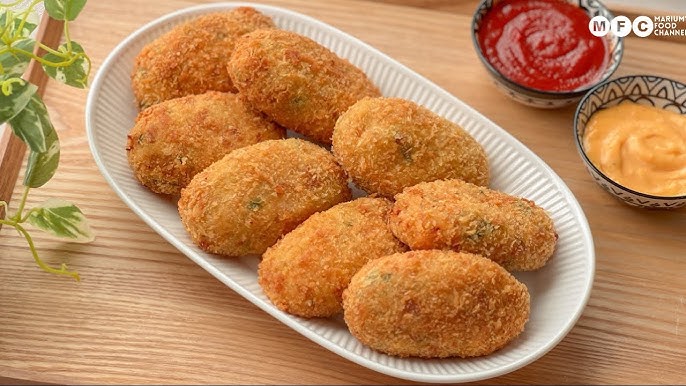
Step 7 – Fry to Golden Perfection
Heat vegetable oil in a deep pan to medium-high temperature. Fry the croquettes in batches until they turn deep golden brown and crispy on all sides.
Remove and drain on paper towels to eliminate excess oil.
Proper frying delivers the signature crunch that defines a high-quality croquette.
Serving Suggestions
We serve these croquettes best when hot, paired with:
- Garlic aioli
- Spicy chili sauce
- Creamy mayonnaise dip
- Fresh salad or steamed vegetables
They also work perfectly as a party appetizer, lunch option, or side dish.
Pro Tips for the Best Chicken Croquettes
- Use finely shredded chicken for a smoother texture
- Chill thoroughly to prevent breaking during frying
- Double coat with breadcrumbs for extra crispiness
- Maintain oil temperature to avoid soggy croquettes
- Do not overcrowd the pan for even frying
These techniques ensure restaurant-quality results every time.
Variations to Elevate Your Croquettes
We can easily customize this recipe to create unique flavor profiles:
Cheesy Chicken Croquettes
Add grated cheese to the mixture for a rich, gooey center.
Spicy Croquettes
Incorporate chili flakes or hot sauce for a bold kick.
Herb-Infused Croquettes
Use fresh herbs like basil, cilantro, or dill for enhanced freshness.
Baked Version
For a lighter option, bake at 200°C (400°F) until golden, brushing lightly with oil.
Storage and Reheating
- Store leftovers in an airtight container in the refrigerator for up to 3 days
- Freeze uncooked croquettes for up to 2 months
- Reheat in an oven or air fryer to retain crispiness
Proper storage maintains both flavor and texture integrity.
FAQs about Leftover Chicken Croquettes Recipe
1. What are chicken croquettes?
Chicken croquettes are small, breaded patties made from shredded chicken, mixed with a creamy binder, then shaped and fried or baked until crispy on the outside.
2. What ingredients are used in leftover chicken croquettes recipe?
A typical recipe includes leftover cooked chicken, breadcrumbs, eggs, milk or cream, and seasonings like salt, pepper, and herbs. Some recipes also add onions, garlic, or cheese.
3. Can I use any type of leftover chicken?
Yes, you can use roasted, grilled, or boiled chicken. Just shred or finely chop it so it mixes well with the other ingredients.
4. How do I shape chicken croquettes?
Form the mixture into small balls, oval shapes, or patties. Keeping them uniform helps them cook evenly.
5. Can I bake chicken croquettes instead of frying?
Yes, you can bake them for a healthier option. Bake at about 375°F (190°C) until golden and heated through, though frying gives a crispier texture.
6. What can I serve with chicken croquettes?
They go well with dipping sauces like aioli, ketchup, or mustard, and sides like salads, rice, or vegetables.
7. Can I freeze chicken croquettes?
Yes, you can freeze them before or after cooking. Store in an airtight container and reheat when ready to serve.
Conclusion
We have created a highly refined Leftover Chicken Croquettes Recipe that transforms simple ingredients into a crispy, flavorful, and satisfying dish. By following this structured method, we achieve the perfect balance between a creamy interior and a crunchy exterior, delivering a result that stands out in both taste and presentation.
This recipe not only minimizes waste but also elevates everyday cooking into a premium culinary experience.


