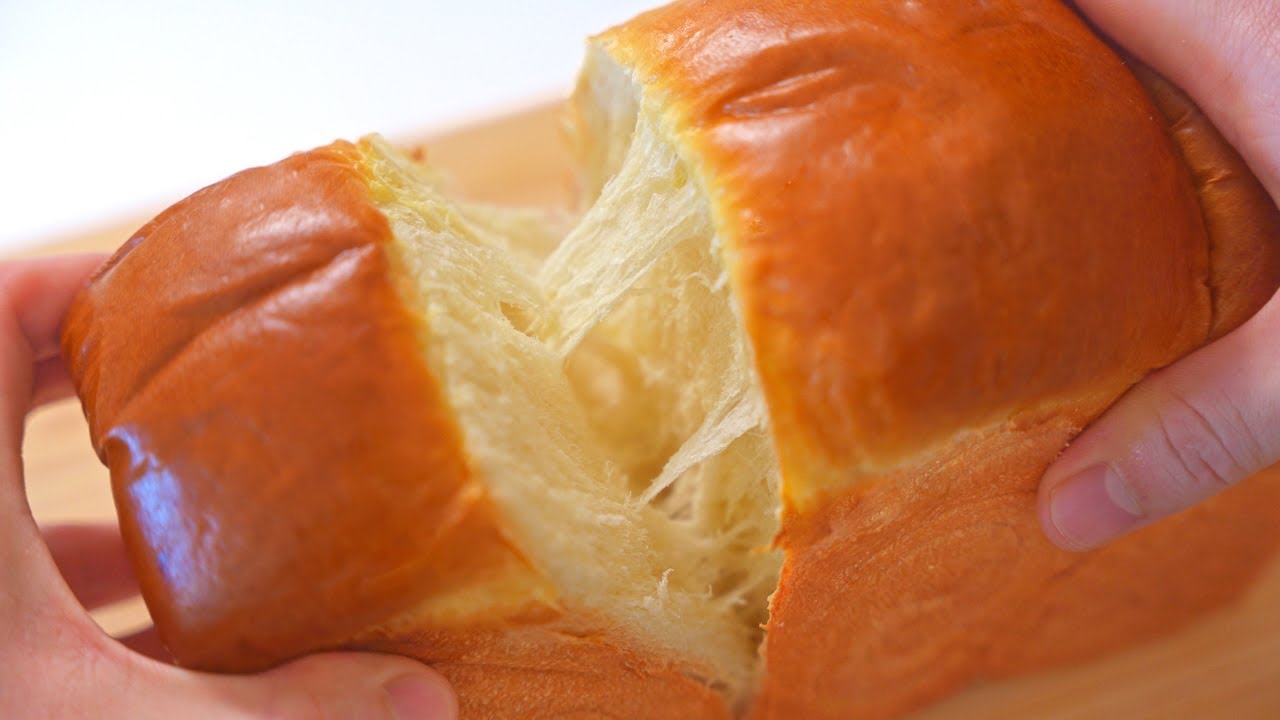
Japanese Milk Bread Recipe: Japanese milk bread is one of the softest, fluffiest, and most satisfying breads we can make at home. Known for its cloud-like texture, gentle sweetness, golden crust, and beautifully tender crumb, this bread is perfect for breakfast, sandwiches, toast, snacks, and homemade bakery-style meals. The secret behind its signature softness is the tangzhong method, a simple cooked flour-and-milk mixture that helps the bread stay moist, airy, and fresh for longer.
In this detailed Japanese milk bread recipe, we will prepare a soft, rich, and fluffy loaf using simple ingredients and a careful step-by-step process. With the right mixing, kneading, proofing, shaping, and baking method, we can create a beautiful homemade bread that tastes like it came from a professional bakery.
Ingredients You’ll Need for Japanese Milk Bread
To make the best Japanese milk bread, we need ingredients that create softness, structure, flavor, and moisture. Each ingredient plays an important role in achieving the perfect loaf.
For the Tangzhong Starter
- 3 tablespoons bread flour
- ½ cup whole milk
- ¼ cup water
For the Bread Dough
- 2 ½ cups bread flour
- ¼ cup granulated sugar
- 2 teaspoons instant yeast
- 1 teaspoon salt
- ½ cup warm whole milk
- 1 large egg
- 4 tablespoons unsalted butter, softened
- All of the tangzhong starter
For Brushing the Bread
- 1 egg, beaten
- 1 tablespoon milk
This egg wash gives the bread a shiny, golden-brown finish. For a softer crust, we can brush the bread with melted butter immediately after baking.
What Makes Japanese Milk Bread So Soft?
The main secret to soft Japanese milk bread is tangzhong. Tangzhong is made by cooking flour with milk and water until it becomes a smooth paste. This paste allows the flour to absorb more liquid, which helps the bread become extra soft, moist, and fluffy.
Unlike regular bread, Japanese milk bread has a light, springy texture that pulls apart beautifully. The dough is enriched with milk, butter, egg, and sugar, giving it a mild sweetness and a rich bakery-style taste. When baked properly, the bread has a tender inside and a soft golden crust.
Step-by-Step Guide to Make Japanese Milk Bread
Step 1: Prepare the Tangzhong Starter
To begin, we will make the tangzhong starter. In a small saucepan, add the bread flour, whole milk, and water. Whisk everything together until there are no lumps.
Place the saucepan over low to medium heat and stir constantly. After a few minutes, the mixture will thicken into a smooth paste. It should look like a thick pudding or soft custard. Once it reaches this texture, remove it from the heat.
Transfer the tangzhong to a small bowl and allow it to cool until it is warm, not hot. The starter must not be too hot when added to the dough because high heat can affect the yeast.
Step 2: Mix the Dry Ingredients
In a large mixing bowl, combine the bread flour, sugar, instant yeast, and salt. Stir the ingredients together so they are evenly distributed.
Bread flour is best for this recipe because it has more protein than all-purpose flour. This helps create a stronger dough structure while still keeping the bread soft and fluffy. The sugar adds gentle sweetness and also helps feed the yeast, while the salt balances the flavor.
Step 3: Add the Wet Ingredients
Add the cooled tangzhong starter to the dry ingredients. Then pour in the warm milk and add the egg.
Mix everything together until a rough dough forms. At first, the dough may look sticky and uneven, but this is normal. Japanese milk bread dough is soft and slightly tacky because it contains milk, butter, and tangzhong.
We should avoid adding too much extra flour at this stage. Too much flour can make the bread dense instead of soft and fluffy.
Step 4: Knead the Dough Until Smooth
Kneading is one of the most important steps in making Japanese milk bread. We need to knead the dough until it becomes smooth, elastic, and stretchy.
If using a stand mixer, knead the dough with a dough hook on low to medium speed for about 8 to 10 minutes. If kneading by hand, place the dough on a lightly floured surface and knead for about 12 to 15 minutes.
Once the dough begins to look smoother, add the softened butter a little at a time. Continue kneading until the butter is fully absorbed. The dough should become glossy, soft, and elastic.
A good way to test the dough is the windowpane test. Stretch a small piece of dough gently between your fingers. If it stretches thin without tearing quickly, the dough is ready.
Step 5: First Proofing
Place the kneaded dough in a lightly greased bowl. Cover the bowl with plastic wrap or a clean kitchen towel.
Let the dough rise in a warm place for about 1 to 1½ hours, or until it doubles in size. The proofing time may vary depending on room temperature. In a warm kitchen, the dough may rise faster. In a cooler kitchen, it may take longer.
The dough is ready when it looks puffy and has increased noticeably in volume. We can gently press one finger into the dough; if the indentation slowly springs back, it is ready for shaping.
Step 6: Divide and Shape the Dough
After the first rise, gently punch down the dough to release excess air. Transfer it to a clean surface and divide it into three equal portions.
Roll each portion into a smooth ball. Cover the dough balls and let them rest for about 10 to 15 minutes. This resting period makes the dough easier to shape.
Take one dough ball and roll it into an oval shape using a rolling pin. Fold the sides toward the center, then roll it up tightly from the bottom to form a small log. Repeat with the remaining dough pieces.
Place the shaped dough logs into a greased loaf pan, seam-side down. Arrange them evenly so they rise together into a beautiful loaf.
Step 7: Second Proofing
Cover the loaf pan and let the dough rise again for about 45 minutes to 1 hour, or until the dough reaches near the top of the pan.
This second proofing helps create the light and fluffy final texture. We should not rush this step because under-proofed dough can result in a dense loaf. At the same time, we should avoid over-proofing because the bread may collapse during baking.
The dough is ready when it looks soft, puffy, and well-risen.
Step 8: Brush with Egg Wash
In a small bowl, whisk together one beaten egg and one tablespoon of milk. Gently brush the top of the risen dough with the egg wash.
This gives Japanese milk bread its beautiful golden color and glossy bakery-style finish. We should brush lightly so we do not deflate the dough.
Step 9: Bake the Japanese Milk Bread
Preheat the oven to 350°F / 175°C.
Place the loaf pan in the center of the oven and bake for about 25 to 30 minutes, or until the top is golden brown and the bread sounds hollow when tapped.
If the top browns too quickly, loosely cover the bread with foil during the last 10 minutes of baking.
Once baked, remove the loaf from the oven and let it cool in the pan for about 10 minutes. Then transfer it to a wire rack to cool completely.
For an extra-soft crust, brush the warm bread with melted butter immediately after removing it from the oven.
How to Know When Japanese Milk Bread Is Done
Japanese milk bread is done when the top is evenly golden brown and the loaf feels light when lifted from the pan. The bread should sound hollow when tapped gently.
For a more accurate result, we can use a kitchen thermometer. The internal temperature should be around 190°F / 88°C. This confirms that the inside is fully baked without being dry.
Best Tips for Soft and Fluffy Japanese Milk Bread
For the best results, we should use bread flour instead of all-purpose flour. Bread flour gives the loaf enough structure to rise high while still staying soft.
We should also make sure the milk is warm, not hot. Warm milk helps activate the yeast, while hot milk can weaken or kill it. The butter should be softened so it mixes smoothly into the dough.
Another important tip is to avoid adding too much flour during kneading. The dough should be soft and slightly tacky. A dry dough will produce a heavier loaf.
Proper proofing is also essential. We should allow the dough to rise until doubled during the first proof and until puffy during the second proof. This helps create the airy, tender crumb that Japanese milk bread is known for.
How to Serve Japanese Milk Bread
Japanese milk bread is delicious on its own, especially when warm and freshly sliced. It can be served with butter, jam, honey, peanut butter, chocolate spread, or cream cheese.
It also makes excellent toast because it becomes lightly crisp on the outside while staying soft inside. We can use it for sandwiches, French toast, bread pudding, breakfast plates, and sweet or savory snacks.
For a simple breakfast, serve thick slices with butter and a cup of tea, coffee, or warm milk. For a more filling meal, use it to make egg sandwiches, chicken sandwiches, or grilled cheese.
How to Store Japanese Milk Bread
To keep Japanese milk bread soft, store it in an airtight container or bread bag at room temperature. It is best enjoyed within 2 to 3 days.
Avoid storing the bread uncovered because it can dry out quickly. If the weather is very hot or humid, it can be stored in the refrigerator, but refrigeration may make the bread slightly firmer.
For longer storage, Japanese milk bread freezes well. Slice the bread, wrap the slices tightly, and place them in a freezer-safe bag. Freeze for up to 1 month. To serve, thaw at room temperature or toast directly from frozen.
Common Mistakes to Avoid
One common mistake is using too much flour. Japanese milk bread dough should be soft and slightly sticky. Adding too much flour can make the loaf dry and dense.
Another mistake is under-kneading. The dough needs enough kneading to develop gluten, which gives the bread its stretchy and fluffy texture.
We should also avoid rushing the proofing process. If the dough does not rise enough, the bread will not have the soft, airy crumb we want.
Overbaking is another problem. Baking too long can dry out the loaf. We should remove the bread once it is golden and fully cooked.
Japanese Milk Bread Recipe Variations
We can customize this recipe in several ways. For a sweeter loaf, add a little more sugar. For a richer flavor, replace part of the milk with heavy cream.
We can also add fillings such as chocolate chips, cinnamon sugar, sweet red bean paste, custard, or raisins. For a savory version, add cheese, herbs, or garlic butter before shaping the dough.
Another option is to shape the dough into soft dinner rolls instead of a loaf. Simply divide the dough into small balls, place them in a baking pan, proof, brush with egg wash, and bake until golden.
FAQs About Japanese Milk Bread Recipe
1. What makes Japanese milk bread so soft?
Japanese milk bread is soft because it often uses the tangzhong method, where flour and liquid are cooked into a paste before mixing into the dough. This helps the bread hold more moisture and gives it a fluffy, tender texture.
2. Can we make Japanese milk bread without tangzhong?
Yes, we can make it without tangzhong, but the bread may not be as soft, moist, or airy. Tangzhong is one of the key secrets behind the signature pillowy texture of Japanese milk bread.
3. What flour is best for Japanese milk bread?
Bread flour is best because it has more protein, which helps create a strong dough structure. This gives the bread its light, stretchy, and fluffy crumb.
4. Why did my Japanese milk bread turn dense?
Japanese milk bread can become dense if the dough is under-kneaded, under-proofed, over-proofed, or if too much flour is added. We should knead until the dough is smooth and elastic, then allow it to rise properly.
5. How should we store Japanese milk bread?
We should store Japanese milk bread in an airtight container or bread bag at room temperature for 2–3 days. For longer storage, slice it and freeze it, then toast or warm before serving.
Final Thoughts
Japanese milk bread is a soft, fluffy, and beautifully rich homemade bread that is worth every step. With the tangzhong method, careful kneading, proper proofing, and gentle baking, we can create a loaf with a tender crumb, golden crust, and bakery-quality texture.
This bread is perfect for breakfast, sandwiches, snacks, toast, and special homemade meals. Once we master this recipe, it becomes one of the most reliable and rewarding bread recipes to make again and again.
The key is to keep the dough soft, knead it well, let it rise properly, and bake it until golden. With these steps, we can enjoy fresh, fluffy Japanese milk bread straight from our own kitchen.