Summer Sausage Recipe: Summer sausage is a classic American cured meat that’s as tasty as it is versatile. Traditionally enjoyed during the warmer months—hence the name—it doesn’t actually need to be refrigerated until opened, making it a practical and delicious snack for picnics, camping trips, or charcuterie boards. This sausage type is semi-dry, has a tangy flavor thanks to fermentation or curing, and is often smoked for extra depth.
Unlike fresh sausages, summer sausage is cured and cooked to extend its shelf life. The result? A meaty, firm-textured sausage that slices beautifully and packs in bold, seasoned flavors. Whether you’re a DIY foodie or just someone who loves meat snacks, learning how to make summer sausage at home gives you total control over flavor, texture, and ingredients.
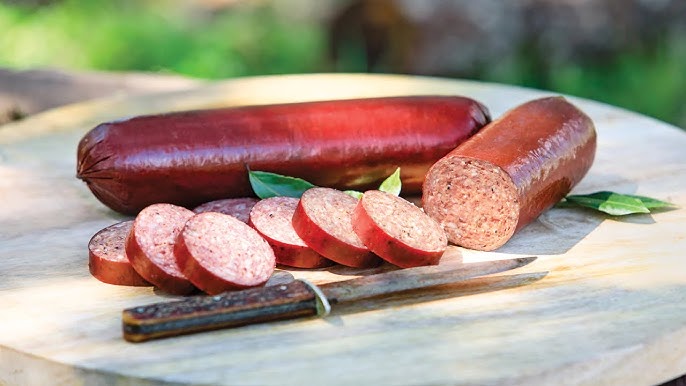
Summer sausage is also known for its iconic reddish-brown exterior and signature spice profile—typically a mix of mustard seed, garlic, peppercorn, and curing salt. Whether made from beef, pork, venison, or a blend, it’s a crowd-pleaser that’s easy to slice and serve on a whim.
Why It’s Perfect for Any Season
Don’t let the name fool you—summer sausage is a year-round treat. Sure, it was originally made in the summer months before refrigeration, but its savory, tangy taste and hearty consistency make it ideal for winter snacking, fall charcuterie boards, spring picnics, or anytime you want something satisfying and protein-packed.
Homemade summer sausage also makes an excellent holiday gift. Wrapped in butcher paper and tied with string, it has that rustic, homemade charm that’s perfect for food baskets or party platters. And because you can tailor the ingredients to your taste (or dietary needs), it’s a great way to show off your culinary creativity.
From tailgate parties to family get-togethers, a properly made summer sausage is more than just food—it’s a nostalgic, flavorful experience that everyone can enjoy.
Ingredients for Homemade Summer Sausage
Meat Selection and Preparation
The base of any good sausage is the meat, and summer sausage is no exception. While you can technically use any type of meat, the most traditional (and best-tasting) versions use a combination of lean beef and fatty pork. This combination ensures the sausage is firm but juicy, with the right balance of flavor and moisture.
Here’s a basic meat blend for making about 5 pounds of summer sausage:
- 3 lbs lean ground beef (80/20 or leaner)
- 2 lbs fatty ground pork (or pork shoulder ground at home)
You’ll want to keep your meat cold throughout the process to maintain texture and prevent smearing. Place your mixing bowl in the fridge or freezer for 10-15 minutes before adding ingredients. If grinding meat yourself, use a medium or fine grinder plate for best results.
For those who like to experiment, venison, elk, or turkey can also be used—just remember to add enough fat to prevent dryness. A good rule of thumb is 70-80% lean meat and 20-30% fat for a balanced summer sausage.
Essential Spices and Curing Agents
What gives summer sausage its signature flavor is the seasoning mix—and there’s more to it than salt and pepper. A good spice blend creates that mouthwatering, savory kick with a hint of tang. Here’s a classic blend to get you started:
- 2 tbsp kosher salt
- 1 tsp curing salt (like Prague Powder #1)
- 1 tbsp black pepper
- 1 tbsp mustard seed
- 1 tbsp garlic powder
- 1 tsp coriander
- 1 tsp crushed red pepper (optional, for heat)
- 1 tbsp sugar or dextrose (helps fermentation)
- 1/4 cup non-fat dry milk (binder)
- 1/2 cup ice water
The curing salt is essential—it inhibits bacterial growth, ensures food safety, and gives the sausage its characteristic pink hue. Don’t skip it unless you’re going for a non-cured (and more perishable) version.
Once all ingredients are ready, it’s time to mix, stuff, and cook. The next sections will walk you through each step, so your homemade summer sausage turns out flavorful, firm, and safe to eat.
Tools and Equipment Needed
Must-Have Kitchen Tools
Before you begin the sausage-making process, make sure your kitchen is equipped with the right tools. Here are the essentials:
- Meat Grinder (if grinding your own meat)
- Large Mixing Bowl
- Digital Scale (for accuracy)
- Sausage Stuffer or Piping Bag
- Casings (fibrous or collagen, 2.5″ diameter recommended)
- Sharp Knife
- Baking Tray or Smoker Rack
- Cooking Thermometer (a must for food safety)
These basic tools will help you create evenly seasoned, well-packed sausage that holds its shape and cooks thoroughly.
Optional But Helpful Gear
Want to level up your sausage game? Here are some optional tools that make life easier:
- Stand Mixer with Paddle Attachment – Great for mixing meat and spices thoroughly without warming it with your hands.
- Vacuum Sealer – Perfect for long-term storage.
- Smoker – Adds depth and flavor that baking can’t match.
- Butcher’s Twine – Useful if tying ends or hanging sausages to dry.
Having the right tools doesn’t just make the process smoother—it helps you achieve a more professional result every time. Next up: we dive into the actual step-by-step process of making your summer sausage from scratch.
Step-by-Step Instructions for Making Summer Sausage
Step 1 – Preparing the Meat
Start by making sure your meat is cold—ideally around 35°F. If you’re grinding it yourself, cut the meat into cubes and partially freeze it for 30 minutes. This helps maintain texture and prevents smearing during grinding.
Using your meat grinder, grind the beef and pork through a medium plate. If using pre-ground meat, make sure it’s fresh and cold. Once ground, place the meat in a large, chilled mixing bowl and prepare your spice blend.
Why is this step so crucial? Because improperly mixed or warmed meat can result in a mushy, greasy sausage. By keeping everything cold and mixing thoroughly, you set yourself up for a firm, delicious final product.
Once ground and ready, proceed to the spice and cure mixing step.
Step 2 – Mixing the Spices and Cure
Now that your meat is prepped and chilled, it’s time to add in all those bold flavors that define summer sausage. Combine your salt, curing salt, pepper, mustard seed, garlic powder, coriander, sugar (or dextrose), and any additional spices in a small bowl. Mixing your spices first ensures even distribution.
Sprinkle the spice mix evenly over the meat. Add your non-fat dry milk and ice water to help bind everything together. If you’re using a stand mixer, use the paddle attachment and mix on low for about 3-5 minutes. If mixing by hand, wear food-safe gloves and mix for at least 5 minutes, folding and pressing until the meat becomes tacky.
This tackiness is important—it means the proteins have bound well, which leads to a better sausage texture. The mixture should cling to itself and form a sticky mass, not crumble or fall apart.
Once mixed, cover the bowl with plastic wrap and let it sit in the refrigerator for 12 to 24 hours. This resting period allows the cure to penetrate the meat and the flavors to develop deeply. It also helps firm up the mix for stuffing.
Step 3 – Stuffing the Sausage Casings
After the meat mixture has rested and cured overnight, it’s time to stuff it into casings. Fibrous casings are commonly used for summer sausage because they’re strong and breathable—ideal for smoking or baking.
First, soak the casings in warm water for about 30 minutes to soften them. Then, load your sausage stuffer or a piping bag with the meat mixture. Work slowly and steadily to prevent air pockets.
Hold the casing firmly as you stuff, allowing it to fill evenly. Once filled, twist the ends tightly and tie them off with butcher’s twine. Make sure the sausage is firm but not overly packed, which can cause splitting during cooking.
Use a sterilized pin or sausage pricker to gently poke small holes in the casing to release any trapped air. This helps prevent blowouts and ensures a smoother appearance.
If you’re making multiple sausages, be sure they’re all about the same size and shape to ensure even cooking. Once stuffed and tied, they’re ready for the next stage: cooking or smoking.
Step 4 – Smoking or Baking the Sausage
This is where the magic really happens. Traditionally, summer sausage is smoked, giving it that rich, complex flavor and deep reddish color. However, if you don’t have a smoker, baking works too.
Smoking Method:
- Preheat your smoker to 130°F.
- Place sausages on racks or hang them inside the smoker.
- Smoke for 1 hour without smoke to dry the casings.
- Gradually raise the temperature to 160°F and begin smoking with your wood chips of choice (hickory and applewood are great).
- Continue smoking until internal temperature reaches 155°F (this may take 4-6 hours).
Baking Method:
- Preheat oven to 170°F.
- Place sausages on a wire rack over a baking sheet.
- Bake for 4 to 6 hours, or until internal temperature reaches 155°F.
Always use a meat thermometer to check the internal temp. This step is critical—not only for food safety but to achieve the proper firmness and texture of authentic summer sausage.
Once cooked, immediately move to the cooling step.
Step 5 – Cooling, Storing, and Serving
As soon as your sausages hit that 155°F internal mark, take them out and immerse them in an ice water bath for 10-15 minutes. This “shock” halts the cooking process and helps firm up the sausage.
Once cooled, dry them with a clean towel and let them sit at room temperature for about an hour. Then, refrigerate for at least 24 hours before slicing—this allows the flavors and texture to fully develop.
To store:
- Refrigerate: Wrap tightly in plastic or vacuum-seal. Good for 3-4 weeks.
- Freeze: Store in vacuum-sealed bags for up to 6 months.
To serve, slice into thin rounds and pair with cheese, crackers, pickles, or mustard. It’s the star of any charcuterie board and makes a great snack on the go.
Tips for Perfect Summer Sausage
Troubleshooting Common Issues
- Sausage too dry? You might need more fat. Try a higher-fat meat blend or increase your pork ratio.
- Crumbly texture? Likely due to under-mixing or not enough binder. Make sure your meat mix is tacky before stuffing.
- Sausage split while cooking? Over-stuffing or cooking too hot too fast. Use a thermometer and slowly raise the temperature.
Flavor Variations to Try
- Cheddar Jalapeño: Add diced sharp cheddar and jalapeños for a spicy twist.
- Venison Version: Use 3 lbs venison and 2 lbs pork fat for a gamey but balanced sausage.
- Smoky Garlic: Double up on garlic and use mesquite wood chips for smoking.
FAQs about Summer Sausage Recipe
Can I make summer sausage without curing salt?
Technically yes, but it won’t last as long or have the same flavor and color. Use curing salt for authenticity and safety.
How long can I store summer sausage?
Unopened and refrigerated, it lasts 3-4 weeks. Vacuum-sealed and frozen, it can last up to 6 months.
Can I freeze summer sausage?
Absolutely. Wrap it well or vacuum-seal, and it will keep its flavor and texture for several months in the freezer.
What’s the best meat blend for summer sausage?
A 60/40 blend of lean beef and fatty pork works best for flavor and texture.
Is it okay to bake instead of smoke it?
Yes. While you’ll lose the smoky flavor, baking at low temps still produces great results.
Conclusion
Making summer sausage at home might take a little effort, but the results are 100% worth it. From selecting your own meats and spices to choosing your cooking method, you’re in full control of what ends up on your plate. Whether smoked to perfection or baked in the oven, summer sausage is flavorful, satisfying, and incredibly versatile.
This step-by-step guide gives you everything you need to make a batch of delicious homemade summer sausage that’s perfect for snacking, gifting, or showing off at your next get-together. Fire up your smoker (or oven), gather your ingredients, and give it a try—you’ll never go back to store-bought again.


