Yogurt Recipe: Making yogurt at home might sound intimidating, but once you try it, you’ll realize it’s one of the simplest and most rewarding kitchen projects. Yogurt is not just a delicious and versatile food; it’s also loaded with probiotics, proteins, and nutrients that are great for gut health.
In this step-by-step guide, you’ll learn everything you need to know about making yogurt at home—from the ingredients to the exact method that guarantees success.
Introduction to Homemade Yogurt
Homemade yogurt is a staple in many households worldwide. Unlike store-bought varieties, homemade yogurt gives you complete control over texture, flavor, and nutritional value. It is budget-friendly, healthier, and allows you to avoid unnecessary additives or sweeteners often found in commercial yogurts.
Why Make Yogurt at Home?
There are countless reasons to start making yogurt at home. First, it’s incredibly cost-effective. A gallon of milk can easily yield multiple jars of yogurt at a fraction of the cost of pre-packaged ones. Second, you can customize it however you like—whether you prefer it plain, tangy, thick, or flavored with fruits and honey.
Making yogurt at home also ensures freshness. Store-bought yogurt often travels long distances and may sit on shelves for weeks before you buy it. Homemade yogurt, on the other hand, is made fresh and consumed within days, giving it a superior taste and quality. Plus, once you’ve mastered the technique, it becomes second nature, much like baking bread or making coffee at home.
Health Benefits of Yogurt
Yogurt is a nutritional powerhouse. It’s rich in protein, calcium, B vitamins, and probiotics. Probiotics are beneficial bacteria that help improve digestion, support the immune system, and balance gut health. Regular consumption of yogurt has been linked to improved digestion, stronger bones, and even better skin health.
For people who are lactose intolerant, homemade yogurt can often be easier to digest than milk because the fermentation process breaks down much of the lactose. This makes yogurt a go-to dairy product for many.
Ingredients You’ll Need
Every great recipe begins with the right ingredients, and yogurt is no exception. Luckily, making yogurt requires very few items—just milk and a starter culture. However, the quality of these ingredients plays a huge role in the outcome.
Essential Ingredients
To make basic yogurt, you only need two ingredients:
- Milk – Any variety of milk can be used, but whole milk typically produces the creamiest yogurt.
- Starter culture – This can be a spoonful of plain yogurt containing live active cultures or a freeze-dried yogurt starter.
That’s it! With these two simple ingredients, you can create batches of creamy, tangy yogurt right at home.
Choosing the Right Milk
Not all milk is created equal, especially when it comes to yogurt-making. The fat content in milk affects the creaminess and thickness of the yogurt.
- Whole Milk: Produces the richest and creamiest yogurt.
- 2% Milk: Gives a lighter texture but still creamy enough.
- Skim Milk: Results in thinner yogurt unless you add powdered milk for extra thickness.
- Raw Milk: Can be used, but it’s essential to heat it properly to eliminate harmful bacteria.
Pro tip: Avoid ultra-pasteurized milk when possible, as the high-heat processing can sometimes interfere with proper culturing. Regular pasteurized milk works best for consistent results.
Picking the Perfect Starter Culture
Your starter culture determines the flavor and probiotic content of your yogurt. If using store-bought yogurt as a starter, make sure it has “live and active cultures” listed on the label. Some popular strains include Lactobacillus bulgaricus and Streptococcus thermophilus, which are essential for yogurt fermentation.
If you want consistency, opt for a freeze-dried starter culture. These are available online or in specialty stores and can be stored for long periods. Using a powdered starter is especially useful if you plan to make yogurt regularly and want a predictable outcome each time.
Equipment Needed for Making Yogurt
Making yogurt doesn’t require fancy gadgets. You probably already have everything you need in your kitchen. Still, there are a few tools that can make the process easier.
Basic Kitchen Tools
Here are the essentials:
- Heavy-bottomed pot – Prevents milk from scorching while heating.
- Cooking thermometer – Ensures milk reaches the correct temperature.
- Whisk or spoon – For mixing the starter into the milk.
- Glass jars or containers – For storing yogurt during incubation.
- Towel or blanket – To keep yogurt warm during the setting process.
Optional Tools for Convenience
While not necessary, these tools can make the process smoother:
- Yogurt maker – Keeps milk at a steady incubation temperature.
- Slow cooker or Instant Pot – Convenient for heating and incubating in one pot.
- Cheesecloth or strainer – Useful if you want to make thicker, Greek-style yogurt.
Having the right tools doesn’t mean spending extra money—just start with the basics and upgrade as you go.
Step-by-Step Guide to Making Yogurt
Now that you’ve gathered your ingredients and equipment, let’s walk through the yogurt-making process. Each step plays a crucial role in ensuring your yogurt turns out creamy, tangy, and delicious.
Step 1 – Heating the Milk
Start by pouring your milk into a heavy-bottomed pot. Heat the milk slowly over medium heat until it reaches around 180°F (82°C). This step kills any unwanted bacteria and helps denature the milk proteins, giving your yogurt a smoother texture.
Make sure to stir occasionally to prevent a skin from forming on top. If you accidentally let it boil, don’t worry—it won’t ruin the yogurt, but it might affect the final texture.
Step 2 – Cooling the Milk
After heating the milk, the next important step is cooling it down to the right temperature. Once the milk reaches 180°F (82°C), remove it from the heat and allow it to cool until it’s about 110°F–115°F (43°C–46°C). This is the sweet spot for the live cultures to thrive.
If the milk is too hot, it will kill the bacteria in your starter culture. If it’s too cool, the bacteria won’t activate properly, and the fermentation process will be too slow or may not happen at all.
You can speed up the cooling process by placing the pot in a sink filled with cold water. Just make sure to stir occasionally and check with a thermometer until the milk reaches the right temperature.
Step 3 – Adding the Starter Culture
Now comes the magic. Once your milk has cooled, take about half a cup of warm milk and mix it with 2–3 tablespoons of starter yogurt in a separate bowl. Stir until smooth, then pour this mixture back into the pot with the rest of the milk.
This helps distribute the live cultures evenly, ensuring consistent fermentation. Remember, less is more—adding too much starter can actually make the yogurt runny or overly sour.
Step 4 – Incubating the Yogurt
The incubation step is where the real transformation happens. After adding your starter, pour the milk into clean glass jars or containers, cover them with lids or plastic wrap, and keep them warm for 6–12 hours.
The longer you let it incubate, the tangier your yogurt will be. For a mild flavor, 6 hours is usually enough. For a stronger tang and firmer texture, let it sit for up to 12 hours.
Ways to Keep Yogurt Warm During Incubation:
- Wrap jars in a towel and place them in an oven with the light on.
- Use a yogurt maker for steady heat.
- Place jars in an insulated cooler filled with warm water.
- Use the “Yogurt” setting on an Instant Pot.
Maintaining a steady temperature between 105°F–115°F (40°C–46°C) is crucial for success.
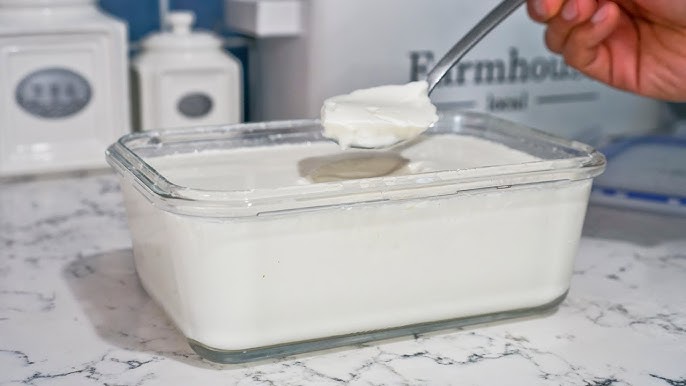
Step 5 – Checking the Consistency
After incubation, check your yogurt. It should look set, with a creamy texture. Gently tilt the jar—if it jiggles slightly like custard, it’s ready. If it’s still runny, you can let it incubate longer.
Don’t stir the yogurt at this stage. Stirring too early can break the structure and make it watery. Once you’re satisfied with the consistency, it’s time for the final step.
Step 6 – Refrigerating the Yogurt
Transfer your yogurt jars to the refrigerator and chill them for at least 2–4 hours before eating. This not only improves texture but also helps the yogurt firm up more.
Homemade yogurt typically lasts 1–2 weeks in the fridge. Always save a few tablespoons from your fresh batch to use as a starter for the next one. This way, you’ll never run out of yogurt again!
Tips for Perfect Yogurt Every Time
Even though yogurt-making is simple, little tweaks can make a huge difference in the final result.
How to Make Thicker Yogurt
- Use whole milk for creamier texture.
- Add 2–3 tablespoons of powdered milk before heating.
- Strain yogurt with cheesecloth for Greek-style thickness.
Common Mistakes to Avoid
- Overheating milk: Can change flavor and texture.
- Wrong incubation temperature: Too hot kills bacteria, too cold prevents fermentation.
- Using flavored yogurt as a starter: Added sugars and thickeners interfere with cultures.
Following these tips will help you achieve consistent, delicious yogurt every single time.
Variations of Homemade Yogurt
One of the biggest perks of making yogurt at home is the ability to experiment with different variations. Whether you like it thick and creamy, flavored with fruits, or entirely dairy-free, there’s a version of yogurt for everyone.
Greek Yogurt
Greek yogurt is simply strained regular yogurt. By removing excess whey (the liquid), you’re left with a thicker, creamier product that’s high in protein. To make Greek yogurt, line a strainer with cheesecloth and place it over a bowl. Pour your freshly made yogurt into the strainer and let it drain for a few hours. The longer you strain, the thicker it becomes.
This type of yogurt is perfect for smoothies, dips, or as a substitute for sour cream in recipes. Plus, it keeps you full longer thanks to its higher protein content.
Flavored Yogurt
If plain yogurt feels too tangy, you can easily add flavors at home. Stir in honey, maple syrup, vanilla extract, or fruit puree after the yogurt has chilled. For a healthier option, blend fresh berries or bananas directly into the yogurt.
Unlike store-bought flavored yogurts, making your own ensures you skip the added sugars and artificial ingredients. You get to control both sweetness and flavor intensity.
Dairy-Free Alternatives
For those who are lactose intolerant or prefer plant-based options, yogurt can be made with non-dairy milks like almond, soy, oat, or coconut milk. The process is similar, but you’ll need a thickener like agar-agar or tapioca starch since plant-based milks don’t set as easily as dairy.
Dairy-free yogurts are a fantastic option for vegans or anyone looking to diversify their diet while still enjoying probiotics.
Storing and Serving Homemade Yogurt
Once you’ve perfected your yogurt, storing it properly will keep it fresh and safe to eat.
Proper Storage Techniques
- Always store yogurt in clean, airtight glass jars or containers.
- Keep it refrigerated immediately after incubation.
- Consume within 7–14 days for the best flavor and texture.
- Save 2–3 tablespoons from each batch to use as your starter for the next one.
If your yogurt develops an unusual smell, mold, or separation that looks suspicious, it’s best to discard it.
Serving Suggestions
Homemade yogurt is incredibly versatile. Here are some tasty ways to enjoy it:
- Top with granola and fresh fruit for breakfast.
- Blend into smoothies for creaminess and probiotics.
- Use as a base for savory dips like tzatziki.
- Mix with herbs and spices to create a healthy salad dressing.
- Enjoy plain with a drizzle of honey for a simple dessert.
FAQs about Yogurt Recipe
1. Can I make yogurt without a starter?
Not exactly. You need live bacteria to kickstart the fermentation. However, once you make your first batch, you can always use some of it as the starter for the next one.
2. How long does homemade yogurt last?
Typically, 1–2 weeks in the refrigerator. Always check for freshness before consuming.
3. Why is my yogurt runny?
It could be due to low incubation temperature, too much or too little starter, or using skim milk. Straining the yogurt can help thicken it.
4. Can I use flavored yogurt as a starter?
It’s not recommended because added sugars and thickeners can interfere with fermentation. Always use plain yogurt with live cultures.
5. Is homemade yogurt cheaper than store-bought?
Absolutely. A gallon of milk costs much less than buying multiple tubs of yogurt, making homemade a cost-effective choice.
Conclusion
From plain yogurt to Greek, flavored, or even dairy-free versions, the possibilities are endless. The key lies in following the right steps—heating, cooling, adding the starter, incubating, and chilling. Once you’ve mastered the basics, you can customize your yogurt exactly how you like it.
Homemade yogurt is more than just food—it’s a tradition, a science experiment, and a health booster all rolled into one. So grab some milk, set aside a little time, and start your journey into the world of homemade yogurt. You’ll never look back!