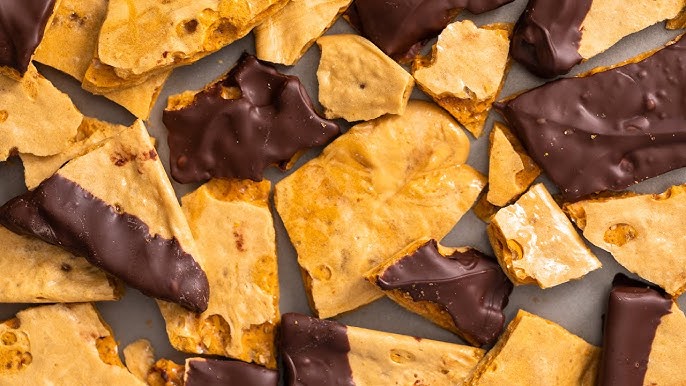
Sponge Candy Recipe: Sponge candy is a light, crisp, golden confection known for its airy honeycomb texture, deep caramel flavor, and satisfying crunch. It is made by cooking sugar, corn syrup, and vinegar to the correct temperature, then quickly adding baking soda to create the signature bubbles that turn the hot syrup into a foamy, delicate candy. When prepared properly, sponge candy breaks into beautiful golden pieces with a melt-in-the-mouth crispness that makes it perfect for snacking, gifting, dipping in chocolate, or serving during holidays and special occasions.
This sponge candy recipe gives us a dependable homemade version using simple pantry ingredients and a careful step-by-step method. The key is precision: the sugar syrup must reach the right stage, the baking soda must be mixed in quickly, and the hot candy must be left undisturbed until fully cooled. With the correct technique, we get a batch of crunchy, airy, old-fashioned sponge candy with a rich caramel taste and a beautifully bubbled center.
Ingredients You’ll Need for Sponge Candy
To make a classic homemade sponge candy recipe, we need only a few ingredients, but each one plays an important role in the final texture and flavor.
Main Ingredients
- 1 cup granulated sugar
- 1 cup light corn syrup
- 1 tablespoon white vinegar
- 1 tablespoon baking soda
- 1 teaspoon vanilla extract (optional)
- Pinch of salt (optional, but recommended)
Optional Chocolate Coating
- 2 cups milk chocolate, dark chocolate, or semi-sweet chocolate chips
- 1 tablespoon vegetable shortening or coconut oil (optional, for smoother melting)
Best Equipment for Making Sponge Candy
For the best results, we should prepare our tools before cooking because sponge candy moves quickly once the syrup reaches the proper temperature.
We need a heavy-bottomed saucepan, a candy thermometer, a wooden spoon or heatproof spatula, a large baking sheet, parchment paper, and a sifter or small bowl for the baking soda. A candy thermometer is especially important because sponge candy depends on temperature accuracy. Guessing the stage of the syrup can lead to soft, sticky candy or burned sugar.
A heavy saucepan helps distribute heat evenly, reducing the risk of scorching. The baking sheet should be lined before we begin, because once the baking soda is added, the candy foams immediately and must be poured out fast.
How to Prepare the Pan Before Cooking
Before turning on the stove, line a baking sheet with parchment paper. We may also lightly grease the parchment with butter or nonstick spray, but this is optional. The candy will be extremely hot when poured, so the baking sheet should be placed on a stable, heat-resistant surface.
It is also helpful to measure the baking soda in advance and keep it close to the stove. Sponge candy is not a recipe where we can pause to search for ingredients. The moment the syrup reaches the correct temperature, everything must happen quickly.
Step-by-Step Guide to Making Sponge Candy
Step 1: Combine the Sugar, Corn Syrup, and Vinegar
In a heavy-bottomed saucepan, combine granulated sugar, light corn syrup, and white vinegar. Stir gently until the sugar is evenly moistened. Place the pan over medium heat and allow the mixture to warm gradually.
The corn syrup helps prevent crystallization, giving the candy a smooth, glassy structure. The vinegar helps balance sweetness and supports the candy’s final texture. As the mixture heats, it will begin to bubble and turn clear.
Step 2: Cook the Syrup Without Over-Stirring
Once the sugar dissolves and the mixture begins boiling, avoid excessive stirring. Too much stirring can encourage sugar crystals to form along the sides of the pan. Instead, let the syrup boil steadily. If sugar crystals appear on the sides of the saucepan, we can carefully brush them down with a pastry brush dipped in water.
Attach the candy thermometer to the side of the pan, making sure the tip sits in the syrup but does not touch the bottom of the pot. This gives us a more accurate reading.
Step 3: Heat the Syrup to the Hard Crack Stage
Continue boiling until the syrup reaches 300°F to 310°F, also known as the hard crack stage. This is the temperature range that gives sponge candy its crisp, crunchy structure.
As the syrup cooks, it will change from pale and clear to a light golden color. We should watch carefully near the end because sugar can move from perfectly cooked to burned very quickly. The ideal color is golden amber, not dark brown.
If the syrup does not reach the hard crack stage, the finished candy may turn sticky or chewy. If it gets too hot, the flavor may become bitter.
Step 4: Remove From Heat Immediately
When the syrup reaches the correct temperature, remove the saucepan from the heat immediately. Turn off the stove and work quickly. At this point, the syrup is extremely hot, so careful handling is important.
Add the vanilla extract and a small pinch of salt if using. These ingredients are optional, but they add depth and balance to the sweetness. The vanilla gives a warmer flavor, while the salt sharpens the caramel notes.
Step 5: Quickly Add the Baking Soda
Immediately add the baking soda all at once. Stir quickly but briefly with a heatproof spatula or wooden spoon. The mixture will foam up dramatically as the baking soda reacts with the hot syrup.
This reaction creates the airy bubbles that give sponge candy its signature honeycomb structure. Do not overmix. Stir just enough to incorporate the baking soda. Overmixing can collapse the bubbles and make the candy dense instead of light and crisp.
Step 6: Pour the Foamy Candy Onto the Prepared Pan
Quickly pour the foaming candy onto the prepared baking sheet. Do not spread it with a spatula. Spreading can crush the bubbles and flatten the airy texture. Simply allow the mixture to flow naturally into a mound or sheet.
The candy will begin setting almost immediately. Leave it alone and let it cool completely at room temperature. Avoid touching, moving, or cutting it while warm.
Step 7: Let the Sponge Candy Cool Completely
Allow the candy to cool for at least 1 hour, or until it is fully hardened. Once cooled, it should feel dry, crisp, and firm. The inside should have a light honeycomb texture filled with tiny air pockets.
When the candy is completely cool, lift it from the parchment and break it into pieces using your hands or the back of a knife. The pieces do not need to be perfectly shaped. Irregular chunks are part of the classic homemade sponge candy look.
How to Coat Sponge Candy in Chocolate
Chocolate-coated sponge candy is one of the most popular ways to serve this treat. The chocolate adds richness and protects the candy from moisture, helping it stay crisp for longer.
Melt the chocolate in a microwave-safe bowl in short intervals, stirring between each session until smooth. Add a small amount of vegetable shortening or coconut oil for a thinner, glossier coating if desired.
Dip each sponge candy piece into the melted chocolate, allowing excess chocolate to drip off. Place the coated pieces on parchment paper and let them set until firm. For a cleaner finish, we can use a fork to dip and lift each piece.
Milk chocolate gives a sweet, creamy coating, while dark chocolate creates a deeper, more balanced flavor. Semi-sweet chocolate is a good middle option for those who want both sweetness and richness.
Tips for Perfect Homemade Sponge Candy
For the best homemade sponge candy, accuracy and preparation matter. Always use a candy thermometer because temperature determines whether the candy becomes crisp or sticky. Measure the baking soda before cooking, line the pan early, and avoid distractions while the syrup is boiling.
Humidity can affect sponge candy. Making it on a dry day gives better results because sugar-based candies absorb moisture from the air. If the weather is very humid, the candy may become sticky faster after cooling.
Use fresh baking soda. Old baking soda may not react strongly enough, which can lead to a flatter texture. Also, avoid pressing or spreading the mixture once poured because that can destroy the airy structure.
Common Sponge Candy Mistakes to Avoid
One common mistake is removing the syrup from the heat too early. If the syrup does not reach the hard crack stage, the candy will not harden properly. Another mistake is stirring too much after adding the baking soda. The mixture should be stirred quickly, but only briefly.
Using too small of a saucepan can also cause problems because the mixture expands quickly when baking soda is added. A medium or large saucepan gives the foam enough space to rise without overflowing.
Storing sponge candy incorrectly is another issue. Since the candy absorbs moisture easily, it should never be left uncovered for long periods.
How to Store Sponge Candy
Store sponge candy in an airtight container at room temperature. Keep it away from humidity, heat, and direct sunlight. For best texture, place parchment paper between layers to prevent sticking.
Do not store sponge candy in the refrigerator. The moisture inside the fridge can make it sticky and soft. Properly stored sponge candy can stay crisp for several days. Chocolate-coated sponge candy may last longer because the coating helps protect the airy center from moisture.
Serving Ideas for Sponge Candy
Sponge candy is delicious on its own, but it can also be used in creative ways. Serve it as a holiday candy, package it in decorative bags for gifts, crumble it over ice cream, or add pieces to dessert boards. Chocolate-coated sponge candy is especially good for birthdays, Christmas trays, party favors, and homemade candy boxes.
Small broken pieces can be sprinkled over cakes, brownies, cupcakes, milkshakes, and sundaes. The crisp texture adds a sweet caramel crunch that works beautifully with creamy desserts.
FAQs About Sponge Candy Recipe
1. What is sponge candy made of?
Sponge candy is usually made with sugar, corn syrup, vinegar, baking soda, and chocolate. The sugar mixture is cooked until hot and caramel-like, then baking soda is added to create the light, airy, sponge-like texture.
2. Why did my sponge candy become chewy?
Sponge candy can become chewy if the sugar mixture was not cooked to the right temperature or if the candy absorbed moisture from the air. For best results, cook it to the proper hard-crack stage and store it in an airtight container.
3. Can I make sponge candy without corn syrup?
Yes, but corn syrup helps prevent the sugar from crystallizing. Without it, the texture may become grainy. Some recipes use honey or golden syrup, but the result may taste slightly different.
4. How do I store sponge candy?
Store sponge candy in an airtight container at room temperature. Keep it away from humidity, heat, and the refrigerator because moisture can make it sticky or soft.
5. Can sponge candy be dipped in chocolate?
Yes. Once the sponge candy has cooled completely, break it into pieces and dip each piece in melted chocolate. Let the chocolate set before serving. This gives the candy a crisp, sweet, and rich finish.
Conclusion
This recipe works because it uses the right balance of sugar, corn syrup, acid, and baking soda. The syrup cooks to the hard crack stage, creating a firm candy base. The baking soda reacts instantly with the hot syrup, producing air bubbles that expand through the mixture. As the candy cools, those bubbles remain trapped, forming the light, crunchy honeycomb texture that makes sponge candy so special.
The result is a golden, crisp, sweet candy with a deep caramel flavor and a delicate bite. Whether served plain or coated in chocolate, this sponge candy recipe delivers a classic homemade treat with impressive texture and rich old-fashioned flavor.