Clothes Soap Recipe: Let’s face it—laundry detergent is one of those things we buy without thinking twice, but it adds up fast and is full of chemicals we can barely pronounce. Ever flipped over a detergent bottle and tried to read the ingredients? Yeah, me too. That’s why learning how to make your own homemade clothes soap isn’t just a trend—it’s a smart, sustainable, and surprisingly fun way to take control of what’s going on your clothes and, ultimately, your skin.
Making your own laundry soap may sound like a homesteader’s hobby, but it’s actually one of the easiest DIY projects you can start today. And the best part? It’s cost-effective, environmentally friendly, and can be tailored to your family’s needs—whether that means skin sensitivity or scent preferences.
This guide will walk you through everything from what ingredients you need, to how to make it step-by-step, and even a few handy pro tips to make your clothes look, feel, and smell amazing. Ready to ditch the commercial chemicals and get a little crafty in the laundry room? Let’s dive in.
What is Homemade Clothes Soap?
Homemade clothes soap—also commonly called DIY laundry detergent—is a cleaning solution made with just a few basic, natural ingredients. Unlike traditional store-bought detergents that often contain harsh chemicals, dyes, synthetic fragrances, and unnecessary fillers, homemade laundry soap is simple, safe, and effective.
It typically consists of three core components: a soap base (like Castile or Fels-Naptha), washing soda, and borax. These ingredients are all natural cleaning agents that work together to break down grease, lift stains, soften water, and neutralize odors.
What makes it different from what you buy at the store? For starters, you know exactly what’s in it. There are no harsh surfactants, no artificial perfumes, and no mystery preservatives. You can also control the strength, scent, and quantity of your detergent—something that’s nearly impossible with store-bought options.
Another bonus? You’ll probably spend a fraction of the cost. One batch of DIY clothes soap can last months and costs pennies per load. Compare that to commercial brands, which can run you $15–$25 a bottle, and the savings are obvious.
Is Homemade Laundry Detergent Effective?
If you’re wondering, “Does homemade detergent really clean my clothes?” the answer is a resounding YES. While it might not have the sudsy drama of commercial soaps (which is mostly aesthetic, by the way), homemade soap packs a powerful punch—especially when used correctly.
Each ingredient plays its role:
- Washing soda breaks down grime and deodorizes.
- Borax acts as a whitening agent and natural disinfectant.
- Grated soap loosens dirt and softens fabrics.
That said, it’s important to manage expectations. Homemade soap doesn’t have heavy-duty enzymes or stain-fighting additives unless you include them. It’s excellent for everyday laundry, but you may need spot treatment for oil stains, heavy grime, or set-in dirt.
In terms of fabric care, it’s gentle. So gentle that many parents use homemade soap for baby clothes and sensitive skin. It’s also safe for high-efficiency (HE) machines because it’s low-sudsing—an important requirement for those washers.
So yes, it works. And it works without the baggage of synthetic chemicals and overpriced marketing.
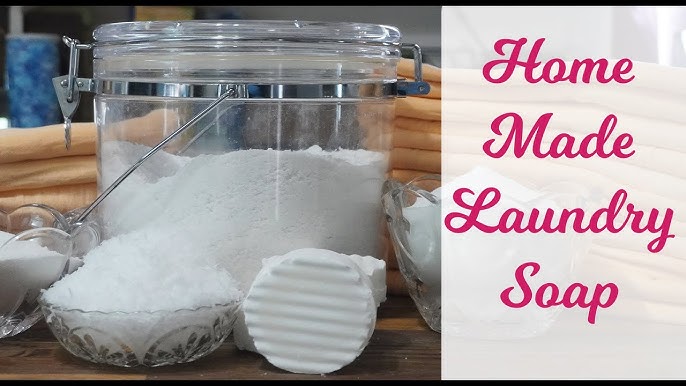
Ingredients You’ll Need
Let’s get down to business. Here’s a basic ingredient list to whip up your own batch of laundry soap. This makes about 5–6 cups of detergent (enough for 40–60 loads).
Dry Laundry Soap Recipe Ingredients:
- 1 bar of soap (Fels-Naptha, Castile, Dr. Bronner’s, or even Ivory)
- 1 cup washing soda (sodium carbonate)
- 1 cup borax (sodium borate)
- 15–20 drops of essential oils (optional for scent – lavender, lemon, tea tree, etc.)
Optional Ingredients:
- Oxygen bleach powder (for extra whitening power)
- Baking soda (for deodorizing)
- Epsom salt (to soften water)
Where to Buy Ingredients:
- Local grocery or health stores
- Bulk bins in co-ops
- Online retailers like Amazon, Thrive Market, or Walmart
- Some dollar stores also carry Fels-Naptha and washing soda
These ingredients are often budget-friendly and easy to find. Plus, once you have them, you’ll be set for multiple batches.
Tools & Supplies Required
Aside from ingredients, you’ll need a few tools to help you whip everything into shape.
Basic Supplies:
- Cheese grater or food processor (for grating soap)
- Large mixing bowl
- Measuring cups
- Airtight container (like a mason jar, plastic tub, or repurposed coffee can)
- Spoon or whisk for mixing
Storage Suggestions:
- Use glass jars for long-term storage
- Label containers with name + date
- Keep away from moisture and direct sunlight
Most of these items are probably already in your kitchen. If not, they’re cheap and easy to grab.
Understanding the Ingredients
Let’s break down what each ingredient actually does and why it’s important in your homemade detergent.
Washing Soda
- Purpose: Breaks down stains, neutralizes odors
- Where It’s Found: Often in the laundry aisle, also known as soda ash
- Fun Fact: You can make washing soda by baking baking soda at 400°F for an hour
Borax
- Purpose: Softens hard water, removes stains, acts as a natural booster
- Controversy: Some people avoid borax due to skin sensitivities. If that’s you, substitute with baking soda.
Bar Soap
- Purpose: The main cleaning agent that lifts dirt and grime
- Best Options:
- Fels-Naptha: Heavy-duty, ideal for grease
- Castile Soap: Natural, vegan, perfect for sensitive skin
- Zote: Large, lightly scented, budget-friendly
Essential Oils
- Purpose: Adds natural scent, can boost antibacterial properties
- Popular Choices:
- Tea tree: Antifungal and fresh
- Lavender: Soothing and clean
- Citrus: Bright, energizing
Step-by-Step Guide to Making Clothes Soap
Now that you’ve got all your ingredients and tools lined up, it’s time to actually make the magic happen. Making homemade clothes soap is surprisingly simple and satisfying. Whether you’re a DIY pro or this is your first time making a homemade cleaning product, just follow these steps and you’ll have a batch ready in under 20 minutes.
Step 1: Grate the Soap Bar
Start by taking your chosen bar of soap and grating it finely using a standard kitchen cheese grater. If you have a food processor, that’ll save time—just make sure it’s clean and dry before use. The finer the soap shavings, the easier they’ll dissolve in water.
- Pro Tip: If the soap is too soft, let it dry out overnight before grating. This makes it crumble more easily and prevents clumping.
- Amount: You’ll want 1 full bar, roughly 4–5 ounces.
Step 2: Mix Dry Ingredients
In a large bowl, combine:
- 1 cup of washing soda
- 1 cup of borax
- Your grated soap
Use a large spoon, whisk, or your hands (with gloves) to blend everything together. Make sure there are no large soap chunks and that the mixture is consistent.
- Optional: Add ½ cup baking soda if you want extra deodorizing power.
- Optional: Add ½ cup of oxygen bleach for an eco-friendly whitening agent.
Step 3: Add Essential Oils (Optional)
If you want to scent your detergent naturally, now’s the time. Add about 15–20 drops of your favorite essential oil(s). Here are some great blends:
- Lavender + Lemon – calming and fresh
- Eucalyptus + Mint – invigorating and clean
- Orange + Tea Tree – bright and antibacterial
Stir the mixture again after adding oils so the scent distributes evenly.
Step 4: Store Your Detergent
Transfer your finished detergent into an airtight container. A large mason jar, old coffee tin, or even a plastic container with a tight-fitting lid will do. Be sure to label the container with:
- “Homemade Laundry Soap”
- Date made
- Usage instructions (e.g., 1–2 tablespoons per load)
And that’s it! You’ve just made your very own batch of chemical-free, eco-friendly clothes soap.
Liquid vs Powdered Homemade Detergent
You might be wondering—should I make liquid or powdered laundry detergent? While both work, they each come with their own set of pros and cons. Let’s compare.
Powdered Detergent
Pros:
- Easier and quicker to make
- Requires fewer steps and no cooking
- Easier to store and transport
- Lasts longer in storage
Cons:
- Needs warm or hot water to fully dissolve
- Can clump if not stored in dry environment
Liquid Detergent
Pros:
- Dissolves easily in cold water
- May work better in soft water conditions
Cons:
- Takes longer to make (requires melting and boiling)
- Needs to be stored in a large jug
- Can separate over time and needs shaking before use
For beginners, powdered detergent is the easiest and most foolproof option. Once you get comfortable, you can try experimenting with a liquid version if you prefer.
How to Use Homemade Laundry Soap
One of the biggest advantages of DIY detergent is how little you need to use. It’s super concentrated, so a small amount goes a long way.
Recommended Dosage:
- Top-loading machines: 1–2 tablespoons per load
- Front-loading (HE) machines: 1 tablespoon per load
If you’re dealing with heavily soiled clothes, muddy sports uniforms, or stinky gym gear, feel free to add an extra spoonful or a half cup of white vinegar to the rinse cycle as a natural fabric softener and odor eliminator.
Usage Tips:
- Store powder in a dry place to avoid clumping
- For cold water washing, dissolve detergent in a cup of warm water before adding
- Shake or stir liquid versions before each use
Using homemade soap doesn’t change how you do laundry—it just makes the process cleaner and cheaper.
Scenting Your Homemade Soap Naturally
If you’re used to that “fresh linen” smell from commercial detergents, switching to homemade may feel… unscented. But don’t worry, essential oils are your new best friend.
Here are a few ideas for making your laundry smell as amazing as it is clean:
Fresh & Clean Blends
- Lemon + Lavender
- Eucalyptus + Peppermint
- Orange + Vanilla
Earthy & Cozy Blends
- Cedarwood + Sage
- Rosemary + Tea Tree
- Patchouli + Lavender
Add essential oils either to the detergent mix or directly into the washer drum before starting your cycle. You can also use DIY wool dryer balls scented with oils to infuse clothes during the drying process.
How Long Does It Last?
One of the biggest benefits of making your own detergent is how long it lasts. A single batch (as described above) will last:
- Top Loaders: Up to 40–60 loads
- HE Machines: Up to 80–100 loads
That’s months of laundry for just a few bucks.
Shelf Life:
- Powdered detergent: Lasts 6–12 months if stored in a dry, airtight container
- Liquid detergent: Lasts 2–3 months due to water content (can spoil or separate)
So, not only are you saving money and reducing waste, but you’re also saving trips to the store. Win-win.
Is It Safe for Sensitive Skin?
Absolutely. One of the most common reasons people switch to homemade detergent is to avoid skin irritation. Commercial brands often include sulfates, dyes, synthetic fragrances, and preservatives that can cause dryness, rashes, or allergic reactions.
With homemade clothes soap:
- You control the ingredients
- You can avoid essential oils if needed
- You can use hypoallergenic soaps like Dr. Bronner’s Baby Unscented
Still concerned? Do a simple patch test. Wash a single towel or T-shirt using your new soap and wear/use it for a day. If there’s no irritation, you’re good to go.
Common Mistakes to Avoid
Even though this recipe is simple, it’s still possible to make mistakes that reduce effectiveness. Keep an eye out for these common pitfalls:
- Using too much detergent – More is not better. It can cause buildup and make clothes feel stiff.
- Not grating soap finely enough – Larger chunks may not dissolve properly.
- Storing in humid conditions – This causes clumping and mold in both liquid and powder.
- Using cold water only – For powder detergent, pre-dissolve in warm water for better results.
- Skipping vinegar rinse – Especially if you have hard water, a vinegar rinse can soften clothes and help rinse out any residue.
Avoid these and your homemade detergent will work beautifully every time.
Eco-Friendly Packaging Ideas
Once you’ve made your homemade clothes soap, storing it properly doesn’t just keep it fresh—it also helps reduce your environmental footprint. After all, if you’re making your own detergent to be more sustainable, why stop at the recipe?
Storage Options
- Glass Mason Jars: Durable, reusable, and plastic-free. Plus, they look nice on a laundry shelf.
- Repurposed Containers: Think old coffee tins, plastic tubs, or even a used detergent box (well-cleaned).
- Bulk Food Storage Bins: Great for large batches—especially if you’re making soap for a big family or to share.
Labeling Tips
- Always label your containers with the recipe name and the date it was made.
- Include instructions (e.g., “Use 1 tablespoon per load”).
- You can even add ingredients on the label in case someone else uses it—or you forget later!
Going the Extra Green Mile
- Skip plastic scoops. Use a metal tablespoon or wooden scoop instead.
- Consider making mini travel jars of detergent for vacations or trips.
- Share extra batches with friends and neighbors—it’s a great gift and a great way to spread sustainable habits.
Using thoughtful, eco-friendly packaging complements the natural qualities of your homemade soap and minimizes your environmental impact even more.
FAQs about Clothes Soap Recipe
1. Can I use homemade clothes soap in my HE (high-efficiency) washer?
Yes! Homemade detergent is low-sudsing, which is perfect for HE machines. Just use about 1 tablespoon per load, and avoid overfilling the soap compartment.
2. Is borax safe to use in laundry soap?
For most people, yes. Borax is a natural mineral that’s effective for cleaning. However, if you have very sensitive skin or want to avoid it, you can substitute it with baking soda or washing soda.
3. Will this detergent work for cloth diapers or baby clothes?
Absolutely! Just make sure you’re using a fragrance-free, natural soap base like Dr. Bronner’s Baby Unscented. Also, avoid essential oils in baby loads unless you’ve tested for sensitivity.
4. Why doesn’t homemade detergent make a lot of suds?
Suds don’t equal cleaning power! Most commercial detergents include foaming agents for appearance, not effectiveness. Homemade soap cleans without bubbles—and that’s exactly what you want, especially in HE machines.
5. Can I double or triple the recipe?
Yes! The recipe scales beautifully. Just keep the same ratios and mix well to ensure even distribution. Store in a large, airtight container and label accordingly.
Conclusion
Making your own clothes soap isn’t just a cool DIY project—it’s a lifestyle shift. With just a few natural ingredients, some simple tools, and about 20 minutes of your time, you can create a detergent that’s cheaper, safer, and better for the planet than most store-bought options.
So, why not give it a shot? The next time you’re about to toss another $20 on a bottle of name-brand detergent, remember—you can make your own for pennies per load. Once you try it, there’s a good chance you’ll never go back.
Let’s make clean laundry and clean living go hand in hand.