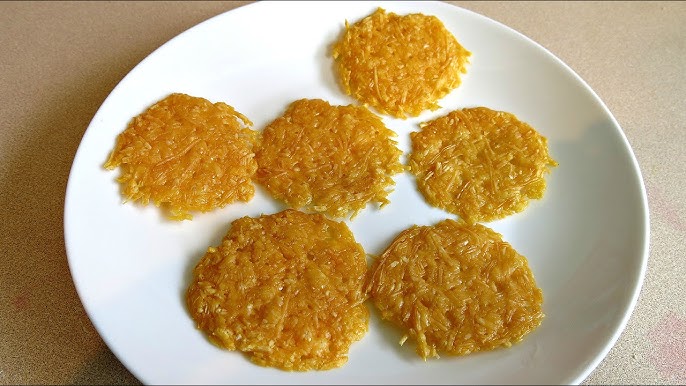
Cheese Crisps Recipe: There is something almost magical about turning a simple pile of shredded cheese into a light, crunchy, deeply savory snack. Cheese crisps have become popular because they hit that sweet spot between convenience and satisfaction.
They are easy to make, packed with flavor, and versatile enough to work as a snack, appetizer, side, or crunchy topping. People love recipes that feel special without demanding a long shopping list or complicated techniques, and cheese crisps fit that description perfectly.
In a world where many snacks come from a package and taste forgettable, homemade cheese crisps feel fresh, warm, and full of personality.
What Are Cheese Crisps?
Cheese crisps are thin rounds or mounds of baked cheese that become crisp as they cool. At their simplest, they require only one ingredient: cheese. When small amounts of cheese are baked on a lined tray, the fat melts, the moisture cooks off, and the cheese firms up into a crunchy, richly flavored crisp. They are often compared to crackers, but that comparison only goes so far. Crackers are flour-based and dry from the start, while cheese crisps begin as something soft and melty before becoming crisp through baking. That difference gives them a much more intense flavor and a wonderfully delicate texture.
One of the best things about cheese crisps is how adaptable they are. They can be made large and flat for dipping, or smaller and bite-sized for snacking. Some people like them plain with nothing more than the salt naturally found in the cheese. Others dress them up with black pepper, garlic powder, paprika, Italian seasoning, sesame seeds, or chili flakes. They can be served on a snack board, paired with soup, crumbled onto salads, or eaten straight from the container while standing in the kitchen. That kind of flexibility is part of their charm. They feel polished enough for guests yet simple enough for a weekday craving.
Although they are easy to make, not every batch turns out perfectly unless you understand a few basics. The type of cheese matters. The thickness matters. The cooling time matters. Too much cheese in one pile, and you may get a chewy center. Too little, and it may burn before it crisps. That is why a proper step-by-step cheese crisps recipe is helpful. Once you know the small details that influence the result, you can consistently make batches that are deeply golden, wonderfully crunchy, and hard to stop eating.
Ingredients You’ll Need
Below is the exact list you need so there is no guesswork. This is especially useful if you want a clean, professional cheese crisps recipe that is easy to follow and share.
Main Ingredients
- 2 cups shredded cheddar cheese
- 1 cup shredded parmesan cheese
- 1 cup shredded mozzarella cheese (optional for a slightly different texture, best mixed with harder cheese rather than used alone)
Optional Seasonings and Add-Ins
- 1/2 teaspoon garlic powder
- 1/2 teaspoon onion powder
- 1/2 teaspoon smoked paprika
- 1/4 teaspoon black pepper
- 1/4 teaspoon chili flakes
- 1 teaspoon Italian seasoning
- 1 teaspoon sesame seeds (optional)
- 1 teaspoon poppy seeds (optional)
These ingredients allow you to create a classic version or a seasoned variation without making the recipe complicated. Think of the cheese as the lead singer and the seasonings as the backup band. You want support, not noise. Used properly, these ingredients produce crisps that are flavorful, balanced, and irresistibly crunchy.
Kitchen Tools for the Best Results
You do not need fancy equipment to make cheese crisps, but the right tools make the process smoother and more consistent. A baking sheet is essential because it gives the cheese enough flat, even space to cook. Lining that tray matters just as much. Parchment paper or a silicone baking mat prevents sticking and helps the cheese release cleanly once cooled. Skipping this step is one of the easiest ways to ruin a batch, because melted cheese can cling to bare metal like glue. When that happens, the crisps often break apart before they ever reach the plate.
A tablespoon or small cookie scoop is useful for portioning equal mounds of cheese. Uniform size means even baking, and even baking is the difference between a batch where everything finishes together and one where half the tray is burnt while the rest remains soft. A spatula also helps, particularly a thin one, because it allows you to lift the cooled crisps without cracking them. If you are using block cheese, a box grater or food processor grater attachment is helpful as well. Freshly grated cheese usually performs better than pre-shredded cheese because it lacks the anti-caking powders that can interfere with smooth melting.
Cooling equipment matters more than many people realize. A wire rack is helpful because it lets air circulate around the crisps as they cool, helping them firm up properly. You can cool them on the tray too, but moving them carefully to a rack may keep them from trapping excess heat underneath. A small bowl for mixing seasonings is useful if you want to create a specific flavor blend. None of these tools are especially expensive or difficult to use, but together they make the process more controlled and more reliable. When the method is simple, small tools play a bigger role. They are like stage crew in a theater production: they may not get the spotlight, but without them the performance suffers.
How to Choose the Right Cheese
The type of cheese you choose can completely shape the final result. Some cheeses bake into crisp, lacy rounds with a nutty flavor and satisfying crunch, while others melt into oily puddles or stay rubbery in the center. That is why understanding cheese selection is one of the most important parts of making a successful cheese crisps recipe. In general, harder cheeses and semi-hard cheeses tend to work best because they contain less moisture and more protein structure, which helps them firm up as they cool. Parmesan, cheddar, asiago, and romano are strong choices that consistently produce good results.
Best Cheeses for Crisps
Parmesan is one of the top choices because it creates deeply savory, delicate crisps with a naturally salty bite. It is especially good for thin, lacy rounds that feel elegant and snackable. Cheddar is another favorite because it melts beautifully and produces a richer, fuller flavor. Sharp cheddar gives a stronger taste, while mild cheddar is a little softer and more crowd-friendly. Asiago, romano, and pepper jack can also work well, especially if you want something slightly different in flavor. Mixing cheeses can be a smart move too. Pairing parmesan with cheddar often gives both great taste and strong texture.
Cheeses to Avoid
Very moist cheeses can be tricky. Fresh mozzarella, for example, contains too much water to crisp properly on its own. Instead of becoming crunchy, it may turn stretchy or leave a greasy pool. Soft cheeses like brie, ricotta, or goat cheese are generally not suitable for this recipe because they are designed for creaminess, not crisping. Even with shredded mozzarella, the result is often best when it is blended with a firmer cheese rather than used alone. Pre-shredded cheese can also be less reliable because it often contains starches or cellulose to prevent clumping. Those extra coatings may affect how the cheese melts and how evenly it browns.
Choosing the right cheese is a little like choosing the right fabric for clothing. Some materials are meant to flow, others are meant to hold shape. Cheese works the same way in the oven. Start with varieties that are naturally better at crisping, and your chances of success increase dramatically. Once you master the basics, you can experiment with blends that match your taste.
Step-by-Step Guide for Cheese Crisps
Think of this as building something small but precise. You are not just melting cheese. You are controlling how it melts, spreads, browns, and cools. That is what turns a pile of shredded cheese into a snack worth making again.
Step 1 – Prepare Your Baking Surface
Begin by preheating your oven to 375°F (190°C) and lining a baking sheet with parchment paper or a silicone baking mat. This step is important because melted cheese can stick quickly, and a proper surface makes removal much easier. Think of it like setting the stage before a performance—everything works better when the foundation is ready. Make sure the tray is clean and flat so the cheese crisps bake evenly.
Step 2 – Portion the Cheese Properly
Scoop small mounds of shredded or finely grated cheese onto the prepared baking sheet, using about 1 tablespoon per crisp. Leave enough space between each pile because the cheese will spread as it melts. Flatten them slightly with the back of a spoon if you want a thinner, more even crisp. Small, even portions help the cheese cook at the same speed and give you better texture.
Step 3 – Add Flavor Without Overloading
Sprinkle light seasonings such as black pepper, garlic powder, paprika, chili flakes, or Italian herbs over the cheese. Keep the toppings simple and light. Too many extras can weigh the cheese down and stop it from crisping properly, like trying to run in heavy boots. A little seasoning adds a big boost of flavor without ruining the texture.
Step 4 – Bake Until Golden and Crisp
Bake the cheese for about 5 to 7 minutes, or until it looks melted, bubbly, and golden around the edges. Watch it closely near the end because cheese can go from perfect to burnt very quickly. The golden color is your signal that the crisps are ready to come out.
Step 5 – Cool Before Serving
Let the cheese crisps cool on the tray for a few minutes before touching them. This is when they firm up and become wonderfully crisp. Serve them as a snack, side, or crunchy topping once fully set.
Tips for Extra Crispy Cheese Crisps
If your goal is a truly shattering crunch, a few small adjustments can make a big difference. First, use cheeses that naturally crisp well, such as parmesan or cheddar, and grate them fresh when possible. Freshly grated cheese usually melts more evenly and browns more beautifully than pre-packaged shredded cheese. It is a small step that often produces a noticeably better result. Another useful trick is to keep your portions modest. Oversized mounds tend to stay soft in the center, while smaller circles bake and cool into better crisps.
Oven behavior matters too. Every oven has its own personality, and some run hotter or cooler than the dial suggests. That means your first batch should be treated almost like a test run. Check the crisps early, especially if you are trying a new cheese or seasoning combination. If your crisps come out slightly soft, you may need another minute in the oven next time or a thinner layer of cheese. If they come out too dark, reduce the baking time slightly. Tiny changes create big improvements here because the total cooking window is so short.
Cooling is another factor many people underestimate. Cheese crisps do not become fully crunchy the second they leave the oven. They need a few quiet minutes to settle and firm up. Moving them too soon can bend or break them, and covering them while still warm can trap steam and soften them again. Let them cool uncovered so the moisture escapes properly. Crisp texture is really about moisture management. When that moisture disappears at the right pace, you get a snack that cracks cleanly and tastes rich without feeling heavy.
Common Mistakes and How to Avoid Them
One of the most common mistakes is using too much cheese per crisp. It sounds harmless, but larger piles often lead to uneven results. The outside may brown quickly while the center remains soft or greasy. Smaller, flatter rounds are usually more dependable. Another frequent issue is forgetting enough spacing between the cheese mounds. Because the cheese spreads as it melts, crowded portions can merge into one giant sheet. That is not always a disaster, but it does defeat the goal of making neat individual crisps.
A second major mistake is relying on the oven appearance alone. Cheese crisps often still look a little soft when they come out, and that can tempt people to keep baking them until they become overdone. The problem is that cheese continues to firm as it cools, so leaving it in too long can create bitterness rather than better texture. Learning to pull them when they are golden and bubbling, not dark brown and stiff, is one of the biggest upgrades you can make. Timing matters more than brute force here.
Another problem comes from using the wrong cheese or overloading with toppings. Wet cheeses or heavy toppings can interfere with crisping. Seeds, herbs, and spices should be used lightly so they enhance the texture instead of disrupting it. Skipping parchment paper is also a classic mistake, and it usually ends in frustration. The good news is that all of these issues are easy to avoid once you know them. Cheese crisps are not hard, but they do reward attention. Treat the recipe with care, and it usually returns that effort with a tray full of crunchy success.
Flavor Variations to Try
Once you have mastered the basic cheese crisps recipe, flavor variations open up a whole new world. A simple batch can be transformed with just one or two well-chosen additions. For a smoky version, add a dusting of smoked paprika and a tiny pinch of cayenne. For an Italian-inspired twist, use parmesan, Italian seasoning, and black pepper. These versions pair especially well with tomato-based soups or antipasto boards. If you enjoy bold flavors, try using pepper jack with chili flakes for a spicy snack that delivers a little kick in every bite.
There are also more subtle options for people who want complexity without heat. Sesame seeds and poppy seeds add visual appeal and a gentle nutty flavor. Garlic powder and onion powder make the crisps taste fuller and more savory, especially when paired with cheddar. You can even experiment with blends like cheddar-parmesan or asiago-romano for a layered taste that feels a bit more gourmet. Each cheese combination behaves a little differently, which means every batch has a chance to teach you something new. That is part of the fun.
Flavor variations also make cheese crisps useful for different occasions. A spicy batch feels right for game day snacks. An herby parmesan version can fit neatly onto a dinner party platter. A plain sharp cheddar crisp is often the most universally loved, especially by kids and anyone who prefers straightforward comfort food. The recipe is flexible enough to bend toward whatever mood or meal you have in mind. It is like owning a single black jacket that somehow works with everything. The foundation stays the same, but the details make it feel fresh every time.
Serving Ideas for Cheese Crisps
One of the best things about homemade cheese crisps is that they are far more versatile than many people expect. Of course, they are excellent on their own as a crunchy snack, but that is really just the starting point. They also work beautifully as a replacement for crackers on a cheese board or appetizer platter. Pair them with olives, sliced cucumbers, roasted nuts, and a dip like guacamole or hummus for an easy spread that feels thoughtful without being fussy. Because they are rich and savory, they help anchor lighter ingredients and add contrast to creamy textures.
Cheese crisps also shine as toppings. Crumble them over a bowl of tomato soup, a Caesar salad, or even roasted vegetables, and suddenly the dish has more crunch, salt, and character. They can stand in for croutons if you want something with more flavor and less bulk. Used this way, they behave almost like little edible sparks, adding brightness to every bite. They also pair surprisingly well with eggs, especially scrambled eggs or omelets, where their crispness balances the softness of the dish.
For entertaining, cheese crisps can be shaped while still warm. If you drape them gently over a rolling pin or the side of a small bowl right after baking, they can cool into curved shells or elegant shapes suitable for appetizers. That tiny trick can make a simple recipe feel restaurant-worthy. Whether you serve them casually in a bowl or style them for guests, they bring a lot of return for very little effort. Their appeal is not just taste. It is the way they upgrade whatever they touch.
How to Store and Reheat Cheese Crisps
Cheese crisps are best on the day they are made, but they can still hold up well if stored properly. The key is protecting them from moisture, because moisture is the enemy of crunch. Once the crisps are completely cool, place them in an airtight container lined with a paper towel. The paper towel helps absorb any lingering moisture and keeps the crisps from softening too quickly. Store them at room temperature for up to 2 days, or in the refrigerator for around 4 to 5 days if your kitchen is warm. Just remember that refrigeration can sometimes soften them slightly.
If they do lose some of their crispness, reheating can help bring them back. Place the crisps on a lined baking sheet and warm them in a 300°F (150°C) oven for 2 to 4 minutes. This short reheat helps dry out any absorbed moisture and restore the crunch. Let them cool again before eating, because they will firm up as they sit. Avoid microwaving them, since that usually makes them chewy instead of crisp. A microwave heats quickly but tends to trap steam, and steam is exactly what you do not want here.
Proper storage can make the difference between a snack that still feels fresh and one that tastes tired. It is a little like storing cookies: texture can disappear quickly when air and moisture get involved. By cooling them fully, sealing them well, and reheating them gently when needed, you can extend their life without losing the qualities that make them special. They may be simple, but they still benefit from good handling.
Are Cheese Crisps Keto and Low-Carb?
For many people, cheese crisps are more than just tasty. They are also a practical snack choice for specific eating plans. Because they are made primarily from cheese, they are naturally low in carbohydrates and usually fit well into keto and low-carb diets. Unlike traditional crackers or chips, they do not rely on flour, starch, or added sugar for structure. That makes them especially appealing to anyone who wants something crunchy without the carb load that often comes with packaged snacks. It is one of the reasons they have become a staple in low-carb kitchens.
That said, not all cheese crisps are identical in nutrition. The exact carb and protein content depends on the cheese you use and whether you add any extra ingredients. Parmesan and cheddar are generally solid choices for keto-style snacking, especially when served plain or with low-carb dips. Seasonings such as garlic powder, pepper, paprika, and dried herbs usually add flavor without meaningfully increasing carbs. The main thing to watch is portion size. Cheese is nutrient-dense and satisfying, but it is also rich, so a small serving can go a long way.
What makes cheese crisps especially useful is that they solve a familiar problem: the craving for crunch. Many low-carb eaters miss the texture of crackers, chips, and toasted bread more than the flavor itself. Cheese crisps answer that craving with a snack that feels indulgent while still aligning with their goals. That is part of the reason this recipe continues to stay popular. It is not trying to imitate junk food badly. It creates its own category of snack and does it well.
FAQs about Cheese Crisps Recipe
1. What type of cheese works best for cheese crisps?
Hard and semi-hard cheeses like Parmesan, cheddar, asiago, and mozzarella work very well. Parmesan gives a thinner, crispier texture, while cheddar offers a richer and slightly bolder flavor.
2. Why are my cheese crisps not crispy?
This usually happens when the cheese is too thick, underbaked, or not cooled properly. Cheese crisps continue to firm up as they cool, so letting them rest is very important.
3. Can I make cheese crisps in the microwave?
Yes, cheese crisps can be made in the microwave. Place small portions of cheese on parchment paper and heat in short intervals until melted and lightly golden. Let them cool fully before removing them.
4. Are cheese crisps low carb?
Yes, cheese crisps are naturally low in carbohydrates, which makes them a popular snack for people following keto or low-carb diets. Always check the cheese label if you are being very strict with carbs.
5. Can I add spices or herbs to cheese crisps?
Yes, simple additions like garlic powder, paprika, black pepper, oregano, or chili flakes can make them even more flavorful. Just use small amounts so the crisps still bake evenly.
6. How do I store cheese crisps?
Store them in an airtight container once they are completely cool. This helps keep them crunchy and prevents moisture from making them soft.
7. What can I serve with cheese crisps?
Cheese crisps are great on their own, but they also work well with dips, soups, salads, or charcuterie boards. They can even replace crackers for a crisp, cheesy bite.
Conclusion
The real secret is understanding the details that shape the final texture. Thin portions crisp better than thick ones. Harder cheeses work better than very moist cheeses. Cooling matters just as much as baking. Once those small principles click, making cheese crisps becomes less of a recipe and more of a reliable skill. And that is the kind of kitchen knowledge that pays off again and again.
This step-by-step guide gives you everything needed to get started with confidence. Keep the ingredients simple, follow the method carefully, and do not be afraid to test flavors that suit your taste. Soon enough, you will have a tray of crunchy, golden cheese crisps that disappear faster than expected. That is usually the surest sign you made them right.