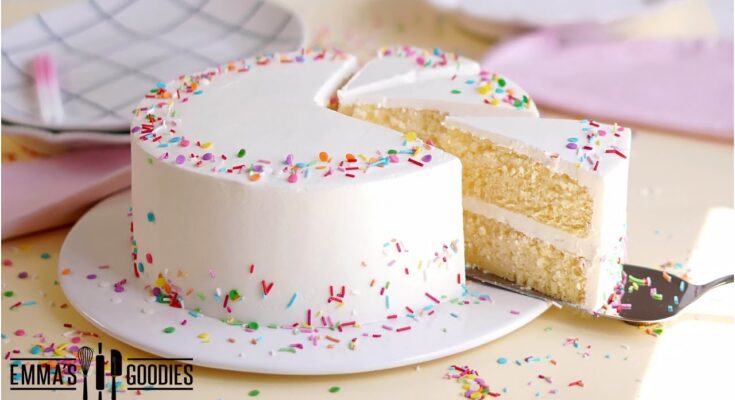
Best Vanilla Cake Recipe: Vanilla cake isn’t just a dessert—it’s a nostalgic trip down memory lane. It’s the kind of cake that reminds you of birthdays, school events, and family get-togethers. With its soft, fluffy texture and sweet, buttery flavor, this cake is a hit with both kids and adults. Its simplicity is what makes it stand out. You don’t need a long list of ingredients or fancy decorations—just a solid recipe and a little love in the mixing bowl. That’s the beauty of vanilla cake: it’s like a blank canvas, ready to be enjoyed as-is or dressed up with frosting, fruit, or even a drizzle of chocolate.
Another reason vanilla cake stands the test of time? It’s versatile. Whether you’re planning a laid-back weekend dessert or a tiered wedding masterpiece, this cake fits right in. And let’s be real—there’s something about the aroma of vanilla and butter wafting through the kitchen that just screams comfort. It’s familiar. It’s delicious. And once you get the hang of it, it’s surprisingly easy to make from scratch.
Perfect Occasions for Serving Vanilla Cake
Wondering when to whip up a vanilla cake? The answer is: anytime. This cake is a go-to choice for birthdays, anniversaries, holidays, or even those “just because” moments. Need a crowd-pleaser for a potluck? Vanilla cake. Want a reliable option for a family dinner dessert? Vanilla cake. Planning a cake for your kid’s school function? Yup, vanilla cake again.
What makes it so adaptable is how well it pairs with everything. Top it with fresh strawberries and whipped cream in summer, or add a rich chocolate ganache in winter. Serve it with a cup of coffee, or slice it up and pack it for a picnic. No matter how you serve it, it’s going to get devoured.
Essential Ingredients for the Perfect Vanilla Cake
Key Ingredients You Need
You don’t need a mile-long shopping list to make an amazing vanilla cake. Here’s what you’ll typically need:
- All-purpose flour – Provides structure. Go for a high-quality, unbleached flour.
- Sugar – Granulated white sugar is the standard, and it gives that lovely sweetness.
- Eggs – Room-temperature eggs help bind the ingredients and add richness.
- Butter – Use unsalted and let it soften before you begin.
- Baking powder – Gives the cake a light, fluffy texture.
- Milk – Whole milk adds moisture and richness.
- Vanilla extract – The star of the show. Use pure vanilla extract, not the imitation stuff.
These simple ingredients, when measured correctly and mixed well, come together to create magic in the oven.
Importance of Ingredient Quality
Here’s the thing—when your ingredient list is short, the quality of each item matters a lot. Cheap vanilla extract can’t hold a candle to the real deal. Fresh eggs and high-fat butter make a noticeable difference in both taste and texture. Even the type of flour can impact the outcome. Investing in high-quality ingredients doesn’t just make the cake taste better—it elevates the whole experience.
Think of it this way: a vanilla cake doesn’t hide behind bold flavors. It relies on the basics to shine. That’s why it’s crucial to go for the best you can afford. You’ll thank yourself when you take that first bite.
Tools and Equipment Needed
Must-Have Baking Tools
Before you dive into mixing and baking, make sure your kitchen is stocked with these essentials:
- Mixing bowls – Preferably glass or stainless steel.
- Measuring cups and spoons – Accuracy is key.
- Electric mixer or stand mixer – Makes creaming butter and sugar much easier.
- Rubber spatula – Great for scraping down the sides of bowls.
- Cake pans – Two 8-inch round pans work perfectly.
- Cooling rack – Helps the cake cool evenly after baking.
- Oven thermometer – Many ovens run hotter or cooler than the dial says.
Tips on Prepping Your Baking Area
A little prep goes a long way. Set out all your ingredients before you start (this is called mise en place). Grease and line your cake pans with parchment paper. Preheat your oven early—it needs to be at the right temperature when the batter goes in. Clean as you go so you’re not overwhelmed by the mess at the end. Trust me, you’ll thank yourself later.
Step-by-Step Guide to Making Vanilla Cake
Step 1 – Preparing Your Ingredients and Oven
Start with the basics. Take out your butter, eggs, and milk and let them come to room temperature. This step is often skipped, but it makes a big difference in how well everything mixes. Preheat your oven to 350°F (175°C), and prepare your cake pans by greasing them with butter and lining the bottom with parchment paper. A little dusting of flour also helps prevent sticking.
Once your oven is warming up and your ingredients are prepped, you’re ready to mix.
Step 2 – Mixing the Batter the Right Way
Now comes the fun part—bringing everything together. In a large mixing bowl, beat your softened butter until it’s smooth and creamy. This should take about 1-2 minutes on medium speed. Then, gradually add in the sugar while continuing to beat. This creaming process is crucial—it adds air into the batter, which helps give the cake its light and fluffy texture.
Next, add the eggs one at a time, beating well after each addition. Scrape down the sides of the bowl to ensure everything is fully combined. Now it’s time for the vanilla extract—don’t skimp! Use at least one tablespoon of pure vanilla extract for that rich, fragrant flavor.
In a separate bowl, whisk together your dry ingredients: flour, baking powder, and a pinch of salt. Gradually add these dry ingredients to the wet mixture, alternating with the milk. Begin and end with the flour mixture. Mix just until everything is combined—overmixing can make your cake dense instead of tender.
The batter should be smooth, thick, and velvety. If you see lumps, don’t worry too much; just make sure you don’t overwork the mixture trying to get rid of them. It’s better to have a few tiny lumps than a tough cake.
Step 3 – Baking to Golden Perfection
Pour the batter evenly into your prepared cake pans. Give the pans a gentle tap on the counter to remove any large air bubbles. Place them in the middle rack of your preheated oven.
Bake at 350°F (175°C) for about 25–30 minutes, or until a toothpick inserted into the center comes out clean. Don’t open the oven too often, especially in the first 20 minutes—this can cause your cakes to collapse.
The cakes should be golden brown and spring back lightly when touched. If they look too pale, they probably need a few more minutes. Once done, let the cakes cool in the pans for about 10 minutes, then turn them out onto a wire rack to cool completely. This cooling step is vital. Frosting a warm cake will result in a gooey, melty mess.
Step 4 – Cooling and Frosting
Once your cakes are completely cool, it’s time to frost. You can go simple with a classic vanilla buttercream, or try cream cheese frosting, whipped cream, or even a ganache. If you want to make it extra special, slice each cake in half horizontally to create four layers, adding frosting between each one.
For the buttercream, whip together butter, powdered sugar, vanilla extract, and a touch of milk until fluffy. Spread a generous layer between the cake layers, then cover the top and sides. Use a spatula to smooth it out, or get creative with swirls and designs.
If you’re feeling fancy, decorate with fresh berries, sprinkles, or edible flowers. Or keep it simple and elegant with a clean, frosted finish. Either way, it’s going to look and taste amazing.
Tips for the Best Texture and Flavor
Moisture Secrets for a Soft Crumb
No one likes a dry cake. The key to a moist vanilla cake is balance. Too much flour or overbaking can suck the moisture right out of it. One tip is to measure your flour correctly—spoon it into your measuring cup and level it off, rather than scooping directly from the bag.
Another pro tip? Add a spoonful of sour cream or plain yogurt to the batter. This little trick adds extra moisture and a slight tang that enhances the vanilla flavor beautifully. Some bakers also like to use cake flour instead of all-purpose for an even softer texture.
And let’s not forget the importance of not overbaking. Set a timer, check early, and use a toothpick to test. Once it comes out clean, take it out of the oven. Overbaking even by a few minutes can lead to a dry crumb.
Flavor Enhancements You Can Try
Want to jazz up your vanilla cake a bit? Here are some easy add-ins:
- Citrus zest: Add lemon or orange zest for a bright twist.
- Spices: A pinch of cinnamon or nutmeg can give your cake a cozy, warm flavor.
- Almond extract: A tiny splash adds a lovely, nutty undertone.
- Coffee: A tablespoon of brewed coffee can deepen the vanilla flavor without making it taste like coffee.
You can also fill the cake with jam, lemon curd, or chocolate ganache for a surprise in every bite. Vanilla cake is like a blank page—it welcomes creativity.
Creative Variations on the Classic Vanilla Cake
Layered Vanilla Cake with Fillings
If you’re looking to impress, a layered vanilla cake with fillings is a showstopper. Once your cakes are baked and cooled, you can slice each layer horizontally to create two thinner layers, giving you four total. This allows room for fillings that not only enhance the taste but also make each bite exciting.
Some delicious filling options include:
- Fresh berry compote – Slightly tart and beautifully colorful.
- Vanilla custard – Creamy and luxurious.
- Chocolate ganache – Rich and decadent.
- Lemon curd – Bright and tangy for contrast.
To build the cake, start with one layer, add a generous amount of filling, and repeat until you top it with the final cake layer. Frost the outside with your buttercream of choice, and you’ve got a bakery-quality dessert right at home.
Cupcake Conversion Tips
Not in the mood for a full cake? This vanilla cake recipe transforms beautifully into cupcakes. They’re great for parties, picnics, or portion control (if that’s your thing). Simply line a muffin tin with cupcake liners and fill each about two-thirds full.
Bake at the same temperature—350°F (175°C)—but reduce the baking time to 18–22 minutes. Keep an eye on them and test with a toothpick. Once cooled, frost them as you would the cake, and decorate to your heart’s content.
Cupcakes also offer a fun opportunity to experiment with flavors. Try adding a fruit center, like a dollop of jam, or topping each with a swirl of flavored frosting. Kids especially love the surprise factor!
Common Mistakes to Avoid
Overmixing or Undermixing
One of the biggest mistakes in baking cakes is overmixing the batter. While it might seem like you’re getting a smoother mix, overmixing develops the gluten in the flour, leading to a tough, chewy cake. Not exactly the tender texture you’re going for.
On the flip side, undermixing leaves lumps of flour and butter that won’t bake evenly. The goal is to mix just until the ingredients are combined. Once everything looks uniform and smooth, stop mixing. If using a stand mixer, be extra cautious—it’s powerful enough to overmix before you realize it.
Wrong Oven Temperature
Even if you follow every step perfectly, the wrong oven temperature can ruin your cake. If your oven runs too hot, the cake may rise too quickly and then collapse. Too cool, and it might not rise enough, leaving you with a dense or gummy texture.
Always preheat your oven and use an oven thermometer to ensure accuracy. Most ovens aren’t calibrated correctly, and even a 10-degree difference can throw things off. It’s a small investment that saves a lot of frustration in the long run.
Storing and Serving Vanilla Cake
Best Ways to Store Your Cake
If you’re lucky enough to have leftovers, you’ll want to store them properly to keep the cake moist and fresh. An unfrosted vanilla cake can be wrapped tightly in plastic wrap and stored at room temperature for up to 3 days or in the fridge for up to a week. If it’s frosted, cover it with a cake dome or store it in an airtight container in the fridge.
For longer storage, wrap the cake (or even individual slices) in plastic wrap and aluminum foil, then freeze for up to 3 months. Thaw in the fridge overnight before serving.
Serving Suggestions
Vanilla cake shines on its own but pairs wonderfully with a few extras. Serve with:
- A scoop of vanilla or strawberry ice cream
- A dollop of whipped cream
- Fresh fruit or berries
- A drizzle of caramel or chocolate sauce
You can also get fancy and serve it warm with custard or make it into a trifle by layering it with cream and fruit in a bowl. The possibilities are endless, and they’re all delicious.
FAQs about Vanilla Cake Recipe
1. What ingredients do I need for a vanilla cake?
A classic vanilla cake typically requires all-purpose flour, sugar, baking powder, unsalted butter, eggs, milk, and vanilla extract. Some recipes may suggest adding a pinch of salt for enhanced flavor.
2. Can I make a vanilla cake without eggs?
Yes, you can make a vanilla cake without eggs by using substitutes like unsweetened applesauce, mashed bananas, or yogurt. Each of these can act as a binding agent while keeping the cake moist.
3. How do I make my vanilla cake extra moist?
To achieve a moist vanilla cake, ensure you don’t overmix the batter, as this can make the cake dense. Using ingredients like sour cream, yogurt, or a bit of vegetable oil can also add extra moisture.
4. What type of frosting goes best with vanilla cake?
Vanilla cake pairs well with various frostings, such as buttercream, cream cheese frosting, or whipped cream. Chocolate or fruit-flavored frostings can also add a delicious contrast.
5. How can I store vanilla cake to keep it fresh?
To keep your vanilla cake fresh, store it in an airtight container at room temperature for up to two days. For longer storage, refrigerate it for up to a week or freeze it for up to three months.
6. Can I add other flavors to my vanilla cake?
Absolutely! You can add flavors like almond extract, lemon zest, or cinnamon to give your vanilla cake a unique twist. Just be cautious with quantities to avoid overpowering the vanilla essence.
7. How do I prevent my vanilla cake from sinking in the middle?
Make sure your oven is preheated, and avoid opening the oven door too soon during baking. Overmixing the batter or using expired baking powder can also cause the cake to sink.
Conclusion
Vanilla cake may seem simple, but when done right, it’s a masterpiece of flavor and texture. It’s the cake that never goes out of style, always pleasing and endlessly versatile. Whether you’re baking for a celebration or just because, this step-by-step guide ensures you’ll create a dessert that’s tender, flavorful, and unforgettable. With quality ingredients, careful mixing, and the right techniques, you can bake the best vanilla cake every time.


