Baked Brisket Recipe: Brisket is more than just a cut of beef—it’s comfort food at its finest. When prepared right, it transforms into a melt-in-your-mouth masterpiece filled with deep flavors, tenderness, and juiciness. While most people associate brisket with BBQ smokers, baking it in the oven is one of the easiest and most reliable ways to achieve that same rich, hearty taste without needing outdoor equipment.
This guide will walk you through everything you need to know about making a perfect baked brisket at home. From selecting the right cut and seasoning it to baking it low and slow for hours, you’ll learn the exact process that guarantees tender results every single time. Whether you’re cooking for a holiday dinner, a weekend gathering, or just a cozy family meal, baked brisket will always impress.
So, roll up your sleeves, grab your apron, and let’s dive into the world of baked brisket.
What is Brisket?
Brisket comes from the lower chest area of the cow, making it one of the tougher cuts of beef. Because it contains a lot of connective tissue and muscle, it requires long, slow cooking to break everything down and turn it into something truly delicious. That’s why brisket is often smoked, braised, or baked—it’s all about time and patience.
When baked, brisket develops a rich, roasted flavor, and the oven’s steady heat creates a juicy, fork-tender result. Unlike smoked brisket, which can take up an entire day of outdoor cooking, baked brisket is far more manageable. All you need is your oven, a roasting pan, and the right blend of seasonings.
Another great thing about brisket is its versatility. You can make it sweet and tangy with barbecue sauce, savory with garlic and herbs, or spicy with a chili rub. It also makes fantastic leftovers for sandwiches, tacos, or even brisket chili.
So, if you’ve ever been intimidated by this cut, don’t be. Once you know how to bake brisket properly, you’ll realize it’s one of the most rewarding dishes you can make in your own kitchen.
Ingredients You’ll Need
Like any great recipe, the magic of baked brisket lies in the seasoning. You don’t need a laundry list of ingredients to create flavor-packed meat. The beauty of brisket is that simple, everyday pantry staples can make it extraordinary.
Here’s a classic ingredient list for baked brisket:
Essential Ingredients:
- Brisket – Choose a 3–5 lb cut with some marbling of fat for tenderness.
- Olive oil – Helps the rub stick and adds richness.
- Garlic powder – A must-have for savory depth.
- Onion powder – Complements the beefy flavor.
- Paprika – Adds color and a mild smokiness.
- Brown sugar – For a hint of sweetness and caramelization.
- Salt and black pepper – The basics for enhancing flavor.
- Beef broth or stock – Keeps the brisket moist while baking.
Optional Add-ons for Extra Flavor:
- Barbecue sauce – For a sticky, sweet glaze.
- Liquid smoke – Adds a smoky note without a smoker.
- Chili powder or cayenne pepper – For a spicy kick.
- Fresh herbs (thyme, rosemary, parsley) – For aroma and freshness.
- Soy sauce or Worcestershire sauce – Deepens the umami flavor.
Tips for Choosing the Best Brisket:
- Look for marbling. A little fat throughout the meat ensures juiciness.
- Pick the right size. Smaller briskets (3–5 lbs) are great for family meals, while larger cuts are ideal for gatherings.
- Check the thickness. A brisket that’s even in thickness cooks more evenly.
When you gather these ingredients, you set yourself up for success. The combination of spices and slow baking will infuse the meat with flavors that sink into every bite.
Tools and Equipment Required
Before you get started, make sure your kitchen is ready for brisket-making. While you don’t need fancy gadgets, the right tools will make the process smoother and more effective.
Kitchen Essentials:
- Roasting pan or Dutch oven – Large enough to hold the brisket comfortably.
- Aluminum foil – Essential for covering and sealing in moisture.
- Sharp knife – For trimming fat and slicing the brisket after cooking.
- Cutting board – A sturdy surface for prepping the meat.
Helpful Utensils:
- Meat thermometer – To ensure your brisket reaches the perfect internal temperature.
- Mixing bowls – For making the rub or marinade.
- Tongs – Handy for moving the brisket without piercing it.
Substitutes if You Don’t Have Certain Tools:
- No roasting pan? Use a deep baking dish.
- No Dutch oven? Cover tightly with foil in any oven-safe dish.
- No meat thermometer? While it’s highly recommended, you can check tenderness with a fork—if it pulls apart easily, it’s done.
Having these tools ready will save you from last-minute scrambling. Once your brisket is seasoned and oven-ready, all you need is patience.
Step-by-Step Guide to Making Baked Brisket
The key to a perfect brisket is taking it one step at a time. Each stage plays a role in creating that tender, flavorful result. Here’s a breakdown of the process:
Step 1: Preparing the Brisket
Start by trimming any excess fat from the brisket, but don’t remove it all. A thin layer of fat helps keep the meat moist during cooking. Rinse it under cold water, then pat it completely dry with paper towels. This helps the rub stick better.
Step 2: Making the Marinade or Rub
Mix your chosen spices—garlic powder, onion powder, paprika, brown sugar, salt, and pepper—in a small bowl. Add a drizzle of olive oil to make it a paste. If you’re using liquid smoke, Worcestershire sauce, or soy sauce, mix them in too.
Step 3: Marinating the Brisket
Rub the spice mixture all over the brisket, covering every side. Place it in a covered dish or wrap it in plastic wrap, then refrigerate for at least 4 hours (overnight is best). This allows the flavors to penetrate deeply into the meat.
Step 4: Preheating and Setting the Oven
When you’re ready to cook, preheat your oven to 300°F (150°C). Low and slow is the secret to tender brisket. Place the brisket in a roasting pan, fat side up, and pour beef broth into the pan to keep it moist.
Step 5: Baking the Brisket Slowly
Cover the pan tightly with aluminum foil. Bake for about 1 hour per pound of brisket. For a 4-pound cut, that means roughly 4 hours. Halfway through, check the liquid and add more broth if needed.
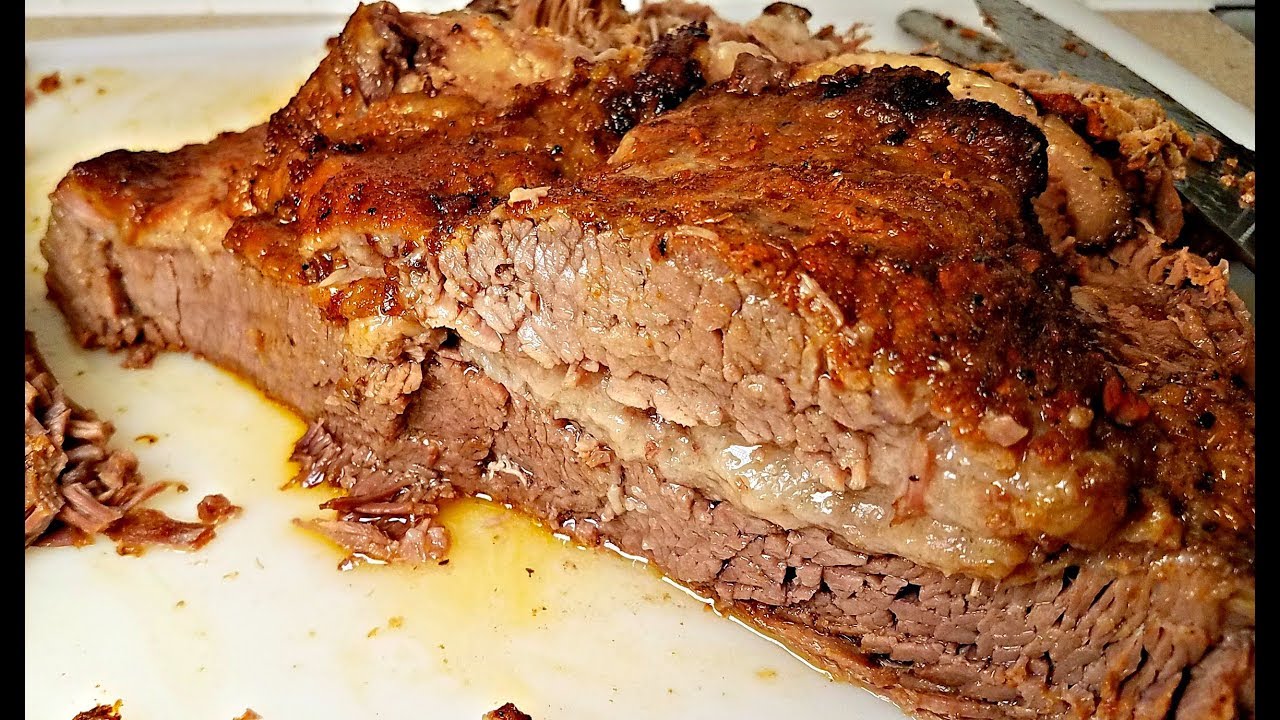
Step 6: Resting and Slicing
Once the brisket reaches an internal temperature of 190–200°F (88–93°C), remove it from the oven. Let it rest, still covered, for at least 20–30 minutes. This allows the juices to redistribute. Slice it thinly against the grain for maximum tenderness.
And there you have it—the perfect baked brisket, step by step.
Flavor Variations for Baked Brisket
One of the best things about brisket is its adaptability. The base recipe is delicious on its own, but with just a few tweaks, you can transform your brisket into something completely new. Whether you enjoy sweet, spicy, or herbaceous flavors, brisket can handle it all. Let’s dive into some of the most popular variations you can try.
Sweet and Smoky Brisket
If you love that BBQ-style flavor without using a smoker, this variation is for you. Simply mix your dry rub with extra brown sugar and a touch of liquid smoke. Once the brisket has baked for a few hours, brush on your favorite barbecue sauce and let it bake uncovered for the final 30 minutes. This creates a sticky, caramelized crust that pairs beautifully with the tender meat.
Spicy Kick Brisket
For those who crave heat, add cayenne pepper, chili powder, or crushed red pepper flakes to your rub. You can also blend in hot sauce or sriracha with your marinade for an extra fiery punch. The slow baking process mellows out the spice, leaving you with a bold yet balanced flavor.
Herb and Garlic Infused Brisket
If you prefer something more savory and aromatic, go heavy on fresh herbs like thyme, rosemary, and parsley. Add minced garlic and a splash of olive oil to your rub. The herbs will infuse the brisket with earthy, fragrant notes, making it perfect for a holiday table or elegant dinner.
By experimenting with these flavor variations, you can create a baked brisket that suits your personal taste. It’s also a fun way to keep the dish exciting each time you make it.
Tips for the Perfect Brisket
Cooking brisket can feel intimidating, especially since it takes hours to prepare. But don’t worry—these tips will help you avoid common mistakes and guarantee success every time.
1. Keep It Low and Slow
Brisket needs patience. Baking it at a low temperature (around 300°F / 150°C) for several hours is the only way to achieve that melt-in-your-mouth texture. Trying to rush the process by raising the heat will only result in tough, chewy meat.
2. Don’t Skip the Resting Period
Resting the brisket after baking is just as important as the cooking itself. If you slice it too soon, all the juices will escape, leaving your meat dry. Wrap it in foil and let it sit for at least 20–30 minutes before carving.
3. Slice Against the Grain
This small detail makes a huge difference. The grain of brisket runs in long fibers, so slicing against it shortens those fibers and gives you tender, easy-to-chew bites. If you slice with the grain, you’ll end up with stringy, tough pieces.
4. Keep It Moist
Always add broth or liquid to the roasting pan before baking. The steam keeps the brisket from drying out during its long cooking time. You can use beef broth, vegetable broth, or even beer or wine for added flavor.
5. Use a Meat Thermometer
Brisket is done when it reaches an internal temperature of 190–200°F (88–93°C). That’s the sweet spot where the collagen breaks down, making the meat tender and juicy.
By following these simple but crucial tips, your baked brisket will come out perfect every single time.
Serving Suggestions
Brisket is rich, hearty, and flavorful, which means it pairs beautifully with a wide variety of side dishes. The key is balance—pair the meaty brisket with sides that complement its richness rather than overpower it.
Classic Side Dishes for Brisket
- Mashed Potatoes – Creamy and buttery, perfect for soaking up brisket juices.
- Roasted Vegetables – Carrots, Brussels sprouts, or green beans add color and nutrition.
- Mac and Cheese – A cheesy, comforting side that pairs well with smoky brisket flavors.
- Coleslaw – Adds a crunchy, tangy contrast to the tender brisket.
- Cornbread or Dinner Rolls – Great for mopping up sauce and drippings.
Creative Serving Ideas
- Brisket Sandwiches – Pile slices onto toasted buns with pickles and BBQ sauce.
- Brisket Tacos – Use tortillas, onions, cilantro, and salsa for a Tex-Mex twist.
- Brisket Chili – Turn leftover brisket into a hearty stew with beans and spices.
- Brisket Salad – For a lighter option, serve slices over a fresh green salad with vinaigrette.
Presentation Tips
When serving brisket at a dinner party or holiday gathering, presentation matters. Arrange the slices neatly on a large platter, garnish with fresh herbs like parsley, and drizzle some pan juices over the top for shine and flavor.
Whether you go classic or creative, brisket is always the star of the table.
How to Store and Reheat Baked Brisket
If you’ve made a big batch of brisket (which is always a good idea), you’ll want to know how to store and reheat it properly so it stays juicy and flavorful.
Storing Brisket
- In the fridge: Place cooled brisket in an airtight container or wrap it tightly in foil. It will last 3–4 days.
- In the freezer: Wrap brisket slices in foil, then place them in freezer bags. It will keep well for up to 3 months.
Reheating Brisket
The key to reheating brisket is low and slow, just like cooking it.
- In the oven: Place brisket in a baking dish, add a splash of broth, cover with foil, and reheat at 300°F (150°C) until warmed through.
- On the stovetop: Heat slices in a skillet with a bit of broth or sauce over medium-low heat.
- In the microwave: Use only for small portions. Cover with a damp paper towel and heat in short intervals to avoid drying out.
Pro Tip: Always reheat brisket with a little liquid (broth, sauce, or drippings). This helps lock in moisture and keeps the meat from becoming tough.
Properly stored and reheated, brisket tastes just as good the next day—sometimes even better because the flavors have deepened overnight.
Common Mistakes to Avoid
Even though baked brisket is a straightforward recipe, there are a few common mistakes that can ruin the results. Learning what not to do is just as important as following the right steps.
1. Cooking at Too High a Temperature
Brisket is a tough cut of meat that requires gentle cooking. If you try to rush it by cranking up the oven heat, the fibers won’t have enough time to break down, leaving you with dry and chewy meat. Always stick to the low-and-slow method—around 300°F (150°C) is ideal.
2. Forgetting to Cover the Brisket
Some people bake brisket uncovered, thinking it will create a crust. While this can work in certain recipes, it often leads to dried-out meat. Covering with foil or a lid locks in moisture and ensures the brisket stays juicy.
3. Skipping the Resting Period
Slicing brisket immediately after it comes out of the oven is a big mistake. The juices will run out, leaving the slices dry. Letting it rest for at least 20–30 minutes gives the meat time to reabsorb its juices.
4. Slicing the Wrong Way
Brisket must be sliced against the grain for tenderness. Cutting with the grain results in long, stringy fibers that are tough to chew.
5. Not Adding Enough Liquid
Brisket needs moisture to cook properly. Skipping broth or pan juices during baking can cause the meat to dry out. Always add liquid to your pan before sealing it up.
By avoiding these pitfalls, you’ll ensure your brisket turns out tender, flavorful, and satisfying every single time.
Nutritional Information
Brisket is indulgent, but when enjoyed in moderation, it can be part of a balanced diet. Let’s break down the typical nutritional values for a 3-ounce (85g) serving of baked beef brisket:
| Nutrient | Amount |
|---|---|
| Calories | ~250–300 |
| Protein | ~22–24g |
| Fat | ~18–20g |
| Saturated Fat | ~7–8g |
| Carbohydrates | 0–2g |
| Fiber | 0g |
| Sugars | 0–1g |
| Cholesterol | ~75–80mg |
| Sodium | Varies (depending on seasoning) |
Health Benefits of Brisket
- High in protein – Great for muscle repair and energy.
- Rich in iron and zinc – Supports red blood cell health and immune function.
- Collagen content – When slow-cooked, brisket releases collagen, which turns into gelatin and benefits joint and skin health.
Things to Keep in Mind
- Brisket can be high in fat, especially if you don’t trim it before cooking.
- Watch the sodium levels if you’re using salty marinades or rubs.
- Pair brisket with lighter sides like roasted vegetables or salads to balance out the richness.
When eaten occasionally and prepared properly, baked brisket can be a hearty and nourishing dish that satisfies both body and soul.
FAQs about Baked Brisket Recipe
1. Can I bake brisket without marinating overnight?
Yes, you can. While overnight marinating helps the flavors penetrate deeply, even a couple of hours will make a difference. If you’re short on time, apply a dry rub and let it sit at room temperature for 30–60 minutes before baking.
2. What’s the ideal oven temperature for brisket?
The sweet spot is 300°F (150°C). This temperature allows the connective tissues to break down slowly, resulting in tender, juicy brisket.
3. How do I make my brisket more tender?
Tender brisket comes from three key things: low heat, long cooking time, and resting before slicing. Adding broth or sauce during baking also helps keep it moist.
4. Can I freeze baked brisket?
Absolutely. Wrap the cooled brisket tightly in foil, then place it in freezer bags. It can be frozen for up to 3 months. To reheat, thaw overnight in the fridge and warm it in the oven with added broth.
5. Is brisket better baked or smoked?
Both methods have their fans. Smoked brisket has that classic BBQ flavor, while baked brisket is easier and more convenient, especially if you don’t own a smoker. Both can be incredibly delicious if done right.
Conclusion
The beauty of brisket lies in its versatility—you can keep it classic, go sweet and smoky, or experiment with bold spices and herbs. And with the right tips, serving ideas, and reheating tricks, you’ll be able to enjoy brisket not just for one meal but for days afterward.
Whether you’re hosting a holiday dinner, a weekend cookout, or just want to treat your family to something special, baked brisket is a showstopper that never fails to impress.
So, next time you’re at the butcher’s shop, don’t hesitate to grab a brisket cut—you’ve got the perfect step-by-step guide to turn it into a masterpiece.