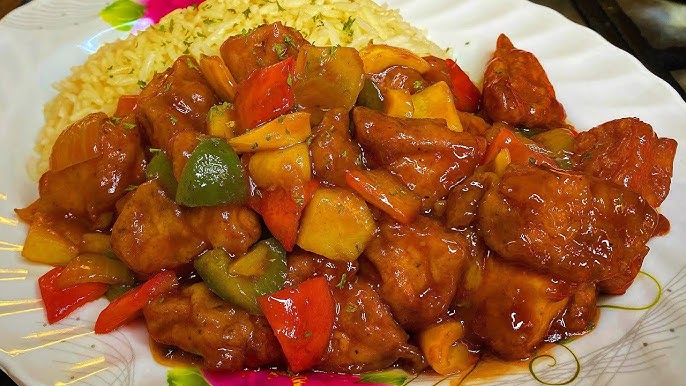
Sweet and Sour Chicken Recipe: Sweet and Sour Chicken is a classic Chinese-inspired dish known for its bold flavors and vibrant colors. The dish features crispy fried chicken coated in a tangy, sweet, and slightly tart sauce, balanced with bell peppers, onions, and pineapple chunks. It’s a popular takeout choice but can be easily made at home with fresh ingredients.
Why You’ll Love This Recipe
This recipe delivers restaurant-quality results with simple ingredients. It’s perfect for busy weeknights or special dinners, and the homemade sauce tastes far better than anything pre-made. Plus, it’s highly customizable, so you can adapt it to fit your preferences or dietary needs.
Ingredients Needed
Main Ingredients
- Chicken: 2 large chicken breasts or 500g of boneless, skinless chicken thighs, cut into bite-sized pieces.
- Vegetables: 1 red bell pepper, 1 green bell pepper, and 1 medium onion, all chopped into 1-inch pieces.
- Pineapple: 1 cup of pineapple chunks (fresh or canned).
- Cornstarch: 1/2 cup for coating the chicken.
- Eggs: 2 large eggs for battering the chicken.
- Oil: Vegetable or canola oil for frying.
For the Sauce
- Ketchup: 1/2 cup for rich flavor and color.
- Rice Vinegar: 1/4 cup to add tanginess.
- Soy Sauce: 2 tablespoons for umami.
- Brown Sugar: 1/3 cup for sweetness.
- Pineapple Juice: 1/2 cup for a tropical twist.
- Garlic: 2 cloves, minced.
- Ginger: 1 teaspoon, grated.
- Cornstarch Slurry: 1 tablespoon cornstarch mixed with 2 tablespoons water to thicken the sauce.
Optional Garnishes
- Sesame seeds for extra crunch.
- Green onions, finely sliced, for a pop of color.
Kitchen Tools Required
Essential Tools
- Knife and Cutting Board: For chopping vegetables and chicken.
- Mixing Bowls: To mix batter and coat chicken.
- Wok or Large Skillet: For frying and stir-frying.
- Saucepan: To prepare the sauce.
Additional Useful Tools
- Tongs or Slotted Spoon: For frying chicken.
- Paper Towels: To drain excess oil.
- Measuring Cups and Spoons: For precise measurements.
Preparation Steps
Prepping the Chicken
- Cut Chicken into Pieces: Start by trimming any fat and cutting the chicken into 1-inch cubes for even cooking.
- Season the Chicken: Sprinkle salt and pepper to season lightly.
- Marinate (Optional): For extra flavor, marinate the chicken in soy sauce and garlic for 15 minutes.
Prepping the Vegetables
- Chop Bell Peppers and Onion: Dice them into equal-sized pieces for even cooking.
- Prepare Pineapple: Drain canned pineapple or chop fresh pineapple into chunks.
Making the Batter and Coating the Chicken
Ingredients for the Batter
- 2 beaten eggs.
- 1/2 cup cornstarch.
- 1/2 cup all-purpose flour (optional for extra crispiness).
Step-by-Step Coating Process
- Prepare Dredging Station: Place cornstarch in one bowl and beaten eggs in another.
- Double Coating for Extra Crispiness: Dip each piece of chicken into the cornstarch, then into the egg, and back into the cornstarch.
- Shake Off Excess: Ensure the chicken is evenly coated without clumps.
Frying the Chicken to Perfection
Tips for Crispy Chicken
- Heat Oil Properly: Heat the oil to 350°F (175°C) before adding chicken.
- Fry in Batches: Avoid overcrowding to maintain crispy texture.
- Drain Excess Oil: Use a paper towel-lined plate to absorb extra oil.
Healthier Options (Baking or Air Frying)
- Baking: Preheat oven to 400°F (200°C) and bake for 20-25 minutes, flipping halfway.
- Air Frying: Spray coated chicken lightly with oil and air fry at 375°F (190°C) for 12-15 minutes.
Preparing the Sweet and Sour Sauce
Ingredients for the Sauce
- Ketchup: 1/2 cup for a rich tomato base.
- Rice Vinegar: 1/4 cup for tanginess.
- Soy Sauce: 2 tablespoons for a savory depth.
- Brown Sugar: 1/3 cup to add sweetness.
- Pineapple Juice: 1/2 cup for a fruity touch.
- Garlic: 2 cloves, finely minced, for flavor.
- Ginger: 1 teaspoon, grated, to add warmth.
- Cornstarch Slurry: 1 tablespoon cornstarch mixed with 2 tablespoons water for thickening.
Cooking the Sauce
- Heat the Pan: Use a small saucepan and set it over medium heat.
- Combine Ingredients: Add ketchup, rice vinegar, soy sauce, brown sugar, and pineapple juice. Stir continuously to dissolve the sugar.
- Simmer and Thicken: Bring the mixture to a gentle simmer, then add minced garlic and grated ginger. Stir in the cornstarch slurry and cook until the sauce thickens, about 3–5 minutes.
- Taste and Adjust: Check for sweetness or tanginess. Adjust with more vinegar for tartness or sugar for sweetness if needed.
- Set Aside: Keep the sauce warm while preparing the final dish.
Combining Chicken and Sauce
Mixing the Ingredients Properly
- Reheat the Sauce: If it has cooled down, gently warm it in a pan.
- Add Fried Chicken: Toss the crispy fried chicken pieces into the sauce. Stir quickly to coat every piece evenly without softening the batter.
- Add Vegetables and Pineapple: Stir in the chopped bell peppers, onions, and pineapple chunks. Cook for 2–3 minutes, ensuring the vegetables remain crisp-tender.
Achieving the Perfect Balance
- Balance the Flavors: Taste test the sauce-coated chicken. Add a splash of soy sauce for saltiness or more vinegar if you prefer tangier flavors.
- Control the Texture: Avoid overcooking to retain the crispy coating on the chicken while allowing the vegetables to stay crunchy.
Serving Suggestions
Pairing with Rice or Noodles
- White Rice: Steamed jasmine or basmati rice pairs perfectly to soak up the sauce.
- Fried Rice: Enhance your dish with vegetable or egg-fried rice for an authentic Chinese experience.
- Noodles: Lo mein or chow mein noodles add another layer of texture and flavor.
Garnishing Tips
- Sesame Seeds: Sprinkle toasted sesame seeds for added crunch.
- Green Onions: Freshly sliced green onions add color and freshness.
- Red Chili Flakes: For those who enjoy a spicy kick, a light sprinkle of chili flakes does the trick.
Storage and Reheating Tips
Refrigerating Leftovers
- Cool Down First: Let the chicken and sauce cool to room temperature before storing.
- Airtight Container: Store leftovers in an airtight container in the refrigerator for up to 3 days.
Best Ways to Reheat Without Losing Crispiness
- Oven Method: Preheat the oven to 375°F (190°C). Spread the chicken on a baking sheet and heat for 10–12 minutes until warm and crispy.
- Stovetop Method: Reheat in a pan over medium heat with a splash of water or sauce to prevent drying out. Stir occasionally until heated through.
- Avoid Microwaving: While convenient, microwaving can make the chicken soggy. Use other methods for best results.
Common Mistakes to Avoid
Overcooking Chicken
- Over-frying can result in dry, chewy chicken. Always monitor the temperature and fry in batches to avoid overcrowding the pan.
Sauce Consistency Issues
- Too Thin? Add a bit more cornstarch slurry and simmer for a few more minutes.
- Too Thick? Add water or pineapple juice a tablespoon at a time until desired consistency is reached.
Losing Crispiness Too Quickly
- Add the sauce just before serving to prevent the crispy coating from becoming soggy.
Variations and Substitutions
Vegetarian and Vegan Options
- Plant-Based Protein: Replace chicken with crispy tofu, cauliflower florets, or tempeh. Coat and fry them the same way for a similar texture.
- Vegan Sauce Adjustments: Use vegan-friendly ketchup and soy sauce, ensuring they contain no animal-derived ingredients. Swap honey (if used) with maple syrup or agave nectar.
Gluten-Free Alternatives
- Batter Substitutions: Replace all-purpose flour with rice flour or gluten-free flour for coating the chicken.
- Soy Sauce Alternative: Use tamari or coconut aminos instead of traditional soy sauce to make the dish gluten-free.
Low-Carb and Keto-Friendly Options
- Skip the Batter: Pan-sear the chicken without coating to cut down on carbs.
- Sauce Adjustments: Use sugar-free ketchup and a sugar substitute like stevia or erythritol instead of brown sugar.
Nutritional Information
Calorie Breakdown (Per Serving)
| Nutrient | Amount |
|---|---|
| Calories | 350–400 kcal |
| Protein | 25g |
| Carbohydrates | 40g |
| Sugars | 18g |
| Fat | 12g |
| Saturated Fat | 2g |
| Sodium | 800mg |
Health Benefits
- Protein-Packed Meal: Chicken provides high-quality protein to support muscle growth and repair.
- Nutrient-Rich Vegetables: Bell peppers and pineapple deliver vitamins C and A, boosting immunity and skin health.
- Balanced Macros: Carbs provide energy, while fats help with nutrient absorption, making it a well-rounded meal.
Tips for Meal Prepping
Make-Ahead Suggestions
- Chicken Preparation: Pre-bread and fry the chicken, then store it separately from the sauce to keep it crispy.
- Sauce Storage: Make the sauce in advance and refrigerate it for up to 5 days. Reheat before mixing with chicken.
Freezing for Later
- Freeze Components Separately: Freeze fried chicken and sauce in separate airtight containers. Thaw overnight in the refrigerator before reheating.
- Reheat Properly: Use the oven or stovetop to maintain crispiness when reheating the chicken. Avoid microwaving to preserve texture.
FAQs about Sweet and Sour Chicken Recipe
What are the main ingredients in Sweet and Sour Chicken?
The key ingredients for this dish include chicken (breast or thigh), bell peppers, onion, and pineapple. The sauce is typically made from vinegar, sugar, ketchup, soy sauce, and cornstarch to thicken it.
How can I make Sweet and Sour Chicken crispy?
For crispy Sweet and Sour Chicken, coat the chicken pieces in cornstarch or a mixture of flour and cornstarch before frying them in oil. Ensure the oil is hot enough so that the chicken sizzles upon contact, which helps to seal the exterior and keep it crispy.
Can Sweet and Sour Chicken be made gluten-free?
Yes, to make this dish gluten-free, use a gluten-free soy sauce or tamari and ensure that all other ingredients, like cornstarch and ketchup, are certified gluten-free.
Is there a healthier version of Sweet and Sour Chicken?
For a healthier variant, you can bake the chicken instead of frying. Use honey instead of sugar for the sauce and increase the amount of vegetables like bell peppers, carrots, and snap peas.
What sides go well with Sweet and Sour Chicken?
This dish pairs wonderfully with steamed rice, noodles, or a fresh vegetable stir fry. For a low-carb option, serve it with cauliflower rice or zoodles.
How do I store and reheat leftovers?
Store leftovers in an airtight container in the refrigerator for up to 3 days. Reheat in the microwave, stirring occasionally, or gently on the stovetop until thoroughly warmed.
Can Sweet and Sour Chicken be frozen?
Yes, you can freeze Sweet and Sour Chicken. Freeze it in an airtight container for up to 3 months. Thaw in the refrigerator overnight before reheating as suggested above.
Conclusion
Sweet and Sour Chicken is a crowd-pleasing dish that combines crispy textures with bold flavors, making it perfect for family dinners or special occasions. With this step-by-step guide, you can recreate the classic takeout favorite at home using fresh, wholesome ingredients. Whether you stick to the original recipe or adapt it to suit dietary preferences, the result will always be satisfying and delicious.
Experiment with variations, serve it alongside rice or noodles, and don’t forget to garnish with sesame seeds or green onions for an extra touch of flavor. Now that you have everything you need, it’s time to start cooking and impress your family or guests with this irresistible dish!


