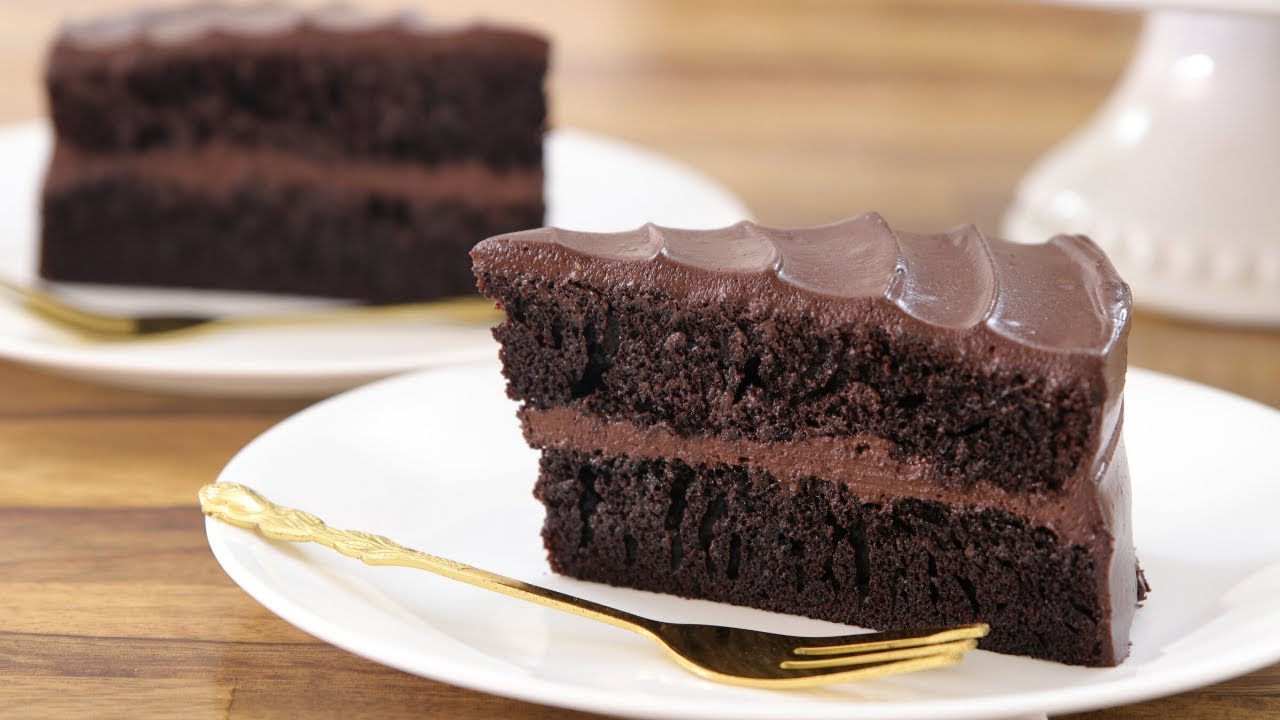
Mud Cake Recipe: When we want a dessert that is deeply chocolatey, irresistibly moist, and beautifully dense, nothing compares to a classic mud cake. This timeless favorite is known for its rich texture, smooth crumb, and luxurious flavor that satisfies every chocolate lover. Whether we are baking for birthdays, celebrations, afternoon tea, or special occasions, this mud cake recipe delivers bakery-quality results with ease.
Our step-by-step guide ensures a flawless bake every time, using simple pantry ingredients and precise techniques that create a soft, fudgy center with a smooth outer finish. This cake can be served plain, glazed, frosted, or layered for an elegant presentation.
Ingredients You’ll Need for Mud Cake
To prepare the perfect homemade mud cake, gather the following ingredients:
Dry Ingredients
- 2 cups all-purpose flour
- ½ cup unsweetened cocoa powder
- 2 teaspoons baking powder
- ½ teaspoon baking soda
- ¼ teaspoon salt
Wet Ingredients
- 250g unsalted butter
- 200g dark chocolate, chopped
- 1½ cups granulated sugar
- 1 cup milk
- ½ cup hot coffee (optional for enhanced chocolate flavor)
- 3 large eggs
- 1 teaspoon vanilla extract
- ½ cup sour cream or plain yogurt
Essential Equipment
For best results, we recommend:
- 8-inch or 9-inch round cake tin
- Mixing bowls
- Whisk
- Saucepan
- Spatula
- Baking paper
- Cooling rack
Step-by-Step Guide to Making Mud Cake
Step 1: Prepare the Cake Tin
Preheat the oven to 160°C (320°F). Grease the cake tin thoroughly with butter or non-stick spray. Line the base and sides with baking paper to prevent sticking and ensure easy removal.
This step helps the cake bake evenly while protecting the edges from overcooking.
Step 2: Melt the Butter and Chocolate
In a medium saucepan over low heat, combine:
- Butter
- Dark chocolate
- Milk
- Sugar
Stir continuously until smooth and glossy. Remove from heat once everything has melted completely.
Allow the mixture to cool slightly before adding eggs later. This prevents scrambling and maintains a silky batter texture.
Step 3: Mix the Dry Ingredients
In a large bowl, sift together:
- Flour
- Cocoa powder
- Baking powder
- Baking soda
- Salt
Sifting removes lumps and creates a lighter, smoother cake crumb.
Step 4: Add Eggs and Vanilla
Whisk the eggs in a separate bowl. Slowly add them into the cooled chocolate mixture along with:
- Vanilla extract
- Sour cream
Mix until fully combined and smooth.
The sour cream adds richness and helps keep the cake moist for days.
Step 5: Combine Wet and Dry Mixtures
Gradually pour the chocolate mixture into the dry ingredients. Fold gently using a spatula or whisk until no streaks remain.
Do not overmix. A smooth batter creates the signature dense yet tender mud cake texture.
Step 6: Pour Into Tin
Transfer the batter into the prepared cake tin. Tap the tin lightly on the counter to release trapped air bubbles.
Smooth the top evenly using a spatula.
Step 7: Bake Slowly
Place the cake in the preheated oven and bake for 60 to 75 minutes, depending on oven strength and tin size.
Check doneness by inserting a skewer into the center. It should come out with a few moist crumbs, not wet batter.
Avoid overbaking, as mud cake should remain rich and soft inside.
Step 8: Cool Completely
Leave the cake in the tin for 15 minutes before removing. Transfer to a cooling rack and allow it to cool fully before decorating or slicing.
Cooling helps the crumb set and intensifies the chocolate flavor.
Chocolate Ganache Topping for Mud Cake
A glossy ganache transforms mud cake into a premium dessert.
Ganache Ingredients
- 200g dark chocolate
- 1 cup heavy cream
Method
Heat cream until just steaming. Pour over chopped chocolate. Let sit for 2 minutes, then stir until smooth.
Spread over cooled cake and let it drip naturally down the sides for a stunning finish.
Expert Tips for the Best Mud Cake
Use Quality Chocolate
Higher-quality chocolate creates a deeper, smoother flavor. Use dark chocolate with at least 50% cocoa solids.
Do Not Rush Baking
Mud cake benefits from gentle, slow baking. Lower heat prevents cracking and dryness.
Cool Before Frosting
Warm cake melts frosting and ganache. Always cool completely.
Use Room Temperature Eggs
Room-temperature eggs blend better into batter and improve structure.
Store Overnight for Better Flavor
Mud cake often tastes even better the next day as flavors deepen and texture becomes richer.
How to Serve Mud Cake
This versatile cake pairs beautifully with:
- Fresh berries
- Vanilla ice cream
- Whipped cream
- Chocolate sauce
- Salted caramel drizzle
- Coffee or espresso
Serve slightly chilled for a denser bite or at room temperature for a softer texture.
How to Store Mud Cake
At Room Temperature
Store in an airtight container for up to 3 days.
In the Refrigerator
Keeps fresh for 1 week. Bring to room temperature before serving.
Freezing Instructions
Wrap slices individually and freeze for up to 3 months. Thaw overnight in the refrigerator.
Common Mistakes to Avoid
Overmixing the Batter
Too much mixing develops gluten and creates a tougher cake.
Using High Oven Temperature
Mud cake requires slow baking. High heat dries the edges before the center cooks.
Skipping Baking Paper
Because the cake is rich and dense, lining the pan helps prevent sticking.
Cutting Too Early
Allow the cake to cool fully for clean slices and best texture.
Mud Cake Variations
Mocha Mud Cake
Add 1 tablespoon espresso powder for bold coffee notes.
White Chocolate Mud Cake
Replace dark chocolate with premium white chocolate.
Salted Caramel Mud Cake
Layer caramel sauce between cake slices and top with ganache.
Nutty Mud Cake
Fold in chopped walnuts or hazelnuts for texture.
Why This Mud Cake Recipe Works
This recipe balances:
- Rich chocolate flavor
- Moist crumb
- Dense yet soft texture
- Elegant appearance
- Reliable baking results
Every slice is indulgent, smooth, and satisfying.
FAQs about Fried Mozzarella Cheese Sticks Recipe
1. What type of cheese is best for mozzarella sticks?
Mozzarella string cheese is the best choice because it melts well and is easy to cut and coat. It also gives the classic stretchy cheese texture.
2. Why do mozzarella sticks need to be frozen before frying?
Freezing helps the coating stay firm and prevents the cheese from melting too quickly in hot oil. This keeps the sticks crispy outside and cheesy inside.
3. Can I use panko breadcrumbs?
Yes, panko breadcrumbs work very well. They create a crispier and lighter coating than regular breadcrumbs.
4. How do I keep the cheese from leaking out?
Coat the sticks fully, making sure there are no gaps. Double-coating and freezing them before frying also helps prevent leaks.
5. What oil is best for frying?
Use a neutral oil with a high smoke point, such as vegetable oil, canola oil, or sunflower oil.
6. Can I bake or air-fry mozzarella sticks instead?
Yes, you can bake or air-fry them for a lighter version. They may not be exactly the same as deep-fried ones, but they still turn out crispy and tasty.
7. How long do mozzarella sticks take to fry?
They usually take about 1 to 2 minutes in hot oil at 350°F (175°C) until golden brown.
8. What dips go well with mozzarella sticks?
Marinara sauce is the classic dip, but ranch dressing, garlic sauce, or spicy mayo also pair well.
9. Can I make them ahead of time?
Yes, you can bread them in advance and keep them frozen until ready to fry. This makes them great for quick snacks or parties.
Final Thoughts
A perfectly baked mud cake is one of the most rewarding desserts we can make at home. With deep chocolate flavor, velvety texture, and endless topping options, it suits every celebration and craving. Follow this step-by-step guide carefully, use quality ingredients, and enjoy a bakery-style cake from your own kitchen.


