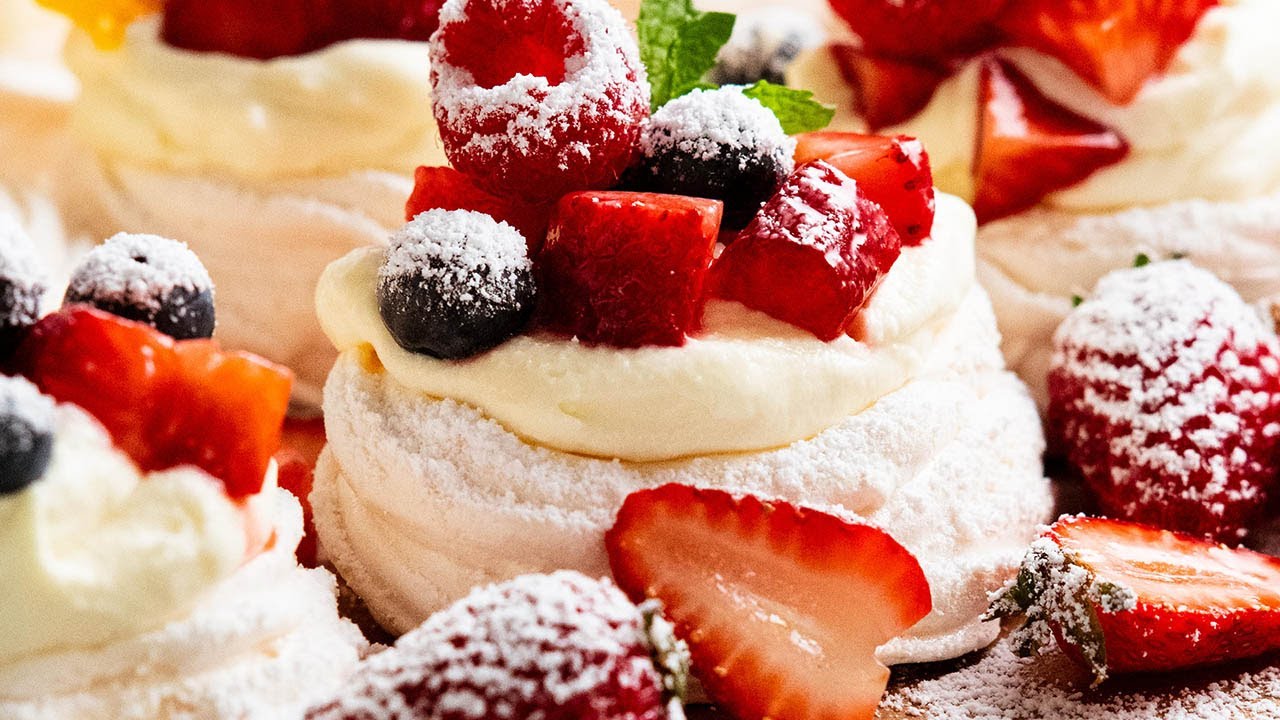
Mini Pavlova Recipe: Mini pavlovas are elegant, crisp-on-the-outside, marshmallow-soft-on-the-inside desserts that bring together delicate meringue shells, luscious cream, and vibrant fruit toppings.
Their light texture and beautiful presentation make them perfect for celebrations, afternoon tea, holidays, or whenever we want a refined homemade dessert.
This complete guide covers everything needed to create flawless mini pavlovas with confidence.
What Is a Mini Pavlova?
A mini pavlova is an individual-sized version of the classic pavlova dessert. It features a baked meringue nest with a crisp shell and tender center, typically filled with whipped cream and topped with fresh fruit. Because they are individually portioned, mini pavlovas are easier to serve, faster to decorate, and ideal for gatherings.
The contrast of textures is what makes them exceptional: crunchy exterior, pillowy middle, silky cream, and juicy fruit.
Ingredients You’ll Need
For the Mini Pavlova Shells
- 4 large egg whites (room temperature)
- 1 cup caster sugar or superfine sugar
- 1 teaspoon cornstarch
- 1 teaspoon white vinegar or lemon juice
- 1 teaspoon vanilla extract
- Pinch of salt
For the Whipped Cream Filling
- 1 cup heavy whipping cream
- 2 tablespoons powdered sugar
- 1 teaspoon vanilla extract
For the Toppings
- Fresh strawberries, sliced
- Blueberries
- Raspberries
- Kiwi, sliced
- Passion fruit pulp
- Mint leaves for garnish
Essential Equipment for Best Results
- Electric hand mixer or stand mixer
- Large clean mixing bowl
- Baking tray
- Parchment paper
- Spoon or piping bag
- Cooling rack
Using grease-free bowls and beaters is essential because even a trace of oil can prevent egg whites from whipping properly.
Step-by-Step Guide to Making Mini Pavlova
Step 1: Prepare the Oven and Tray
Preheat the oven to 250°F (120°C) or 110°C fan-forced. Line a baking tray with parchment paper.
Draw small circles on the parchment as guides if uniform sizes are desired. Turn the paper upside down so the ink or pencil does not touch the meringue.
Step 2: Whip the Egg Whites
Place room-temperature egg whites in a clean bowl. Add a pinch of salt and beat on medium speed until soft peaks begin to form.
Once soft peaks appear, increase speed gradually.
The whites should look foamy, glossy, and airy before sugar is added.
Step 3: Add Sugar Slowly
Add sugar one tablespoon at a time, beating well after each addition.
This slow process creates a stable meringue with a glossy finish. Continue whisking until the mixture becomes thick and shiny.
To test readiness, rub a little mixture between your fingers. If it feels smooth without sugar grains, it is ready.
Step 4: Fold in Final Ingredients
Gently fold in:
- Cornstarch
- Vinegar
- Vanilla extract
These ingredients help create the classic pavlova texture: crisp shell with a soft center.
Avoid overmixing.
Step 5: Shape the Mini Pavlovas
Spoon or pipe the mixture onto prepared parchment in circles.
Use the back of a spoon to create a slight indentation in the center of each mound. This will later hold cream and toppings beautifully.
Aim for approximately 3 to 4 inches wide each.
Step 6: Bake Slowly
Place tray in the oven and bake for 60 to 75 minutes.
The shells should feel dry to the touch and lift easily from the parchment.
Do not brown the pavlovas. They should remain pale ivory in color.
Step 7: Cool Gradually
Turn the oven off and leave the door slightly ajar. Let pavlovas cool inside the oven for at least 1 hour.
This prevents sudden temperature changes that may cause cracking.
Step 8: Make the Whipped Cream
Add heavy cream, powdered sugar, and vanilla extract to a chilled bowl.
Whip until soft peaks form.
The cream should be smooth and spoonable, not stiff or grainy.
Step 9: Assemble the Mini Pavlovas
Once shells are fully cooled:
- Spoon whipped cream into the center of each pavlova
- Add fresh fruit generously
- Finish with mint leaves or passion fruit pulp
Serve immediately for the freshest texture.
Mini Pavlova Tips for Perfect Results
Use Room Temperature Egg Whites
Egg whites whip faster and gain better volume when not cold.
Add Sugar Gradually
Rushing this step can produce grainy or unstable meringue.
Avoid Humidity
Moist air softens pavlova shells. Bake on dry days when possible and store in airtight containers.
Do Not Open the Oven Frequently
Temperature fluctuations can cause collapse or cracking.
Assemble Before Serving
Add cream and fruit just before serving to preserve the crisp shell.
Best Fruit Toppings for Mini Pavlova
Mini pavlovas pair beautifully with many fruits. Popular combinations include:
Berry Pavlova
- Strawberries
- Blueberries
- Raspberries
Tropical Pavlova
- Mango
- Kiwi
- Passion fruit
- Pineapple
Citrus Pavlova
- Orange segments
- Lemon curd
- Grapefruit
Stone Fruit Pavlova
- Peaches
- Nectarines
- Cherries
- Apricots
How to Store Mini Pavlova
Unfilled Shells
Store in an airtight container at room temperature for 2 to 3 days.
Filled Pavlovas
Best eaten immediately. Refrigeration softens the shell, though leftovers can be chilled for several hours.
Common Mini Pavlova Mistakes to Avoid
Why Did My Pavlova Crack?
Minor cracks are normal. Large cracks often come from sudden cooling or oven temperatures that are too high.
Why Is My Pavlova Sticky?
Humidity or underbaking usually causes sticky shells.
Why Did My Egg Whites Not Whip?
Possible reasons:
- Greasy bowl
- Egg yolk contamination
- Cold egg whites
- Sugar added too early
Mini Pavlova Variations
Chocolate Mini Pavlova
Fold in 1 tablespoon cocoa powder before shaping.
Coffee Pavlova
Add 1 teaspoon espresso powder for a rich flavor.
Lemon Pavlova
Top with lemon curd and berries.
Nut Pavlova
Sprinkle toasted pistachios or almonds over whipped cream.
Why Mini Pavlovas Are Perfect for Entertaining
Mini pavlovas are an excellent dessert for parties because:
- Individual servings look elegant
- Easy to customize toppings
- Naturally gluten-free
- Light after a heavy meal
- Can be prepared in stages
Bake shells ahead of time, whip cream later, and assemble quickly before serving.
Mini Pavlova Serving Ideas
Serve mini pavlovas for:
- Birthday celebrations
- Bridal showers
- Tea parties
- Holiday dinners
- Summer gatherings
- Romantic dinners
Pair with tea, coffee, sparkling drinks, or dessert wine.
Quick Mini Pavlova Recipe Summary
Ingredients
- 4 egg whites
- 1 cup sugar
- 1 tsp cornstarch
- 1 tsp vinegar
- 1 tsp vanilla
- 1 cup cream
- Fruit toppings
Method
- Whip egg whites
- Add sugar gradually
- Fold in cornstarch, vinegar, vanilla
- Shape nests
- Bake low and slow
- Cool gradually
- Fill with cream and fruit
FAQs about Mini Pavlova Recipe
1. What is mini pavlova?
Mini pavlova is a small meringue-based dessert with a crisp outer shell and a soft, marshmallow-like center. It is usually topped with whipped cream and fresh fruit.
2. Why did my mini pavlovas crack?
Cracking can happen if the oven is too hot or if the pavlovas cool too quickly. Letting them cool slowly in the oven helps reduce cracks.
3. Why are my mini pavlovas chewy inside?
A soft center is normal, but if they are too chewy, they may need a little more baking time. High humidity can also affect the texture.
4. How do I know when mini pavlovas are done?
They should feel dry on the outside and lift easily from the baking paper. The inside should still be slightly soft.
5. Can I make mini pavlovas ahead of time?
Yes, you can bake the meringue shells a day or two in advance. Store them in an airtight container and add the toppings just before serving.
6. What toppings go best with mini pavlovas?
Popular toppings include whipped cream, strawberries, blueberries, kiwi, mango, passion fruit, or chocolate shavings.
7. How should I store mini pavlovas?
Store the plain shells in an airtight container at room temperature. Once topped, they should be kept in the refrigerator and served soon after.
8. Can I make mini pavlovas without cream?
Yes, you can top them with yogurt, fruit curd, or dairy-free whipped topping if you want a different option.
Final Thoughts
Mini pavlovas deliver impressive results with simple ingredients. Their crisp shell, soft center, rich cream, and fresh fruit create a dessert that feels luxurious yet approachable. By following each step carefully, we can consistently produce bakery-quality mini pavlovas at home.
Whether served at an elegant event or enjoyed as a weekend treat, this mini pavlova recipe offers timeless flavor, beautiful presentation, and dependable results every time.


