Cannoli Recipe: Cannoli is one of the most loved Italian pastries, known for its crisp golden shells and rich, creamy filling. When we prepare a proper cannoli recipe, every detail matters, from the texture of the shell to the smoothness of the filling. A great cannoli should deliver a delicate crunch first, followed by a sweet, creamy center that feels light, flavorful, and balanced. This classic dessert may look impressive, but once we understand the process, it becomes simple to make at home with excellent results.
In this complete guide, we will cover the ingredients you’ll need, the best method for making authentic cannoli shells, how to prepare a luxurious filling, and the exact step-by-step process for assembling bakery-style cannoli.
Ingredients You’ll Need for Cannoli Recipe
To make a traditional cannoli recipe, we need two main components: the shells and the filling.
Ingredients for the Cannoli Shells
- 2 cups all-purpose flour
- 2 tablespoons granulated sugar
- 1/2 teaspoon salt
- 2 tablespoons unsalted butter, cold and cubed
- 1 egg yolk
- 1/2 cup dry white wine or marsala wine
- 1 teaspoon white vinegar
- 1 egg white, lightly beaten for sealing
- Vegetable oil, for frying
Ingredients for the Cannoli Filling
- 2 cups ricotta cheese
- 1 cup mascarpone cheese
- 3/4 cup powdered sugar
- 1 teaspoon vanilla extract
- 1/2 teaspoon ground cinnamon
- 1/3 cup mini chocolate chips
- 2 tablespoons finely chopped candied orange peel (optional)
For Garnish
- Extra powdered sugar
- Crushed pistachios
- Mini chocolate chips
- Candied orange peel
How to Prepare the Perfect Cannoli Dough
The shell is what defines a true homemade cannoli recipe. It should be thin, blistered, crisp, and sturdy enough to hold the filling without becoming soggy too quickly.
In a large mixing bowl, combine the flour, sugar, and salt. Add the cold butter and rub it into the flour using your fingertips until the mixture resembles coarse crumbs. This step helps create a shell that fries crisp and flaky rather than hard and dense.
Next, add the egg yolk, white wine, and vinegar. Mix until a dough begins to form. If it feels too dry, add a teaspoon of wine at a time until it comes together. The dough should be firm, smooth, and not sticky.
Transfer the dough to a lightly floured surface and knead for about 8 to 10 minutes. This develops structure and helps us roll the dough thin without tearing. Once smooth, wrap the dough tightly and let it rest for at least 1 hour. This resting period relaxes the gluten and makes the dough easier to handle.
How to Make the Creamy Cannoli Filling
The filling is the second essential part of a great cannoli recipe. It should be creamy, sweet, and thick enough to hold its shape inside the shell.
Start by draining the ricotta cheese very well. If the ricotta contains too much moisture, the filling will turn loose and make the shells soggy. Place it in a fine sieve or cheesecloth and let it drain for several hours, or overnight in the refrigerator if possible.
In a mixing bowl, combine the drained ricotta, mascarpone, powdered sugar, vanilla extract, and cinnamon. Beat until smooth and creamy. Fold in the mini chocolate chips and candied orange peel if using. Once mixed, cover and chill the filling for at least 30 minutes. Chilling helps it firm up and improves the texture.
A proper filling should be smooth and luxurious, never watery. It should pipe easily but stay in place once inside the shell.
Step-by-Step Guide to Making Cannoli Shells
Step 1 – Roll the Dough Thin
After the dough has rested, divide it into two portions. Keep one portion covered while working with the other. Roll the dough out on a lightly floured surface until it is very thin, about 1/8 inch thick or slightly thinner. Thin dough is essential for crisp shells.
For even better results, use a pasta machine if available. This gives a more uniform thickness and creates a delicate shell texture.
Step 2 – Cut the Dough into Rounds
Use a round cutter, about 4 to 5 inches wide, to cut circles from the dough. Gather the scraps, rest them briefly, and roll again to cut more rounds.
Step 3 – Wrap Around Cannoli Tubes
Take each dough round and wrap it around a metal cannoli tube. Overlap the ends slightly and brush one edge with the beaten egg white to seal. Press gently so the shell stays closed during frying.
Step 4 – Heat the Oil
Pour vegetable oil into a deep pot or fryer and heat it to 350°F (175°C). The oil must stay at the right temperature. If it is too cool, the shells will absorb oil and become greasy. If it is too hot, they will brown too quickly before crisping properly.
Step 5 – Fry the Shells
Carefully place a few wrapped cannoli tubes into the hot oil. Fry for about 2 to 3 minutes, turning as needed, until the shells are golden brown and blistered. These tiny bubbles on the surface are a classic sign of a well-made cannoli shell.
Remove the shells with tongs and place them on paper towels to drain. Let them cool slightly, then gently slide the shells off the tubes. Handle them carefully, as fresh fried shells are delicate until fully cooled.
Repeat until all the shells are fried.
How to Fill Cannoli Properly
Step 1 – Transfer Filling to a Piping Bag
Spoon the chilled filling into a piping bag or a sturdy plastic bag with the corner snipped off. This makes it easier to fill the shells neatly and evenly.
Step 2 – Fill from Both Sides
Pipe the filling into one side of the shell until it reaches the center, then repeat from the other side. This ensures the entire shell is filled without air gaps.
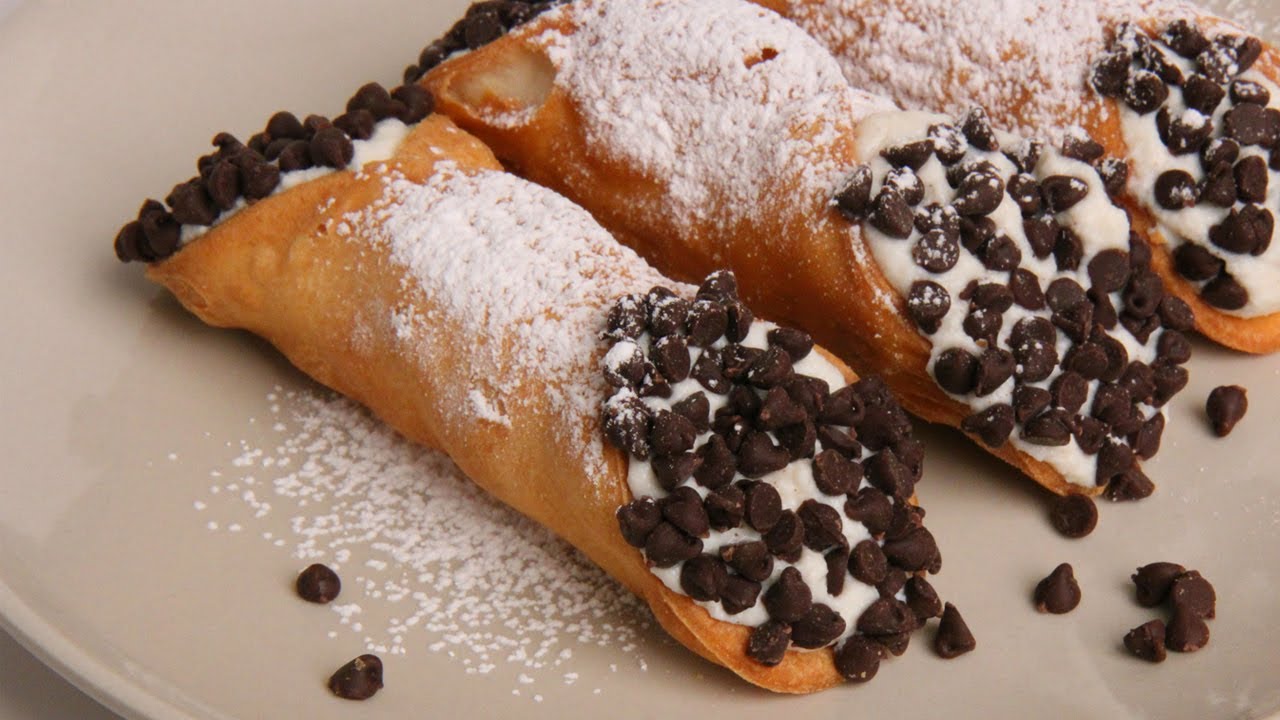
Step 3 – Add Garnish
Dip each end of the filled cannoli into mini chocolate chips, crushed pistachios, or candied orange peel. Dust lightly with powdered sugar before serving.
For the best texture, fill the shells just before serving. This keeps them crisp and prevents them from softening too soon.
Best Tips for a Successful Cannoli Recipe
A well-made cannoli recipe depends on careful preparation and attention to texture. These practical tips help improve the final result:
Drain the Ricotta Thoroughly
This is one of the most important steps. Excess moisture weakens the filling and ruins the shell texture after assembly.
Roll the Dough Very Thin
Thick dough produces shells that feel heavy and overly hard. Thin dough gives the classic crisp bite that makes cannoli so appealing.
Use Cannoli Tubes
Metal tubes help the shells keep their signature shape while frying. Without them, the shells will not form properly.
Keep the Oil at a Steady Temperature
Consistent frying temperature gives evenly cooked shells with a golden, crisp finish.
Fill Right Before Serving
This keeps the contrast between crispy shell and smooth filling, which is the heart of a great cannoli.
Cannoli Filling Variations We Can Try
One of the reasons this cannoli recipe remains popular is its flexibility. Once we master the base version, we can create different flavors while keeping the classic structure.
Chocolate Cannoli
Add extra mini chocolate chips to the filling and drizzle melted chocolate over the finished shells.
Pistachio Cannoli
Mix finely chopped pistachios into the filling and coat the ends with more crushed pistachios for a nutty finish.
Citrus Cannoli
Add a little orange zest or lemon zest to brighten the flavor and make the filling taste fresher.
Coffee Cannoli
Stir a small amount of espresso powder into the filling for a deeper, more intense dessert flavor.
How to Store Cannoli
If we want the best quality, store the components separately.
- Keep the fried shells in an airtight container at room temperature for up to 2 days
- Store the filling in the refrigerator for up to 3 days
- Assemble only when ready to serve
This method preserves the ideal texture and prevents sogginess.
Why This Cannoli Recipe Works So Well
This cannoli recipe works because it balances every key element. The shell is crisp and light, the filling is thick and creamy, and the final dessert feels elegant without being difficult to prepare. By using drained ricotta, rolling the dough thin, and filling only before serving, we get the exact texture that makes cannoli memorable.
A homemade cannoli also offers more freshness and flavor than many store-bought versions. The shell tastes cleaner and crisper, while the filling feels richer and more natural. When made properly, every bite delivers the contrast that defines this classic Italian dessert.
FAQs about Cannoli Recipe
1. What is cannoli?
Cannoli is a classic Italian dessert made with crispy pastry shells filled with a sweet, creamy filling. The filling is often made from ricotta cheese, sugar, and flavorings.
2. What is cannoli filling made of?
Traditional cannoli filling is usually made with ricotta cheese, powdered sugar, and vanilla. Some recipes also include chocolate chips, cinnamon, or citrus zest for extra flavor.
3. Can I make cannoli shells at home?
Yes, cannoli shells can be made at home with a simple dough that is rolled thin, wrapped around metal tubes, and fried until crisp. However, many people also use store-bought shells for convenience.
4. Why is my cannoli filling runny?
Cannoli filling can become runny if the ricotta is too wet. Therefore, it is important to drain the ricotta well before mixing the filling.
5. When should I fill the cannoli shells?
It is best to fill the shells just before serving. This helps keep them crisp and prevents them from becoming soggy.
6. Can I make cannoli ahead of time?
Yes, you can make the shells and filling separately ahead of time. Then assemble them shortly before serving for the best texture.
7. What can I use to decorate cannoli?
You can decorate cannoli with chocolate chips, chopped pistachios, powdered sugar, or candied orange peel. This adds both flavor and a beautiful finish.
8. How do I store leftover cannoli?
Store the filling in the refrigerator and keep the shells in a dry container at room temperature. Once filled, cannoli are best eaten the same day.
Conclusion
A classic cannoli recipe is one of the most rewarding desserts we can make from scratch. It combines crisp pastry shells, smooth ricotta filling, and a beautiful finish that looks as impressive as it tastes. With the right ingredients, careful preparation, and proper timing, we can create cannoli that are rich, elegant, and full of authentic flavor.
Whether we are preparing them for holidays, family gatherings, special occasions, or simply to enjoy a true Italian dessert at home, this step-by-step method gives us a dependable way to achieve excellent results every time. When the shells are crisp, the filling is thick and creamy, and the garnish adds the final touch, homemade cannoli becomes a dessert worth making again and again.


