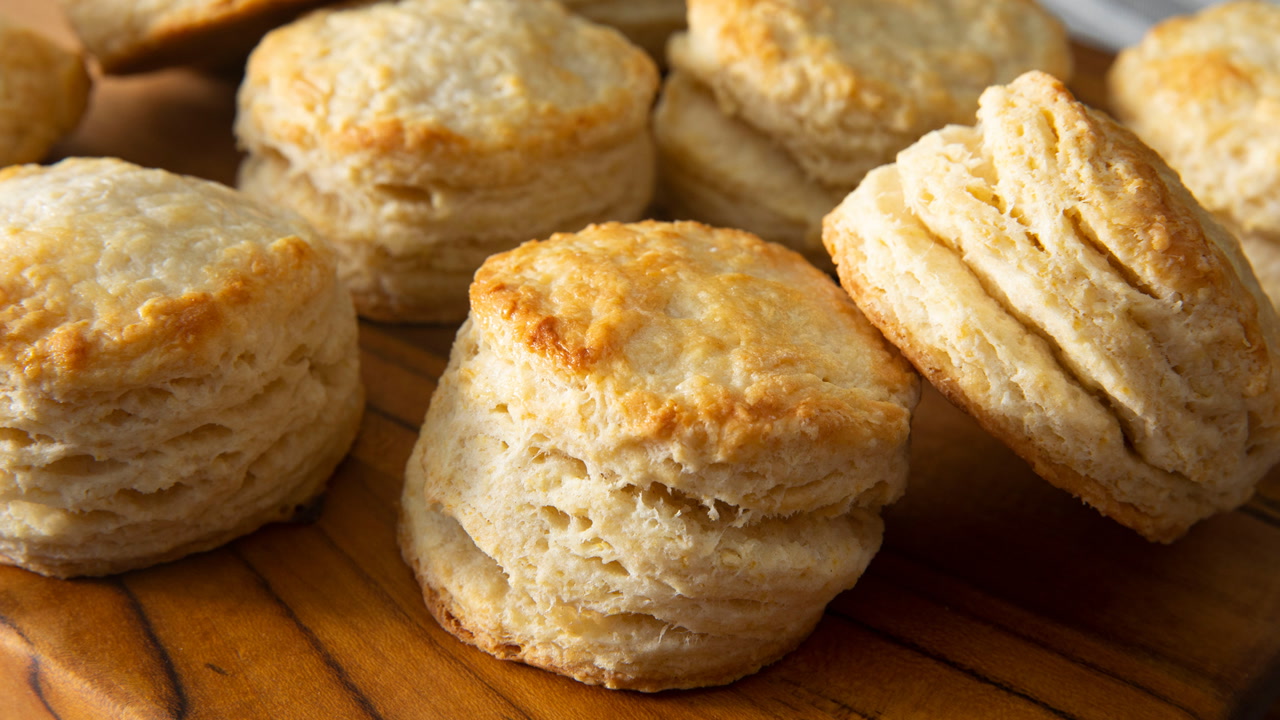
Southern Biscuit Recipe: Southern biscuits are not just a dish; they’re a love language. Every flaky layer tells a story of home kitchens, early mornings, and warm ovens. These iconic treats are a staple in Southern households and can be served in countless ways — with gravy, jam, honey, or just a pat of butter fresh out of the oven. What makes them so special? It’s their texture. Proper Southern biscuits are crisp on the outside, impossibly soft and fluffy inside, and rich with buttery goodness. Whether it’s a casual Sunday breakfast or part of a celebratory dinner, they bring comfort and warmth to every table.
What sets Southern biscuits apart from other styles is the technique — it’s not just about mixing ingredients, it’s about understanding them. You’ll learn why cold butter is crucial, how folding the dough helps create those delicious layers, and what not to do if you want that perfect rise. And the best part? Once you master the basics, you can make them your own — cheesy biscuits, sweet cinnamon variations, or even savory bacon-packed ones. But first, let’s get those basics down.
Why This Recipe Works
This isn’t just any biscuit recipe. It’s been tested and tweaked to strike the perfect balance between simplicity and authenticity. We focus on ingredients you can find in your pantry and steps that are foolproof. The magic lies in a few critical techniques — minimal mixing, cold butter, and a hot oven. By sticking with these fundamentals, you ensure that each biscuit is high-rising, soft, and melt-in-your-mouth good.
What really makes this recipe stand out is how forgiving it is. Even if you slightly overwork the dough or your butter isn’t perfectly grated, you’ll still end up with biscuits that beat any store-bought version. It’s approachable for beginners and loved by seasoned bakers alike.
Ready to start? Let’s take a look at the ingredients that make these biscuits so irresistible.
Ingredients You’ll Need
Key Ingredients Breakdown
You don’t need a ton of fancy ingredients to make Southern biscuits — in fact, simplicity is the goal. Here’s what you’ll need and why each component matters:
- All-purpose flour (2 cups): Some purists use self-rising flour, but we’re sticking with all-purpose and adding our own leavening. It’s versatile and works well for this recipe.
- Baking powder (1 tablespoon): This gives your biscuits that sky-high lift. Don’t skimp here.
- Salt (½ teaspoon): Essential for flavor balance.
- Unsalted butter (½ cup, very cold): The star of the show. Cold butter helps create steam pockets in the dough — which means fluffy, layered biscuits.
- Buttermilk (¾ to 1 cup, cold): Adds tang, moisture, and tender crumb. Buttermilk reacts with baking powder for extra rise.
- Optional: Sugar (1-2 teaspoons): If you like a hint of sweetness in your biscuits.
Each ingredient has a purpose, and using them in the right way — especially keeping everything cold — is what ensures you’ll get that perfect biscuit every time.
Substitutions and Variations
Can’t find buttermilk? No problem. Mix 1 tablespoon of lemon juice or vinegar into a cup of regular milk and let it sit for 10 minutes. That homemade buttermilk will do the trick. Want a dairy-free version? Use plant-based butter and unsweetened almond milk with a touch of acid.
You can also get creative with mix-ins. Fold in shredded cheddar and chives for a savory twist, or a handful of blueberries and a sprinkle of sugar for a sweet breakfast treat. Just be sure to fold them in gently at the very end to avoid overworking the dough.
Tools and Equipment
Basic Tools for Biscuit Making
You don’t need high-end kitchen gadgets to make incredible biscuits. Just a few reliable tools:
- Mixing bowl: A large one gives you room to mix without spilling.
- Pastry cutter or forks: For cutting the butter into the flour — though your fingers can work too.
- Measuring cups and spoons: Accuracy matters, especially with baking powder and salt.
- Biscuit cutter or round glass: To cut uniform biscuits. Don’t twist when cutting — press straight down for the best rise.
- Baking sheet: Heavy-duty, with a parchment paper lining.
Optional Tools That Make a Difference
- Box grater: For grating cold butter — faster than cutting and evenly distributes fat through the dough.
- Food processor: Speeds up the butter-integration process, though it’s easy to overmix.
- Bench scraper: Handy for folding dough or lifting biscuits onto your baking tray.
- Rolling pin: Some prefer hands, but a rolling pin can help you get an even thickness.
The goal is efficiency without compromising on texture. The right tools help ensure that your biscuits not only taste great but also look bakery-worthy.
Step-by-Step Guide to Making Southern Biscuits
Step 1: Prepping Your Ingredients
First things first — prep like a pro. Preheat your oven to 450°F (232°C). A hot oven is essential for a good rise. Next, measure out all your ingredients and place your butter in the freezer for 10-15 minutes if it’s not already cold. Cold ingredients are crucial here — warm butter melts too early and ruins the texture.
Set up your workstation with your bowl, utensils, and tools. Line a baking sheet with parchment paper so it’s ready to go. This isn’t just about saving time; it’s about ensuring the butter stays cold through every stage. Think of this stage as laying the foundation — if it’s solid, everything else will fall into place.
Once prepped, you’re ready to move on to the fun part: mixing that dough into biscuit magic.
Step 2: Mixing the Dough
Now that your ingredients are prepped and your oven is heating up, it’s time to mix. Start by whisking together your flour, baking powder, and salt in a large mixing bowl. If you’re adding sugar, include it here. Once combined, it’s time to add the butter.
Using a pastry cutter, two forks, or your hands, cut the cold, cubed butter into the flour mixture. If you’re using a box grater, grate the butter directly into the flour. The goal is to work quickly — you want pea-sized bits of butter still visible. These bits will create steam as they bake, forming those beautiful biscuit layers.
Once the butter is distributed, pour in ¾ cup of cold buttermilk and gently stir with a wooden spoon or spatula until the dough just comes together. If it looks too dry, add a splash more buttermilk — but don’t overdo it. The dough should be shaggy and slightly sticky. This stage is critical: don’t overmix. Overworked dough means tough biscuits, and nobody wants that.
Let the dough rest for 5-10 minutes if you can. This helps hydrate the flour and makes rolling easier. Now you’re ready to shape the dough — arguably the most satisfying part of biscuit-making.
Step 3: Folding and Rolling
Turn the dough out onto a lightly floured surface. Use your hands to gently pat it into a rough rectangle about an inch thick. Now comes a classic Southern biscuit technique: lamination.
Fold the dough in half like a letter, then turn it 90 degrees and pat it out again. Repeat this folding process 3–4 times. This creates layers, which is the secret to biscuits that rise tall and flake beautifully. Each fold traps air and butter, resulting in fluffy layers inside and golden crispness outside.
After your final fold, pat the dough into a ¾ to 1-inch thick slab. Don’t use a rolling pin too aggressively — a gentle touch is key here. Once it’s shaped, it’s time to cut the biscuits.
Use a biscuit cutter or round glass, dipping it in flour before each cut. Press straight down and lift — don’t twist. Twisting seals the edges and prevents them from rising properly. Place each biscuit on your prepared baking sheet, sides touching if you like soft sides, or spaced apart for crispier edges.
Gather the scraps, gently press them together, and cut more biscuits. Try not to rework the dough more than once or twice — the more you handle it, the less tender your biscuits will be.
Step 4: Cutting and Baking
With your biscuits cut and placed on the baking sheet, it’s time for the final step. If you want that golden finish, brush the tops with a bit of melted butter or buttermilk. This adds flavor and helps the tops brown beautifully.
Slide your tray into the preheated 450°F oven. Bake for 12-15 minutes, or until the tops are golden brown and the biscuits have risen to fluffy perfection. Keep an eye on them — every oven is a little different.
When they’re done, pull them out and let them rest for a few minutes. You can brush them with more melted butter if you like (and who doesn’t?). Serve them hot with your favorite toppings — gravy, honey, jam, or just plain butter.
Pro tip: Biscuits are best fresh out of the oven, but they also reheat well. Just wrap them in foil and warm in the oven at 300°F for 10 minutes. Or split them and toast them for a crispy twist.
Pro Tips for Fluffy, Buttery Biscuits
Mistakes to Avoid
Even a simple recipe like this can go sideways if you’re not careful. Here are common pitfalls and how to dodge them:
- Using warm butter: Cold butter is key. It creates steam during baking, making those light, airy layers.
- Overmixing the dough: Mix just until everything comes together. Overworking activates gluten, resulting in chewy biscuits.
- Twisting the cutter: Always press straight down when cutting. Twisting seals the layers and hinders the rise.
- Wrong oven temp: Too low and your biscuits will spread rather than rise. A hot oven is a must.
Remember: biscuit making is part science, part love. Give the dough gentle hands, and it’ll reward you with tender, flaky results.
Enhancing Flavor and Texture
Want to level up your biscuit game? Try these flavor and texture tips:
- Chill everything: If your kitchen is warm, pop your flour and tools in the fridge for a few minutes.
- Add cheese and herbs: Mix in sharp cheddar, rosemary, or even jalapeños for a savory twist.
- Use cultured butter: It adds a richer, deeper flavor than regular butter.
- Try honey butter glaze: A mix of melted butter and honey brushed over the tops adds a sweet touch.
Once you’ve nailed the basic recipe, the variations are endless. From sausage-stuffed biscuits to biscuit sandwiches, you’ll find yourself making them again and again.
Serving Suggestions for Southern Biscuits
Perfect Pairings for Any Meal
Southern biscuits are incredibly versatile and can be the star of any meal — breakfast, lunch, or dinner. For breakfast, you can’t go wrong with the classic: biscuits and sausage gravy. This rich, savory combination is hearty and satisfying, a true Southern staple. Just split your fresh biscuits in half and ladle on creamy sausage gravy for a dish that’s pure comfort.
Prefer something sweet in the morning? Slather your warm biscuits with homemade strawberry jam, apple butter, or even a drizzle of honey. A pat of melting butter never hurts either.
At lunch or dinner, biscuits pair perfectly with fried chicken, collard greens, or a hearty stew. They can even be used as the base for sandwiches — think bacon, egg, and cheese or pulled pork with tangy BBQ sauce. And let’s not forget about chicken and biscuits, where creamy chicken stew is poured over freshly baked biscuits for a cozy, soul-warming dish.
Biscuits also make fantastic appetizers or snacks. Cut them smaller, add cheese or jalapeños, and serve them as part of a charcuterie board. Or turn them into mini sliders with ham and spicy mustard.
Creative Twists to Try
If you’re feeling adventurous, experiment with sweet versions like cinnamon sugar biscuits or s’mores biscuits (filled with chocolate and marshmallows). You can also go savory with garlic herb or cheddar-chive biscuits. These variations are crowd-pleasers at brunches or potlucks.
And don’t throw out leftover biscuits! Cube and toast them into croutons, use them in bread pudding, or make biscuit breakfast casserole by layering them with eggs, sausage, and cheese. The possibilities are endless — just like their flavor.
Storing and Reheating Biscuits
How to Keep Them Fresh
Fresh biscuits are best eaten the day they’re made, but you can definitely make them ahead and still enjoy amazing results. If you’ve got leftovers, let them cool completely before storing. Wrap them in aluminum foil or place them in an airtight container. They’ll stay fresh at room temperature for up to 2 days, or in the refrigerator for up to 5 days.
To freeze, wrap individual biscuits in foil or plastic wrap, then store them in a freezer-safe bag. They’ll keep well for about 2–3 months. When you’re ready to enjoy, thaw at room temperature or reheat straight from the freezer.
Best Reheating Methods
For the oven: Wrap biscuits in foil and warm them at 300°F for about 10 minutes. This method retains the moisture and softness.
For a crispier finish: Slice the biscuits in half and toast them in a skillet with a bit of butter, or place them under the broiler for 2–3 minutes.
Avoid microwaving if you can — it can make biscuits rubbery. But if you’re in a rush, wrap them in a damp paper towel and heat in 15-second intervals.
Nutritional Information and Dietary Options
Standard Nutrition Breakdown
A typical homemade Southern biscuit made with all-purpose flour, butter, and buttermilk contains approximately:
- Calories: 180–220
- Fat: 10–12 grams
- Carbohydrates: 20–24 grams
- Protein: 3–5 grams
These values can vary based on portion size and added ingredients like cheese or honey. Biscuits are rich in fats due to the butter, which contributes to their rich flavor and flaky texture.
Diet-Friendly Alternatives
Looking for a healthier version? Try these tweaks:
- Whole wheat flour: Adds fiber and nutrients, though it may slightly change the texture.
- Low-fat buttermilk or yogurt: Cuts down on calories and fat without sacrificing too much taste.
- Plant-based alternatives: Use vegan butter and non-dairy milk (like almond or oat milk) with a splash of vinegar to replicate buttermilk.
You can also make gluten-free biscuits by substituting a 1:1 gluten-free baking mix. Add a touch more fat or a binder like xanthan gum to help with structure. While they won’t be exactly like traditional biscuits, they’ll still be fluffy, tasty, and satisfying.
FAQs about Southern Biscuit Recipe
1. Can I make biscuit dough ahead of time?
Yes! You can prepare the dough and cut the biscuits, then freeze them on a tray. Once solid, store them in a freezer bag. Bake from frozen at 450°F, adding 2–3 minutes to the baking time.
2. What’s the best flour for Southern biscuits?
All-purpose flour works well, but Southern cooks often prefer White Lily or a low-protein flour, which produces a lighter texture.
3. How do I keep my biscuits from spreading flat?
Make sure your butter and buttermilk are ice-cold, and don’t twist the cutter when cutting the dough.
4. Can I use milk instead of buttermilk?
Yes, but the flavor and rise may be slightly affected. For a quick substitute, mix 1 tablespoon vinegar or lemon juice into 1 cup of milk and let it sit for 10 minutes.
5. How do I make my biscuits taller and fluffier?
Use fresh baking powder, handle the dough gently, and make sure your oven is fully preheated before baking.
Conclusion
Southern biscuits aren’t just food — they’re a piece of heritage, a symbol of comfort, and a taste of home. With their golden crust, buttery layers, and pillowy softness, they elevate any meal from ordinary to unforgettable. This step-by-step guide takes you from pantry to plate with all the know-how you need to bake them just like grandma used to — maybe even better.
Whether you’re whipping them up for Sunday brunch or adding them to your holiday feast, one thing’s for sure: these biscuits will be gone before you know it. Now that you know the secret behind making perfect Southern biscuits, it’s your turn to pass the tradition on. Happy baking!


