Smores Bars Recipe: Smores bars are the ultimate dessert for anyone craving that nostalgic, campfire taste without having to build an actual fire. Think about it: graham crackers, melty chocolate, and gooey marshmallows – what could be better? These bars are the perfect blend of crunchy, sweet, and sticky, all layered into a dessert that’s easy to make and even easier to devour.
You don’t need to be a master chef to whip up a batch of these mouthwatering bars. Whether you’re hosting a summer BBQ, looking for a school bake-sale hit, or simply want a treat for your next movie night, smores bars are a crowd-pleaser.
Plus, they store well and taste amazing both warm and cool. Let’s break down exactly how you can bring this classic treat to your kitchen.
What Are Smores Bars?
Smores bars are essentially a baked version of the traditional smores you’d make over a campfire. But instead of making each one individually, you create them in a baking dish like brownies or cookie bars. The traditional trio – graham crackers, chocolate, and marshmallows – forms the foundation. But what makes smores bars even better is the ability to layer and bake them, melding all the flavors together in every bite.
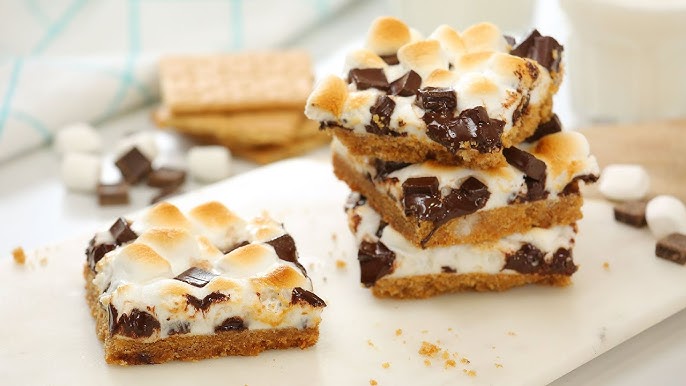
Unlike the outdoor version, smores bars aren’t just for camping. They’re a hybrid dessert that combines the best parts of a cookie and a candy bar. With a graham cracker crust, layers of semi-sweet chocolate, and a marshmallow topping that turns golden brown and puffy in the oven, they’re nothing short of heavenly.
Why Everyone Loves This Treat
It’s simple: nostalgia + taste = magic. Smores bars remind people of childhood, campfires, and carefree summer nights. But more than that, they’re incredibly satisfying. The combination of textures – crunchy, creamy, chewy – is what keeps people coming back for more. And the fact that you can make a whole tray at once means they’re perfect for parties and potlucks.
Another reason people love smores bars is how customizable they are. Don’t like chocolate bars? Use chocolate chips. Want to add peanut butter? Go for it. The base recipe is just the beginning. With endless variations, it’s no wonder this dessert has become a modern classic.
Ingredients Needed
Core Ingredients
Before you preheat the oven, gather your ingredients. Here’s what you’ll need for a classic smores bar recipe:
- Graham crackers – These form the base crust. Crushed into fine crumbs, they create a solid, flavorful foundation.
- Butter (unsalted) – Helps bind the crust together and adds rich flavor.
- Brown sugar – Adds moisture and sweetness to the crust.
- Chocolate bars or chips – The second layer; go classic with Hershey’s or use dark/milk chocolate chips.
- Mini marshmallows – The crowning glory, they puff and brown in the oven.
You likely have most of these ingredients in your pantry already. That’s part of the appeal – they’re accessible, affordable, and don’t require any fancy shopping trips.
Optional Add-ins and Variations
Want to jazz things up a bit? Here are some variations to consider:
- Peanut butter or Nutella – Spread a layer between the crust and chocolate for extra richness.
- White chocolate or butterscotch chips – A unique twist on the traditional flavor.
- Chopped nuts – Walnuts or pecans add crunch and depth.
- Crushed pretzels – For a salty-sweet contrast.
You can also make them gluten-free by using gluten-free graham crackers. Vegan marshmallows and dairy-free chocolate can make this treat vegan-friendly too.
Kitchen Tools You’ll Need
Essential Tools for Preparation
Making smores bars doesn’t require fancy kitchen gadgets, but having the right tools will make things easier. Here’s a list of the must-haves:
- 9×13 inch baking dish – The perfect size for a family-sized batch.
- Mixing bowls – For combining crust ingredients and melting butter.
- Measuring cups and spoons – Precision matters, especially for the crust.
- Spatula or spoon – For spreading the crust and layers evenly.
- Oven mitts – Safety first when dealing with hot dishes!
Tools to Make the Process Easier
While the essentials are all you need, here are a few optional tools that can streamline the process:
- Food processor – Speeds up crushing graham crackers.
- Parchment paper – Helps lift the bars out of the pan easily.
- Wire rack – For cooling the bars evenly.
- Knife dipped in hot water – Makes slicing gooey bars a breeze.
Step-by-Step Smores Bars Recipe
Step 1: Preparing the Crust
Start with the graham cracker crust – the solid base that holds everything together. Crush about 2 cups worth of graham crackers (around 14 whole crackers) into fine crumbs. You can use a food processor or place them in a zip-top bag and crush with a rolling pin.
In a mixing bowl, combine the crumbs with 1/2 cup of melted unsalted butter and 1/4 cup of brown sugar. Mix until the crumbs are evenly moistened. Press this mixture firmly into the bottom of your greased or parchment-lined baking dish. Use the back of a spoon or a flat-bottomed glass to get an even layer.
Bake the crust at 350°F (175°C) for 8–10 minutes. It should look lightly golden and set. Let it cool slightly before moving on to the next layer.
Step 2: Layering the Chocolate and Marshmallows
Now comes the fun part – layering! Place your chocolate pieces or chips evenly over the cooled crust. You can break up 2-3 standard chocolate bars or use about 1 1/2 cups of chips. Either way, you want a good chocolate layer that will melt and bind the dessert together.
Next, sprinkle a generous layer of mini marshmallows on top – at least 2 cups. Press them down gently so they don’t roll around. The more marshmallows, the gooier your bars will be. Some people even add a few more chips on top for good measure.
Step 3: Baking and Finishing Touches
Pop the whole pan back into the oven for 10–12 minutes. Keep a close eye after the 8-minute mark. You’re looking for marshmallows that are puffed up and golden-brown. If you want them extra toasty, turn on the broiler for the last 1–2 minutes – just don’t walk away!
Once done, remove from the oven and let the bars cool completely. This is crucial because it helps them set and makes cutting easier. For best results, chill in the fridge for 30 minutes before slicing.
Tips for the Best Smores Bars
Common Mistakes to Avoid
Even though smores bars are pretty simple to make, a few common slip-ups can ruin the texture or flavor. Here’s what to avoid:
- Overbaking the marshmallows – This is a big one. Marshmallows go from golden and gooey to burnt in a flash. Set a timer and keep a close watch once you hit the 8-minute mark during the second bake.
- Using too much butter in the crust – It might seem harmless, but too much butter makes the crust greasy and causes it to fall apart. Stick to the recipe’s ratio.
- Not letting the bars cool – Slicing too early results in a gooey mess. Letting them cool (and even chill) helps everything set and makes them much easier to cut into neat squares.
- Skipping parchment paper – If you want clean edges and an easy lift from the pan, parchment paper is your best friend. It makes removing and cutting the bars effortless.
Pro Tips from Home Bakers
Want to take your smores bars from good to great? Try these expert-level tips:
- Toast the marshmallows before layering – If you want that authentic campfire flavor, toast the marshmallows over your stove flame for a few seconds before placing them on the bars. This gives a smoky, caramelized edge.
- Add a sprinkle of sea salt – A tiny pinch of flaky sea salt on top balances the sweetness and gives the dessert a gourmet touch.
- Use flavored chocolate – From caramel-filled to dark chili chocolate, switching up the chocolate adds unexpected depth.
- Layer strategically – If you’re going for multiple layers (like adding peanut butter or Nutella), make sure each layer is evenly spread so no one part overpowers the rest.
How to Store and Serve Smores Bars
Storage Tips
One of the best things about smores bars is how well they store. Whether you want to enjoy them over several days or prep ahead for an event, here’s how to keep them fresh:
- Room temperature – Store in an airtight container for up to 3 days. Keep them in a cool, dry place away from sunlight or heat sources.
- Refrigerator – If you live in a warmer climate or prefer a firmer texture, refrigerate your bars. They’ll last up to a week. Just let them sit at room temp for 10 minutes before serving to soften up.
- Freezing – Yes, smores bars freeze well! Wrap each bar in plastic wrap, then place in a freezer-safe bag or container. They’ll keep for up to 2 months. Thaw overnight in the fridge or microwave for 10-15 seconds before eating.
Serving Suggestions
You can serve smores bars in so many fun and creative ways:
- A la mode – Warm them slightly and serve with a scoop of vanilla ice cream.
- Drizzle it – Add a drizzle of chocolate or caramel sauce for an extra indulgent touch.
- Holiday style – Use seasonal sprinkles, colored marshmallows, or festive-themed chocolate pieces to match any holiday or celebration.
- Mini bites – Cut them into small cubes and stick with toothpicks for party platters or dessert tables.
Want to impress your guests? Serve them slightly warmed with a mug of hot cocoa or a glass of cold milk. It’s the kind of cozy treat that wins hearts every time.
FAQs about Smores Bars Recipe
1. Can I make smores bars ahead of time?
Absolutely! Smores bars are a great make-ahead dessert. Prepare them a day in advance, cool completely, and store in an airtight container. They’ll taste just as delicious the next day.
2. Can I use marshmallow fluff instead of mini marshmallows?
You can, but the texture will be different. Marshmallow fluff melts more uniformly and doesn’t puff or brown like mini marshmallows. It’s gooier but less visually dramatic.
3. What’s the best way to cut smores bars cleanly?
Chill the bars for 30 minutes, then use a sharp knife dipped in hot water. Wipe the blade between cuts for clean, neat squares.
4. Can I make this recipe gluten-free or vegan?
Yes! Use gluten-free graham crackers and substitute vegan butter, chocolate, and marshmallows. There are great plant-based options available today.
5. How do I prevent the marshmallows from sticking to the knife?
Use a knife coated with nonstick spray or dipped in warm water. Clean the blade between cuts to prevent buildup and get smooth slices.


