Yeast Roll Recipe: Yeast rolls are soft, fluffy bread rolls leavened with yeast. Unlike quick breads or biscuit-style rolls, these require rising time, which helps develop a chewy, tender texture and rich flavor. The magic of yeast is that it feeds on sugar, produces carbon dioxide, and gives the dough its airy structure. The result? Beautifully puffed rolls with just the right chew and a slightly sweet, buttery flavor that makes them irresistible.
Traditionally served with dinners, especially around holidays like Thanksgiving and Christmas, yeast rolls have become a staple in many homes. They’re also incredibly versatile. You can serve them with soup, make sliders, or enjoy them warm with butter and jam.
Yeast rolls are a little more time-intensive than other bread recipes, but they’re not difficult. The key lies in being patient and following each step carefully. Once you’ve made these from scratch, you’ll realize it’s totally worth the effort.
Why You’ll Love This Recipe
There are dozens of yeast roll recipes out there, so what makes this one stand out? First, it’s foolproof—even for beginners. We’ve simplified each step to ensure it’s easy to follow. Second, it uses common pantry ingredients, so no fancy grocery trips are necessary. Third, the flavor and texture are simply unmatched: soft, buttery, slightly sweet, and golden-brown on the outside.
Other reasons to love this recipe include:
- Great for freezing and meal prep.
- Can be shaped into dinner rolls, pull-apart rolls, or even braided for flair.
- Customizable—add herbs, garlic, or even cheese for a twist.
Once you try these homemade yeast rolls, store-bought will never taste the same.
Ingredients You’ll Need
Essential Ingredients for Yeast Rolls
Let’s start with the basics. You don’t need a long list of fancy ingredients to create perfect yeast rolls. Here’s what you’ll need:
- All-purpose flour – The foundation of your rolls. You can also use bread flour for a chewier texture.
- Active dry yeast – This is what gives the rolls their rise. Make sure your yeast is fresh for best results.
- Warm milk – It should be around 110°F (43°C), warm to the touch but not hot.
- Sugar – A little sweetness to help activate the yeast and enhance flavor.
- Salt – Essential for flavor balance.
- Unsalted butter – Adds richness and tenderness.
- Egg – Helps with structure and adds softness.
When combined in the right order and proportions, these simple ingredients work together to create pillowy-soft rolls with a golden-brown finish.
Ingredient Substitutes and Tips
Sometimes, you may not have all ingredients on hand. Don’t worry—you can make a few substitutions without compromising the outcome too much.
- Milk: If you’re out of milk, you can use water, though the rolls may not be as rich. Add an extra tablespoon of butter for flavor compensation.
- Butter: Margarine can be used in a pinch, but unsalted butter gives the best flavor.
- Sugar: Honey or maple syrup can replace white sugar. Start with a little less since they’re sweeter.
Pro tip: Always check your yeast’s expiration date. If in doubt, test it by combining it with warm water and sugar. If it foams within 5–10 minutes, it’s alive and ready to use.
Equipment You’ll Need
Tools to Make the Process Easier
Baking doesn’t require a professional kitchen—just a few essential tools. Here’s what you’ll need to make your yeast rolls with ease:
- Large mixing bowl – For combining and kneading the dough.
- Measuring cups and spoons – Precision matters in baking.
- Whisk or wooden spoon – For mixing ingredients.
- Rolling pin (optional) – Helps shape the dough evenly.
- Baking dish or sheet pan – To bake the rolls to golden perfection.
- Clean towel or plastic wrap – For covering the dough while it rises.
You can knead the dough by hand or use a stand mixer with a dough hook if you have one. Either method works well—just ensure the dough becomes smooth and elastic.
Optional Tools for Perfection
If you want to go the extra mile, here are some optional tools that can elevate your baking experience:
- Kitchen thermometer – To check milk temperature and baking doneness.
- Bench scraper – Makes dividing and shaping dough easier.
- Pastry brush – For brushing butter on top after baking.
Even without these extras, you’ll still end up with fantastic rolls. But for consistent results and ease, these tools are worth considering if you bake often.
Preparing the Dough
Activating the Yeast Properly
The first and most crucial step in making yeast rolls is activating the yeast. Without proper activation, the dough won’t rise, and you’ll end up with flat, dense rolls.
Here’s how to do it:
- Warm your milk to around 110°F (43°C). Too hot, and you’ll kill the yeast. Too cold, and it won’t activate.
- Pour the warm milk into a bowl, add sugar, and sprinkle the yeast over it.
- Let it sit for 5 to 10 minutes. You should see a bubbly foam forming on the surface—that means your yeast is alive and kicking!
Pro tip: If your mixture doesn’t foam, don’t proceed. Your yeast might be dead. Start over with a new batch for guaranteed results.
Mixing and Kneading the Dough
Once the yeast is activated, add melted butter, egg, salt, and flour. Stir until a sticky dough forms.
- Mixing: Use a wooden spoon or stand mixer until the ingredients are well combined.
- Kneading: Turn the dough onto a floured surface and knead for about 8–10 minutes by hand, or 5 minutes with a dough hook.
You’re looking for a smooth, elastic dough that bounces back when poked.
Why kneading matters: This process develops gluten, which gives the rolls structure and chewiness.
First Rise (Proofing)
Ideal Conditions for the First Rise
Place the kneaded dough in a lightly oiled bowl, cover it with a clean towel or plastic wrap, and let it rest in a warm, draft-free place.
- Temperature: Around 75°F to 85°F (24°C to 29°C) is ideal.
- Time: 1 to 1.5 hours, or until the dough has doubled in size.
Some great spots to let the dough rise include:
- Inside an oven (turned off) with the light on.
- Near a sunny window.
- On top of a warm appliance.
How to Know When the Dough Has Risen Enough
The dough should look puffy and be about double its original size. To test, gently press your finger into the dough. If the indentation stays, it’s ready for the next step.
Shaping the Rolls
How to Divide and Shape the Dough
Once your dough has finished its first rise, it’s time to shape the rolls. This step is where you turn your fluffy dough into perfectly round, even-sized balls of deliciousness.
- Punch Down the Dough: Gently press down on the risen dough to deflate it and release some of the gas bubbles formed during proofing.
- Turn Out and Divide: Transfer the dough onto a lightly floured surface. Use a bench scraper or sharp knife to divide the dough into equal parts. For standard dinner rolls, aim for about 12–16 portions, depending on how large you want them.
- Shape Each Piece: Take one piece of dough, tuck the edges under, and roll it into a smooth ball with your hands. Use a cupping motion to ensure the top stays smooth and round.
For consistency, weigh each piece using a kitchen scale. Rolls between 50–60 grams each bake evenly and look more professional.
Letting the Dough Rest Before Second Rise
After shaping, place each dough ball into a greased baking dish or on a parchment-lined baking sheet. Make sure there’s a bit of space between each roll so they can expand.
Cover the rolls with a towel or plastic wrap again and let them rise for a second time. This final proof gives them that soft, pull-apart texture we all love.
- Time: Let them rise for about 30–45 minutes.
- What to Look For: The rolls should look puffed up and touch each other slightly.
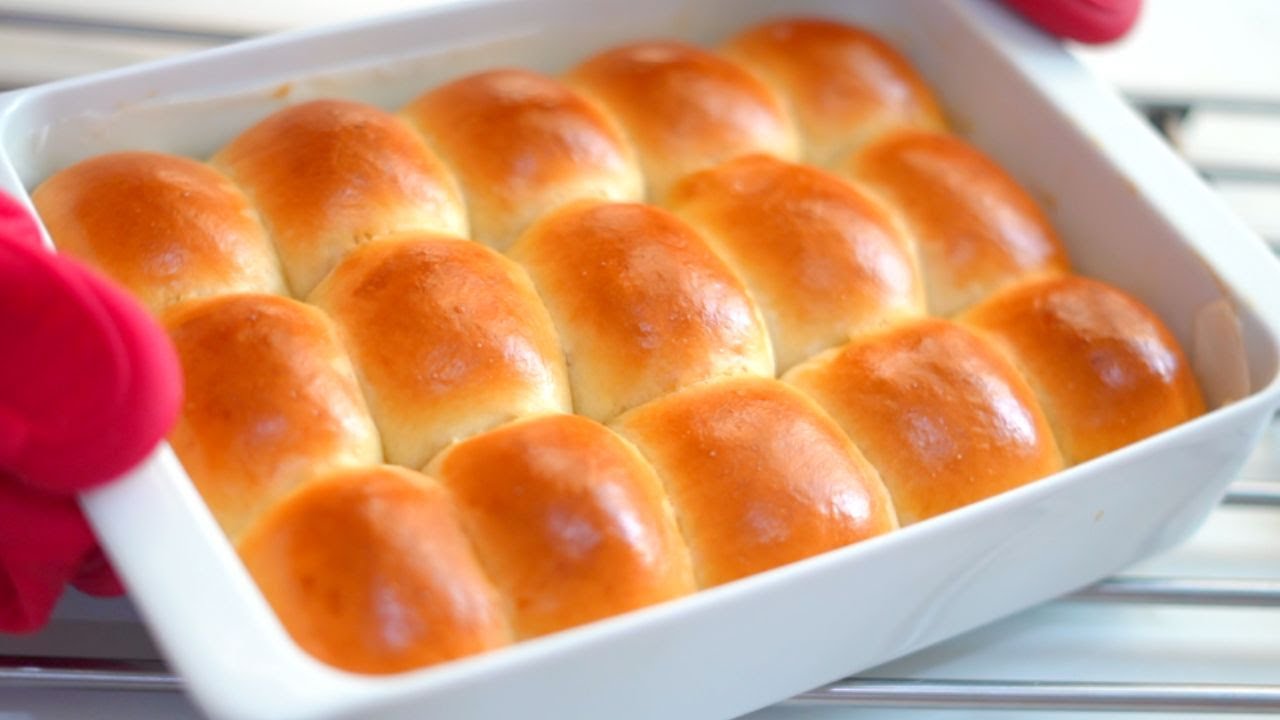
Baking the Yeast Rolls
Temperature and Time Guidelines
Baking is where the magic happens. After the second rise, preheat your oven to 375°F (190°C). A properly preheated oven ensures that the rolls bake evenly and rise well.
- Baking Time: 15–18 minutes
- Doneness Clues:
- Golden brown tops
- Hollow sound when tapped
- Internal temperature of around 190°F (88°C)
Place the rolls in the center rack of your oven and avoid opening the door too often—sudden changes in temperature can cause them to collapse.
Brushing with Butter for Extra Flavor
As soon as you pull the rolls out of the oven, brush them generously with melted butter. This step enhances both the flavor and the appearance, giving your rolls a beautiful glossy finish.
If you like extra flavor, try mixing some garlic powder or chopped herbs into the melted butter before brushing.
Optional Finishes:
- Sprinkle with sea salt for a savory twist.
- Add a touch of honey to the butter for a slightly sweet glaze.
Serving Suggestions
Best Ways to Serve Yeast Rolls
Yeast rolls are incredibly versatile and can be served in a variety of delicious ways. Here are some popular serving suggestions:
- With butter and jam: A classic breakfast or brunch combo.
- Alongside soups or stews: Perfect for soaking up every drop.
- As a sandwich bun: Slice them open and fill with ham, turkey, or pulled pork.
- Holiday dinners: A must-have for Thanksgiving, Christmas, or Easter meals.
They pair beautifully with dishes like roast chicken, beef stew, mashed potatoes, or even hearty pasta dishes.
Creative Uses for Leftover Rolls
Got leftovers? No problem! Here are some fun ideas to make the most of them:
- Bread pudding: Use them in a sweet or savory bread pudding recipe.
- Croutons: Cube and toast them for soups or salads.
- Mini sliders: Slice open and fill with meat, cheese, or veggies.
- French toast: Dip in egg mixture and cook on a skillet for a decadent breakfast.
Storing and Freezing Tips
How to Store Yeast Rolls Properly
Homemade rolls are best enjoyed fresh, but they can still taste great days later if stored correctly.
- At Room Temperature: Store in an airtight container or zip-top bag for up to 3 days.
- Avoid the Fridge: Refrigeration tends to dry out bread, so it’s best avoided.
To reheat:
- Wrap in foil and warm in a 300°F (150°C) oven for 10 minutes.
- Or microwave a roll for 10–15 seconds to restore softness.
Freezing Instructions for Make-Ahead Prep
Yeast rolls freeze beautifully, making them a great option for meal prepping or holiday planning.
To freeze baked rolls:
- Let them cool completely.
- Wrap individually in plastic wrap or foil.
- Place in a freezer bag and store for up to 3 months.
To reheat frozen rolls:
- Wrap in foil and bake at 350°F (175°C) for 15–20 minutes.
- Or thaw overnight and warm in the oven or microwave.
To freeze unbaked rolls:
- Shape the rolls after the first rise.
- Place on a baking sheet and freeze until solid.
- Transfer to a freezer bag.
When ready to bake, let them thaw and rise for 1–2 hours before baking as usual.
Troubleshooting Common Issues
Why Didn’t My Dough Rise?
This is one of the most common problems beginners face when making yeast rolls. Here are a few reasons it might have happened:
- Dead Yeast: The yeast may have expired or died due to hot liquid. Always check the expiration date and water/milk temperature (ideal: 105°F–110°F).
- Wrong Environment: Cold kitchens can slow down or prevent rising. Make sure your dough is resting in a warm, draft-free space.
- Not Enough Time: Sometimes dough needs a little longer than expected, especially in cooler environments. Be patient and give it the time it needs to double in size.
- Too Much Salt: Salt can kill yeast if added too early. Always mix it with flour before adding to yeast mixtures.
If your dough still didn’t rise, it’s best to start over with fresh yeast and ensure all ingredients are at the proper temperature.
Why Are My Rolls Dense or Tough?
Dense rolls are typically a result of under-kneading or not allowing enough rise time. Here are a few potential causes:
- Under-kneading: Proper kneading develops gluten, which gives your rolls structure and softness.
- Too much flour: Adding too much flour during kneading makes the dough dry and hard. It should be slightly sticky.
- Skipping the second rise: This step is crucial for creating a light, fluffy texture.
- Overbaking: Rolls that bake too long become dry. Stick to the time and temperature guidelines.
Variations of Yeast Rolls
Sweet Yeast Rolls
Want a sweeter version for breakfast or dessert? Try these simple tweaks:
- Add more sugar to the dough (2–3 tablespoons).
- Include a touch of vanilla extract.
- Brush with melted butter and sprinkle cinnamon sugar on top before baking.
You can also stuff them with jam, Nutella, or cream cheese for a delicious surprise.
Savory Yeast Rolls
If you’re more into savory flavors, here are some mix-in ideas:
- Add shredded cheese and chopped herbs to the dough.
- Top with garlic butter and parmesan before baking.
- Mix in chopped bacon or sun-dried tomatoes.
These versions make excellent sides for hearty meals or snacks on their own.
Tips for First-Time Bakers
Helpful Advice for Best Results
If it’s your first time making yeast rolls, here are some simple tips to guide you through:
- Read the whole recipe first: This gives you a clear idea of the timeline and ingredients.
- Don’t rush the rising time: Bread baking is all about patience. Give the dough time to develop.
- Use a kitchen scale: This helps ensure even-sized rolls and a more professional appearance.
- Practice makes perfect: Even if your first batch isn’t flawless, keep practicing. Each time gets easier.
Most importantly, enjoy the process. There’s something incredibly satisfying about watching a ball of dough transform into golden, buttery rolls.
Nutritional Information
Calories and Nutritional Breakdown (Per Roll)
Here’s a basic nutritional estimate for a standard homemade yeast roll (based on 16 rolls per batch):
| Nutrient | Amount |
|---|---|
| Calories | 120–150 kcal |
| Carbohydrates | 22g |
| Protein | 3g |
| Fat | 4g |
| Sugar | 2g |
| Fiber | 1g |
| Sodium | 120mg |
Note: Nutritional values can vary based on the ingredients and portion size. For detailed dietary needs, consider using a nutrition calculator with your exact ingredients.
FAQs about Yeast Roll Recipe
1. Why didn’t my yeast rolls rise properly?
This could be due to expired yeast, water that was too hot or too cold, or not allowing enough time for proofing. Always check the yeast’s freshness and let the dough rise in a warm, draft-free area.
2. Can I use instant yeast instead of active dry yeast?
Yes, instant yeast can be used. You can skip the proofing step and mix it directly with the dry ingredients, but still ensure your liquid is warm (around 110°F) to activate it properly.
3. How do I store leftover yeast rolls?
Store baked rolls in an airtight container at room temperature for up to 2 days or in the refrigerator for up to 5 days. For longer storage, freeze them for up to 3 months.
4. Can I make the dough ahead of time?
Absolutely! You can prepare the dough, cover it tightly, and refrigerate it overnight. Bring it to room temperature and let it rise again before baking.
5. How do I get soft and fluffy yeast rolls?
Use warm milk, don’t over-knead, and make sure to let the dough rise fully. Brushing the tops with melted butter also helps lock in moisture and adds softness.
Conclusion
Yeast rolls may take a little time and effort, but once you bite into that soft, buttery perfection, you’ll realize it was all worth it. From mixing and kneading to watching the dough rise and smelling the rolls bake in the oven, the process is both satisfying and rewarding. Whether you serve them at a family dinner, holiday gathering, or simply enjoy them fresh out of the oven with a slab of butter, homemade yeast rolls are pure comfort food.
So grab your apron, clear some counter space, and let the aroma of fresh bread fill your home. This step-by-step guide has given you all the tools, tips, and tricks you need to succeed—even if you’re a total beginner. Your homemade yeast rolls are just a few steps away from becoming a household favorite.