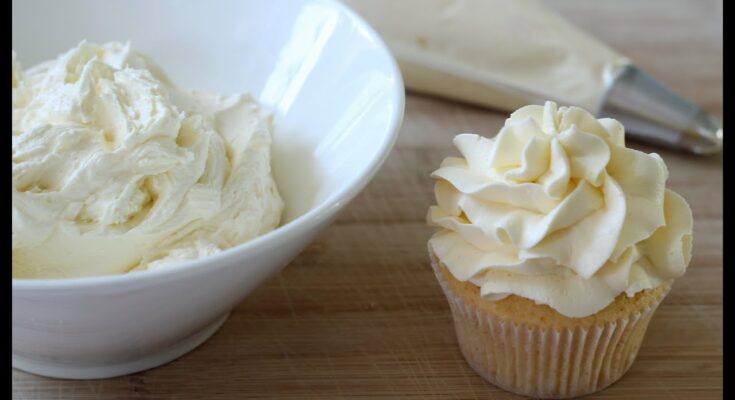
Wilton Buttercream Recipe: Let’s be honest—when it comes to decorating cakes or cupcakes that not only look great but taste delicious too, buttercream is king. And if you’ve been around the baking world even just a little, you’ve likely heard of the Wilton buttercream recipe. It’s a staple among bakers, cake decorators, and pastry enthusiasts for a reason: it’s simple, customizable, reliable, and pipes like a dream.
This isn’t just your average buttercream. The Wilton recipe is designed to hold its shape beautifully, making it ideal for piping flowers, borders, or smooth finishes on cakes. Whether you’re baking for a wedding, birthday, baby shower, or just because, this frosting has you covered.
In this guide, we’re diving deep into everything you need to know to master Wilton buttercream. From the classic ingredients to step-by-step instructions, troubleshooting, and customizations—get ready to whip up your new favorite frosting. Grab your apron and let’s get started!
Ingredients You’ll Need
The Classic Wilton Buttercream Recipe Ingredients
Here’s what you’ll need to make the standard Wilton buttercream recipe. These ingredients are pantry staples, but they pack a powerful punch when combined right:
- 1/2 cup solid vegetable shortening (Crisco preferred)
- 1/2 cup (1 stick) unsalted butter, softened
- 1 teaspoon vanilla extract
- 4 cups sifted confectioners’ sugar (about 1 lb.)
- 2 tablespoons milk or water
Each ingredient plays a specific role. The shortening helps give the frosting stability—especially crucial for hot or humid climates. Butter adds a rich flavor and smooth texture. Vanilla brings a classic flavor profile that enhances your cake without overpowering it. Powdered sugar is, of course, the main sweetener and structure provider. Finally, a splash of milk or water helps you achieve the right consistency—whether you want it thick for piping or thin for spreading.
Want a creamier flavor? You can swap the shortening with more butter. Prefer a whiter frosting? Stick to shortening and use clear vanilla extract.
Optional Add-Ins for Flavor and Color
You’re not limited to vanilla here. The Wilton recipe is super flexible. Want almond-flavored frosting? Just swap out the vanilla for almond extract. Want it chocolatey? Add 3/4 cup unsweetened cocoa powder and an extra tablespoon of milk.
For color, Wilton gel food colors are the top choice—they give intense color without altering the texture. You can go soft and pastel or bold and vibrant. Just dip a toothpick into the color gel and swirl into your frosting until you get your desired hue. Easy peasy.
Tools & Equipment You’ll Need
To get this frosting just right, make sure you have the proper tools on hand. Here’s your must-have list:
- Stand mixer or electric hand mixer
- Large mixing bowl
- Rubber spatula
- Measuring cups and spoons
- Sifter (for confectioners’ sugar)
- Piping bags and tips (if decorating)
- Food-safe gel colors (if coloring)
- Airtight containers (for storing leftovers)
Having the right gear makes the process faster, cleaner, and more precise. No more guesswork or frustration.
Step-by-Step Guide to Making Wilton Buttercream
Step 1: Soften the Butter and/or Shortening
Start by making sure your butter and shortening are at room temperature. This is crucial. If they’re too cold, they won’t blend properly and your frosting could turn out lumpy. You’re aiming for that perfect “soft but not melted” consistency—kind of like the texture of Play-Doh.
Add the butter and shortening into your mixing bowl and beat them together on medium speed until fully combined and creamy. This should take about 2–3 minutes. Don’t rush this part—it lays the foundation for the rest of your frosting.
Softening helps incorporate air, which leads to a light, fluffy texture. If the mixture still looks chunky, keep mixing. Smoothness is key here.
Step 2: Gradually Add Powdered Sugar
This is where things can get messy if you’re not careful. To avoid that sugary cloud all over your kitchen, start adding the sifted confectioners’ sugar one cup at a time—on low speed. Don’t skip the sifting step; it helps eliminate clumps and keeps the frosting smooth.
Beat on low until each addition is incorporated, then increase to medium speed before adding the next cup. Continue until all the sugar is mixed in.
Once everything’s combined, your frosting might look a bit stiff—and that’s okay. We’re about to fix that in the next step.
Step 3: Mix in Milk or Water
Add your milk (or water) one tablespoon at a time. This is your chance to control the consistency. Want a thicker buttercream for piping roses or borders? Use less liquid. Need it thinner to spread over a cake? Add a little more.
Beat the mixture on medium-high speed for another 2–3 minutes until it’s light, fluffy, and perfectly creamy. You’ll know it’s ready when it forms soft peaks and spreads smoothly without pulling.
This step is also where you adjust the texture based on what you’re using the frosting for—decorating, filling, or crumb coating.
Step 4: Add Flavoring (Vanilla, Almond, etc.)
Now’s the time to stir in the flavor. Add your vanilla extract—or swap it out for something like almond, lemon, or even coconut extract.
Always taste-test! Too mild? Add a few more drops. Too strong? You can balance it with a pinch more powdered sugar. Use clear vanilla extract if you’re trying to keep your frosting white, especially for wedding cakes or themed designs.
Pro tip: Add flavor gradually and mix thoroughly between each addition. That way, you won’t go overboard.
Step 5: Beat the Mixture Until Smooth and Fluffy
Crank up the mixer to high and let it go for about 3–5 minutes. This is what gives your buttercream that dreamy, cloud-like texture. You’ll see it change—getting lighter in both color and texture.
Don’t stop until it’s smooth, airy, and holds its shape. This is your “perfect moment” with buttercream. Scoop some up with your spatula and see how it peaks. If it’s holding up without drooping, you nailed it.
Customizing Your Wilton Buttercream
Making It Thicker or Thinner
One of the best things about Wilton buttercream is how easily it can be adjusted to match your needs. Whether you want to frost a cake smoothly or pipe detailed decorations, you’ll want the perfect consistency. So, how do you get it?
If your buttercream is too thin or runny, you might’ve added a bit too much liquid—or maybe the environment is just warm. No problem! The fix is simple: add more powdered sugar, one tablespoon at a time, mixing well after each addition. This will thicken things up and help the frosting hold its shape better.
Now, if your buttercream feels too thick or dry, don’t panic. Just add a tiny bit of milk or water—again, just a teaspoon at a time. Mix and test as you go. You want the frosting to be soft enough to spread or pipe but still firm enough to keep its form.
Here’s a quick guide to help you dial it in:
| Use Case | Ideal Consistency | Tip |
|---|---|---|
| Cake frosting | Soft, spreadable | Slightly looser consistency |
| Piping borders | Medium-firm | Should hold sharp edges |
| Creating flowers | Firm | Should not droop or melt |
| Writing with piping | Medium | Smooth flow, but holds shape |
Just remember—room temperature affects consistency a lot. If your kitchen is too warm, your buttercream might soften. If it’s too cold, it might feel stiff. Work with the environment and adjust accordingly.
Coloring Your Buttercream
Buttercream isn’t just about taste—it’s also about presentation. Adding color to your Wilton buttercream turns it from ordinary to “wow” in just a few drops. But there’s a trick to doing it right.
First, always use gel food coloring, especially Wilton’s brand. Gel colors are concentrated, so you get vibrant colors without watering down your frosting. Liquid food coloring? Not ideal—it can change the consistency and make your buttercream runny.
Here’s how to do it:
- Separate your buttercream into bowls (one for each color).
- Use a toothpick to dip into the gel color and swirl it into the buttercream.
- Mix thoroughly until the color is even.
- Add more if needed, little by little.
Want pastel shades? Use a tiny dab of color. Going for bold or dark tones like red or black? You’ll need more color and time. Deep shades sometimes develop over time, so let your buttercream sit for 30–60 minutes and see the final shade.
If you’re making large batches for events like weddings or birthdays, always color a little extra—you don’t want to run out mid-decorating and have to match a shade again from scratch!
Flavor Variations to Try
Vanilla is classic, but there’s a whole world of flavors to explore with Wilton buttercream. And the best part? You can easily tailor it to match your dessert.
Here are a few delicious variations to spice things up:
- Almond Buttercream – Swap vanilla for almond extract for a nutty, sweet flavor.
- Lemon or Citrus Buttercream – Add a teaspoon of lemon extract or zest for a bright, tangy kick.
- Chocolate Buttercream – Mix in 3/4 cup cocoa powder and an extra tablespoon of milk.
- Peppermint Buttercream – A drop or two of peppermint extract is perfect for holiday cakes.
- Fruit-Flavored – Use freeze-dried fruit powders (like raspberry or strawberry) for natural flavor and color.
- Coffee Buttercream – Dissolve a teaspoon of instant espresso in your milk before adding it.
The trick is to balance flavor and sweetness. Some extracts are strong—peppermint or almond, for instance—so start small and taste as you go.
Pro tip: Want a gourmet touch? Mix in some sea salt to cut the sweetness and enhance flavor depth. Just a pinch can make a huge difference.
Using and Storing Wilton Buttercream
How to Use Buttercream for Decorating
Once you’ve nailed your buttercream, it’s time for the fun part—decorating! Wilton buttercream is super versatile, making it perfect for:
- Frosting cakes: Use an offset spatula to apply a smooth coat.
- Piping flowers: Load up your piping bags with different tips to create roses, stars, or ruffles.
- Borders and writing: Use smaller tips for clean lines and messages.
- Cupcakes: Swirl it on using a 1M or 2D tip for bakery-style designs.
Before decorating, make sure your cake is cool to the touch—frosting a warm cake will melt your buttercream fast. If you’re planning on intricate piping, you may want to refrigerate the frosting briefly to firm it up.
Need inspiration? Wilton has tons of piping tips with different effects. Try mixing colors in one piping bag for an ombre or rainbow swirl effect.
Storing Buttercream
Got leftovers? Good news—Wilton buttercream stores really well.
Here’s how to keep it fresh:
- Room Temperature: If you’re using it within 1-2 days and it’s cool in your kitchen (under 75°F), you can store it in an airtight container on the counter.
- Refrigerator: For longer storage (up to 2 weeks), seal it tightly and refrigerate. Let it come to room temperature before using.
- Freezer: Yep, you can freeze it! Store in a freezer-safe container for up to 3 months. Thaw overnight in the fridge, then let it sit out and re-whip before using.
Be sure to press plastic wrap directly on the surface if storing in a bowl—this prevents a crust from forming.
How to Revive Refrigerated Buttercream
Ever pulled out your buttercream from the fridge, only to find it’s stiff, separated, or a bit crusty? No worries—it’s easy to bring it back to life.
Here’s how:
- Let it come to room temperature—this takes about 1 hour on the counter.
- Place it in your mixing bowl and beat on medium speed for 3–5 minutes.
- If it’s too thick, add 1 teaspoon of milk or water and beat again until fluffy.
The key is to reintroduce air and moisture. Don’t just stir it by hand—whipping it will restore that fluffy, creamy consistency.
Troubleshooting Common Issues
Even though the Wilton buttercream recipe is pretty foolproof, sometimes things can go a little sideways. Maybe it’s too runny, too sweet, or not the right texture. Don’t worry—every baker hits a few bumps. Here’s how to troubleshoot like a pro and rescue your buttercream in no time.
Buttercream Too Runny or Too Stiff
This is one of the most common problems. If your buttercream is too runny, chances are you’ve added a little too much liquid or the room is just too warm (especially if you’re using all butter). On the flip side, if it’s too stiff, it might be dry from too much sugar or not enough liquid.
Fix for runny buttercream:
- Add more powdered sugar, 1 tablespoon at a time.
- Mix on low speed to thicken it up gradually.
- Place the bowl in the fridge for 10–15 minutes if it’s still too soft due to room temperature.
Fix for stiff buttercream:
- Add milk or water, 1 teaspoon at a time.
- Beat until you reach your desired consistency.
- You can also add a small spoon of corn syrup to help smooth it out without thinning it too much.
The key is to go slowly and adjust in small amounts. Think of it like balancing a recipe—it’s easier to add than to take away.
Grainy or Curled Texture
If your buttercream turns out grainy or almost curdled, don’t panic—it’s fixable. Graininess usually happens when:
- You don’t sift the powdered sugar properly.
- The butter or shortening wasn’t fully softened.
- The ingredients weren’t mixed long enough.
How to fix grainy buttercream:
- Mix it longer! Seriously, 5–8 minutes on medium-high speed can make a huge difference.
- Add a teaspoon of warm milk and beat again—it can help smooth it out.
- If all else fails, press it through a fine mesh sieve to break down any clumps.
Consistency and temperature are everything here. A smooth buttercream should feel like soft silk between your fingers.
Buttercream Separating
If you see your buttercream separating—like it’s oily or lumpy—it’s usually a temperature issue. Warm kitchens or overmixed shortening can cause it to break down.
How to bring it back together:
- Pop the bowl in the fridge for 15 minutes to firm it up slightly.
- Then re-whip it at medium speed.
- Add a spoon of powdered sugar if it still seems separated—it will help stabilize it.
Think of your buttercream like a delicate emulsion (kind of like mayonnaise). When the balance is off, you need to restore it by chilling and remixing.
FAQs about Wilton Buttercream Recipe
1. Can I make Wilton buttercream without shortening?
Yes, absolutely! If you prefer not to use shortening, you can substitute it with an equal amount of butter. Keep in mind that the result may be slightly softer and more yellow in color, but still delicious. Butter-only versions may also not hold up as well in warm conditions.
2. What’s the best food coloring for buttercream?
Gel-based food coloring is the best choice for buttercream—especially Wilton’s own brand. It gives you rich, vibrant colors without changing the frosting’s consistency like liquid colors might. Always add color gradually, and allow time for colors to deepen.
3. Can I use this buttercream under fondant?
Yes! Wilton buttercream creates a great base layer for fondant. Use a thin, smooth coating as your crumb coat. Chill the cake for about 30 minutes to firm up the buttercream before applying the fondant. It helps everything stick together better and keeps the fondant from sagging.
4. How do I make it less sweet?
Buttercream is naturally sweet due to all the powdered sugar, but you can cut the sweetness slightly by:
- Adding a pinch of salt.
- Using salted butter instead of unsalted.
- Adding a few tablespoons of cream cheese.
- Whipping the frosting longer to introduce more air, which lightens the texture and flavor.
5. How far in advance can I make Wilton buttercream?
You can make it up to 2 weeks in advance if you store it in the refrigerator in an airtight container. Just bring it to room temperature before using and re-whip it for best texture. For longer storage, freeze it for up to 3 months.
Conclusion
The Wilton buttercream recipe is more than just a frosting—it’s a baker’s best friend. Whether you’re a total beginner or a seasoned cake artist, this versatile buttercream is your go-to for smooth finishes, bold colors, and creative piping. It’s easy to make, incredibly customizable, and stores like a dream.
From the basics of butter, shortening, and sugar, to fun variations with color and flavor, this frosting is only limited by your imagination. You now know how to whip it up, tweak the texture, fix common problems, and store it for future use. So go ahead—try it out. Pipe those roses, frost those cupcakes, and impress your friends with bakery-worthy treats right from your kitchen.
Happy baking, and don’t forget—practice makes perfect. The more you work with Wilton buttercream, the more confident and creative you’ll become. You got this!


