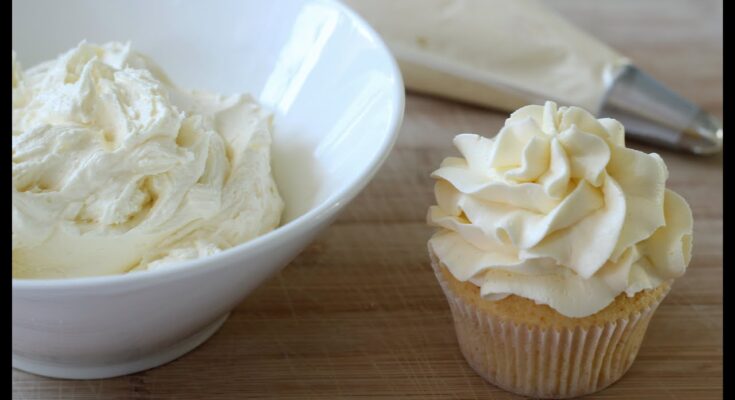
Wilton Buttercream Icing Recipe: Buttercream icing is the backbone of most cake decorating projects, and if you’ve ever dabbled in baking, you’ve probably heard of the iconic Wilton Buttercream Icing. This classic recipe has been trusted by generations of bakers for its smooth texture, pipeable consistency, and versatility. Whether you’re frosting cupcakes, decorating cookies, or creating detailed floral designs on a wedding cake, this icing is your go-to. The best part? It’s easy to make, highly adaptable, and absolutely delicious.
What Makes Wilton’s Buttercream Icing So Popular?
Wilton is a household name in the world of baking and cake decorating, and their buttercream icing recipe is no exception. It’s loved for being incredibly reliable, which is crucial when you’re working on intricate cake designs. Unlike some other buttercream recipes that melt easily or are too sweet, this one strikes a perfect balance.
The Wilton recipe stands out because:
- It holds shape well—perfect for piping flowers, borders, and text.
- It can be made in different consistencies.
- You can flavor and color it easily.
- It’s stable even in warmer environments (if made with shortening).
- It stores well, making it ideal for prepping in advance.
Whether you’re a home baker or a professional cake decorator, this recipe delivers every time.
When to Use Wilton Buttercream Icing
Wondering when to whip up a batch of this buttercream? Let’s break it down. This icing is your best friend when:
- You need a smooth finish for a cake.
- You’re creating piped decorations like borders, rosettes, and writing.
- You want to fill cake layers with a creamy, sweet layer.
- You’re frosting cupcakes for a birthday, wedding, or special occasion.
- You’re decorating cookies or cake pops.
- You want an icing that sets slightly on the outside but remains soft inside.
In short, Wilton buttercream is a must-have in your frosting toolkit.
Tools & Equipment You’ll Need
Before diving into the recipe, gather your tools. Trust us—prepping your station makes the whole process smoother.
Essential Kitchen Tools
- Mixing bowls (preferably stainless steel or glass)
- Measuring cups and spoons
- Rubber spatula
- Sifter or fine mesh strainer
- Storage containers (if making ahead)
Recommended Mixing Equipment
- Electric hand mixer or stand mixer (with paddle attachment)
- Piping bags and decorating tips (for decorating use)
- Offset spatula (for smooth cake finishes)
Having the right equipment makes a huge difference in texture and consistency.
List of Ingredients You’ll Need
Here’s what you’ll need for the classic Wilton Buttercream Icing:
Main Ingredients
- 1 cup (2 sticks) butter or vegetable shortening (or a combination)
- 4 cups (about 1 lb) powdered sugar, sifted
- 1-2 tablespoons milk or water (depending on consistency)
- 1 teaspoon vanilla extract (use clear vanilla for whiter icing)
- Pinch of salt (if using unsalted butter)
Optional Add-Ins for Flavor & Color
- Almond, lemon, or peppermint extract (for unique flavors)
- Wilton food coloring gels (vibrant, non-watered-down colors)
- Cocoa powder (to make chocolate buttercream)
These simple ingredients come together for magic—rich, fluffy, and beautifully sweet buttercream.
Tips Before You Begin
Before you get mixing, keep these helpful tips in mind:
- Sift your sugar—this ensures a smooth, lump-free icing.
- Room temperature butter gives the best creamy texture.
- Using shortening? Opt for high-ratio shortening for better stability.
- Always start mixing on low speed to avoid powdered sugar clouds!
- Gradually add liquid to control consistency.
- Want whiter icing? Use clear vanilla and white shortening.
Trust these tips, and your buttercream will turn out perfect every time.
Step-by-Step Guide to Making Wilton Buttercream Icing
Let’s get into the nitty-gritty. Follow these steps carefully for the smoothest buttercream you’ve ever made.
Step 1: Sift the Powdered Sugar
Sifting may feel like an extra step, but don’t skip it! Sifting:
- Removes lumps
- Makes your buttercream smoother
- Helps the sugar incorporate evenly
Use a fine mesh strainer or flour sifter and sift 4 cups of powdered sugar into a large bowl. Set aside.
Step 2: Cream the Shortening and Butter
Add 1 cup of shortening or butter (or ½ cup of each) into your mixer bowl. Use the paddle attachment and beat on medium speed until creamy and fluffy—about 2 to 3 minutes.
This step is crucial because it sets the foundation for the icing’s texture.
Step 3: Add Vanilla Extract
Pour in 1 teaspoon of vanilla extract and mix until combined. This adds flavor and enhances the sweetness of the sugar. If you’re after a pure white buttercream, use clear vanilla instead of traditional amber-colored vanilla.
Step 4: Gradually Mix in Powdered Sugar
With the mixer on low speed, slowly add the sifted powdered sugar ½ cup at a time. Scrape the sides of the bowl frequently to ensure everything gets incorporated.
Don’t rush this step—mixing slowly avoids a sugar explosion and creates a fine, silky icing texture.
Step 5: Adjust with Milk or Water
After the sugar is fully incorporated, add 1 tablespoon of milk or water. Mix again and assess the consistency. Add more (1 teaspoon at a time) if the icing feels too thick.
Use milk for a creamier texture, or water for a slightly stiffer finish (which is great for piping).
Step 6: Beat to Desired Consistency
Now crank up the mixer to medium-high and beat for about 1 minute. Your buttercream should now be:
- Smooth
- Fluffy
- Easily spreadable or pipeable
Want it stiffer or thinner? Don’t worry—we’re covering consistency next.
Choosing the Right Consistency: Thin, Medium, or Stiff
Different decorating techniques need different icing textures. Here’s how to adjust your buttercream.
Thin Consistency
- Add 2 teaspoons more liquid
- Best for icing cakes, crumb coating, or writing
- Spreads easily with a spatula
Medium Consistency
- Add 1 teaspoon of liquid
- Perfect for stars, borders, and simple decorations
Stiff Consistency
- No extra liquid added
- Ideal for flowers, upright decorations, and structural piping
You can always adjust batch-by-batch depending on what you’re decorating.
Flavoring & Coloring Your Icing
Buttercream isn’t just about sweetness—it can be a canvas for endless flavors and colors. Once your base is ready, it’s time to have fun.
Best Flavor Extracts to Try
While vanilla is the classic, you can elevate your icing by mixing in other extracts:
- Almond extract: Adds a nutty depth, great for wedding cakes.
- Peppermint: Perfect for holiday treats.
- Lemon or orange: Bright and zesty.
- Coconut or maple: Unique spins for cupcakes or fall desserts.
Use high-quality extracts and start small—just ¼ teaspoon at a time—then taste and adjust. You don’t want the flavor to overpower the buttercream.
How to Add Gel or Liquid Coloring
Color is everything in cake decorating, and Wilton food coloring gels are your best bet. Unlike liquid drops, gels won’t water down your icing or change its consistency.
Tips for coloring buttercream:
- Use a toothpick to dab gel color into your icing—then mix.
- Build up slowly. It’s easier to darken than lighten.
- Let the icing sit for a few hours after coloring; some colors (especially red or black) deepen over time.
- For pastel shades, just a touch is all you need.
- Mix colors to create custom shades—experiment and keep notes!
Pro tip: Always make more than you need in the same color—matching a shade later is tough.
Troubleshooting Common Buttercream Issues
Even experienced bakers sometimes run into problems with buttercream. Don’t panic—most issues are fixable.
Why Is My Icing Too Stiff or Runny?
- Too stiff? Add a tiny bit of milk or water (½ teaspoon at a time) until smooth.
- Too runny? Add more sifted powdered sugar—again, gradually. Or chill it slightly.
Environmental factors like heat and humidity can affect your results, so always adjust as needed.
How to Fix Grainy Buttercream
Grainy texture usually means:
- Your powdered sugar wasn’t sifted.
- The sugar hasn’t fully dissolved into the fat.
Fix it by:
- Mixing longer on medium-high speed.
- Adding a teaspoon of milk and re-beating.
If it’s still grainy, you may need to start with fresh powdered sugar next time.
How to Store Wilton Buttercream Icing
Made a big batch? No problem. Buttercream stores wonderfully and can be made ahead of time.
Refrigeration Tips
- Store in an airtight container.
- Keeps well in the fridge for up to 2 weeks.
- Bring to room temperature before using. Then beat again to fluff it back up.
Freezer Storage Tips
- Freeze buttercream in a freezer-safe, airtight container for up to 3 months.
- When ready to use, thaw in the fridge overnight, then re-whip to restore texture.
Always label your container with the date, so you know how long it’s been stored.
How Long Does Wilton Buttercream Icing Last?
Here’s a quick storage guide:
| Storage Method | Duration | Notes |
|---|---|---|
| Room Temp | Up to 2 days | Best if using within the same day |
| Refrigerated | Up to 2 weeks | Allow to come to room temp before using |
| Frozen | Up to 3 months | Re-whip after thawing |
Keep in mind: Icing with dairy (like real butter or milk) should always be refrigerated.
Can You Freeze Decorated Cakes With Buttercream?
Absolutely! Wilton’s buttercream freezes like a dream—even once piped onto a cake.
To freeze decorated cakes:
- Place the cake in the freezer for 1-2 hours to firm up.
- Wrap it carefully in plastic wrap, then foil.
- Store for up to 2 months.
When ready to eat, thaw in the fridge overnight, then bring to room temp before serving.
Important: Avoid storing cakes near items with strong odors. Buttercream absorbs smells easily.
Best Cakes and Cupcakes to Use With Wilton Buttercream
You can use this buttercream on almost anything sweet, but here are some pairings that always shine:
- Classic vanilla sponge cakes
- Chocolate fudge cake
- Red velvet cupcakes
- Funfetti birthday cakes
- Sugar cookies (piped or spread)
- Brownies (yes, you can frost them!)
This frosting adds a rich, sweet finish that’s versatile enough for formal occasions or casual bakes.
Creative Decorating Ideas Using Wilton Buttercream
Ready to take your icing skills to the next level? Try these decorating ideas with your freshly made buttercream:
1. Rosette Cakes
Use a Wilton 1M tip to pipe stunning roses all over your cake for a textured, elegant look.
2. Ombre Layers
Color three bowls of icing with increasing intensity. Layer on a cake and blend with an offset spatula for a seamless ombre effect.
3. Floral Cupcakes
Use different piping tips like petal, leaf, and star tips to make lifelike flowers.
4. Textured Spatula Designs
Smooth on buttercream and drag your spatula in waves, stripes, or swirls for a trendy, rustic finish.
5. Buttercream Transfers
Pipe a design onto parchment, freeze it, and transfer it to your cake. Perfect for cartoons or characters!
There are endless ways to get creative with Wilton’s buttercream—and it’s forgiving enough for beginners to practice with.
FAQs about Wilton Buttercream Icing Recipe
1. Can I use salted butter in this recipe?
Yes, but it may slightly alter the flavor. If using salted butter, skip the pinch of added salt in the recipe.
2. How do I make this icing whiter?
Use clear vanilla extract and white vegetable shortening instead of butter. You can also add a small drop of violet gel coloring to counteract yellow tones.
3. Can I pipe roses with this icing?
Absolutely! Just make sure you’re using stiff consistency buttercream and the right piping tip (like Wilton 104 or 1M).
4. Is this icing safe to leave out overnight?
If made with shortening and water, yes—it can be left out for 2–3 days. If it contains real butter or milk, it’s safer to refrigerate.
5. Can I reduce the sweetness of the icing?
You can try reducing the powdered sugar slightly or balancing it with a pinch of salt or lemon juice. Just know that less sugar may affect the texture.
Conclusion
Wilton’s buttercream icing is more than just a sweet topping—it’s an essential tool in any baker’s toolkit. Whether you’re piping intricate flowers or simply frosting a batch of cupcakes for the kids, this reliable, versatile recipe delivers every time. The texture is smooth, the taste is rich, and the possibilities are endless. With just a few basic ingredients and a little practice, you’ll be on your way to creating bakery-worthy treats right from your kitchen.
So go ahead, gather your ingredients, whip up a batch, and let your creativity take the lead. And remember—perfect buttercream isn’t just about the recipe—it’s about the love and effort you put into every swirl and spread.


