Walking Tacos Recipe: Let’s be honest—sometimes, the best meals are the messiest, and walking tacos are the poster child of delicious chaos. These handheld wonders are basically tacos, but instead of using a shell or tortilla, all the fillings go right into a snack-sized chip bag. Yes, really! Think about it: tacos in a bag, eaten with a fork, standing up, walking around, having fun. It’s no surprise that walking tacos are a hit at fairs, parties, camping trips, and tailgates.
But why have they become so popular? Easy: they’re simple, versatile, and downright fun to eat. Everyone can customize their own bag with toppings of their choice. There’s no need for plates, minimal cleanup, and they’re super filling. Whether you’re planning a casual weeknight dinner or organizing a big outdoor event, walking tacos fit the bill perfectly.
In this step-by-step guide, we’ll cover everything—from what makes them unique to how to make them at home in less than 30 minutes. Ready to dive in?
What Are Walking Tacos?
A walking taco is not your average taco. Instead of being served in a soft or crunchy taco shell, all the classic taco fillings—like seasoned ground beef, shredded cheese, lettuce, salsa, and sour cream—are scooped right into a single-serve bag of chips. You then grab a fork, mix it all up inside the bag, and chow down.
The chips usually used include Fritos, Doritos, or Tostitos, with Fritos being the most traditional. Each chip brings a slightly different flavor profile, and they all work well depending on your preferences. The key idea here is portability. You can eat them on the go, hence the name “walking tacos.”
They’re great for group gatherings where everyone builds their own. Want a veggie version? Done. Like it extra spicy? Add jalapeños and hot sauce. The possibilities are endless, and that’s a huge part of the appeal.
Why Are They Called “Walking” Tacos?
The name “walking taco” might sound quirky at first, but it makes perfect sense once you see one. The concept is simple: a taco that can be eaten while walking. Because everything is self-contained in a chip bag, there’s no need for a plate or utensils—just open the bag, add your toppings, mix it with a fork, and you’re good to go.
They’re popular at state fairs, carnivals, food trucks, and sports events for that very reason. Convenience is king here. When you’re at a busy event, balancing a plate full of food is a hassle. Walking tacos solve that problem. You get all the taste of tacos, minus the mess and fragility of taco shells.
Plus, they make cleanup a breeze. Once you’re done, just toss the bag and fork—no dishes required. Whether you’re camping or just don’t feel like doing dishes, walking tacos save the day.
Who Invented the Walking Taco?
While no one knows the exact origin, many food historians believe that walking tacos gained popularity in the Midwestern United States, particularly in states like Iowa, Texas, and New Mexico. The term “Frito pie” is often used interchangeably with walking tacos, especially in the southern U.S.
The original version probably involved Fritos, chili, and shredded cheese. Over time, the idea evolved into a full-on taco-in-a-bag experience with a much wider variety of ingredients. Though you might hear different names—like taco-in-a-bag, Frito pie, or walking taco—they all refer to the same tasty concept.
Some credit Frito-Lay marketing efforts in the 1950s and 1960s for popularizing the snack version of chili-and-Fritos, which slowly morphed into the walking taco as we know it today. Whether it was a food vendor, a mom at a school fundraiser, or a campfire cookout hero, we owe them all a big thank you!
Ingredients You’ll Need
Before we dive into the actual steps, let’s talk ingredients. Walking tacos are flexible, so you can easily tailor them to your liking. However, there are a few core components you’ll almost always need.
Main Ingredients
Here’s your basic shopping list for a crowd of 4–6 people:
- 1 lb ground beef or ground turkey
- 1 packet taco seasoning (or homemade blend)
- 3/4 cup water
- 6–8 single-serve bags of chips (Fritos, Doritos, or Tostitos)
- 1 cup shredded cheddar or Mexican cheese
- 1 cup shredded lettuce
- 1/2 cup diced tomatoes
- 1/2 cup chopped onions
- Sour cream, for topping
- Salsa or taco sauce
- Jalapeños or hot sauce (optional)
You can always scale up or down depending on the size of your group.
Optional Toppings and Variations
This is where things get creative! Here are some popular add-ons:
- Black beans or refried beans
- Avocado or guacamole
- Corn or grilled corn kernels
- Pickled red onions
- Olives
- Diced bell peppers
- Crumbled queso fresco or Cotija cheese
- Chopped cilantro
- Squeeze of lime juice
If you’re making this vegetarian, skip the meat and add seasoned beans or tofu. Vegan? Use plant-based cheese and sour cream alternatives. Gluten-free? Most chips like Fritos are naturally gluten-free—just double-check the label.
Tools and Equipment Required
Making walking tacos doesn’t require a high-tech kitchen or fancy tools. That’s part of the beauty—it’s a low-effort, high-reward kind of meal. However, having a few essential items can streamline the process and make your taco-making experience smoother and more enjoyable.
Kitchen Tools
Here’s a basic checklist of tools you’ll want to have on hand:
- Large skillet or frying pan – For browning and seasoning the ground meat.
- Spatula or wooden spoon – To stir and break up the meat while cooking.
- Cutting board and sharp knife – For prepping veggies and toppings.
- Measuring cups and spoons – To get the taco seasoning and other ingredients just right.
- Serving bowls – To organize toppings so everyone can build their tacos with ease.
- Can opener – If you’re using canned beans or corn.
- Paper towels – Useful for quick cleanup or blotting excess grease off cooked meat.
This isn’t an intense cooking project, but a little organization goes a long way—especially when you’re serving a group or prepping for a picnic or party.
Recommended Serving Utensils
Here’s what you’ll need when it’s time to serve your walking tacos:
- Plastic or metal tongs – For grabbing toppings like lettuce, tomatoes, or cheese.
- Long-handled spoons – To scoop heavier items like beans or guacamole into the chip bags.
- Disposable forks – A must-have for eating the tacos straight out of the bag.
- Small napkins or wet wipes – Since this is finger-food territory, some cleanup help will be appreciated.
- Trash bag or bin – To keep things tidy as guests toss their used bags and utensils.
Optional but handy: place chip bags in a basket or cooler to keep them from falling over while people are assembling their walking tacos.
Step-by-Step Instructions
Okay, now for the good stuff! Let’s break down how to actually make walking tacos from start to finish. This process is super simple, and you’ll be amazed how quickly everything comes together.
Step 1: Preparing the Ground Beef
Start by cooking the meat. This will be your flavorful taco base.
- Heat a skillet over medium heat.
- Add 1 lb of ground beef or turkey. Cook until browned, breaking it up with a spoon.
- Drain excess grease from the skillet.
- Add your taco seasoning packet and 3/4 cup water. Stir well to combine.
- Let the mixture simmer for 5–7 minutes, until the liquid reduces and the meat is fully seasoned.
Want to go the extra mile? Make your own taco seasoning with chili powder, cumin, garlic powder, onion powder, paprika, and salt. It tastes even better and lets you control the spice level.
Once cooked, set the meat aside in a bowl or keep it warm in the skillet on low heat.
Step 2: Assembling the Tacos in a Bag
Now for the fun part—building the walking tacos!
- Gently crush the chip bags while they’re still sealed to break up the chips a bit. This makes mixing easier.
- Carefully cut open each bag along the side or top—whichever makes it easier to eat out of.
- Scoop 2–3 spoonfuls of the cooked taco meat into each bag.
- Invite your guests or family members to add their toppings of choice.
Because each person builds their own taco, this is a great interactive meal for kids, picky eaters, or anyone with dietary restrictions. Everyone gets exactly what they want, no compromises.
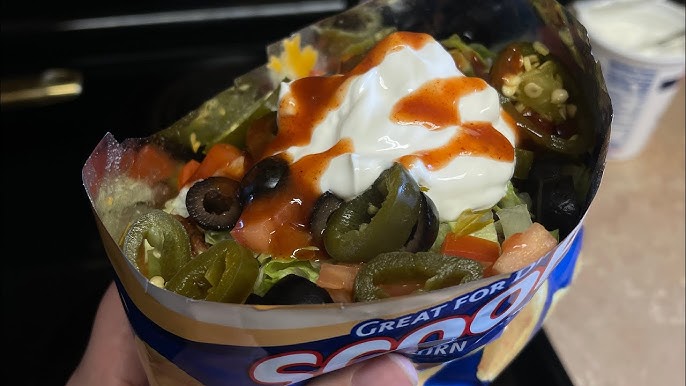
Step 3: Adding Your Favorite Toppings
This is where walking tacos get their personality! Here are some suggested combos to suit different tastes:
- Classic Combo: Shredded cheese, lettuce, diced tomatoes, sour cream
- Spicy Kick: Jalapeños, hot sauce, spicy salsa, pepper jack cheese
- Veggie Delight: Black beans, corn, avocado, red onion, cilantro
- Tex-Mex Style: Guacamole, queso, pico de gallo, green onions
Don’t be afraid to mix and match. That’s half the fun. As long as your ingredients are prepped and in bowls or containers, the process moves quickly—even with a big group.
Step 4: Mixing and Enjoying
Once your taco bag is loaded with your favorite toppings, it’s time to dig in.
- Use a fork or spoon to gently mix everything inside the bag. This spreads the flavor evenly.
- Hold the bag in one hand and your utensil in the other, and go to town!
- Be warned—this can get a little messy. But hey, that’s part of the charm.
You’ll get crunchy chips, seasoned meat, creamy sour cream, fresh veggies, and melty cheese in every bite. It’s like a taco explosion in a bag.
You can serve them alongside lemonade, soda, or Mexican street corn for a full-blown food fest. They’re just as perfect for a quick weeknight meal as they are for game day parties.
Tips for the Best Walking Tacos
Now that you know how to make walking tacos, let’s level things up. These handy tips will help you make the most delicious, no-fuss tacos in a bag that everyone will love.
Make-Ahead Tips
If you’re planning for a party, tailgate, or camping trip, you’ll want to save time by prepping ingredients in advance. Here’s how:
- Cook and season the meat ahead of time. You can refrigerate it for up to 3 days or freeze it for up to a month. Reheat before serving.
- Chop all your toppings like lettuce, tomatoes, onions, and store them in airtight containers. Keep them chilled until it’s taco time.
- Portion out toppings into small containers or zip-lock bags if you’re traveling or going outdoors.
- For sauces like sour cream or salsa, use squeeze bottles or small deli containers for easy dispensing.
This approach works great for large groups—especially when you’re short on time. Just set everything out buffet-style and let everyone DIY their taco bag.
Storage and Leftovers
Let’s say you made a big batch of everything and ended up with extras. Good news: most components of walking tacos store beautifully.
- Meat: Store in an airtight container in the fridge for 3–4 days. Reheat in the microwave or on the stove.
- Veggies: Keep chopped toppings separate to avoid sogginess. Most will last 2–3 days if kept in sealed containers.
- Cheese and sauces: Shredded cheese and sour cream will stay fresh for up to a week when stored properly.
But remember, once a chip bag has been opened and mixed with wet toppings, it’s not ideal for storing. So if you’re prepping extra for later, don’t assemble all the bags—store ingredients separately instead.
Customizing for Dietary Preferences
One of the best things about walking tacos is how easily they can accommodate different diets. Whether you’re feeding vegetarians, vegans, or someone who’s gluten-free, there are plenty of options.
- Vegetarian: Skip the meat and use black beans, pinto beans, or even lentils. Grilled veggies or meat substitutes work too.
- Vegan: In addition to meatless options, use vegan cheese, dairy-free sour cream, and check your chip ingredients.
- Gluten-Free: Many chips like Fritos and plain Doritos are naturally gluten-free—but always check the label to be sure.
You can even do keto-friendly walking tacos by using pork rinds instead of chips and topping with extra cheese, meat, and avocado.
Having a variety of toppings and letting people build their own taco bags guarantees that everyone gets something they love.
FAQs about Walking Tacos Recipe
1. Can I use chicken or pork instead of ground beef?
Absolutely! Shredded chicken or pulled pork work great. Just season them with taco spices and you’re good to go.
2. What kind of chips are best for walking tacos?
Fritos are the classic choice, but Doritos (nacho cheese or cool ranch), Tostitos, or even tortilla strips all work well depending on your taste.
3. Are walking tacos spicy?
Not necessarily. The base recipe is mild, but you can kick up the heat with jalapeños, hot sauce, or spicy salsa.
4. Can I make walking tacos ahead of time?
You can prep all the ingredients in advance, but it’s best to assemble the tacos fresh to avoid soggy chips.
5. Are walking tacos kid-friendly?
Yes! Kids love assembling their own and the chip bag makes it fun. Just watch out for messy fingers!
Conclusion
Walking tacos are more than just a fun food trend—they’re a celebration of simplicity, flavor, and creativity. With minimal prep, easy cleanup, and tons of flexibility, they’ve become a favorite for weeknight dinners, outdoor gatherings, school events, and everything in between.
Whether you’re feeding a crowd or just making dinner for the family, walking tacos are the kind of meal that puts a smile on everyone’s face. There’s just something satisfying about scooping into a crunchy, cheesy, meaty bag of deliciousness.
So go ahead—grab some chip bags, whip up that taco meat, and let the topping bar begin. You’ll be amazed how quickly they disappear. And hey, don’t be surprised if people start asking for them again and again.