Walking Taco Recipe: Ever heard of a taco that doesn’t need a plate? Welcome to the wonderfully messy, ultra-portable world of the walking taco. This fun, flavorful snack has taken casual dining and street food to another level. Whether you’re planning a backyard BBQ, organizing a school event, or heading out on a camping trip, walking tacos are the ultimate in grab-and-go comfort food.
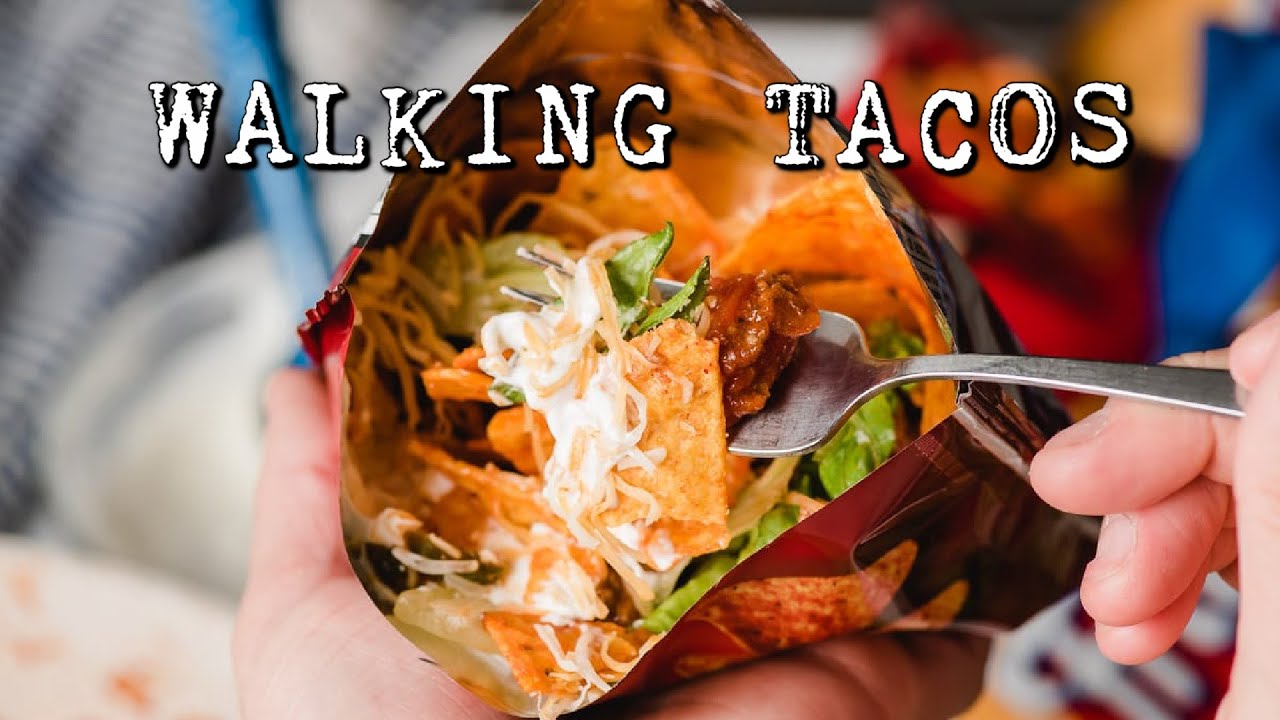
A walking taco isn’t really a taco in the traditional sense—there’s no folded tortilla involved. Instead, you take a small bag of chips (usually Doritos or Fritos), crack it open, pile in taco ingredients like seasoned meat, cheese, lettuce, and salsa, and dig in with a fork. It’s the deliciousness of a taco, minus the mess and the need for plates.
Why is it called a walking taco? Simple: it’s a taco you can walk around with. The concept originated in the Midwest and quickly became a hit at fairs, festivals, and youth sports events. It’s easy, customizable, and ridiculously tasty. This guide will walk you through everything you need to know—from ingredients and preparation to tips and variations—so you can make walking tacos that everyone will love.
Ingredients Needed
The beauty of the walking taco lies in its simplicity and flexibility. You can customize it to fit your taste, dietary preferences, or whatever you have on hand. But let’s start with the basics.
Main Ingredients:
- Ground beef (1 lb – serves 4): The classic base for your taco.
- Taco seasoning (1 packet or homemade mix): Adds that signature Tex-Mex flavor.
- Small bags of chips (1 per person): Fritos and Doritos are most popular.
Optional Toppings:
- Shredded cheddar cheese
- Diced tomatoes
- Shredded lettuce
- Sour cream
- Sliced black olives
- Chopped onions
- Guacamole or sliced avocado
- Jalapeños
- Hot sauce or salsa
Toppings are where you can really get creative. Think of a taco bar—but everything fits into a chip bag. This is what makes walking tacos such a fun meal: everyone builds their own.
Best Chips to Use:
- Fritos Original Corn Chips: A salty, crunchy base that pairs well with taco meat.
- Nacho Cheese Doritos: Adds a cheesy kick and enhances the taco flavor.
- Cool Ranch Doritos: For those who like a little tangy twist.
- Tostitos Scoops or mini bags: Another solid option if you like a plainer chip.
Tools and Supplies Required
You won’t need a full kitchen for this, which is another reason walking tacos are a hit for parties and events. Here’s what you’ll need to prepare and serve:
Kitchen Tools:
- Large skillet or frying pan: For browning the ground beef.
- Wooden spoon or spatula: To stir and break up the meat.
- Measuring spoons: If you’re using homemade seasoning.
- Cutting board and knife: For chopping veggies and toppings.
Serving Containers:
- Mini chip bags (individual size): Acts as your taco shell.
- Plastic forks or sporks: To eat on the go.
- Napkins: Because this can get a little messy—in the best way.
- Tongs or serving spoons: If you’re doing a DIY taco bar.
Optional but helpful: disposable gloves for handling toppings at events, and a warming tray to keep meat hot.
Step-by-Step Instructions
Now let’s dig into the meat of the matter (literally). Follow these steps for a foolproof walking taco experience:
Step 1: Prepare the Ground Beef
Start by heating your skillet over medium heat. Add a bit of oil if your pan tends to stick. Toss in the ground beef and begin to brown it, using a wooden spoon to break it up into crumbles.
You want the beef to cook evenly, so stir it occasionally. This should take about 7–10 minutes. Make sure there’s no pink left before moving on to the next step. Drain any excess fat to avoid greasy tacos.
Step 2: Season the Meat
Once the meat is cooked through, sprinkle in your taco seasoning. If you’re using a packet, follow the instructions—usually, it involves adding about 2/3 cup of water along with the seasoning and simmering until thickened.
Prefer homemade? A basic taco spice blend includes chili powder, cumin, garlic powder, onion powder, paprika, salt, and a pinch of cayenne. Stir well and let everything simmer for another 5–10 minutes until the flavors meld together and the sauce reduces.
The result? Savory, spicy taco meat that’s ready to be the star of your walking taco.
Step 3: Prepare the Chip Bags
While your meat is simmering, it’s time to get the chip bags ready. Grab individual-sized bags of chips—don’t open them just yet. Gently crush the chips inside the bag with your hands to create a base that’s easier to eat with a fork. You want smaller pieces, but not crumbs.
Next, carefully cut open the bags either at the top (traditional style) or along the side (for more of a “bowl” feel). Cutting along the side gives you a wider opening, making it easier to add toppings and eat.
Place the opened bags upright in a basket, tray, or bowl to keep them stable and upright while filling them with delicious taco ingredients.
This is the perfect time to involve the kids or your guests—let them personalize their own walking taco bag!
Step 4: Add the Meat to Chips
Now that the meat is fully cooked and seasoned, spoon it directly into each bag of crushed chips. You’ll want to add about 1/4 to 1/3 cup of meat per bag depending on the size of the bag and the appetite of the eater.
Try to get an even layer so the meat mixes well with the chips underneath. The warmth of the beef will slightly melt cheese and soften up the chips just a touch—creating a flavor explosion in every bite.
Be careful not to overfill. Remember, you still have toppings to pile in, and you want everything to be easy to mix and eat inside the bag.
Step 5: Add Toppings
This is where the magic happens. Once the meat is in, let everyone go wild with toppings. Sprinkle in shredded cheddar cheese right after the meat so it gets a little melty. Then add fresh toppings like lettuce, diced tomatoes, onions, and olives.
Want to take it to the next level? A spoonful of guacamole, a drizzle of sour cream, or a splash of hot sauce will do the trick. Don’t forget the jalapeños if you like a little heat.
Once the toppings are in, hand out forks and napkins. Give the bag a gentle shake to mix everything together—and boom, your walking taco is ready to eat!
Tips for the Best Walking Tacos
To make walking tacos truly unforgettable, it helps to go beyond the basics. Here are some tried-and-true tips for taco perfection:
Get Creative with Combinations
- Tex-Mex Twist: Add black beans, corn, and a hint of lime juice.
- Buffalo Style: Substitute taco meat for buffalo chicken and blue cheese crumbles.
- Breakfast Tacos: Use scrambled eggs, bacon bits, and cheese.
Stay Organized for Events
If you’re serving walking tacos at a party or event, set up a taco station. Keep ingredients in separate containers and label them clearly. Use warming trays for meat and coolers with ice packs for perishable toppings like sour cream and guacamole.
Keep Ingredients Fresh
- Prep toppings just before serving to keep them crisp.
- Store chopped vegetables in airtight containers in the fridge.
- If making ahead, keep chips sealed until it’s time to eat to prevent sogginess.
Taco Bar Tip
Lay everything out buffet-style and let your guests build their own walking tacos. It’s less work for you, more fun for them, and everyone gets exactly what they want.
Serving Suggestions
Walking tacos aren’t just great because they taste amazing—they’re also incredibly versatile when it comes to serving. You can present them in a casual or creative way depending on the setting.
Perfect for Parties and Gatherings
If you’re hosting a party, family get-together, or game night, walking tacos are a major crowd-pleaser. Set up a DIY taco bar with different chip bags and a toppings station. Use fun signs to label ingredients and create themed decor based on the occasion (think fiesta vibes or sports team colors).
You can even pre-make a few walking tacos and place them in a tray under a heat lamp if you expect a large crowd. This helps with flow and minimizes congestion at the food table.
Great for Outdoor Events
These tacos were born for outdoor fun—whether it’s a school fair, a church potluck, or a neighborhood picnic. Since you don’t need plates, you’ll save on cleanup and make serving food so much simpler. Just hand over a chip bag with a fork and boom—lunch is served.
Fun for Family Dinners or Camping Trips
Trying to shake up your weeknight dinner routine? Walking tacos are an awesome solution. They’re quick, interactive, and fun enough to make a regular night feel like a special event.
And if you’re camping? This meal is practically made for it. Just brown your meat ahead of time, store it in a sealed container, and reheat it over the campfire or portable stove. Toppings can be stored in a cooler and laid out picnic-style for an unforgettable fireside dinner.
Variations of Walking Tacos
One of the coolest things about walking tacos is how customizable they are. Whether you’re dealing with dietary preferences or just want to mix things up, there are plenty of variations to explore.
Vegetarian Version
Skip the meat entirely and opt for a hearty, plant-based filling instead. Black beans, pinto beans, or lentils cooked with taco seasoning make a great substitute. Add grilled veggies like bell peppers, onions, and mushrooms for extra flavor and texture.
Want to boost the protein? Try tofu crumbles or meat substitutes like Beyond Meat or Impossible ground “beef.” You’ll still get that classic taco taste, minus the meat.
Chicken or Turkey Tacos
Ground beef is traditional, but don’t be afraid to branch out. Ground turkey is leaner and still takes on taco seasoning beautifully. Shredded or grilled chicken breast also works great—just season it well and chop it into small, fork-friendly pieces.
For a smoky flavor, consider using rotisserie chicken or leftover BBQ chicken mixed with salsa.
Vegan Option
For a fully vegan taco, choose plant-based proteins like beans, lentils, or vegan ground meat. Swap out dairy cheese for vegan shreds and use a non-dairy sour cream. Top with avocado or guacamole for creaminess and toss in fresh veggies for crunch. Even meat-lovers will enjoy the flavor combo.
These variations aren’t just good—they’re often even better than the original. Play around until you find your perfect mix.
Storing and Reheating
You might find yourself with leftovers—lucky you! Walking tacos are easy to store and reheat, especially if you keep ingredients separate.
How to Store Leftovers
- Meat: Let it cool completely before storing. Keep it in an airtight container in the fridge for up to 4 days.
- Toppings: Store each topping in its own container. Moist items like tomatoes and sour cream should be kept in the coldest part of the fridge.
- Chips: Always leave the chips sealed until you’re ready to use them. Opened chips can become stale quickly, so keep extras in a zip-lock bag or airtight container.
How to Reheat for Best Taste
- Microwave: Add taco meat to a microwave-safe bowl and cover. Heat in 30-second bursts, stirring each time until warmed through.
- Stovetop: Reheat in a skillet over medium heat, stirring occasionally until hot.
Once everything’s heated, reassemble your taco in a fresh chip bag or bowl and you’re good to go.
Nutritional Information
Walking tacos can be as indulgent or as health-conscious as you want them to be—it all depends on what you put inside. Let’s break down the typical nutritional profile for a classic walking taco with ground beef, cheese, lettuce, and sour cream served in a bag of Doritos.
Estimated Nutritional Breakdown (per serving):
| Nutrient | Amount |
|---|---|
| Calories | 450–600 kcal |
| Protein | 18–25g |
| Carbohydrates | 35–45g |
| Fat | 25–30g |
| Saturated Fat | 10–12g |
| Sodium | 800–1000mg |
| Fiber | 4–6g |
Of course, the numbers will vary depending on the ingredients you use. Opting for ground turkey or beans instead of beef will reduce fat and calories. Skipping cheese or sour cream and adding more vegetables boosts the fiber and reduces saturated fat.
Tips to Make It Healthier:
- Use baked chips or tortilla chips with less sodium.
- Choose lean meats like turkey or chicken.
- Add extra veggies like spinach, bell peppers, or even shredded carrots.
- Go light on cheese and sour cream, or use low-fat versions.
- Substitute plain Greek yogurt for sour cream for added protein.
Whether you’re counting calories or just trying to make smarter choices, you can easily tweak the walking taco to fit your needs.
FAQs about Walking Taco Recipe
1. Can I make these ahead of time?
Yes, but keep all ingredients separate until serving. Cook and season the meat ahead of time, store toppings in containers, and only open chip bags when ready to serve to prevent sogginess.
2. What are the best chips to use?
Fritos and Doritos are classic choices, but any corn-based chip works. Nacho Cheese Doritos give a cheesy boost, while Fritos offer a simple, salty crunch.
3. How do I make this gluten-free?
Use gluten-free taco seasoning and make sure your chips are labeled gluten-free. Many brands of corn chips qualify, but always double-check the label.
4. Can kids help make these?
Absolutely! Kids love crushing the chips, adding toppings, and building their own tacos. It’s a great hands-on meal that encourages creativity and independence in the kitchen.
5. Is this a budget-friendly meal?
Very! Ground meat, chips, and basic toppings go a long way, especially when feeding a group. You can stretch ingredients with beans and veggies to make it even more affordable.
Conclusion
Walking tacos are the perfect storm of flavor, convenience, and fun. Whether you’re throwing a birthday bash, looking for a no-fuss dinner, or planning a cookout, this taco-in-a-bag recipe brings everyone together. It’s a great way to feed a crowd with minimal mess and maximum flavor.
From classic beef and cheese to veggie-packed, vegan delights, there’s a version of the walking taco for everyone. You can make them healthier, heartier, or just full-on indulgent depending on the occasion. And let’s be honest—anything that lets you eat tacos with one hand and a drink in the other is a win.
So grab your chip bags, gather your favorite toppings, and get ready to wow your family, friends, and party guests with this ultimate comfort food. Walking tacos aren’t just a meal—they’re a whole experience.