Veggie Chili Recipe: There’s something incredibly comforting about a warm bowl of chili, especially when it’s loaded with hearty vegetables and beans. Veggie chili isn’t just for vegetarians—it’s a dish that even meat-lovers can enjoy thanks to its rich flavor, bold spices, and satisfying texture. Whether you’re trying to eat less meat or simply want a quick, nutritious meal, veggie chili is a go-to recipe that checks all the boxes.
Why Choose Veggie Chili?
First of all, veggie chili is versatile. You can throw in just about any vegetable you have lying around—zucchini, carrots, corn, bell peppers—and they’ll all work beautifully. Secondly, it’s a one-pot meal that’s easy on your wallet and super simple to prepare, even for beginners. And let’s not forget—it’s incredibly filling without being heavy. You’re getting tons of fiber, protein, and essential nutrients, all while enjoying a comfort food classic.
Health Benefits of Veggie Chili
Veggie chili is a nutritional powerhouse. The beans provide plant-based protein and fiber, which help keep you full and support digestion. The array of vegetables offers antioxidants, vitamins, and minerals that boost immunity and reduce inflammation. Unlike meat-based chili, veggie chili is naturally lower in saturated fat, making it heart-healthy. Plus, when you cook it yourself, you control the salt and spice levels, keeping it as clean and wholesome as you like.
Ingredients You’ll Need
Let’s break down what you’ll need to make this delicious chili. You can tweak the ingredients based on your taste or what you’ve got in your pantry.
Fresh Vegetables
- 1 large onion, chopped
- 2 cloves garlic, minced
- 2 bell peppers (any color), diced
- 2 carrots, peeled and diced
- 1 zucchini, chopped
- 1 can of corn or 1 cup fresh/frozen corn
These ingredients are the base of the chili, providing texture, sweetness, and depth. Feel free to add mushrooms, celery, or even sweet potato if you’re feeling adventurous.
Beans and Protein Sources
- 1 can black beans, rinsed and drained
- 1 can kidney beans, rinsed and drained
- 1 can pinto beans, rinsed and drained
- Optional: ½ cup lentils or a meat substitute like tofu or tempeh
Beans are your primary source of protein and fiber here. Mixing different beans adds variety and a complex texture that elevates your chili game.
Spices and Flavor Enhancers
- 2 tablespoons chili powder
- 1 teaspoon cumin
- 1 teaspoon smoked paprika
- ½ teaspoon cayenne pepper (adjust to taste)
- Salt and pepper to taste
- 1 tablespoon tomato paste
- 1 can crushed tomatoes (28 oz)
- 1 cup vegetable broth or water
These spices are what make chili, chili. Don’t skimp on them. If you love bold flavor, you can also add oregano, cinnamon, or cocoa powder for a deeper, richer taste.
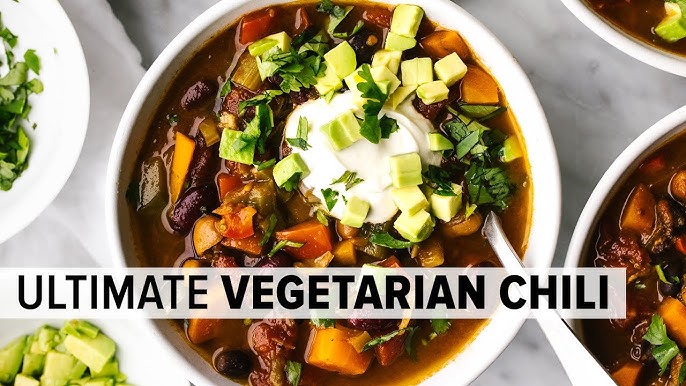
Optional Toppings and Add-ons
- Chopped cilantro
- Avocado slices
- Vegan sour cream or yogurt
- Shredded cheese (vegan or dairy)
- Lime wedges
- Tortilla chips or cornbread
Toppings add that final flair and flavor boost. Go wild or keep it simple—it’s your chili!
Equipment Required
You don’t need fancy kitchen gear to make veggie chili. Here’s what you’ll want to have on hand:
- Large pot or Dutch oven
- Wooden spoon or spatula
- Knife and cutting board
- Can opener
- Measuring spoons and cups
A Dutch oven is especially handy because it distributes heat evenly, perfect for simmering your chili to perfection.
Step-by-Step Cooking Instructions
Let’s get down to business. Here’s how to make the best veggie chili ever—step by step.
Step 1: Prepping the Ingredients
Start by washing and chopping all your veggies. Open and rinse your beans. Having everything prepped before you turn on the heat makes the whole process smoother and faster. It also helps make sure nothing burns while you’re scrambling to dice an onion.
Step 2: Sautéing the Base Flavors
This is where the flavor magic begins. Heat a tablespoon of olive oil in your large pot or Dutch oven over medium heat. Add chopped onions and sauté for about 3–4 minutes until they become soft and translucent. Then, toss in the garlic and stir for another minute—don’t let it burn!
Once the aroma fills your kitchen, add your diced carrots and bell peppers. Cook for another 5–7 minutes, stirring occasionally, until they start to soften. This step builds the base flavor of your chili and helps the veggies release their natural sweetness. If you’re adding mushrooms or celery, now’s the time to include them. You’ll start to see a bit of caramelization, and that’s when you know you’re on the right track.
Sautéing is the foundation of your chili’s depth. Skipping or rushing this step would mean missing out on a lot of the flavor you want to build up later.
Step 3: Adding the Veggies and Beans
Now that your base is cooked and fragrant, add in the zucchini and corn. Stir everything well, allowing the veggies to mix evenly with the cooked aromatics. Let them cook for about 2–3 minutes.
Next up: beans! Add all the beans you’ve chosen—black beans, kidney beans, pinto beans, and any others you’re including. Stir them gently so they don’t break apart.
Now is also the moment to add your tomato paste. Mix it in thoroughly to coat all the vegetables and beans. The tomato paste adds umami richness and acts as a thickening base.
Then pour in the crushed tomatoes and vegetable broth. Mix everything well and bring it to a gentle boil. This is where your chili starts to look like, well, chili.
Step 4: Simmering to Perfection
Once the mixture begins to bubble, reduce the heat to low and let it simmer uncovered for at least 30 minutes. Stir occasionally to prevent sticking and help the flavors blend beautifully. This simmering process softens the beans and veggies further and lets the spices really soak in.
Don’t rush this part. If you’ve got more time, let it simmer for 45 minutes to an hour. The longer it cooks, the better it tastes. If it starts getting too thick, just add a splash more broth or water to loosen it up.
This is a great time to taste and adjust your seasoning. Add more salt, a bit more chili powder, or even a dash of sugar if your tomatoes are too acidic. Customize the spice level to suit your taste buds.
Step 5: Finishing Touches and Serving
After simmering, turn off the heat and let your chili sit for about 10 minutes. This resting time helps the flavors settle and makes your chili even more delicious.
Serve hot, and load up those toppings! Avocado slices, a dollop of vegan sour cream, a sprinkle of cilantro, or even a few crunchy tortilla chips make great additions. Pair it with warm cornbread or a bowl of rice for an ultra-satisfying meal.
Your kitchen will smell amazing, and once you dig in, you’ll see just how satisfying a bowl of veggie chili can be. It’s cozy, healthy, and comforting all at once.
Pro Tips for the Best Veggie Chili
Want to make your veggie chili stand out? These tips will help you take it from good to unforgettable.
1. Use fire-roasted tomatoes: They add a smoky depth that regular tomatoes just can’t deliver. If you can find them, they’re a game-changer.
2. Toast your spices: Add your spices to the sautéed veggies before adding liquids. This toasts them, bringing out their oils and boosting their flavor tenfold.
3. Add a touch of sweetness: A teaspoon of maple syrup or brown sugar balances out the acidity from the tomatoes and gives the chili a more rounded flavor.
4. Simmer low and slow: The longer you simmer, the better the flavors meld. It’s tempting to eat it right away, but letting it sit for 30-60 minutes makes a huge difference.
5. Taste and adjust: Every batch of chili can taste a little different depending on your ingredients. Always taste at the end and adjust spices, salt, or acid as needed.
6. Make it ahead: Veggie chili is even better the next day. Make it a day before your big meal, refrigerate, and reheat for an even deeper, richer flavor.
7. Use umami boosters: Add a dash of soy sauce, miso paste, or nutritional yeast to introduce a deep umami flavor that mimics meatiness without the meat.
8. Don’t skip the toppings: A good topping combo can transform your bowl. Creamy, crunchy, spicy—mix and match to create your perfect bite.
Nutritional Information
Here’s a general breakdown per serving (based on a 1-cup portion). These numbers can vary depending on exact ingredients and quantities used:
| Nutrient | Amount per Serving |
|---|---|
| Calories | 220–280 |
| Protein | 10–14g |
| Fiber | 12–15g |
| Carbohydrates | 35–40g |
| Fat | 5–7g |
| Saturated Fat | 0.5g |
| Sodium | 350–500mg |
| Vitamin A | 80% RDI |
| Vitamin C | 60% RDI |
| Iron | 20% RDI |
Veggie chili is a low-fat, nutrient-dense meal. It’s excellent for weight management, digestive health, and boosting immunity thanks to its fiber, vitamins, and minerals.
Looking to reduce sodium or carbs? Use low-sodium broth and canned beans, and limit starchy veggies like corn or sweet potatoes.
Common Mistakes to Avoid
Even the simplest recipes can go sideways if you miss a few key points. Here are some common veggie chili mistakes and how to avoid them:
1. Underseasoning: Chili needs bold seasoning. Don’t be afraid to add a hefty dose of chili powder, cumin, and salt. Taste throughout the cooking process.
2. Overcooking the veggies: Sauté your veggies until they’re just soft before adding beans and liquids. Overcooked veggies can turn to mush.
3. Not draining canned beans: This can lead to a mushy, overly salty chili. Always rinse and drain your beans thoroughly.
4. Adding all ingredients at once: Stagger your additions. Start with aromatics, then add firm veggies, and then softer ones. This maintains texture and flavor.
5. Rushing the simmer time: Chili develops flavor as it cooks. Don’t shortchange it—30 minutes is the minimum, but 45–60 minutes is ideal.
6. Skipping acid balance: Tomatoes are acidic. Sometimes your chili may taste “off.” A small splash of vinegar or a sprinkle of sugar can bring it back into balance.
7. Using the wrong pot: A small or thin-bottomed pot can cause burning. Use a large, heavy pot for even heat distribution.
Avoid these pitfalls, and you’re well on your way to making a chili that everyone will ask for again and again.
Storing and Reheating
Veggie chili is one of those meals that stores beautifully, making it perfect for meal prep or leftovers. Here’s how to keep it fresh and tasty:
Storing in the Fridge: Once your chili has cooled to room temperature, transfer it to an airtight container. It will keep in the fridge for up to 5 days. In fact, the flavors often deepen after a day or two, so don’t be surprised if your leftovers taste even better than the first serving!
Freezing Instructions: Veggie chili freezes like a dream. Pour cooled chili into freezer-safe containers or zip-lock bags. Lay flat for easy storage. Label with the date, and store for up to 3 months. When you’re ready to eat, thaw overnight in the fridge or use the defrost setting on your microwave.
Reheating Tips: To reheat, use the stovetop for the best texture and flavor. Heat over medium-low, stirring occasionally, until warmed through. You can also reheat individual servings in the microwave—cover the bowl to prevent splatter, and heat in 60-second intervals, stirring in between.
If your chili thickens too much in the fridge, just add a splash of water or broth while reheating to loosen it up.
Serving Suggestions and Pairings
While veggie chili can be a meal all on its own, pairing it with the right sides and toppings can elevate your dinner to the next level.
Perfect Pairings:
- Cornbread: Sweet, moist cornbread is a classic chili companion. Try jalapeño or cheese-stuffed versions for extra kick.
- Rice or Quinoa: Serve chili over a bed of whole grains for added texture and protein.
- Baked Potatoes or Sweet Potatoes: Pour chili on top for a hearty, filling meal.
- Tortilla Chips: Use them to scoop your chili or crumble them over the top for crunch.
- Grilled Cheese Sandwich: Pair a bowl of chili with a gooey grilled cheese for the ultimate comfort combo.
Creative Toppings:
- Sliced Avocado or Guacamole: Adds creaminess and a cool contrast to the spice.
- Vegan Cheese or Shredded Cheddar: Melts beautifully into hot chili.
- Fresh Cilantro or Green Onions: Brightens up every bite.
- Lime Wedges: A squeeze of lime adds zest and balances the richness.
- Hot Sauce or Chili Flakes: Spice lovers, this one’s for you.
Chili is a crowd-pleaser, and with the right sides and toppings, it can shine in just about any setting—from weeknight dinners to game-day feasts.
FAQs about Veggie Chili Recipe
1. Can I freeze veggie chili?
Absolutely! It freezes very well for up to 3 months. Just make sure to cool it completely and store it in an airtight, freezer-safe container.
2. How long does veggie chili last in the fridge?
Stored in an airtight container, it stays fresh for about 5 days. It often tastes even better after sitting for a day or two.
3. Can I use canned vegetables instead of fresh?
Yes, you can. Just be sure to drain and rinse them well to remove excess sodium. However, fresh or frozen veggies offer better texture.
4. What types of beans work best in veggie chili?
Black beans, kidney beans, and pinto beans are traditional and work great. Chickpeas or white beans are also tasty alternatives.
5. Is veggie chili supposed to be spicy?
It can be—but doesn’t have to be! You control the spice level with cayenne pepper, chili powder, or hot sauce. Adjust it to your taste.
Conclusion
Making veggie chili from scratch isn’t just a wholesome and nourishing choice—it’s also deeply satisfying. With layers of flavor, hearty ingredients, and customizable elements, this dish is a staple for anyone wanting a delicious plant-based meal that’s both filling and flexible.
Whether you’re a seasoned cook or a kitchen newbie, this step-by-step guide gives you everything you need to make your best chili yet. Remember, the beauty of veggie chili lies in its adaptability. You can swap veggies, tweak the spice level, or add your favorite toppings to make it truly your own.
So next time you’re craving something cozy, comforting, and packed with goodness, grab your pot and whip up a batch of this irresistible veggie chili. You—and your taste buds—won’t regret it.


