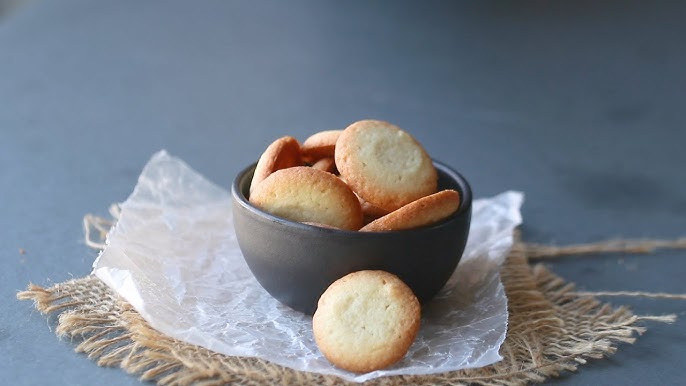
Vanilla Wafers Recipe: There’s something incredibly comforting about biting into a vanilla wafer. It’s simple, lightly sweet, delicately crisp around the edges, and filled with that warm, nostalgic vanilla aroma that instantly takes you back to childhood.
Maybe you remember dipping them into milk after school, layering them into a banana pudding, or sneaking a few straight from the box when no one was looking. But here’s the thing—homemade vanilla wafers? They’re on a whole different level.
By the end, you won’t just have a recipe—you’ll have confidence. And once you taste that first homemade wafer, warm from the oven, you may never go back to store-bought again.
Why Homemade Vanilla Wafers Taste Better Than Store-Bought
Have you ever flipped over a package of store-bought vanilla wafers and looked at the ingredient list? It’s often long, filled with preservatives, artificial flavors, and stabilizers. While they may taste decent, they lack that rich, buttery depth that only fresh ingredients can deliver.
When you make vanilla wafers at home, you’re using real butter—not margarine or hydrogenated oils. You’re using pure vanilla extract—not artificial flavoring. That alone changes everything. The flavor becomes warmer, fuller, and more authentic. It’s like comparing a real vanilla bean to synthetic vanilla essence. There’s simply no competition.
Texture is another game-changer. Store-bought wafers are designed to sit on shelves for months. That means they’re engineered for durability, not necessarily for perfect texture. Homemade wafers, on the other hand, can be baked exactly how you like them. Want them crisp and snappy? Bake a minute longer. Prefer them slightly tender? Pull them out just before they turn deep golden.
And let’s talk about freshness. There’s nothing quite like the aroma of vanilla cookies baking in your kitchen. It fills the room with warmth. It makes the house feel alive. That sensory experience alone makes homemade worth it.
Plus, baking them yourself gives you flexibility. You can reduce sugar, add a hint of lemon zest, experiment with almond extract, or even dip them in chocolate. You’re not limited by what comes in a box.
So yes, homemade vanilla wafers taste better. They feel better. And honestly? They’re surprisingly easy to make.
The History and Origin of Vanilla Wafers
Vanilla wafers may seem like a modern supermarket staple, but their roots actually go back much further. Wafers themselves have been around for centuries, originally made as thin, crisp biscuits cooked between patterned irons. Over time, recipes evolved, especially in Europe, where sugar cookies and butter biscuits became popular household treats.
The American-style vanilla wafer gained popularity in the late 19th century, particularly when commercial bakeries began producing them on a larger scale. They became a pantry essential—simple, sweet, and versatile. Their mild vanilla flavor made them perfect for snacking and baking alike.
One of the biggest reasons vanilla wafers became iconic in American kitchens is their role in classic desserts. Banana pudding, for example, wouldn’t be the same without layers of vanilla wafers. They soak up custard beautifully while still holding structure. That balance of texture is part of what makes them so special.
But while mass production made them widely accessible, something was lost along the way—homemade authenticity. Traditional wafer recipes relied on high-quality butter, fresh eggs, and real vanilla. And when you recreate that original style in your own kitchen, you’re essentially bringing the recipe back to its roots.
So when you bake a batch of homemade vanilla wafers, you’re not just making cookies. You’re participating in a long culinary tradition that spans generations. And that’s kind of beautiful, isn’t it?
Ingredients You’ll Need for Perfect Vanilla Wafers
Before we jump into mixing and baking, let’s talk ingredients. Vanilla wafers are simple—but simplicity means every ingredient matters. There’s nowhere to hide. Each component plays a specific role in flavor, texture, and structure.
Essential Dry Ingredients
- 2 cups all-purpose flour
- 1 teaspoon baking powder
- ¼ teaspoon salt
The flour forms the base structure of your cookies. Baking powder provides just enough lift to keep them from being too dense. Salt? Don’t skip it. Even a small amount enhances the sweetness and deepens the vanilla flavor.
Essential Wet Ingredients
- ¾ cup unsalted butter (softened)
- 1 cup granulated sugar
- 1 large egg
- 1 tablespoon pure vanilla extract
- 2 tablespoons milk
Butter is the heart of the flavor. Use high-quality unsalted butter for best results. Sugar adds sweetness and contributes to that lightly crisp edge. The egg binds everything together, while milk adds moisture and softness.
Optional Flavor Enhancers
- ½ teaspoon almond extract
- Vanilla bean paste for extra depth
- Lemon zest for brightness
These additions aren’t required, but they can elevate your wafers from simple to unforgettable.
With these ingredients ready, you’re already halfway to golden, buttery perfection.
Kitchen Tools and Equipment Required
Before you start mixing and baking, let’s talk about tools. The good news? You don’t need anything fancy or professional-grade to make perfect vanilla wafers. This is one of those recipes that rewards simplicity. If you’ve got a basic home kitchen setup, you’re ready to go.
Here’s what you’ll need:
- Mixing bowls (one large, one medium)
- Electric hand mixer or stand mixer
- Measuring cups and spoons
- Rubber spatula
- Baking sheets
- Parchment paper or silicone baking mat
- Cooling rack
- Cookie scoop or teaspoon
Now, could you mix everything by hand? Technically, yes. But creaming butter and sugar properly is key to getting that light, slightly crisp texture. An electric mixer makes this step easier and more consistent. Think of it as building the foundation of your cookie—if it’s done right, everything else falls into place.
Parchment paper is another small detail that makes a big difference. It prevents sticking and promotes even browning on the bottoms of your wafers. Silicone mats work beautifully too. And don’t skip the cooling rack—letting air circulate underneath the cookies keeps them from getting soggy.
One more tip? Use a small cookie scoop for evenly sized wafers. Uniform size means even baking. And when your cookies bake evenly, you avoid burnt edges or undercooked centers.
See? Nothing complicated. Just the right tools used the right way.
Understanding the Role of Each Ingredient
Ever wonder why some cookies turn out flat while others stay thick? Or why one batch tastes richer than another? It all comes down to understanding your ingredients. When you know what each one does, baking stops feeling like guesswork and starts feeling intentional.
Let’s break it down:
Butter: This is your flavor powerhouse. It adds richness, tenderness, and that melt-in-your-mouth quality. When creamed with sugar, butter traps air, which helps create a lighter texture.
Sugar: Besides sweetness, sugar affects texture. It helps cookies spread and contributes to that delicate crisp edge. Granulated sugar keeps the wafers light and clean-tasting.
Egg: The egg acts as a binder. It holds everything together and adds moisture. It also contributes to the cookie’s structure as it sets during baking.
Vanilla Extract: The star of the show. Real vanilla extract gives warmth and depth. Cheap artificial versions can taste sharp or flat—so quality matters here.
Flour: This provides structure. Too much flour, and your wafers will be dry. Too little, and they’ll spread too thin.
Baking Powder: Just enough lift to prevent dense cookies. Vanilla wafers aren’t supposed to be puffy—but they shouldn’t be hard as rocks either.
Milk: A small but important addition. It softens the dough slightly and helps create a smooth, pipeable or scoopable consistency.
When all these ingredients work together, they create balance. Not too sweet. Not too rich. Not too dense. Just perfectly light, buttery vanilla wafers.
Step-by-Step Guide to Making Vanilla Wafers
Now comes the fun part. Let’s walk through this step by step. No rushing. No shortcuts. Just simple, clear instructions that guarantee success.
Step 1: Preparing Your Ingredients
Bring butter and eggs to room temperature for smooth mixing. Measure all ingredients accurately and preheat your oven to 175°C (350°F). Line baking trays with parchment paper.
Step 2: Creaming Butter and Sugar
Beat softened butter and sugar together until light and fluffy. This step incorporates air, which helps create crisp yet tender wafers.
Step 3: Adding Eggs and Vanilla Extract
Add the egg and vanilla extract to the creamed mixture. Mix until fully combined, scraping down the bowl to ensure even blending.
Step 4: Mixing Dry Ingredients
In a separate bowl, whisk together flour, baking powder (or baking soda, if specified), and a pinch of salt. This ensures even distribution and consistent texture.
Step 5: Combining Wet and Dry Mixtures
Gradually add the dry ingredients to the wet mixture. Mix gently until a soft dough forms. Avoid overmixing to keep the wafers light and crisp.
Step 6: Shaping the Cookies
Scoop small portions of dough and roll into balls, or pipe small rounds for uniform wafers. Place them on the prepared tray, leaving space for slight spreading.
Step 7: Baking to Golden Perfection
Bake for 10–12 minutes, or until the edges turn lightly golden. The centers should be set but not dark.
Step 8: Cooling and Storing
Allow the wafers to cool on the tray for a few minutes before transferring to a wire rack. Once fully cooled, store in an airtight container at room temperature to maintain crispness.
These vanilla wafers are light, crisp, and perfect for snacking, layering in desserts, or serving with tea or coffee.
Pro Tips for Soft and Crispy Vanilla Wafers
Want to take your vanilla wafers from good to unforgettable? Let’s talk strategy. Baking isn’t just about following instructions—it’s about understanding the little tweaks that elevate results. Think of these tips as your secret weapon.
First, pay attention to butter temperature. If the butter is too cold, it won’t cream properly. Too melted, and your cookies will spread too much. The sweet spot? Soft enough to press gently with your finger but still holding its shape. This one small detail can completely change texture.
Second, don’t overcrowd your baking sheet. Giving each cookie space ensures even heat circulation. When cookies are too close together, they steam instead of bake, which affects crispness.
If you prefer extra crispy wafers, bake them for an additional 1–2 minutes until the edges deepen in color. Keep a close eye—seconds matter. For slightly softer wafers, remove them when the centers still look a touch pale.
Another powerful trick? Chill the dough for 20–30 minutes before baking. This helps control spreading and intensifies flavor. It’s not mandatory, but it makes a noticeable difference.
Finally, always rotate your baking sheet halfway through baking. Ovens often have hot spots. Rotating ensures uniform golden edges.
Little adjustments. Big impact.
Common Mistakes to Avoid
Even simple recipes can go sideways if small details are ignored. Let’s prevent that from happening.
One common mistake is overmixing the dough. Once you add the flour, mix only until combined. Overmixing develops gluten, leading to tough cookies. And nobody wants a vanilla wafer that crunches like a cracker.
Another issue? Incorrect flour measurement. Scooping directly from the bag compacts flour, adding more than intended. Instead, spoon and level. Precision equals perfection in baking.
Skipping parchment paper is another avoidable error. Without it, bottoms can brown too quickly or stick.
Also, avoid opening the oven door repeatedly. Temperature fluctuations affect baking time and texture. Trust the process.
Lastly, don’t store warm cookies in a container. Trapped steam makes them soggy. Let them cool completely first.
Avoid these pitfalls, and your vanilla wafers will come out beautifully every time.
Flavor Variations to Try
Once you master the classic version, why not experiment? Vanilla wafers are like a blank canvas. You can add subtle twists without overpowering their delicate charm.
Here are some delicious variations:
- Chocolate-Dipped Wafers: Melt dark or milk chocolate and dip half of each cooled wafer. Let set on parchment paper.
- Cinnamon Sugar Wafers: Sprinkle tops with cinnamon sugar before baking.
- Lemon Vanilla Wafers: Add 1 teaspoon of lemon zest for a bright citrus note.
- Almond Vanilla Wafers: Replace half the vanilla extract with almond extract.
- Sandwich Wafers: Spread buttercream or chocolate ganache between two wafers.
You can even crumble them into cheesecake crusts or layer them into trifles.
Vanilla wafers are versatile. Once you start experimenting, it’s hard to stop.
How to Store and Preserve Freshness
Homemade cookies don’t contain preservatives, so storage matters.
Keep your vanilla wafers in an airtight container at room temperature. They’ll stay fresh for up to 7 days.
For longer storage, freeze them. Place cooled wafers in a freezer-safe container with parchment between layers. They can last up to 3 months.
To restore crispness, pop them in a 300°F oven for 3–5 minutes.
Freshness isn’t complicated—it just requires proper sealing and dryness.
Serving Ideas and Pairings
Vanilla wafers shine on their own, but they truly sparkle in desserts.
Serve them with:
- Cold milk
- Coffee or tea
- Ice cream
- Banana pudding
- Cheesecake crusts
They’re also perfect for dipping into hot chocolate on chilly evenings.
Sometimes the simplest treats bring the biggest comfort.
FAQs about Vanilla Wafers Recipe
1. Can I use salted butter instead of unsalted?
Yes, you can use salted butter. Simply reduce or omit any additional salt in the recipe to keep the flavor balanced.
2. Why are my vanilla wafers too hard?
This usually means they were overbaked. Try reducing the baking time slightly in your next batch and remove them as soon as the edges turn lightly golden.
3. Can I freeze the dough?
Absolutely. Scoop the dough into balls and freeze until firm. You can bake them straight from frozen—just add 1–2 extra minutes to the baking time.
4. How do I make them extra crispy?
Bake the wafers for 1–2 minutes longer and allow them to cool completely on a wire rack. They crisp up more as they cool.
5. Can I use vanilla bean instead of extract?
Yes. Scrape the seeds from one vanilla bean and mix them into the dough for a richer, more intense vanilla flavor.
These tips will help you achieve perfectly crisp and flavorful vanilla wafers every time.
Conclusion
Vanilla wafers may look humble, but they carry timeless charm. With just a handful of pantry ingredients and careful attention to detail, you can create a batch that tastes fresher, richer, and more satisfying than anything store-bought.
Baking them at home isn’t just about flavor—it’s about experience. The aroma filling your kitchen. The golden edges forming in the oven. The first crisp bite once they cool.
Simple ingredients. Clear steps. Incredible results.
Now it’s your turn. Preheat that oven and start baking.


