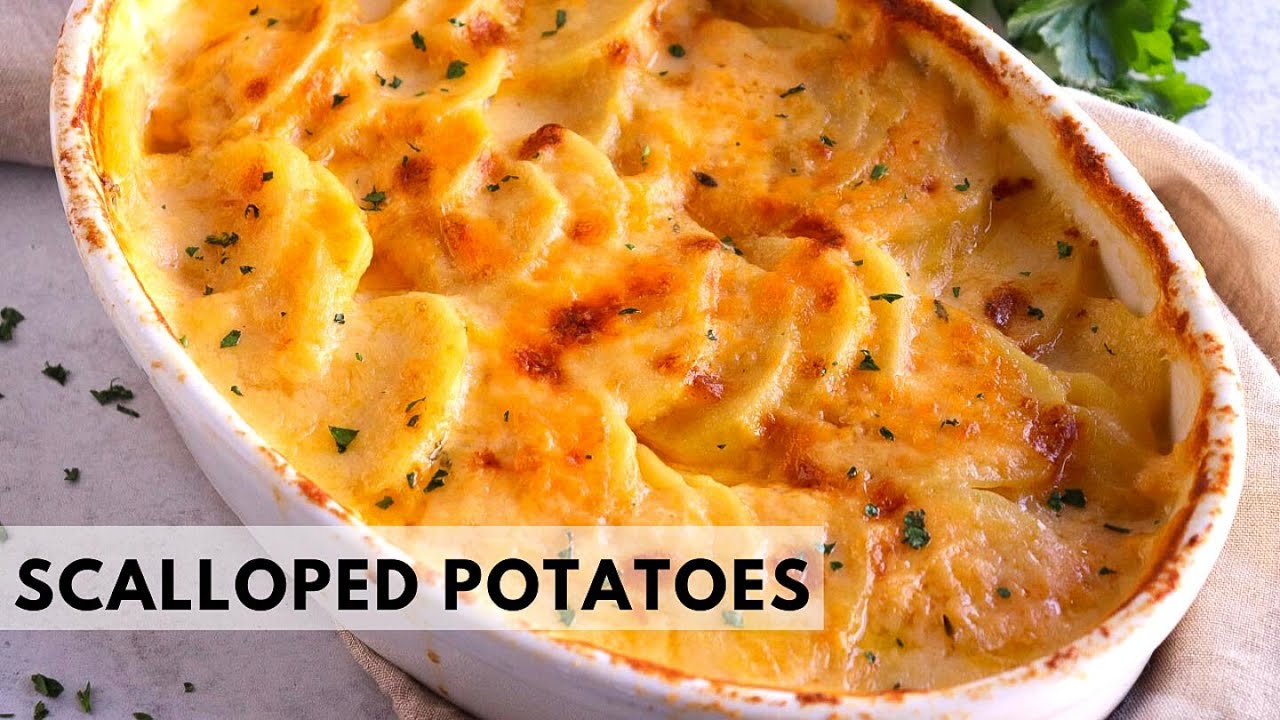
Traditional Scalloped Potatoes Recipe: There’s something about scalloped potatoes that just screams comfort food. Maybe it’s the creamy, cheesy texture, or the way the thinly sliced potatoes soak up all the flavor from the sauce as they bake to golden perfection. Scalloped potatoes are more than just a side dish—they’re the unsung heroes of family dinners, potlucks, and holidays. This dish has been around for generations, handed down in recipe cards stained with love and memories.
Scalloped potatoes traditionally consist of thin slices of potato layered in a creamy sauce and baked until soft and golden. The dish has roots in European cuisine and has become a classic in American homes. Unlike au gratin potatoes, scalloped potatoes typically don’t have shredded cheese layered throughout—though modern recipes (like this one) often add cheese for that extra punch of flavor. It’s hearty, rich, and satisfying, with a mild, savory flavor that complements almost any main dish.
This guide will take you step-by-step through making traditional scalloped potatoes from scratch. By the end, you’ll have a bubbling casserole dish full of creamy, golden, perfectly cooked potatoes ready to impress everyone at your table.
Ingredients Needed
Before we jump into cooking, let’s round up everything you’ll need. This recipe keeps it classic with basic ingredients you probably already have at home.
Main Ingredients:
- 2 lbs Russet or Yukon Gold potatoes
- 2 tablespoons unsalted butter
- 2 tablespoons all-purpose flour
- 2 cups whole milk (or half-and-half for richer texture)
- 1 small onion, finely chopped (optional but recommended)
- Salt and pepper to taste
- 1 cup shredded cheddar cheese (optional for a richer flavor)
- Fresh thyme or parsley for garnish (optional)
Optional Add-Ins:
- Garlic (for extra depth)
- Nutmeg (just a pinch for warmth)
- Grated Parmesan (for topping)
- Ham or bacon bits (to turn it into a main dish)
You can mix and match based on what you have or want. If you’re after the most traditional version, stick to the basics: potatoes, butter, flour, milk, and seasoning.
Tools You’ll Need
You don’t need a professional kitchen setup to make great scalloped potatoes. Here are the basic tools you’ll want to have ready:
- Cutting board – For slicing potatoes and onions
- Sharp knife or mandoline slicer – To get those thin, even slices
- Large saucepan – For making the sauce
- Whisk – Essential for a lump-free béchamel (white sauce)
- Casserole dish (9×13 inches works well) – To bake everything in
- Aluminum foil – For covering while baking
- Oven mitts – Safety first when pulling out hot dishes!
Want restaurant-level thin potato slices? Invest in a mandoline slicer. Just be careful—it’s sharp, and you’ll want to use the hand guard or cut-resistant gloves.
Preparing Your Potatoes
Not all potatoes are created equal when it comes to scalloped dishes. You want a starchy potato like Russet or Yukon Gold. Russets are classic—they soak up the creamy sauce well and break down just enough to be tender. Yukon Golds, on the other hand, hold their shape better and have a buttery taste that enhances the richness of the dish.
Here’s how to prep them:
- Wash and peel your potatoes.
- Slice them into 1/8-inch thick rounds using a sharp knife or mandoline. Keep the slices uniform to ensure even cooking.
- Place the sliced potatoes in a bowl of cold water while prepping the sauce. This prevents browning and removes excess starch.
Uniform slices are key to consistent texture throughout the bake. Too thick, and they won’t cook through. Too thin, and they might turn to mush.
Making the Creamy Sauce
Now comes the heart of the dish: the velvety white sauce. This starts with a basic roux—a mixture of butter and flour used to thicken sauces.
Step-by-step for the sauce:
- In a saucepan over medium heat, melt 2 tablespoons of butter.
- Stir in 2 tablespoons of flour and whisk constantly for about 1–2 minutes until it turns a light golden color. This cooks off the raw flour taste.
- Slowly add 2 cups of warm milk, continuing to whisk to prevent lumps.
- Let the sauce simmer gently until thickened (about 5–7 minutes). You want it to coat the back of a spoon.
- Season with salt, pepper, and optionally, a pinch of nutmeg or garlic for extra depth.
- (Optional) Stir in ½ cup of shredded cheese for a cheesier sauce.
This béchamel is the glue that binds everything together. It should be creamy, not too runny, and seasoned well. Don’t rush this step—it sets the tone for the whole dish.
Layering the Potatoes
Once your sauce is smooth and your potatoes are sliced, it’s time to assemble the masterpiece. Layering is more than just stacking—it’s about building flavor and ensuring every bite is rich and creamy.
Here’s how to layer your scalloped potatoes:
- Grease your baking dish with a bit of butter or cooking spray. This prevents sticking and makes cleanup easier.
- Start with a single layer of potatoes, slightly overlapping each slice like shingles.
- Add a sprinkle of salt and pepper, and optionally, a thin layer of chopped onions.
- Spoon some of the creamy sauce over the potatoes, spreading it evenly.
- Repeat the layers—potatoes, seasoning, onions, sauce—until you’ve used all the ingredients.
- (Optional) Top with shredded cheese for a crispy, golden top layer.
- If you want extra flavor, add a little grated Parmesan or breadcrumbs before baking.
Don’t overload the top with too much cheese early on—it can burn. A light topping at the start is fine, but for a perfectly browned finish, consider adding more cheese in the last 10-15 minutes of baking. This ensures that gooey, golden crust without overdoing it.
Baking Instructions
You’ve done the prep—now it’s time to bring it all together in the oven. Scalloped potatoes take time to bake, but the result is well worth the wait. Low and slow is the name of the game here.
How to bake scalloped potatoes:
- Preheat your oven to 350°F (175°C).
- Cover the dish with aluminum foil to prevent the top from drying out during the first phase of baking.
- Bake covered for 45 minutes.
- Remove the foil and bake for an additional 30–40 minutes. The top should be golden brown and bubbling.
- Check for doneness by inserting a knife or fork into the center—it should glide through easily without resistance.
- Let the dish rest for about 10–15 minutes before serving. This allows the sauce to set and makes it easier to slice.
Want that crispy top? Broil for the last 2–3 minutes—but watch closely to avoid burning. This gives you a delicious contrast between the creamy layers and the crunchy surface.
Tips for Perfect Scalloped Potatoes
Even with a straightforward recipe like this, a few insider tips can take your scalloped potatoes from good to unforgettable. Here’s how to level up your potato game:
- Use warm milk when making the sauce. Cold milk can shock the roux and create lumps.
- Season every layer lightly—don’t just dump salt on top. Balanced seasoning is key.
- Avoid watery sauce by cooking the béchamel until thick. Thin sauce = runny dish.
- Slice potatoes thinly and uniformly. This ensures even cooking and better texture.
- Don’t rush the bake time. The longer, slower bake gives potatoes a melt-in-your-mouth quality.
- Let it rest before serving. This allows the sauce to thicken and flavors to meld.
And remember, scalloped potatoes are flexible. You can add ingredients like garlic, herbs, or even thin-sliced leeks for extra flavor. Just don’t overcrowd the dish, or the sauce may not penetrate properly.
Serving Suggestions
Scalloped potatoes are the ultimate comfort food and play well with many main dishes. Whether it’s a holiday table or a casual dinner, this side dish can shine next to meats, veggies, or even as a standalone option.
Perfect pairings include:
- Roast chicken or turkey
- Baked ham or pork chops
- Grilled steak
- Vegetarian dishes like roasted veggies or a hearty mushroom main
- Fresh salads with vinaigrette to balance the richness
Want to make it a full meal? Add some diced ham or cooked bacon between the potato layers. This gives you a protein boost and turns a side into the star of the table.
You can also serve scalloped potatoes with a simple green salad and crusty bread for a cozy, satisfying vegetarian meal. It’s rich enough to stand on its own with just a little balance from a lighter side.
Storage and Reheating
Let’s face it—scalloped potatoes taste even better the next day. That creamy, flavorful goodness continues to soak into the potatoes, making leftovers something to look forward to. But if you want to keep the texture and taste just right, you need to store and reheat them properly.
How to store scalloped potatoes:
- Let them cool to room temperature before storing. Covering hot food directly in the fridge can cause condensation and a soggy texture.
- Transfer to an airtight container or cover the original baking dish tightly with plastic wrap or foil.
- Store in the refrigerator for up to 4 days.
Reheating tips:
- Oven method (best for texture): Preheat your oven to 350°F (175°C). Place the scalloped potatoes in an oven-safe dish, cover with foil, and heat for about 20–25 minutes, or until heated through. You can uncover for the last few minutes to crisp up the top again.
- Microwave method (faster, but may be less crispy): Place a portion in a microwave-safe dish, cover loosely, and heat on medium power for 2–3 minutes. Stir halfway through to ensure even heating.
Freezing scalloped potatoes:
You can freeze them, but be warned: the texture may change slightly due to the milk-based sauce. If you do want to freeze:
- Cool completely.
- Portion into airtight freezer-safe containers.
- Freeze for up to 2 months.
- Thaw overnight in the fridge and reheat using the oven method for best results.
Scalloped vs. Au Gratin Potatoes
If you’ve ever been confused by these two, you’re not alone. Scalloped potatoes and au gratin potatoes are often used interchangeably, but there are a few key differences that set them apart.
Scalloped Potatoes:
- Typically use a cream or milk-based sauce (béchamel) without cheese between the layers.
- More subtle in flavor, with a soft, creamy texture.
- Focuses more on the potato itself than added toppings.
Au Gratin Potatoes:
- Use shredded cheese between the layers and often a breadcrumb topping.
- Richer and more indulgent, with a crispy, cheesy crust.
- “Gratin” literally means “grated” in French—referring to the cheese.
So, when to choose which?
- Want something rich and cheesy? Go au gratin.
- Craving something creamy and classic? Scalloped potatoes are your go-to.
Both are delicious, but scalloped potatoes offer a more traditional, elegant comfort food feel—perfect for holidays, Sunday dinners, or impressing dinner guests without overdoing it.
Gluten-Free and Vegan Alternatives
Eating gluten-free or vegan? No problem—scalloped potatoes can easily be adapted without sacrificing flavor or creaminess.
For a gluten-free version:
- Swap all-purpose flour with a gluten-free flour blend, rice flour, or cornstarch.
- Be sure your butter and milk are certified gluten-free.
For a vegan version:
- Use plant-based butter or olive oil.
- Replace milk with unsweetened almond, soy, or oat milk.
- Add creaminess with cashew cream or coconut cream (unsweetened).
- For cheesy flavor, stir in nutritional yeast or a vegan cheese alternative into the sauce.
Pro Tip: To thicken the sauce, use cornstarch or a roux made with oil and gluten-free flour. The consistency should still coat the back of a spoon.
You’ll still get that warm, hearty dish—just without the dairy or gluten. These adaptations are great for guests with food sensitivities or anyone wanting a lighter version.
Recipe Variations to Try
Feeling adventurous? The basic scalloped potatoes recipe is your canvas. Here are a few creative spins to make it your own:
1. Cheesy Bacon Scalloped Potatoes
- Add cooked, crumbled bacon between layers.
- Mix in sharp cheddar or smoked Gouda for extra flavor.
2. Scalloped Potatoes with Ham
- Add diced ham to make it more filling.
- Great for using up leftovers from holiday meals.
3. Garlic Herb Scalloped Potatoes
- Infuse your sauce with fresh thyme, rosemary, or minced garlic.
- Sprinkle chopped herbs on top before serving.
4. Spicy Jalapeño Scalloped Potatoes
- Layer in thin-sliced jalapeños or add cayenne pepper to the sauce.
- Top with pepper jack cheese for a kick.
5. Vegetable-Packed Scalloped Potatoes
- Add thin slices of zucchini, mushrooms, or spinach between the potato layers.
- Great for vegetarians or bulking up the dish with extra nutrients.
Don’t be afraid to experiment. This dish is incredibly forgiving—and often even better when you put your own twist on it.
FAQs about Traditional Scalloped Potatoes Recipe
Q1: Can I make scalloped potatoes ahead of time?
Yes! Assemble them up to a day in advance, cover tightly, and refrigerate. Bake just before serving or bake halfway, refrigerate, and finish baking when ready.
Q2: Can scalloped potatoes be frozen?
They can, but be aware the texture may become a bit grainy when reheated. Best results come from reheating in the oven after thawing overnight.
Q3: Why are my scalloped potatoes watery?
This usually happens if the sauce wasn’t thickened enough, or the potatoes released too much moisture. Pre-cooking the sauce and using starchy potatoes like Russets helps avoid this.
Q4: How do I keep my scalloped potatoes from curdling?
Avoid using high heat and make sure your sauce is well-emulsified before layering. Low, slow baking with foil to start helps, too.
Q5: Can I use a slow cooker instead of baking in the oven?
Yes! Cook on low for about 6–7 hours or high for 3–4. Just note that the top won’t get as golden unless you finish it under a broiler.
Conclusion
Scalloped potatoes are the definition of comfort—simple ingredients, rich flavor, and a dish that brings people together around the table. Whether you’re serving them up for a holiday feast, a weekend dinner, or just because you need a little extra comfort, this traditional recipe is a guaranteed crowd-pleaser.
Now that you’ve got the full guide, don’t be afraid to tweak, add, or elevate it with your own personal touch. Once you’ve mastered the basics, you’ll never look at potatoes the same way again.