Thumbprint Cookies Recipe: Thumbprint cookies are one of those classic desserts that bring back warm memories of holidays, family gatherings, and lazy Sunday afternoons. With their buttery base and sweet jam center, they strike a perfect balance between soft and crisp, sweet and slightly tangy. The texture and flavor are so satisfying that it’s hard to eat just one. They’re especially popular during festive seasons like Christmas, but honestly, they’re good all year round. Whether you’re a baking newbie or a seasoned pro, these cookies are super simple and totally rewarding to make.
Why They’re Called “Thumbprint” Cookies
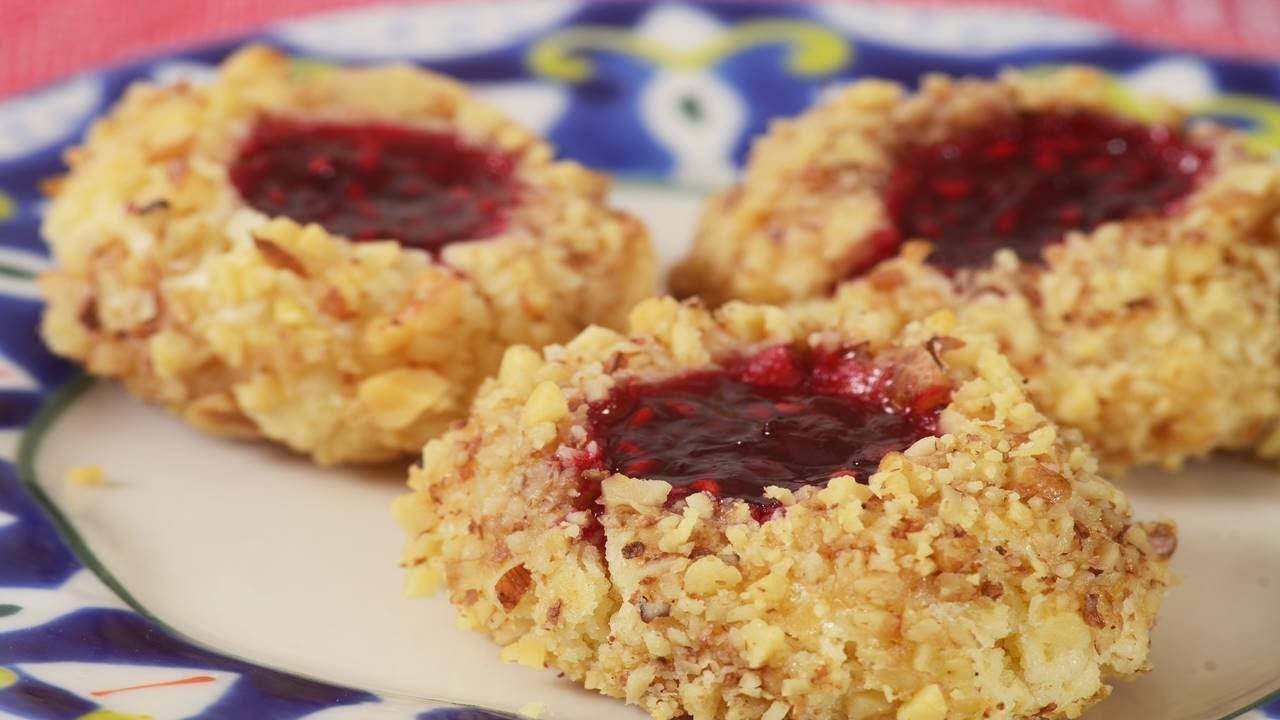
The name “thumbprint cookies” comes from the method used to create the indentation in the center of each cookie. Traditionally, bakers use their thumbs to press a small well into the dough ball before filling it with jam or other sweet fillings. It’s a hands-on approach—literally!—that makes these cookies not just fun to eat but also fun to make. This simple gesture turns a plain cookie into a piece of edible art. The thumbprint holds the jam, turning it into a gooey surprise at the center of every bite.
Ingredients You’ll Need
Basic Pantry Staples
To keep things straightforward, here’s a list of the core ingredients that most thumbprint cookie recipes use:
- 1 cup (2 sticks) unsalted butter – softened
- 2/3 cup granulated sugar
- 2 egg yolks – reserve the whites if using for coating
- 1 tsp vanilla extract
- 2 cups all-purpose flour
- 1/4 tsp salt
- 1/2 cup jam or preserves – raspberry, strawberry, apricot, or your favorite
These ingredients are kitchen staples, which means you probably have them on hand already. If not, a quick grocery run is all it takes.
Optional Add-ins for a Twist
Want to make your cookies stand out? Try adding:
- Chopped nuts – like almonds, pecans, or walnuts, rolled around the dough balls
- Shredded coconut – for a tropical flair
- Lemon zest – for added zing
- A pinch of cinnamon – to warm up the flavor
These optional ingredients give you room to experiment without messing with the basic structure of the cookie.
Kitchen Tools Required
Simplifying the Process
Baking should never feel overwhelming, so keep it simple with these essential tools:
- Mixing bowls (one large, one medium)
- Electric mixer or hand whisk
- Measuring cups and spoons
- Baking sheet
- Parchment paper or silicone baking mat
- Small spoon (for filling)
- Cooling rack
If you’ve got a cookie scoop or melon baller, it’ll help keep the cookies uniformly sized.
Prep Tips for Efficiency
- Pre-measure ingredients to keep things moving smoothly.
- Line your baking tray ahead of time.
- Soften the butter by leaving it at room temperature for 30 minutes.
These simple prep tips save you time and avoid last-minute scrambles.
Step-by-Step Instructions
Step 1: Preparing the Dough
Start by creaming the softened butter and sugar together in a large mixing bowl. Beat them for about 2-3 minutes until the mixture is light, fluffy, and slightly pale. Then, add the egg yolks and vanilla extract, and continue beating until everything is well combined. Gradually mix in the flour and salt. The dough will seem crumbly at first but will come together nicely after a bit of mixing. Don’t overwork it—just enough to combine everything into a soft dough.
Step 2: Chilling for Better Texture
Chilling is crucial. It firms up the dough, making it easier to roll and helps the cookies hold their shape while baking. Wrap the dough in plastic wrap and refrigerate for at least 30 minutes—an hour is even better. If you’re short on time, 20 minutes in the freezer works too. Chilled dough also prevents excessive spreading during baking, which keeps the thumbprint intact.
Step 3: Rolling and Shaping the Cookies
Once chilled, preheat your oven to 350°F (175°C). Roll the dough into 1-inch balls (about the size of a large marble). If you want a nutty finish, roll the balls in crushed nuts or coconut. Space the balls about 2 inches apart on a parchment-lined baking sheet. Now, gently press your thumb (or use the back of a teaspoon) into the center of each dough ball to create a well. Don’t press too deep, but deep enough to hold the jam.
Step 4: Adding the Thumbprint
This is where the fun starts. Spoon about 1/2 teaspoon of your chosen jam into each indentation. Don’t overfill—just enough to fill the cavity without spilling over the sides. If you’re using thicker preserves or jelly, give it a quick stir to loosen it up. Want a double hit of flavor? Mix two jams together and see what magic happens.
Step 5: Filling and Baking
Bake the cookies in your preheated oven for 12–14 minutes, or until the edges are just starting to turn golden. The centers might look a bit soft, but they’ll firm up as they cool. Let them sit on the baking sheet for 5 minutes before transferring them to a wire rack. This cooling step is crucial because they’re fragile when hot.
Variations to Try
Jam-Filled Flavors
One of the most delightful things about thumbprint cookies is how easily customizable they are. The jam you choose completely transforms the flavor profile. Classic options like raspberry, strawberry, and apricot are always crowd-pleasers, but don’t be afraid to branch out. Try using blueberry preserves, cherry pie filling, or even fig jam for a gourmet twist. Want a holiday feel? Mix cranberry sauce with orange zest—it’s like Christmas in a bite.
You can even go tropical by using pineapple jam or mango chutney for a sunny twist that brightens up your cookie tray. And if you’re feeling really adventurous, try pairing goat cheese or cream cheese in the center with a sweet jam overlay—perfect for adult palates and a hit at brunch parties.
Pro tip: For smoother results, slightly heat the jam before spooning it in. This helps it settle perfectly into the indentation and avoids any bubbling over during baking.
Chocolate-Lovers Edition
If jam isn’t your jam, why not go chocolate? After the cookies are baked and cooled, fill the indentations with melted chocolate chips, Nutella, or ganache. You can even sprinkle a pinch of sea salt on top of the chocolate for a rich, salted caramel vibe.
For double chocolate thumbprints, try adding cocoa powder to the dough and filling the centers with white chocolate or peanut butter chips. The contrast in flavors and textures is irresistible.
There’s also the option of caramel fillings—melt soft caramels with a little cream and fill the thumbprints post-bake. Drizzle with chocolate for a decadent finish. Trust us, these cookies won’t last long on the plate.
Storage Tips and Shelf Life
Keeping Them Fresh Longer
Homemade cookies are at their best in the first few days, but proper storage can help them last longer. Once completely cooled, store thumbprint cookies in an airtight container at room temperature. They’ll stay fresh for up to 5 days, though they rarely make it that long!
If you’re stacking them in layers, place a sheet of parchment paper between each layer to prevent the jam centers from sticking together. Avoid exposure to heat or direct sunlight, which can make the jam melt or spoil.
Freezing for Later Use
Want to bake ahead of time? Thumbprint cookies are very freezer-friendly. You can freeze them either before or after baking:
- Unbaked Dough Balls: Form the dough balls, create the indentations, but don’t add jam. Freeze on a tray, then transfer to a zip-lock bag. When ready to bake, thaw, add jam, and bake as usual.
- Baked Cookies: Let them cool completely, then freeze in a single layer until solid. Transfer to an airtight container or freezer bag. They’ll keep well for 2–3 months.
To enjoy, simply let the cookies thaw at room temperature. For that fresh-baked feel, pop them in the oven at 300°F for 5 minutes.
Serving Suggestions
When and How to Serve
Thumbprint cookies are incredibly versatile. Serve them as a sweet treat with afternoon tea, pack them in school lunches, or use them to jazz up your holiday cookie tray. Their size and visual appeal make them ideal for parties, potlucks, and bake sales.
Looking to impress guests? Arrange them on a tiered dessert stand with other small cookies and pastries. Want a more casual vibe? Just pile them into a big, rustic bowl and watch them disappear.
These cookies also make for a great gift idea. Pop them into mason jars, wrap with ribbon, and you’ve got an instant homemade present.
Pairing Ideas with Drinks
Pairing drinks with cookies? Oh yes. Here are some matchups:
- Coffee: The richness of espresso or a creamy latte balances the sweetness.
- Tea: Earl Grey or chamomile pairs well with fruit-filled cookies.
- Milk: The classic choice, especially if you’re serving kids.
- Sparkling wine: For fancy occasions, a glass of bubbly cuts through the buttery texture.
The key is contrast—rich cookies love light, refreshing drinks.
Common Mistakes to Avoid
Preventing Spreading or Cracking
One of the most common issues people face when making thumbprint cookies is that they spread too much during baking. This usually happens because the dough wasn’t chilled enough. Always refrigerate for at least 30 minutes before shaping and baking.
Cracks forming around the thumbprint? That’s not always a bad thing—some folks love the rustic look. But if you want them perfectly smooth, make sure the dough is soft but firm (not dry or crumbly), and press gently when making the indentation.
Another tip: avoid overmixing the dough. Overworking it develops the gluten in the flour, which leads to a tougher texture and more cracking.
Perfecting the Thumbprint
Use your thumb, yes—but make sure it’s clean and slightly floured to prevent sticking. Want perfect results every time? Try using the back of a rounded teaspoon or melon baller. Consistency is key, especially if you’re going for that professional look.
Also, don’t overfill the jam. A little goes a long way, and too much can boil over, creating a mess and ruining the shape of the cookie. Aim for a neatly filled center that stays in place during baking.
FAQs about Thumbprint Cookies Recipe
1. What are thumbprint cookies?
Thumbprint cookies are soft, buttery shortbread-style cookies with an indentation in the center—usually filled with jam, chocolate, or other sweet fillings.
2. Why did my thumbprint cookies spread too much?
Cookies may spread if the dough is too warm or if too much butter is used. Chill the dough before baking and measure ingredients accurately for best results.
3. Can I make thumbprint cookies without eggs?
Yes! You can substitute eggs with applesauce, yogurt, or commercial egg replacers to make eggless thumbprint cookies.
4. What fillings work best for thumbprint cookies?
Classic choices include raspberry jam, apricot preserves, lemon curd, or melted chocolate. Choose thick fillings that won’t run while baking.
5. How do I store thumbprint cookies?
Store cookies in an airtight container at room temperature for up to 5 days, or refrigerate for up to 2 weeks. For longer storage, freeze them for up to 3 months.
6. Can I freeze thumbprint cookie dough?
Absolutely. Shape the dough into balls and freeze. When ready to bake, thaw slightly, press the thumbprint, fill, and bake as directed.
Conclusion
Thumbprint cookies aren’t just a dessert—they’re a tradition. From their buttery, melt-in-your-mouth texture to their jewel-toned centers, they’re as beautiful as they are delicious. What’s more, they’re simple enough for beginners, yet versatile enough for seasoned bakers to get creative with flavors and textures.
Whether you’re whipping up a batch for a holiday party, surprising a friend with homemade goodies, or just treating yourself to something sweet on a Tuesday, thumbprint cookies deliver every single time. They’re fun to make, fun to eat, and let’s be honest—who doesn’t love a cookie with a gooey surprise in the middle?
So go ahead—preheat that oven, grab your favorite jam, and give these classic cookies a whirl. You’ll be hooked after just one bite.