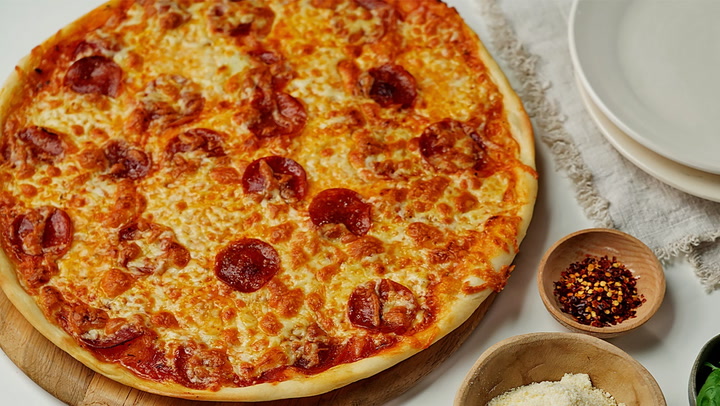
Thin Crust Pizza Dough Recipe: Let’s talk about the crisp, the crunch, and the unbeatable satisfaction of biting into a perfect slice of thin crust pizza. Unlike its thicker, doughier cousin, thin crust pizza keeps things light and crispy, allowing the toppings to shine without being overpowered by the bread. It’s the go-to choice for people who want a snack that feels gourmet yet comforting. Whether you’re a weekend foodie or someone looking to impress guests with homemade pizza night, mastering thin crust dough is your first step to pizza greatness.
Homemade thin crust pizza dough may sound intimidating, but trust me—it’s simpler than you think. With the right ingredients, tools, and a bit of patience, you’ll be on your way to creating that irresistible crust that breaks with a snap and melts in your mouth. In this guide, I’ll walk you through every step of the process. By the end, you’ll not only know how to make it—you’ll know how to master it.
Why Choose Thin Crust?
Healthier Alternative
First off, let’s face it—we all love pizza, but not everyone wants the heavy feeling that comes after downing a thick slice of dough. That’s where thin crust comes in. With significantly fewer carbs and calories per slice, it’s a healthier option for those watching their waistline. When you reduce the amount of dough in each slice, you’re automatically reducing excess carbs without compromising on flavor.
Beyond calories, thin crust pizzas often feature less cheese and sauce, making them easier to digest and a bit gentler on the stomach. This makes them a popular choice for people with dietary sensitivities or those simply trying to eat cleaner.
Crispy Texture Delight
There’s nothing quite like that crunch when you bite into a well-made thin crust. It’s like music for your taste buds. The texture is a massive part of the appeal—it’s crisp on the outside and just the right amount of chewy on the inside.
This type of crust also allows the toppings to take center stage. With a thinner base, flavors aren’t muffled under layers of dough. You taste the tomato sauce, the herbs, the mozzarella, the pepperoni—every ingredient shines through beautifully.
Essential Ingredients for Thin Crust Pizza Dough
Let’s get down to the building blocks of your pizza dough. It all starts with just a few ingredients, but the magic lies in how you mix and treat them.
Flour Choices: All-Purpose vs Bread Flour
All-purpose flour is versatile and accessible, making it a great starting point for beginners. It provides a good balance of texture and strength. However, if you want that slight chewiness with a bit more elasticity, bread flour is your friend—it contains more protein, which helps develop gluten better during kneading.
For the crunchiest crust, some pizzaiolos swear by mixing all-purpose with a bit of semolina flour. It’s all about finding your personal perfect combo.
Yeast – The Rising Star
You can’t skip yeast—it’s what gives the dough its lightness and structure. Instant yeast is super convenient and doesn’t require proofing, but active dry yeast gives you more control if you’re into the traditional process. Make sure your yeast is fresh; expired yeast won’t activate properly, and that means no rise, no crunch, and a disappointing dough.
Water, Salt, and Olive Oil – Balancing the Basics
- Water: Lukewarm water (around 100–110°F) is ideal for activating yeast. Too cold, and it won’t activate; too hot, and you’ll kill it.
- Salt: This isn’t just for flavor—it also controls yeast activity and strengthens the dough.
- Olive Oil: It adds richness, improves texture, and helps with browning. Don’t skip it.
Here’s a basic ingredient list to get you started:
| Ingredient | Amount |
|---|---|
| All-purpose flour | 2½ cups |
| Warm water | ¾ cup |
| Active dry yeast | 1 tsp |
| Olive oil | 1 tbsp |
| Salt | 1 tsp |
Kitchen Tools You’ll Need
Let’s talk gear. Good dough doesn’t require a fancy setup, but the right tools make the process smoother:
- Mixing Bowl – For combining and proofing your dough.
- Measuring Cups/Spoons – Accuracy matters.
- Rolling Pin – To roll out that thin crust perfection.
- Pizza Stone or Baking Sheet – A hot surface = crispy base.
- Dough Scraper or Bench Knife – Helps with kneading and cleaning.
- Kitchen Towel or Plastic Wrap – For covering dough during rise.
Optional but helpful:
- Stand Mixer with Dough Hook – Saves time and effort.
- Digital Scale – For precise flour and water measurements.
Step-by-Step Guide to Making Thin Crust Pizza Dough
Step 1: Activating the Yeast
Start by warming your water to about 105°F (just warm to the touch). Pour it into a bowl and mix in your yeast and a pinch of sugar. Let it sit for 5–10 minutes until it gets foamy on top. This means the yeast is alive and ready to party. No foam? Try fresh yeast—it’s crucial for a good rise.
Step 2: Mixing the Ingredients
Once your yeast is activated and bubbly, it’s time to bring everything together. In a large mixing bowl, combine your flour and salt. Slowly pour in the yeast mixture along with the olive oil. Stir everything together using a wooden spoon or spatula until it starts to form a shaggy dough.
This is the stage where your dough starts coming to life. It might look a little messy at first—don’t worry, that’s normal. If the dough feels too dry, add a teaspoon of water at a time. If it’s too sticky, sprinkle in a little more flour. But remember, slightly sticky is better than too dry. A moist dough creates a better, airier crust.
Mix until everything is mostly combined and then transfer it to a clean surface for kneading.
Step 3: Kneading the Dough
Kneading is where the magic really starts. This process develops gluten—the stretchy protein that gives your dough structure and that satisfying chew when baked.
To knead, fold the dough in half toward you, push it away with the heel of your hand, turn it 90 degrees, and repeat. Do this for about 8–10 minutes. You’re looking for a smooth, slightly elastic dough that springs back when poked. If using a stand mixer, let it run on medium speed with a dough hook for about 5–6 minutes.
Don’t rush this part. Think of kneading as giving your dough a workout so it can perform like a champ in the oven. Once kneaded, form it into a ball and place it in a lightly oiled bowl. Cover with a clean towel or plastic wrap.
Step 4: Letting the Dough Rise
Now comes the waiting game—but it’s worth it. Let the dough rest in a warm, draft-free spot for about 1 to 1.5 hours. This is when your yeast works its magic, creating air bubbles and flavor.
You’ll know it’s ready when it has doubled in size. Gently poke it with your finger—if the dent stays, your dough has risen perfectly.
Short on time? You can speed things up by placing the dough in a slightly warm (but turned off) oven. Alternatively, for better flavor, let it rise slowly in the fridge overnight. The cold fermentation method develops deeper, more complex flavors.
Step 5: Rolling Out the Perfect Crust
Once your dough has risen, punch it down gently to release excess air. Transfer it to a lightly floured surface and let it rest for 5–10 minutes—this relaxes the gluten and makes it easier to roll out.
Using a rolling pin, start from the center and roll outward. Aim for ⅛ inch thick or even thinner if you like that cracker-style crust. If the dough keeps shrinking back, let it rest a little longer before trying again.
Transfer the rolled-out dough to a piece of parchment paper or a pizza peel if using a stone. Add your sauce and toppings quickly, and then bake immediately in a preheated oven at 475–500°F. A pizza stone or steel gives the best results, but a baking sheet works just fine too.
Bake for 8–12 minutes or until the crust is golden and crispy, and the cheese is bubbly and starting to brown.
Tips for the Perfect Thin Crust Pizza
- Use high heat: The hotter the oven, the crispier the crust. Preheat your oven for at least 30 minutes before baking.
- Less is more with toppings: Don’t overload your pizza. Too many toppings can make the crust soggy.
- Invest in a pizza stone or steel: These tools retain heat better and give you that pizzeria-style crispiness.
- Pre-bake for extra crunch: If you like an ultra-crispy crust, pre-bake the dough for 4–5 minutes before adding toppings.
Storing and Freezing Pizza Dough
One of the best things about homemade pizza dough? You can make a big batch and store it for future pizza nights. Here’s how to do it right:
Storing in the Fridge
After the dough has risen, you can store it in the fridge for up to 3 days. Simply punch it down, place it in an airtight container or wrap it in plastic wrap, and refrigerate. When you’re ready to use it, take it out 30 minutes beforehand and let it come to room temperature.
This slow cold fermentation actually improves the dough’s flavor, giving it a richer, more developed taste.
Freezing the Dough
To freeze, divide the dough into individual portions and wrap each tightly in plastic wrap, then place them in a ziplock bag or airtight container. The dough can be frozen for up to 3 months.
When you’re ready to use it, thaw it overnight in the fridge or leave it at room temperature for about 3–4 hours. After it softens, treat it like fresh dough—roll it out, top it, and bake.
Creative Toppings for Thin Crust Pizzas
Thin crust pizzas are like a blank canvas—they’re perfect for all kinds of topping combos. The crispy base makes sure each topping gets its moment to shine. Here are some classic and creative ideas:
Classic Margherita
This timeless favorite is all about simplicity: tomato sauce, fresh mozzarella, basil leaves, and a drizzle of olive oil. When you want elegance and balance, Margherita never disappoints.
Veggie Lovers’ Delight
Pack your pizza with roasted bell peppers, red onions, mushrooms, olives, and spinach. Add a sprinkle of feta or goat cheese for a tangy twist. Thin crust keeps it light and lets the veggies be the stars.
Meat Feast
Go big with pepperoni, sausage, bacon, and even shredded chicken. Just remember, thin crust can’t hold too much weight, so keep it balanced—too much meat can make it soggy.
Other Ideas:
- BBQ Chicken: Barbecue sauce, grilled chicken, red onion, and cilantro.
- Pesto & Goat Cheese: Pesto base, goat cheese, sun-dried tomatoes, and arugula.
- Buffalo Blue: Buffalo sauce, shredded chicken, blue cheese crumbles, and green onions.
The options are endless—get creative, mix and match, and find your personal favorite.
Common Mistakes to Avoid
Even experienced home cooks slip up sometimes. Avoid these pitfalls for the best results every time:
- Overworking the dough: Too much kneading can make your dough tough. Once it’s smooth and elastic, stop.
- Skipping the rise: Don’t rush the rise. It’s where the flavor and texture develop.
- Using too much flour: While it helps with sticking, too much flour can dry out your dough.
- Not preheating the oven: A cold oven equals a limp, soggy crust. Preheat it until it’s scorching hot.
- Overloading with toppings: Less is more. Too many toppings weigh down the dough and lead to a soggy base.
Cooking Methods: Oven vs Pizza Stone vs Cast Iron
How you bake your pizza can be just as important as how you make the dough. Let’s break it down:
Oven (with baking sheet)
The most common method. Easy and effective, but may not give you the ultimate crisp. Use the bottom rack for the best results.
Pizza Stone
Heats evenly and mimics the effect of a brick oven. Place the stone in the oven before preheating and slide your pizza on using a peel. Expect a crisper, more authentic crust.
Cast Iron Skillet
Surprisingly effective. Heat the skillet on the stovetop first, then bake. It holds heat extremely well and gives a fantastic bottom crust.
FAQs about Thin Crust Pizza Dough Recipe
1. What is the secret to a crispy thin crust?
The key lies in using minimal yeast, rolling the dough very thin, and baking it at a high temperature—ideally 475°F (245°C) or higher.
2. How long should thin crust dough rise?
Unlike thick crusts, thin crust dough needs only a short rise—about 30 minutes to 1 hour. Some prefer a cold rise in the fridge for extra flavor.
3. Can I freeze thin crust pizza dough?
Yes! After the first rise, portion the dough, wrap tightly, and freeze for up to 3 months. Thaw in the fridge overnight before use.
4. Do I need a pizza stone for thin crust pizza?
While not required, a pizza stone or steel helps achieve a crispier base. If you don’t have one, use an inverted baking sheet preheated in the oven.
5. What flour is best for thin crust pizza dough?
All-purpose flour works well, but for extra chew and crisp, try bread flour or a mix of all-purpose and 00 flour.
6. Can I make this dough without a stand mixer?
Absolutely. You can mix and knead the dough by hand—it just takes a bit more effort but yields the same delicious result.
Conclusion
Thin crust pizza dough is all about balance—simplicity, crispness, and flavor. With just a few basic ingredients and a bit of patience, you can create a pizza that rivals your favorite pizzeria. Whether you’re going classic with mozzarella and basil or going bold with BBQ chicken and jalapeños, the real hero is the dough. Follow the steps carefully, avoid the common mistakes, and soon you’ll be crafting pies that leave your guests asking for your “secret recipe.”
Remember, pizza night is as much about fun as it is about flavor. Don’t be afraid to experiment, tweak, and play around with toppings, sauces, and textures. The more you bake, the better you’ll get—and the better your pizza will taste.