Tenderloin Roast Recipe: There’s something about a tenderloin roast that screams elegance and celebration. Whether you’re planning a holiday feast, a dinner party, or simply want to treat yourself to something special, this tenderloin roast recipe will help you master the art of cooking this luxurious cut of meat. Follow this detailed, step-by-step guide to create a restaurant-quality roast right in your kitchen—juicy, flavorful, and absolutely unforgettable.
Introduction
Ah, the tenderloin roast. Just the name evokes visions of gourmet meals, fancy dinner parties, and food that melts in your mouth. But here’s the thing—while it might seem intimidating, cooking a perfect tenderloin roast is totally achievable at home. You don’t need to be a professional chef to pull it off. What you do need is a solid recipe, a few quality ingredients, and a little patience.
Why is this particular cut so beloved? It’s one of the most tender and leanest parts of the animal, making it ideal for roasting. Plus, it doesn’t require an overwhelming amount of seasoning—just enough to enhance the natural flavor. In this guide, I’ll walk you through everything you need to know. From choosing your cut and prepping it like a pro to roasting it to perfection, consider this your go-to masterclass.
Ready to get started? Let’s dive in.
What Is a Tenderloin Roast?
Let’s clear one thing up first: when we talk about “tenderloin,” we’re usually referring to the beef tenderloin, though pork tenderloin is also popular and delicious in its own right. For this recipe, we’re focusing on beef, the king of tenderloin roasts.
What Makes It Special?
The beef tenderloin is a long, narrow, and incredibly tender muscle located near the spine. It’s one of the most prized cuts of beef for a reason—it’s naturally lean, super tender, and full of flavor when cooked properly. Unlike ribeye or sirloin, tenderloin doesn’t have much marbling, which means it can dry out if overcooked. But treat it right, and you’re in for a real treat.
Beef vs. Pork Tenderloin
- Beef Tenderloin: Larger, pricier, more tender.
- Pork Tenderloin: Smaller, leaner, cooks faster, more affordable.
Both are great, but they’re not interchangeable in recipes due to size and cooking time differences.
Whole vs. Center-Cut
When shopping for a tenderloin, you might see whole tenderloins or center-cut ones. The whole tenderloin includes the “butt” and the “tail”—less uniform but more meat. The center-cut is trimmed for even thickness, perfect for roasting.
Understanding these basics helps you shop smarter and prep better.
Why Choose Tenderloin Roast for Your Next Meal?
Imagine this: you place a platter of perfectly roasted tenderloin on the dinner table, the room quiets, eyes widen, and someone whispers, “Wow.” That’s the power of this roast.
Here’s why it deserves a spot on your table:
1. Melt-in-Your-Mouth Texture
Tenderloin is famous for its buttery texture. There’s almost no connective tissue, which means the meat is incredibly soft and practically melts in your mouth. When cooked medium-rare, it’s an experience that steak lovers dream about.
2. Elegant Presentation
This roast looks as good as it tastes. When sliced into medallions or thick cuts, it shows off a beautiful pink center and a delicious crust on the outside. Add a few garnishes or drizzle some red wine reduction, and you’ve got a showstopper.
3. Flavor Pairing Versatility
Because it’s not overly fatty, tenderloin pairs well with just about anything—rich sauces, roasted veggies, creamy potatoes, or even bold spices like garlic and rosemary. It’s like a blank canvas for flavor.
4. Special Occasion Worthy
Birthdays, Christmas, Thanksgiving, weddings—you name it. The tenderloin roast turns any meal into a celebration. Plus, it feeds a crowd and leaves a lasting impression.
So if you’re thinking about what to serve at your next dinner party, this is it. No second-guessing needed.
Ingredients You’ll Need
Alright, let’s talk about what you need to make this mouthwatering roast. One of the best things about tenderloin is that it doesn’t need a long grocery list. The goal is to highlight the natural flavor of the meat with simple, high-quality ingredients.
Main Ingredients:
- 1 whole beef tenderloin (4-5 lbs, trimmed)
- Kosher salt (2-3 tablespoons)
- Freshly ground black pepper (2 tablespoons)
- Olive oil (2-3 tablespoons)
- Fresh garlic cloves (4-6, minced)
- Fresh rosemary (2 sprigs, finely chopped)
- Fresh thyme (2 sprigs, finely chopped)
- Butter (4 tablespoons)
Optional Flavor Boosters:
- Dijon mustard (for crusting)
- Crushed red pepper flakes (if you like heat)
- Smoked paprika or cayenne (for a spicy twist)
- Balsamic glaze or red wine reduction (for serving)
Tools and Utensils:
- Roasting pan or cast-iron skillet
- Kitchen twine (for tying the roast)
- Meat thermometer (instant-read is best)
- Sharp chef’s knife
- Cutting board
- Aluminum foil (for resting)
Simple, right? No need for anything fancy. Just the essentials to help that beef shine.
Preparing Your Tenderloin Roast
Making a tenderloin roast isn’t just about tossing it in the oven and hoping for the best. The prep stage is critical to achieving that melt-in-your-mouth, evenly cooked result. Here’s where the magic begins. Let’s break it down into manageable steps that even a beginner can follow.
Selecting the Best Cut
Choosing the right piece of meat is the foundation of this recipe. Even the best techniques can’t save a poor-quality cut, so invest in the best you can afford.
Here’s what to look for when shopping:
- Grade of beef: Go for Prime if you can—it’s richly marbled and flavorful. Choice is the next best, and still excellent for home roasts.
- Color and texture: Fresh beef tenderloin should be a bright, cherry-red color with a fine, firm texture.
- Marbling: While not as marbled as ribeye, look for small streaks of fat. This fat melts during roasting and keeps the meat juicy.
- Uniform shape: A roast that’s relatively even in thickness will cook more evenly. If the ends taper off too much, ask the butcher to trim or fold them.
And if you’re feeling fancy, you can even ask the butcher to trim and tie it for you. Many high-end butchers will do this at no extra cost.
Trimming and Tying the Roast
If you bought a whole, untrimmed tenderloin, you’ll need to do a bit of prep. Don’t worry—it’s not as intimidating as it sounds. And it’s actually kind of fun!
Trimming:
- Remove the silverskin: That shiny, silver membrane doesn’t break down during cooking, so use a sharp knife to slide just under it and slice it away carefully.
- Trim excess fat: Leave a little fat for flavor, but cut away large chunks.
- Cut off the tail (optional): You can fold the tail under for even cooking or slice it off and save it for stir-fries.
Tying:
Use kitchen twine to tie the roast every 1.5 to 2 inches. This keeps the shape uniform, ensuring even cooking and a beautiful final presentation. You’ll also find it easier to slice when it’s bound together like this.
This step makes a huge difference, especially for beginner cooks. Don’t skip it!
Marinating or Seasoning
Now that your roast is prepped, it’s time to infuse it with flavor. There are two main schools of thought here: marinade or dry rub. Both work beautifully—it just depends on your flavor preferences and schedule.
Option 1: Dry Rub (Simple & Quick)
If you’re short on time, a dry rub is your best friend. Here’s a classic combo:
- Kosher salt
- Cracked black pepper
- Garlic powder or minced garlic
- Chopped fresh rosemary
- A drizzle of olive oil
Rub everything generously into the roast and let it sit at room temperature for 30–60 minutes before cooking.
Option 2: Marinade (For Deeper Flavor)
Want to prep ahead? Try this easy marinade:
- 1/2 cup olive oil
- 1/4 cup balsamic vinegar
- 2 tablespoons soy sauce
- 4 garlic cloves, crushed
- 1 tablespoon Dijon mustard
- Herbs: thyme, rosemary, bay leaf
Marinate for at least 4 hours, preferably overnight. Just remember to pat the roast dry before searing it—you want a crust, not steam!
Step-by-Step Cooking Guide
Now it’s time to take that beautifully prepped roast and turn it into something unforgettable. Follow these exact steps for a roast that’s tender, juicy, and cooked to perfection.
Step 1: Bringing Meat to Room Temperature
This step is non-negotiable. Taking the roast straight from the fridge to the oven is a recipe for uneven cooking. Let it sit at room temp for 30 to 60 minutes before you begin.
Why? When the roast is cold in the center and hot on the outside, you end up with overcooked edges and an undercooked middle. Letting it rest ensures the roast cooks evenly throughout.
Step 2: Preheating the Oven
Set your oven to 425°F (220°C). A high initial temperature helps develop a flavorful crust while locking in the juices. You can lower the temp later for more controlled cooking, depending on your method.
While the oven heats, prep your roasting pan or cast-iron skillet.
Pro Tip: Place a wire rack inside your roasting pan. This lets air circulate around the roast, cooking it evenly on all sides.
Step 3: Searing the Tenderloin
This is the game-changer step.
Heat a couple tablespoons of oil (with a high smoke point, like avocado or canola) in a large cast-iron skillet over high heat. Once the oil shimmers, add the tenderloin.
Sear each side of the roast for 2–3 minutes until a deep brown crust forms. Don’t forget the ends! You want an even sear all around.
Why sear? It creates a flavorful crust through the Maillard reaction—a fancy term for browning proteins—which boosts taste and locks in juices.
Once seared, transfer the roast to your prepared pan or keep it in the skillet (if oven-safe).
Step 4: Roasting the Tenderloin
Slide the roast into your preheated oven and roast it until it reaches your desired internal temperature.
Roasting Temperature Guide:
| Doneness | Internal Temp (Remove at) | Final Temp (After Resting) |
|---|---|---|
| Rare | 115°F (46°C) | 120–125°F (49–52°C) |
| Medium Rare | 120–125°F (49–52°C) | 130–135°F (54–57°C) |
| Medium | 130°F (54°C) | 140°F (60°C) |
Use an instant-read thermometer and insert it into the thickest part of the roast to check.
A 4-5 lb tenderloin usually takes 25–35 minutes to roast, depending on thickness and oven accuracy.
Step 5: Resting and Slicing
Once your roast reaches the target temp, remove it from the oven and tent it with foil. Let it rest for at least 15–20 minutes before slicing.
Why rest? The juices inside need time to redistribute. If you cut it too soon, all that delicious moisture will run out, leaving you with a dry roast.
When ready, slice the roast against the grain into thick medallions or thinner slices, depending on your preference.
Each bite should be juicy, flavorful, and ridiculously tender.
Tips for Perfecting Your Roast
Cooking a tenderloin roast might sound straightforward, but even the best of us can make a few slip-ups. Luckily, with a few smart tips, you can avoid rookie mistakes and elevate your roast from “pretty good” to “utterly amazing.”
1. Don’t Overcook It
This one can’t be stressed enough. Tenderloin is lean, which means it doesn’t have the fat content to protect it from drying out. Once it passes the medium doneness mark, it starts losing that melt-in-your-mouth tenderness.
Pro Tip: Always remove the roast from the oven 5–10 degrees before your target temperature. It will continue cooking slightly as it rests.
2. Use a Thermometer
Guesswork is not your friend here. Invest in an instant-read meat thermometer—it takes the stress out of the equation and guarantees results. There are even digital thermometers with alarms you can set to alert you when the roast hits your preferred temp.
3. Let It Rest
This deserves a second mention. Cutting into a hot roast immediately after it comes out of the oven is one of the fastest ways to ruin all your hard work. Let it sit under foil for at least 15–20 minutes. The juices redistribute, making each slice more flavorful and tender.
4. Tie the Roast
It’s tempting to skip the tying part, especially if it looks like a hassle. But tying helps the roast maintain a consistent shape, which ensures even cooking. Plus, it makes for cleaner, uniform slices when serving.
5. Don’t Be Shy With Seasoning
Salt and pepper go a long way, but don’t be afraid to add fresh herbs, garlic, or a mustard crust. Tenderloin doesn’t have a ton of fat, so it benefits from bold, aromatic flavors.
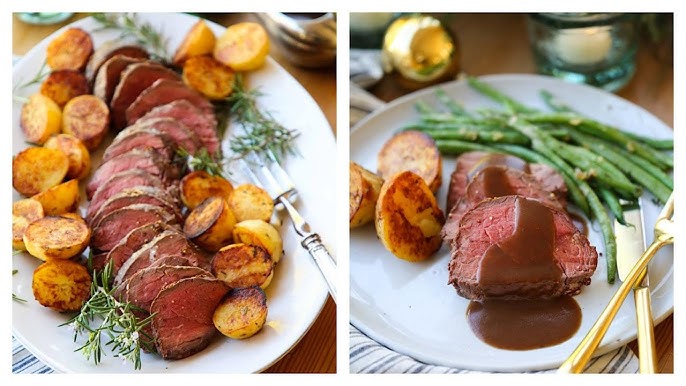
Serving Suggestions
Alright, your roast is resting, your kitchen smells incredible, and now you’re thinking, “What the heck do I serve with this masterpiece?” Don’t worry—I’ve got you.
Here’s a breakdown of side dishes and sauces that pair beautifully with a tenderloin roast.
Best Side Dishes:
1. Garlic Mashed Potatoes
Creamy, fluffy, and loaded with butter and garlic—what more could you want? They soak up the juices from the roast like a dream.
2. Roasted Vegetables
Think carrots, parsnips, Brussels sprouts, or sweet potatoes roasted with olive oil, sea salt, and fresh herbs.
3. Green Beans Almondine
Sautéed green beans with toasted almonds and lemon zest for a touch of crunch and freshness.
4. Creamed Spinach
Rich and decadent, this classic side adds creaminess that balances the lean roast perfectly.
5. Yorkshire Pudding or Dinner Rolls
Perfect for sopping up every last drop of meat juice and sauce.
Sauce Pairings:
- Red Wine Reduction: A savory, glossy sauce made with red wine, beef stock, and shallots.
- Horseradish Cream Sauce: Tangy, spicy, and incredibly simple to whip up.
- Béarnaise Sauce: Buttery and luxurious with hints of tarragon and vinegar.
- Mushroom Gravy: Earthy and rich—a crowd favorite.
A beautiful roast deserves beautiful sides. Go all out—it’s worth it.
Variations and Flavor Twists
One of the best things about a tenderloin roast is how customizable it is. You can keep it classic or play with global flavors depending on your mood. Here are a few crowd-pleasing variations that will keep things exciting in the kitchen.
1. Herb-Crusted Tenderloin
Instead of just salt and pepper, coat the roast with a mix of minced garlic, parsley, rosemary, thyme, and olive oil. It forms a gorgeous green crust packed with flavor.
2. Garlic and Rosemary Infused
Create slits in the roast and insert thin garlic slices and rosemary sprigs before searing. This infuses the meat with robust, earthy flavor from the inside out.
3. Asian-Inspired Glaze
For something different, try a glaze of soy sauce, ginger, sesame oil, hoisin, and honey. Brush it on halfway through roasting for a sticky, savory-sweet finish.
4. Mustard Crust
Rub the roast with Dijon mustard, then press a mixture of breadcrumbs, herbs, and crushed peppercorns onto it before roasting. The mustard helps everything stick and adds a tangy base.
5. Spicy Cajun Style
Use a Cajun spice blend with paprika, cayenne, garlic powder, oregano, and thyme for a roast with Southern flair and a kick of heat.
There’s no limit to how creative you can get—just remember to keep the internal temp in check and let the beef shine.
Storing and Reheating Leftovers
If you’ve got leftovers (lucky you!), you’ll want to store and reheat them properly to preserve all that deliciousness. Here’s how to do it right:
Storage Tips:
- Refrigerate promptly: Let the roast cool completely, then wrap tightly in foil or store in an airtight container.
- Use within 3–4 days: Beyond that, the texture can start to suffer.
- Freeze for longer storage: Wrap individual slices in plastic wrap and foil, then store in freezer bags. They’ll last for up to 3 months.
Reheating Tips:
- Oven method (best for larger pieces):
- Preheat to 250°F (120°C)
- Wrap slices in foil with a bit of beef broth or butter
- Heat for 10–15 minutes until warmed through
- Stovetop method (quick option):
- Use a skillet on low heat with a bit of butter or olive oil
- Cover with a lid and steam slightly to prevent drying out
- Avoid the microwave if possible: It tends to dry out the meat and ruin the texture. But if you must, use a lower power setting and heat in short bursts.
Bonus: Cold tenderloin makes amazing sandwiches the next day with crusty bread, arugula, and a horseradish spread.
Nutritional Value of Tenderloin Roast
We’ve talked about how delicious and elegant tenderloin roast is—but what about the nutritional side of things? Whether you’re watching your macros or just curious, this lean cut of beef is actually a smart choice for those looking to enjoy red meat without going overboard.
Lean Yet Satisfying
Beef tenderloin is considered one of the leanest cuts of beef, with a significantly lower fat content than ribeye or strip steaks. That means it’s a great option if you’re trying to cut back on saturated fat without sacrificing flavor or satisfaction.
Nutritional Breakdown (Per 3 oz. Cooked Serving):
| Nutrient | Amount |
|---|---|
| Calories | 180–200 kcal |
| Protein | 24–26 g |
| Total Fat | 10–12 g |
| Saturated Fat | 4–5 g |
| Cholesterol | 70–80 mg |
| Iron | 2.6 mg |
| Vitamin B12 | 2.5 mcg |
| Zinc | 4–5 mg |
Note: Values may vary based on preparation and trimming
Health Benefits:
- High in protein: Essential for muscle repair, hormone production, and overall health.
- Rich in iron: Helps transport oxygen in your blood.
- Packed with B vitamins: Supports energy metabolism and brain function.
- Low in carbs: Perfect for keto or low-carb diets.
As with all red meat, moderation is key—but when you’re indulging in something this nutritious and flavorful, it’s totally worth it.
Tools You’ll Need for This Recipe
A successful tenderloin roast doesn’t require a Michelin-starred kitchen—just a few reliable tools to help you execute each step with precision and ease.
Essential Equipment:
- Sharp Chef’s Knife
- For trimming silverskin and slicing the finished roast cleanly.
- Meat Thermometer
- A must-have for nailing the perfect internal temperature. Go digital for more accuracy.
- Roasting Pan or Cast-Iron Skillet
- For even heat distribution. Cast iron is ideal for stovetop searing + oven transfer.
- Kitchen Twine
- Keeps the roast in shape, which leads to even cooking.
- Cutting Board with Juice Groove
- Perfect for resting and slicing without making a mess.
- Aluminum Foil
- For tenting the roast during the resting period.
Nice-to-Haves:
- Basting brush (for applying glaze or butter)
- Tongs (to flip the roast safely while searing)
- Herb chopper or mezzaluna (for quick, even herb chopping)
Having the right tools is half the battle. The rest? Just follow the steps, trust the process, and enjoy the delicious outcome.
FAQs about Tenderloin Roast Recipe
1. Can I cook a tenderloin roast without searing it first?
Technically, yes. But searing adds that gorgeous crust and deep, rich flavor that roasting alone won’t provide. Skipping it means missing out on that extra layer of deliciousness.
2. What’s the best internal temperature for beef tenderloin?
Medium-rare is the sweet spot for tenderloin. Remove it from the oven at 120–125°F and let it rest to reach 130–135°F. That’s where you get the juiciest, most tender slices.
3. Can I make this recipe ahead of time?
Absolutely. You can prep, season, and tie the roast the day before. Just keep it wrapped and refrigerated. Let it come to room temperature before cooking the next day.
4. How can I tell if my tenderloin is done without a thermometer?
It’s tough to gauge without one. You can press the meat—rare feels soft and squishy, medium feels firmer—but it’s risky. A thermometer is your best friend for precision.
5. What wine pairs well with tenderloin roast?
A bold red wine like Cabernet Sauvignon, Merlot, or Pinot Noir pairs beautifully. Their tannins cut through the richness of the meat and enhance the flavor.
Conclusion
So there you have it—your complete, step-by-step guide to mastering the perfect tenderloin roast. From selecting the right cut and seasoning it just right, to nailing the cooking time and pairing it with delicious sides, you’re now equipped to create a show-stopping centerpiece that’s worthy of any occasion.
Tenderloin roast isn’t just food—it’s an experience. And once you try this recipe, you’ll see why it’s a go-to for holidays, celebrations, and every memorable meal in between.
Whether you’re cooking for two or entertaining a crowd, this roast will impress every time. So tie that roast, preheat that oven, and prepare to wow your taste buds. Happy roasting!


