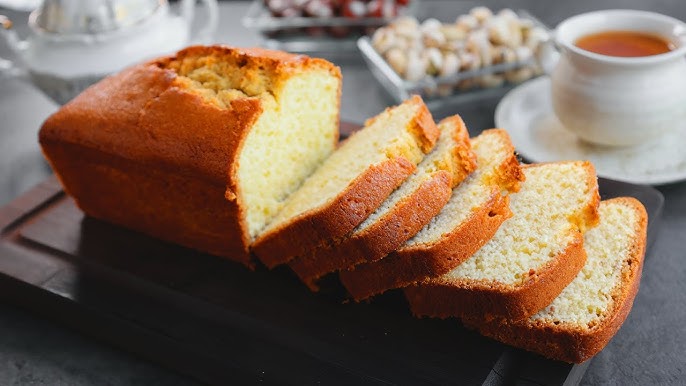
Tea Cake Recipe: Tea cakes are soft, lightly sweetened baked goods that fall somewhere between cookies and cakes. They’re usually made with simple pantry ingredients and are often flavored with vanilla, cinnamon, or nutmeg. Think of them as a perfect pairing with tea—hence the name!
They can vary slightly depending on where you are in the world. In the United States, tea cakes are often soft, cookie-like treats, while in the UK, tea cakes can refer to sweet buns filled with dried fruits and sometimes served toasted with butter. For this guide, we’re focusing on the classic American-style tea cake that is more like a soft cookie.
History and Origin of Tea Cakes
The history of tea cakes dates back centuries and varies by region. In England, tea cakes began as part of the traditional afternoon tea service introduced by the Duchess of Bedford in the 1800s. These English versions were more like yeasted buns, often studded with dried fruits like currants or raisins.
In the American South, tea cakes became popular as a homemade treat in the 18th and 19th centuries. Passed down through generations, they were often made during holidays and special occasions. Each family would have its own take—some adding molasses, others flavoring with nutmeg or lemon zest.
Today, tea cakes continue to be a nostalgic favorite—simple, comforting, and deliciously timeless.
Ingredients Needed for Classic Tea Cakes
List of Basic Ingredients
Let’s talk ingredients. The beauty of tea cakes is their simplicity. Here’s what you’ll need for a traditional batch:
- All-purpose flour – 2 ½ cups
- Granulated sugar – 1 cup
- Unsalted butter – 1 cup (softened)
- Eggs – 2 large
- Milk – ¼ cup
- Baking powder – 1 tsp
- Salt – ½ tsp
- Vanilla extract – 1 tsp
These staples are probably already in your kitchen, making this recipe super accessible anytime the craving hits.
Optional Add-Ins for Extra Flavor
Want to spice things up a bit? Try adding one or more of the following:
- Cinnamon or nutmeg – Just ¼ tsp can elevate the flavor.
- Lemon or orange zest – A tablespoon of zest adds a citrusy kick.
- Almond extract – Swap in for half of the vanilla for a nutty twist.
- Chopped nuts or dried fruits – Pecans, raisins, or cranberries work beautifully.
Feel free to get creative once you’ve mastered the base recipe!
Tools and Equipment Required
Baking Essentials You’ll Need
Before we jump into baking, let’s make sure you have the right tools. Here’s what you’ll need:
- Mixing bowls – Medium and large.
- Electric mixer or hand whisk – Makes creaming butter easier.
- Measuring cups and spoons – For accuracy.
- Baking sheet – Preferably non-stick or lined with parchment paper.
- Cookie scoop or tablespoon – For uniform sizes.
- Cooling rack – Keeps the bottoms from getting soggy.
Prep Tips Before Starting
- Pre-measure everything – It keeps the process smooth.
- Soften the butter – Leave it out 30 minutes before baking.
- Preheat your oven – 350°F (175°C) is ideal for tea cakes.
- Line your baking sheets – Parchment paper or silicone mats work great.
With everything in place, baking becomes less stressful and more enjoyable.
Step-by-Step Instructions to Make Tea Cakes
Step 1: Preparing Your Ingredients
Start by gathering all your ingredients and letting them come to room temperature—especially the butter and eggs. This ensures even mixing and a smoother batter.
In a medium bowl, whisk together your dry ingredients: flour, baking powder, and salt. Set it aside.
Next, in a larger bowl, cream the softened butter and sugar together using an electric mixer or hand whisk. Mix until the mixture becomes light, fluffy, and pale yellow—this step is crucial as it incorporates air into the dough, helping the cakes rise.
Now, add in the eggs one at a time, beating well after each addition. This helps maintain the emulsion and prevents the batter from curdling.
Pour in the vanilla extract and mix until just combined.
At this point, slowly add the dry mixture to the wet mixture, alternating with the milk. Start and end with the dry ingredients. This method keeps the batter smooth and prevents overmixing, which can lead to dense tea cakes.
Once everything is mixed and you have a smooth, slightly sticky dough, cover it and let it chill in the fridge for 30 minutes. Chilling the dough helps prevent spreading and gives the flavors time to develop.
Step 2: Mixing the Dough
Now that your ingredients are prepped and your dough has had some time to chill, it’s time to get mixing—this is where the magic begins. Take your chilled dough out of the fridge. You’ll notice it’s firmer and easier to handle now, which is exactly what we want.
Using a cookie scoop or tablespoon, scoop out even portions of the dough and roll them into balls with your hands. Don’t overwork the dough—just enough to get them into shape. For a traditional tea cake look, slightly flatten each dough ball with the palm of your hand or the bottom of a glass. They should be about ½ inch thick.
Arrange the flattened dough balls on your prepared baking sheet, leaving at least 2 inches between each one. These cakes will spread a little during baking, and giving them room helps them cook evenly and hold their shape.
Before you slide them into the oven, here’s a bonus tip: if you like a little extra crunch on top, sprinkle each cake with a pinch of coarse sugar. It gives a lovely texture and sparkle.
Now you’re ready to bake!
Step 3: Shaping and Baking
Preheat your oven to 350°F (175°C) if you haven’t already. Slide the baking sheet onto the middle rack and bake for about 10 to 12 minutes, or until the edges of the tea cakes just start to turn a light golden brown. You don’t want them to be too dark—part of their charm is their light, buttery color and soft texture.
Resist the urge to overbake. These tea cakes continue to cook slightly on the baking sheet even after they’re out of the oven, so removing them just as the edges begin to brown ensures they stay soft inside.
If you’re baking in batches, make sure to let your baking sheet cool slightly before placing new dough on it, or your next round may spread too much.
Once out of the oven, let the tea cakes cool on the baking sheet for 5 minutes. Then, transfer them to a wire rack to cool completely.
Pro tip: Want to give them a festive touch? Drizzle with a simple icing made from powdered sugar and milk once they’re cool. Or dust with powdered sugar for a more traditional finish.
Step 4: Cooling and Serving
Cooling is just as important as baking when it comes to texture. If you move your tea cakes too early, they might fall apart. Letting them sit on the baking sheet helps them firm up just enough to hold their shape when moved.
Once they’ve cooled on the rack, they’re ready to serve! These tea cakes are fantastic on their own, but even better with a hot cup of tea or coffee. They have a delicate sweetness that makes them feel indulgent without being overpowering.
If you’re planning to serve them for a gathering, arrange them on a pretty tray with fresh berries or a small bowl of clotted cream. Their simplicity makes them incredibly versatile—elegant enough for tea parties, yet comforting enough for everyday snacks.
And don’t be surprised if they disappear fast—these soft, buttery bites are addictive.
Tips for Perfect Tea Cakes
Common Mistakes to Avoid
Making tea cakes may seem simple, but a few missteps can lead to disappointment. Here are some pitfalls to steer clear of:
- Overmixing the dough: This can lead to tough, dense cakes. Mix just until combined.
- Using cold butter: Softened butter is key for the creaming process. Cold butter won’t whip properly.
- Skipping the chill time: This step helps control spreading. Skipping it can make your cakes too flat.
- Overbaking: Tea cakes are meant to be soft. Take them out as soon as the edges start to brown.
Expert Baking Tips for Better Results
Want to bake like a pro? Try these tips:
- Use room temperature ingredients: Eggs and milk blend better when not straight from the fridge.
- Don’t crowd your baking sheet: Give your cakes room to breathe.
- Store them right: Keep in an airtight container at room temperature for up to 3 days, or freeze for longer storage.
- Customize with spices: Cinnamon, cardamom, or a pinch of nutmeg can add depth.
Experiment once you’ve nailed the basics. Try chocolate chips, dried cherries, or even a swirl of jam in the center before baking for fun twists.
Serving Suggestions for Tea Cakes
Pairing Tea Cakes with Beverages
Tea cakes are versatile and complement a wide variety of drinks. Traditionally, they’re served with tea—black, green, or herbal infusions—but don’t stop there. Here are a few delightful pairing ideas:
- Black Tea (Earl Grey, Assam): The robust flavors of black tea match beautifully with the buttery, mild sweetness of tea cakes.
- Green Tea: For a lighter palate, green tea offers a refreshing contrast, especially when the cakes are flavored with citrus.
- Coffee: Whether it’s a bold espresso or a creamy latte, tea cakes balance out the bitter tones with their soft, sweet nature.
- Chai or Spiced Teas: These elevate the warm spice notes in your cakes, especially if you’ve added cinnamon or nutmeg.
Hosting a gathering? Offer a tea bar with multiple drink options so guests can mix and match. Trust us—these little cakes will be the talk of the table.
Creative Serving Ideas
Go beyond the basic plate! Here are some fun, classy ways to serve your tea cakes:
- Tiered stands: For a classic afternoon tea look.
- With cream and jam: Treat them like scones for a rich indulgence.
- Mini sandwich style: Slice and add a filling like lemon curd or chocolate ganache.
- Dipped in glaze: Add elegance with a light vanilla or lemon glaze.
Want to impress kids or guests? Use cookie cutters to shape the dough before baking—hearts, stars, or even tea-themed shapes for added charm.
Storing and Preserving Tea Cakes
Best Practices for Storage
Tea cakes are best enjoyed fresh, but they can be stored for later. Here’s how to keep them tasting their best:
- Room Temperature: Store in an airtight container for up to 3–4 days. Add a slice of bread to the container to keep them soft.
- Refrigeration: Not necessary and can dry them out. Only refrigerate if your environment is very humid.
- Freezing: For longer storage, tea cakes freeze beautifully. Wrap them individually in plastic wrap, then store in a ziplock freezer bag. They’ll last up to 2 months.
When ready to eat, let them thaw at room temperature or warm in the oven for 5 minutes to restore their fresh-baked texture.
How to Refresh Day-Old Tea Cakes
Even the best cakes can go a bit stale. Don’t toss them—refresh them!
- Warm in the oven at 300°F (150°C) for about 5–7 minutes.
- For an extra touch, brush lightly with melted butter before warming.
You’ll be amazed how close they come to tasting freshly baked again.
Variations on the Classic Tea Cake Recipe
Southern-Style Tea Cakes
A Southern favorite, these are slightly denser and often spiced. Here’s how to adapt your basic recipe:
- Add nutmeg and cinnamon to the flour mixture.
- Replace some sugar with brown sugar for a deeper flavor.
- Use buttermilk instead of milk for a tangy richness.
These are often rolled thinner and baked crispier—a nostalgic treat for many families across the South.
Gluten-Free and Vegan Options
Want to enjoy tea cakes without the allergens? No problem.
- Gluten-Free: Substitute all-purpose flour with a 1:1 gluten-free baking flour blend. Ensure it contains xanthan gum for structure.
- Vegan: Replace butter with vegan margarine or coconut oil, and eggs with flax eggs (1 tbsp ground flaxseed + 2.5 tbsp water per egg). Use almond or oat milk instead of dairy.
The texture may be slightly different, but the flavor will still be spot-on. And yes—they’re just as irresistible.
Why You’ll Love Homemade Tea Cakes
There’s something truly special about homemade tea cakes. Not only are they simple and quick to make, but they also bring a sense of nostalgia and warmth with every bite. Whether it’s for a family gathering, a rainy afternoon, or just a sweet pick-me-up, these little treats are a crowd-pleaser.
Baking them yourself also means you control the ingredients—no preservatives, just pure, honest flavor. Customize them to your liking, share them with loved ones, or keep a stash in the freezer for those “I-need-something-sweet-now” moments.
So the next time you’re craving a cozy treat, skip the store-bought cookies and whip up a batch of these delightful, buttery tea cakes. You won’t regret it.
FAQs about Tea Cake Recipe
1. Can I make tea cakes without a mixer?
Yes! You can cream butter and sugar by hand with a sturdy whisk or wooden spoon, though it takes a bit more effort.
2. Why are my tea cakes spreading too much?
Chances are your dough was too warm. Always chill it before baking to help the cakes hold their shape.
3. Can I freeze the dough instead of the baked cakes?
Absolutely! Scoop and flatten the dough into rounds, freeze on a tray, then transfer to a bag. Bake directly from frozen, adding 1–2 extra minutes to the bake time.
4. Are tea cakes the same as sugar cookies?
They’re similar, but tea cakes are softer, less sweet, and more cake-like than traditional sugar cookies.
5. Can I add chocolate chips to tea cakes?
Yes! Fold in ½ to 1 cup of chocolate chips at the end of mixing for a delicious twist.
Conclusion
Tea cakes are a timeless, comforting dessert that never go out of style. From their rich history to their melt-in-your-mouth texture, they’re a favorite across generations for good reason. With just a few simple ingredients and easy steps, you can bake up a batch that’s soft, tender, and bursting with homemade goodness.
Whether you stick to the classic recipe or put your own spin on it, tea cakes are sure to become a staple in your kitchen. So grab that apron, turn on some music, and let the aroma of freshly baked tea cakes fill your home.