Taiyaki Recipe: Taiyaki is one of Japan’s most beloved street foods—a fish-shaped waffle filled with sweet or savory fillings. Despite its fish-like appearance, it’s not made from seafood. The name Taiyaki means “baked sea bream,” referencing the traditional Japanese symbol of good luck and celebration. This cute, crispy treat is often filled with sweet red bean paste, custard, or even chocolate. Its crisp outer shell and warm, gooey center make it irresistible, whether served hot on a chilly day or as a fun dessert at home.
The beauty of Taiyaki lies in its playful presentation and the perfect blend of textures. Think of it like a stuffed pancake or waffle with a crunchy edge and soft, chewy inside. It’s a staple at festivals, street fairs, and specialty cafés across Japan—and now it’s something you can easily master in your own kitchen.
History and Cultural Significance of Taiyaki
Taiyaki’s origins date back to the early 20th century in Tokyo, where it was created by a confectioner who wanted to reshape the traditional imagawayaki (round pastry with filling) into something more festive. The sea bream, or tai in Japanese, is a symbol of good luck and prosperity, often served during celebrations. The idea was to bring those positive vibes into a street snack that everyone could enjoy.
Taiyaki gained rapid popularity and soon became a nostalgic part of Japanese culture. Over time, its variations multiplied—not just in filling, but in size, texture, and even color. You’ll find mini Taiyaki, rainbow-colored versions, and even ice cream-stuffed renditions in modern-day Japan. It’s more than food—it’s a cultural icon.
Why You’ll Love Making Taiyaki at Home
There’s something uniquely satisfying about making Taiyaki from scratch. Not only does it let you recreate a classic Japanese treat in your own kitchen, but it also gives you full control over flavors, textures, and ingredients. Want to stuff it with peanut butter and banana? Go ahead. Prefer it gluten-free? No problem. Making Taiyaki is a creative culinary adventure that suits both seasoned cooks and beginners alike.
Plus, the Taiyaki pan makes every creation look like it came straight out of a food stall in Tokyo. Your friends and family will be seriously impressed, and you’ll get that warm feeling of having made something special and fun. And let’s be real—it’s hard not to smile at a fish-shaped snack.
Ingredients You’ll Need
For the Batter
The batter for Taiyaki is very similar to pancake or waffle batter but needs to strike the right balance between lightness and structure. Here’s what you’ll need:
- 1 cup all-purpose flour – the base of your batter.
- 1 tsp baking powder – gives the batter a gentle lift.
- 1 tbsp cornstarch – helps make the outside extra crispy.
- 1 tbsp sugar – just a hint of sweetness.
- 1/4 tsp salt – balances the flavor.
- 1 egg – binds the batter and adds richness.
- 3/4 cup milk – whole milk or plant-based alternatives work.
- 1/2 tsp vanilla extract – optional, for added flavor.
This recipe makes about 4-6 Taiyaki depending on your mold size. Feel free to double or halve it as needed.
For the Filling (Traditional & Creative Options)
While sweet red bean paste (anko) is the traditional filling, you can get super creative here. Below are some popular options:
Sweet Fillings:
- Sweet red bean paste (anko) – traditional and earthy.
- Custard – creamy and indulgent.
- Chocolate chips or Nutella – perfect for chocoholics.
- Sweet potato or pumpkin puree – cozy fall flavors.
- Fruit jam or fresh berries – adds a tart twist.
Savory Fillings:
- Cheese and corn – creamy and slightly sweet.
- Mashed potatoes and bacon – hearty and filling.
- Scrambled eggs and sausage – breakfast Taiyaki anyone?
You can mix and match fillings depending on your craving. Pro tip: make a Taiyaki bar at home with various fillings and let everyone customize their own!
Optional Toppings and Add-ins
If you’re feeling extra fancy, these extras will take your Taiyaki to the next level:
- Powdered sugar dusting – classic dessert style.
- Drizzle of chocolate or caramel syrup – extra indulgent.
- Sesame seeds or matcha powder – for a Japanese café vibe.
- Sprinkles for kids – or the kid in you.
These ingredients can be used after cooking for decoration or even folded into the batter for a unique texture.
Tools and Equipment Required
Taiyaki Pan: Where to Get One and What to Look For
The magic of Taiyaki truly comes to life with the right pan. You can’t achieve that iconic fish shape without a proper Taiyaki mold. This specialized pan features two fish-shaped cavities and a hinge that allows you to close and flip it easily while cooking.
Where to Buy:
- Online marketplaces like Amazon, eBay, and Etsy
- Asian specialty stores or supermarkets
- Japanese kitchenware retailers
Look for a pan with non-stick coating to prevent batter from sticking and ensure easy cleanup. Cast iron pans are more traditional and offer superior heat distribution, but aluminum pans are lighter and easier for beginners.
Features to Look For:
- Non-stick surface for ease of cooking
- Durability – cast iron or heavy-duty aluminum
- Comfortable handle – especially one with heat-resistant material
- Double-sided hinge – for even cooking and flipping
A good Taiyaki pan will last for years and is a great investment if you love Japanese treats. Plus, it’s a conversation starter—everyone’s going to ask about that fish-shaped waffle maker!
Kitchen Tools That Make It Easier
While the Taiyaki pan is the star of the show, a few additional tools will help you make the process smoother:
- Mixing bowls – for batter and filling prep
- Whisk – to ensure a smooth, lump-free batter
- Measuring cups and spoons – accuracy matters!
- Ladle or squeeze bottle – for precise pouring into the mold
- Silicone spatula or chopsticks – to help lift and flip the Taiyaki if needed
- Cooling rack – to preserve the crispness of the outer shell
If you really want to level up your Taiyaki game, use a kitchen thermometer to monitor the pan’s temperature. Getting the pan too hot can lead to burnt outsides and raw centers—nobody wants that!
Step-by-Step Taiyaki Recipe
Step 1: Prepare the Batter
In a large bowl, whisk together 1 cup of all-purpose flour, 1 teaspoon of baking powder, and a pinch of salt. In another bowl, mix 1 egg, ¾ cup of milk, 2 tablespoons of sugar, and 1 teaspoon of vanilla extract. Combine wet and dry ingredients until you get a smooth, slightly thick batter—similar to pancake consistency. Let it rest for 10 minutes.
Step 2: Make or Prep the Filling
Traditionally, Taiyaki is filled with sweet red bean paste (anko), but you can also use custard, Nutella, or sweet potato filling. Prepare your chosen filling and keep it ready in a piping bag or spoon for easy handling.
Step 3: Preheat the Taiyaki Pan
Place the fish-shaped Taiyaki pan over medium heat and lightly grease both sides with butter or oil. Preheating ensures even browning.
Step 4: Pour Batter into the Mold
Pour a thin layer of batter into one side of the mold, just enough to coat the bottom.
Step 5: Add the Filling and Seal
Spoon or pipe a small amount of filling into the center, then cover with more batter. Close the pan gently so it seals properly.
Step 6: Cook and Flip Until Golden Brown
Cook for about 2–3 minutes per side, flipping halfway through, until both sides are golden and crisp.
Step 7: Serve and Enjoy!
Carefully remove your Taiyaki, let it cool slightly, and serve warm. The crispy exterior and soft, gooey filling make each bite irresistible—sweet nostalgia in fish-shaped form!
Tips for Perfect Taiyaki
Common Mistakes and How to Avoid Them
Making Taiyaki at home can be incredibly rewarding, but like any recipe, a few common mistakes can trip you up. Here’s a quick breakdown of the most typical issues and how to steer clear of them:
1. Overfilling the Mold
It’s tempting to add too much batter or filling, especially when you want that “extra gooey” center. But overfilling leads to spillage, uneven cooking, and Taiyaki that doesn’t close properly. Always leave room for the batter to expand.
2. Batter Too Runny or Too Thick
If your batter is too watery, it won’t hold its shape and will likely leak out of the mold. Too thick? It’ll be dense and dry. Aim for a smooth, pancake-like consistency. If in doubt, do a test Taiyaki and adjust the batter accordingly.
3. Uneven Heat
Your Taiyaki pan needs to be hot—but not blazing. Medium heat works best. Too high, and you’ll burn the outside before the inside cooks. Too low, and your Taiyaki will be pale and soggy. Preheat for a few minutes, and make sure both sides cook evenly.
4. Not Letting Them Rest
As tempting as it is to dive right in, let your Taiyaki rest for a minute or two on a wire rack. This helps the outer shell crisp up and prevents burns from molten filling.
5. Rushing the Flip
One of the biggest mistakes is flipping the pan too soon. Let the bottom side develop a nice golden crust before turning it over. Use a timer and peek carefully before committing to the flip.
By avoiding these missteps, you’ll be on your way to mastering the perfect Taiyaki every time.
Tips on Batter Consistency
Taiyaki batter is what determines the texture and final taste of your snack, so nailing the consistency is critical. Here’s what you need to know:
- Pancake-style batter is the goal: smooth, pourable, but not watery.
- Add a little more milk if it’s too thick, or a touch of flour if it’s too thin.
- Letting your batter rest for 10–15 minutes helps remove air bubbles and allows the flour to fully hydrate, resulting in a smoother finish.
- For extra crispiness, you can add a teaspoon of cornstarch or rice flour to your mix.
If you’re making multiple batches, stir the batter occasionally as it sits to prevent the ingredients from settling.
Getting the Golden Brown Finish
Everyone wants that perfect golden-brown Taiyaki—the kind that looks like it came straight from a Japanese food stall. Here’s how to get that crispy, picture-perfect result:
Use the Right Oil
Lightly oiling your pan with a neutral oil (like canola or vegetable oil) before each use will help crisp up the outside. Too much oil, and it gets greasy. Too little, and it might stick.
Temperature Control
Golden Taiyaki comes from cooking on medium heat, not high. Cooking too fast burns the outside and leaves the inside raw. A consistent flame or heat source makes all the difference.
Patience Pays
Give each side of the Taiyaki about 2 to 3 minutes to form a crust. Flip only when you see the batter bubbling at the edges and it lifts cleanly from the mold.
Even Batter Distribution
Make sure your batter reaches the edges of the mold and covers the filling completely. Use a squeeze bottle or spoon to guide it into every curve of the fish shape.
Once you’ve mastered the golden crust, you’ll not only get better flavor and texture but also Taiyaki that’s Instagram-worthy.
Creative Taiyaki Variations
Sweet Variants (Custard, Nutella, Fruit)
While red bean paste may be the classic choice, modern Taiyaki lovers have turned this snack into a playground of sweet indulgence. Here are some creative ideas to explore:
Custard-Filled Taiyaki
Creamy, rich custard pairs beautifully with the crispy shell. For a Japanese twist, infuse the custard with matcha or black sesame.
Nutella or Chocolate
Melted Nutella creates a gooey, chocolatey center that’s kid-friendly and always a hit. Toss in a few mini marshmallows or banana slices for an extra surprise.
Fruit-Filled Taiyaki
Use blueberry, strawberry, or apple pie filling for a fruity variation. Add a dusting of cinnamon or drizzle of honey to complement the flavors.
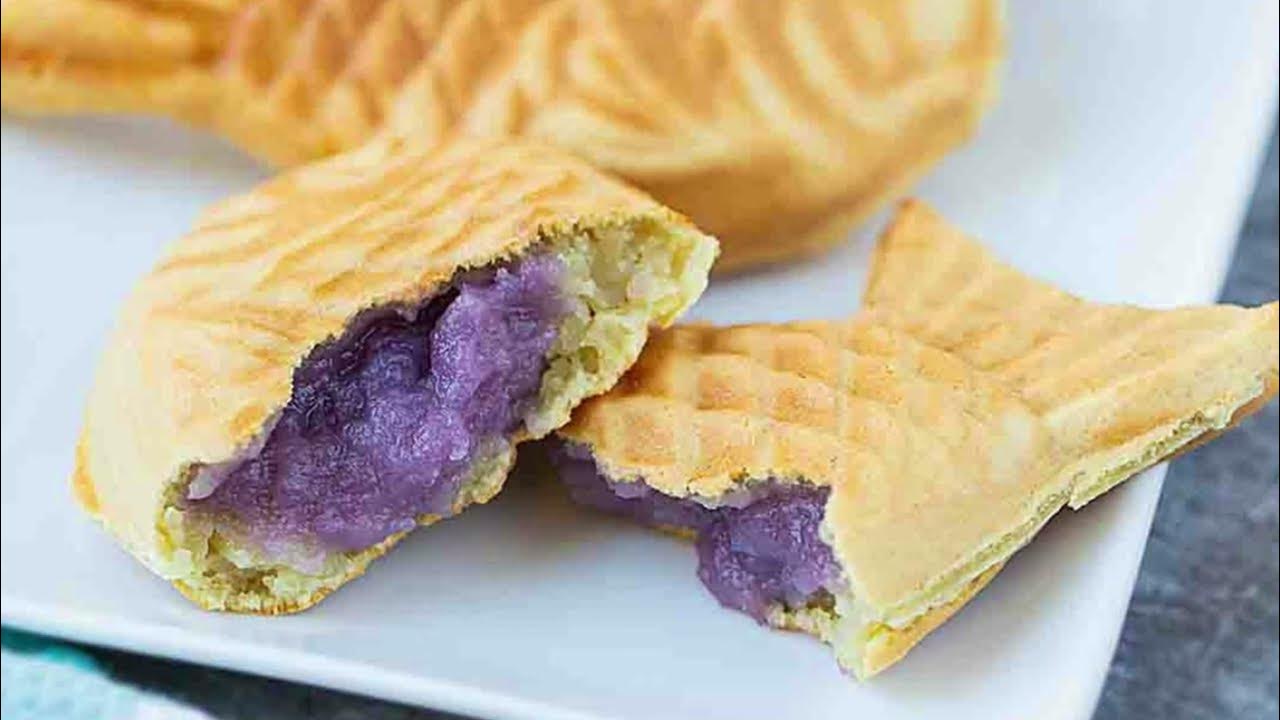
Coconut Cream or Ube
Give your Taiyaki a tropical twist with coconut cream, or go full Filipino fusion with ube halaya (purple yam jam).
Sweet Taiyaki works great as breakfast, dessert, or an anytime indulgence. Don’t be afraid to get creative with what’s in your pantry.
Savory Twists (Cheese, Ham, Potato)
Taiyaki doesn’t have to be sweet! In fact, savory versions are becoming more popular at home and in cafes. These are perfect as snacks, light meals, or appetizers.
Cheese-Stuffed Taiyaki
Fill your fish with mozzarella, cheddar, or even cream cheese. When hot, the cheese melts beautifully and gives that irresistible pull.
Ham and Egg Taiyaki
Make it breakfast-style! A thin slice of cooked ham and a spoonful of scrambled eggs make a portable, protein-rich meal.
Mashed Potato and Corn
Mix in some buttered mashed potatoes with sweet corn and a dash of black pepper for a satisfying, comfort food version.
You can also experiment with spicy fillings like jalapeño cream cheese or even pizza-style with marinara and shredded mozzarella.
Vegan and Gluten-Free Alternatives
For those with dietary restrictions, Taiyaki can still be on the menu! Here’s how to make it work:
Vegan Batter
Replace the egg with a flax egg (1 tbsp ground flax + 3 tbsp water) and use plant-based milk like almond or soy. Stick to neutral oils instead of butter.
Gluten-Free Batter
Use a gluten-free flour blend and add a little xanthan gum to improve texture. Rice flour is also a great option that gives a slightly crispier shell.
Vegan Fillings
Go for dairy-free chocolate, fruit compotes, coconut cream, or even tofu-based custards. Savory options can include vegan cheese, mashed beans, or spiced lentils.
With these options, everyone can enjoy a version of Taiyaki that fits their taste and lifestyle.
How to Store and Reheat Taiyaki
Short-Term and Long-Term Storage Tips
Freshly made Taiyaki is undeniably the best, but life gets busy, and sometimes you want to save some for later. Fortunately, Taiyaki stores quite well if handled properly.
Storing at Room Temperature:
- If you plan to eat your Taiyaki within a day, you can store them in an airtight container at room temperature for up to 12 hours.
- To keep them from getting soggy, place a paper towel underneath and on top of the Taiyaki in the container.
Storing in the Fridge:
- For storage beyond 12 hours but less than 2 days, refrigerate your Taiyaki in a zip-lock bag or sealed container.
- Again, line it with a paper towel to absorb moisture and prevent the crust from going soft.
Freezing for Long-Term Storage:
- Taiyaki freezes beautifully. Wrap each piece in plastic wrap or foil, then place them in a freezer-safe bag.
- Label with the date and use within 2 months for best quality.
- Pro tip: Freeze them individually first on a tray before placing them all together. This prevents them from sticking to each other.
Best Reheating Methods for Fresh Taste
Reheating Taiyaki is an art—do it right, and you’ll recapture that crispy shell and warm, gooey center.
Oven or Toaster Oven (Best Method):
- Preheat to 350°F (175°C).
- Place Taiyaki on a baking tray lined with parchment paper.
- Heat for 8–10 minutes from the fridge, or 15–18 minutes from frozen.
- Flip halfway through to ensure even heating.
Air Fryer:
- Set to 330°F (165°C).
- Reheat for 4–6 minutes for refrigerated, or 10 minutes if frozen.
- Air fryers do a great job of bringing back that crunch!
Microwave (Quickest but Least Ideal):
- Wrap Taiyaki in a paper towel.
- Microwave on medium power for 30–60 seconds.
- Be cautious—microwaving softens the crust and may make the filling too hot.
For the best experience, reheat in an oven or air fryer and enjoy immediately.
Serving Suggestions
Pairing Ideas (Drinks, Dips, Sides)
Taiyaki is versatile and pairs well with a variety of beverages and sides, whether you’re serving it for breakfast, a snack, or dessert.
Drinks to Pair With:
- Matcha latte or green tea – complements the Japanese flavors beautifully.
- Milk tea or bubble tea – adds a creamy, sweet companion.
- Iced coffee or espresso – balances out sweet Taiyaki with a bitter edge.
- Hot chocolate – perfect for chocolate-filled Taiyaki.
- Sake (for adults) – an elegant way to serve Taiyaki as a dessert at dinner parties.
Dips and Sauces:
- Chocolate ganache – rich and indulgent.
- Sweet condensed milk – a Korean twist often used in Bungeoppang.
- Strawberry or raspberry coulis – for fruity versions.
- Honey or maple syrup – adds a sweet glaze.
Sides or Extras:
- Scoop of ice cream – especially vanilla, matcha, or black sesame.
- Small bowl of fresh fruit – strawberries, kiwi, or mango.
- Whipped cream and a mint sprig – a café-style touch.
Mix and match depending on the filling you’ve chosen, and your Taiyaki instantly transforms from street food to a gourmet plate.
How Taiyaki Is Served in Japan vs. Home Style
In Japan, Taiyaki is commonly sold at:
- Street stalls during festivals
- Train station kiosks
- Specialty dessert shops
- Convenience stores (konbini)—sometimes frozen and microwaveable
There, it’s typically served in a paper sleeve, warm and ready to go. It’s often enjoyed on the move—grab one during a winter festival and it becomes the ultimate hand warmer/snack combo.
At home, however, the experience becomes more customizable and creative. You can:
- Add toppings
- Mix in custom fillings
- Serve with drinks and sides
- Make mini Taiyaki for parties
Making Taiyaki at home blends the joy of cooking with cultural exploration—plus, it’s just plain fun.
Nutrition Facts and Health Tips
Estimated Calories Per Serving
The exact calorie count of a Taiyaki depends on the filling and size, but here’s a rough estimate for a standard-sized Taiyaki filled with sweet red bean paste:
| Component | Calories |
|---|---|
| Batter (1 serving) | 120–150 |
| Red Bean Paste | 100–120 |
| Oil (for cooking) | 20–30 |
| Total per Taiyaki | 240–300 |
Now, if you opt for chocolate, custard, or Nutella, you’re adding another 50–100 calories per Taiyaki. Add ice cream or extra toppings? That bumps it up even more.
Making Healthier Taiyaki at Home
Want to indulge guilt-free? Here are some easy tweaks:
- Use whole wheat flour or a mix of almond flour for more fiber.
- Swap regular milk with almond or oat milk for a dairy-free version.
- Cut down on sugar in the batter or use a sugar substitute.
- Use non-stick spray or brush with minimal oil.
- Fill with healthier options like mashed sweet potatoes, fruit compote, or light ricotta cheese with honey.
Making Taiyaki at home gives you control over ingredients, so you can easily tailor it to your nutritional preferences while still enjoying a delicious, crispy treat.
FAQs about Taiyaki Recipe
1. Can I use pancake mix to make Taiyaki batter?
Yes, but it’s best to modify it by adding a bit of cornstarch for crispiness and reducing the sugar slightly. Pancake mix can work in a pinch, but homemade batter gives better control over taste and texture.
2. How long does it take to make Taiyaki from start to finish?
From prepping the batter and filling to cooking and serving, the whole process takes about 30–40 minutes. Once you get into the groove, it becomes even faster.
3. Can I use jam or jelly as a filling?
Yes! Jam is a great option, especially for fruity Taiyaki. Just make sure it’s thick and not too runny to prevent leaking during cooking.
4. Is there a difference between using a stovetop pan vs. an electric Taiyaki maker?
Both work well, but stovetop pans offer better heat control and a crispier shell. Electric makers are more convenient and beginner-friendly, but sometimes lack the intense browning that makes Taiyaki so special.
5. What other desserts are similar to Taiyaki?
If you love Taiyaki, try imagawayaki (a round version), dorayaki (red bean pancakes), or Korean hotteok (filled pancakes). They all share that wonderful combo of crispy outside and gooey inside.
Conclusion
From learning how to mix the perfect batter and choose the right fillings, to getting the timing just right with your mold, the process is part art, part science, and 100% delicious. Whether you’re using red bean paste for tradition, Nutella for indulgence, or mashed potatoes for a savory twist, Taiyaki offers something for everyone.
The joy of Taiyaki isn’t only in the eating—it’s in the making. It’s fun, it’s interactive, and it’s incredibly rewarding. And once you nail that golden, fish-shaped masterpiece? You’ll never look at waffles the same way again.
So, grab that Taiyaki mold, heat up your pan, and get cooking. Whether you’re a dessert lover, a fan of Japanese cuisine, or just looking to try something new, Taiyaki is the treat that keeps on giving.


