Swiss Roll Recipe: A Swiss Roll is a light, fluffy sponge cake rolled up with a sweet filling such as jam, whipped cream, or chocolate ganache. It’s delicate yet indulgent, making it a favorite for tea parties, birthdays, and festive gatherings. Despite its elegant look, the Swiss Roll is surprisingly simple to make at home once you understand the right techniques. Imagine a soft sponge that melts in your mouth, combined with a creamy filling—it’s pure dessert heaven.
A Little History of the Swiss Roll
Despite the name, the Swiss Roll did not actually originate in Switzerland. Culinary historians trace it back to Central Europe, with variations found in Austria and Hungary. Over time, it spread worldwide, evolving into many versions like the British jam roll, Asian matcha roll, and the famous French Yule log (Bûche de Noël). Today, it’s a global dessert that adapts beautifully to different tastes and cultures.
Why You’ll Love Making This Recipe
If you’ve ever admired bakery Swiss Rolls and thought they looked too complicated, you’ll be pleasantly surprised. This recipe is beginner-friendly yet delivers bakery-quality results. The joy of making one is not just in eating it but also in mastering the rolling technique, which feels a bit like a kitchen magic trick. Plus, it’s versatile—you can switch fillings, add decorations, and even create holiday-themed versions. It’s one of those recipes that will impress guests without requiring hours of effort.
Ingredients You’ll Need
Essential Ingredients for the Sponge
To make the perfect Swiss Roll sponge, you’ll need:
- Eggs (large, room temperature): The base for a light and airy sponge.
- Caster sugar: Sweetens the cake while keeping it tender.
- Plain flour (all-purpose): Gives structure without making it heavy.
- Baking powder (optional): Helps with rise, though many recipes rely just on whipped eggs.
- Vanilla extract: Adds warmth and aroma.
The key here is balance—the sponge should be soft enough to roll but firm enough to hold the filling.
Filling Options: Classic Cream or Jam
The filling is what gives the Swiss Roll its personality. Traditional versions often use strawberry or raspberry jam, while modern ones lean toward whipped cream or chocolate ganache. Some popular fillings include:
- Fresh whipped cream with sugar
- Buttercream frosting
- Lemon curd
- Nutella or chocolate spread
- Fresh fruit with cream
Each filling creates a unique taste experience, so you can experiment depending on the occasion.
Optional Add-Ins and Variations
Want to take your Swiss Roll to the next level? Try these variations:
- Cocoa powder for a chocolate sponge.
- Matcha powder for a green tea twist.
- Spices like cinnamon or cardamom for warmth.
- Chopped nuts in the filling for texture.
- Shredded coconut sprinkled over the roll for tropical flair.
The beauty of this dessert is that it adapts easily to different flavors, making it suitable for any season or holiday.
Tools and Equipment Required
Baking Tools
You don’t need fancy gadgets, just the basics:
- A Swiss Roll tin or jelly roll pan (approx. 10×15 inches)
- Mixing bowls
- Electric whisk or stand mixer
- Sieve for flour
- Spatula for folding
Rolling and Shaping Tools
Rolling is the trickiest part, and having the right tools helps:
- Parchment paper: Prevents sticking and aids rolling.
- Clean kitchen towel: Used to roll the sponge while warm.
- Sharp knife: For trimming edges and creating neat slices.
Serving and Storage Essentials
For presentation and storage, you’ll need:
- Cake stand or serving platter
- Plastic wrap or airtight container to keep it fresh
- Refrigerator space if using cream-based fillings
Step-by-Step Guide to Making Swiss Roll
Step 1 – Preparing the Baking Tin
Line your jelly roll pan with parchment paper, ensuring it extends slightly beyond the edges. This makes removing the sponge effortless. Grease the paper lightly to avoid sticking. Preheat your oven to 180°C (350°F) so it’s ready when your batter is.
Step 2 – Mixing the Sponge Batter
Crack your eggs into a bowl and whisk with sugar until pale, thick, and tripled in volume. This step is crucial—your sponge relies on aerated eggs rather than heavy leavening agents. Sift in the flour gently and fold it in with a spatula. Add vanilla extract for flavor. The batter should be light and airy, not overmixed.
Step 3 – Baking the Sponge Perfectly
Pour the batter into your lined pan, spreading it evenly. Bake for 10–12 minutes or until golden and springy to the touch. Avoid overbaking—it will dry out the sponge and make rolling difficult. Once done, remove it from the oven and let it cool for just a minute before rolling.
Step 4 – Rolling the Sponge While Warm
Rolling the sponge while it’s still warm is the secret to achieving that perfect spiral without cracks. As soon as you take the sponge out of the oven, turn it out onto a sheet of parchment paper sprinkled lightly with icing sugar (this prevents sticking). Peel off the baking parchment carefully, then place a clean kitchen towel over the sponge. Starting from the shorter end, gently roll the sponge up with the towel inside. This process helps “train” the sponge into shape, so when you add the filling later, it won’t resist or crack. Leave it rolled up for about 20–30 minutes until it cools completely. Think of it as teaching the sponge some flexibility—it’s much like curling a ribbon before using it. This step might feel delicate, but once you master it, you’ll see how naturally the sponge holds its swirl.
Step 5 – Preparing the Filling
While the sponge cools, you can prepare your filling. If you’re going with a classic jam filling, gently warm it for a few seconds in the microwave to make it easier to spread. For a cream filling, whip chilled heavy cream with a little sugar and vanilla until soft peaks form—this ensures it’s spreadable but not too stiff. Chocolate lovers might melt dark chocolate and fold it into whipped cream for a decadent ganache-style filling. You can even experiment with seasonal flavors—lemon curd in spring, spiced cream for autumn, or peppermint cream for the holidays. The key is not to overload the filling. A thin, even layer works best because too much can squish out when rolling. Aim for flavor balance rather than excess.
Step 6 – Assembling and Final Rolling
Now comes the fun part—assembling your Swiss Roll. Unroll the cooled sponge carefully. Spread your chosen filling evenly, leaving about half an inch around the edges to prevent overflow. Once filled, begin re-rolling the sponge, this time without the towel. Roll it firmly but gently, keeping it tight enough to hold its shape without squeezing out the filling. Use the parchment paper to help guide the roll if needed. Once rolled, transfer it seam-side down onto a serving plate or wrap it tightly in cling film to chill for at least an hour. This helps it set into the perfect spiral and makes slicing neater.
Step 7 – Dusting, Decorating, and Serving
Presentation is everything when it comes to Swiss Roll. Before serving, dust the top generously with icing sugar for a simple, elegant look. If you’re feeling creative, drizzle melted chocolate across the surface, add fresh fruit, or pipe whipped cream decorations. For a festive touch, you can even cover it in chocolate buttercream to resemble a Yule log. Slice the roll with a sharp serrated knife, wiping between cuts for clean slices. Serve it with tea or coffee, or dress it up with a scoop of ice cream for a complete dessert. The beauty of Swiss Roll is that it looks far more complicated than it is—your guests will think you spent hours in the kitchen when, in reality, it’s a straightforward bake.
Tips for the Perfect Swiss Roll
Avoiding Cracks
One of the most common fears when making Swiss Roll is cracking. The good news? With the right technique, it’s totally avoidable. Always roll the sponge while it’s warm—that’s when it’s most flexible. Don’t overbake; a dry sponge cracks more easily. If you do see small cracks, don’t panic—icing sugar, whipped cream, or a chocolate coating can hide them beautifully.
Keeping It Soft and Fluffy
The fluffiness of your Swiss Roll depends on how well you whisk the eggs. Take your time at this stage—whisk until the mixture is pale, thick, and leaves ribbons when you lift the whisk. Folding in the flour gently is just as important; heavy-handed mixing knocks out the air, resulting in a dense sponge.
Creative Presentation Ideas
A Swiss Roll doesn’t have to be plain. You can create striped or patterned rolls by piping designs onto the parchment before adding the main batter. Dusting with cocoa powder or adding fruit decorations on top also gives it a bakery-style finish. For kids, you can drizzle colorful icing or sprinkles for a playful look.
Variations of Swiss Roll
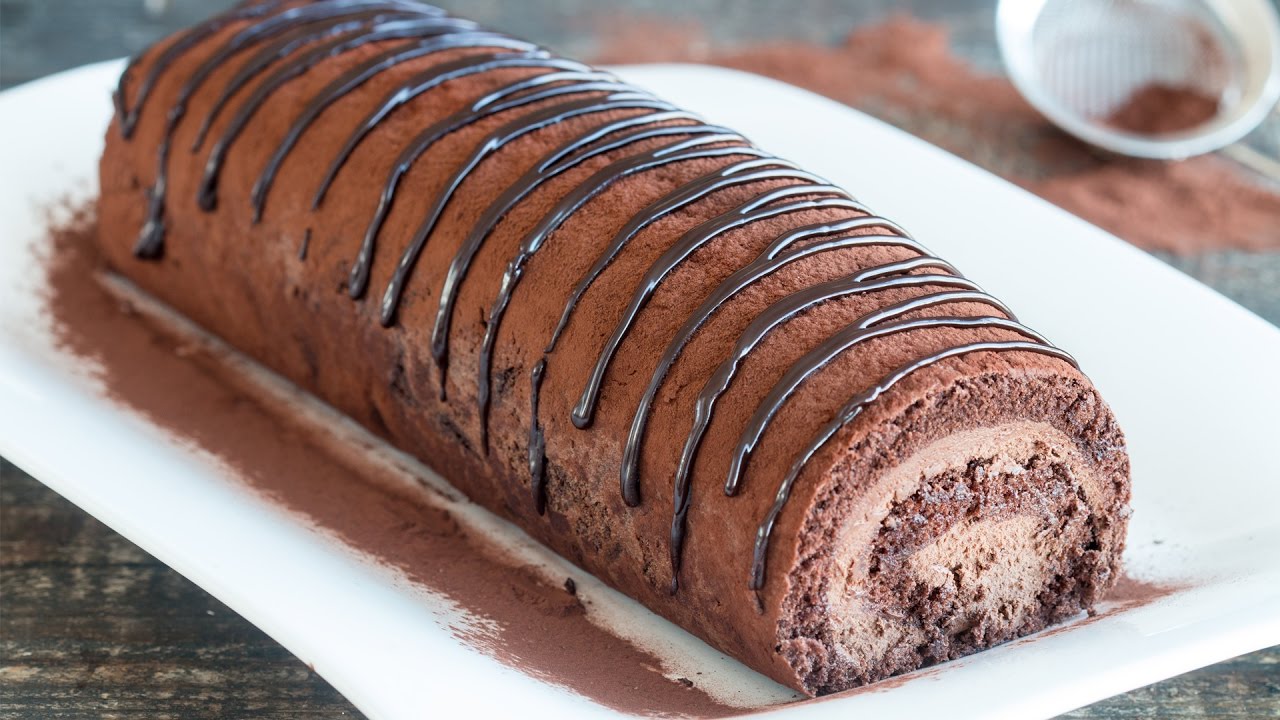
Chocolate Swiss Roll
For chocolate lovers, this variation is pure indulgence. Simply replace a portion of the flour in your sponge with cocoa powder to create a rich, chocolate-flavored base. Pair it with whipped cream for a light contrast or go all out with a chocolate ganache filling for a double-chocolate delight. A dusting of cocoa powder on top or a drizzle of melted chocolate completes the look. This version is especially popular for celebrations because it looks luxurious and feels like a show-stopper dessert. Imagine a soft, velvety sponge wrapped around a creamy chocolate swirl—it’s irresistible.
Strawberry & Cream Swiss Roll
This is a summer favorite. Fresh strawberries paired with whipped cream inside a fluffy sponge create a refreshing, fruity dessert that’s both light and satisfying. You can chop the strawberries finely and mix them into the cream or layer thin slices across the sponge before rolling. A sprinkle of icing sugar on top with extra strawberries makes it picture-perfect. It’s the kind of dessert that feels like a picnic treat, ideal for warm afternoons or garden parties.
Festive Yule Log (Bûche de Noël)
The Yule Log is a holiday classic, essentially a Swiss Roll dressed up for Christmas. The sponge is usually chocolate-flavored, rolled with cream or ganache, and then coated with chocolate buttercream to resemble a tree log. You can add decorative touches like powdered sugar “snow,” holly made from icing, or even tiny edible ornaments. This variation transforms a simple roll into a centerpiece dessert that’s festive, fun, and perfect for impressing guests during the holiday season.
Common Mistakes and How to Fix Them
Overbaking the Sponge
An overbaked sponge becomes dry and loses its flexibility, making rolling nearly impossible without cracks. To avoid this, always keep an eye on the oven and check your sponge a minute or two before the recipe’s suggested baking time. The sponge should spring back lightly when touched. If you’ve accidentally overbaked it, brush a little sugar syrup on the surface before filling—it helps reintroduce some moisture.
Sponge Cracking During Roll
Even when you’ve done everything right, cracks can sometimes appear. If they’re small, don’t stress—cover them with icing sugar, cream, or a chocolate glaze. For larger cracks, you can strategically slice the roll and serve it in smaller sections. Presentation tricks go a long way in turning a baking mishap into a rustic-looking dessert.
Filling Leakage Issues
Using too much filling or spreading it too close to the edges can cause it to squish out when rolling. To fix this, always leave a small border around the edges and spread the filling in a thin, even layer. If leakage does happen, scrape away the excess and smooth the edges—it won’t affect the taste, and most people won’t notice once it’s sliced and served.
Serving Ideas
With Coffee or Tea
A slice of Swiss Roll pairs beautifully with a hot drink. The light sponge and creamy filling make it the perfect afternoon pick-me-up. Whether it’s served with a strong cup of coffee or a delicate herbal tea, it elevates a simple snack break into something special.
As a Dessert Centerpiece
Swiss Roll can easily become the star of your dessert table. Decorate it elegantly with fruit, chocolate drizzle, or whipped cream rosettes, and it instantly looks like a gourmet treat. You can even serve it alongside other small desserts for a stunning dessert platter.
Kid-Friendly Snack Option
Children love Swiss Roll for its fun spiral shape and sweet filling. Make a smaller roll or mini versions, and add colorful sprinkles on top for a playful touch. It’s also a great way to sneak in fruit fillings, like banana or strawberry, making it a slightly healthier treat option for kids’ parties.
Storage and Shelf Life
Refrigeration Tips
If your Swiss Roll contains cream or other perishable fillings, store it in the refrigerator. Wrap it tightly in cling film to keep it from drying out. Chilling not only keeps it fresh but also makes slicing cleaner and easier.
Freezing Swiss Roll
Yes, you can freeze a Swiss Roll! Wrap it tightly in parchment paper, then in plastic wrap, and store it in an airtight container. It can last up to 2 months in the freezer. When ready to serve, thaw it in the refrigerator overnight. The texture stays surprisingly intact, especially if filled with buttercream or jam.
How Long It Lasts
At room temperature, a Swiss Roll with jam can last up to 2 days. Cream-filled versions should be eaten within 24 hours if not refrigerated. In the fridge, it generally stays fresh for up to 3–4 days. For best results, slice only what you plan to serve, keeping the rest wrapped to maintain its softness.
Nutritional Information
Calories and Macronutrients
A typical slice of Swiss Roll contains around 250–300 calories, depending on the filling and portion size. Most of the calories come from the sponge’s sugar and flour, as well as the fat from cream-based fillings. A standard serving provides:
- Carbohydrates: 30–40g (from sugar and flour)
- Protein: 4–6g (mainly from eggs and cream)
- Fat: 10–15g (from cream, butter, or chocolate fillings)
While it’s not exactly a “diet dessert,” it’s a treat that can fit into a balanced lifestyle if enjoyed in moderation.
Healthier Alternatives
If you’re looking for a lighter version, there are plenty of swaps you can make:
- Use low-fat cream or Greek yogurt for the filling.
- Replace some of the sugar with natural sweeteners like stevia or honey.
- Try whole wheat flour or almond flour for a slightly healthier sponge.
- Add fresh fruit as a filling to cut down on heavy creams and increase fiber.
This way, you can enjoy the same indulgent dessert without feeling guilty.
Swiss Roll Around the World
Variations in Asia
In Asian countries, Swiss Rolls are incredibly popular but often lighter and less sweet than Western versions. Common flavors include matcha (green tea), mango, and coffee. Many bakeries fill them with fresh whipped cream and fruit, making them a refreshing treat instead of a heavy dessert.
Popular European Versions
In the UK, the classic jam Swiss Roll is still a favorite, while Austria and Hungary offer rich versions filled with chocolate or nut pastes. France, of course, takes it to the next level with the Bûche de Noël, which transforms the Swiss Roll into a Christmas masterpiece.
American Adaptations
In the U.S., Swiss Roll is often mass-produced as snack cakes, but homemade versions are making a comeback. Chocolate Swiss Rolls with cream filling are especially popular, often decorated with frosting or sprinkles for a fun twist.
Why Homemade Swiss Roll is Better
Freshness and Flavor
There’s nothing quite like the taste of a freshly baked Swiss Roll. Store-bought versions often use preservatives, which affect the texture and flavor. Homemade rolls, on the other hand, are soft, fragrant, and bursting with freshness.
Cost-Effectiveness
Making a Swiss Roll at home is surprisingly affordable. The basic ingredients—eggs, sugar, flour, and cream—are kitchen staples, and you can whip up a bakery-worthy dessert without spending much at all.
Customization Options
One of the best things about homemade Swiss Roll is that you control everything. From the sponge flavor to the filling and decorations, you can tailor it to your taste or theme. Want a tropical twist with pineapple cream? Or a rich mocha version? You can create it all in your own kitchen.
FAQs about Swiss Roll Recipe
Q1: Why does my Swiss Roll crack when I roll it?
Usually, it cracks because the sponge was overbaked or rolled when completely cold. Always roll it while it’s still warm and springy.
Q2: Can I make Swiss Roll without an electric mixer?
Yes, but it requires a lot of elbow grease. You’ll need to whisk the eggs and sugar vigorously by hand until they’re pale and thick.
Q3: What’s the best filling for beginners?
Jam is the easiest option—it spreads smoothly and holds well. Whipped cream is also simple but requires refrigeration.
Q4: How do I make my Swiss Roll look professional?
Trim the edges for a neat look, dust with icing sugar, and slice with a sharp serrated knife for clean cuts.
Q5: Can I prepare Swiss Roll in advance?
Yes! You can make it a day ahead and keep it wrapped in the fridge. In fact, chilling it overnight often improves the texture.
Conclusion
The Swiss Roll is one of those desserts that looks impressive but is surprisingly simple once you know the steps. With just a few basic ingredients and some careful rolling, you can create a light, fluffy sponge wrapped around your favorite fillings. Whether you keep it classic with jam, go rich with chocolate, or make it festive with a Yule Log, this dessert is endlessly versatile. Plus, making it at home gives you the freedom to experiment with flavors and enjoy the freshness that no store-bought roll can match. So grab your whisk, roll up your sleeves, and give this recipe a try—you’ll be amazed at how quickly it becomes a family favorite.