Sweetened Milk Recipe: Sweetened milk is one of those delightful kitchen staples that brings comfort, warmth, and sweetness to a wide range of dishes and drinks. If you’ve ever had a cup of creamy chai, tasted rich Indian sweets, or enjoyed a drizzle of thick milk over desserts, chances are you’ve encountered sweetened milk. But here’s the best part—you don’t need to rely on store-bought versions! Making sweetened milk at home is not only simple but also gives you complete control over the ingredients.
Imagine being able to sweeten your tea or coffee with homemade milk that tastes just the way you like it. Or whipping up a traditional dessert without having to run to the store for canned condensed milk. Homemade sweetened milk isn’t just a recipe—it’s a skill that elevates your cooking.
Whether you’re a beginner in the kitchen or someone who’s cooked for years, this step-by-step guide will walk you through everything you need to know. From choosing the right ingredients to storing it correctly, we’re covering it all in this in-depth, easy-to-follow article.
Health Benefits of Sweetened Milk
Sure, sweetened milk contains sugar—but when made at home with quality ingredients, it can still offer a decent nutritional profile. Milk itself is packed with calcium, vitamin D, protein, and other essential nutrients that support strong bones, healthy muscles, and energy. When you control the sugar content, you also reduce the overly processed elements often found in canned or commercial versions.
Sweetened milk is also comforting and can be part of a balanced diet when consumed in moderation. A warm glass before bed can promote sleep, while a splash in your morning coffee can start your day on a cozy note. Plus, you can experiment with sugar alternatives like honey, maple syrup, or stevia to make it a bit healthier while still keeping that creamy sweetness intact.
If you’re making a plant-based version, the benefits are still there! Almond, oat, or soy milk bring their own nutrients, such as fiber, heart-healthy fats, and antioxidants. It’s all about how you customize your recipe to suit your needs and preferences.
Common Uses of Sweetened Milk
Homemade sweetened milk is incredibly versatile. Once you have a jar in your fridge, you’ll find yourself reaching for it more than you expected. Here are some delicious ways to use it:
1. Desserts:
- Indian sweets like kheer, gulab jamun, or barfi
- Custards and puddings
- Ice creams or milkshakes
- Topping for fruits or pancakes
2. Beverages:
- Coffee or tea sweetener
- Hot chocolate
- Lattes and mochas
- Traditional drinks like Thai iced tea or Vietnamese coffee
3. Baking:
- As a moistening agent in cakes
- To add sweetness and creaminess in bread
- Filling in pastries and pies
Whether you’re baking a cake or sweetening your morning drink, homemade sweetened milk can easily replace store-bought condensed milk, giving you better control over flavor and ingredients.
List of Ingredients You’ll Need
Let’s get to the heart of the recipe—the ingredients. Luckily, you only need a few basics to get started, and you likely already have them in your kitchen.
Basic Ingredients:
- Whole milk (2 cups) – For the creamiest results, use full-fat milk.
- Granulated sugar (½ cup) – White sugar works best, but feel free to experiment.
Optional Add-ons:
- Vanilla extract (½ tsp) – For a sweet and cozy flavor.
- Pinch of salt – Enhances the sweetness.
- Cinnamon or cardamom – For a warm, spiced twist.
- Butter (1 tsp) – Adds a silky texture if you’re going for richness.
- Coconut milk (½ cup) – If you want a tropical, dairy-free twist.
This list is just a starting point. The beauty of homemade sweetened milk is how customizable it is. Want it less sweet? Use less sugar. Prefer plant-based? Go with almond, oat, or soy milk.
Kitchen Tools Required
Before you dive into cooking, make sure you’ve got your tools ready. You don’t need anything fancy, just the basics.
Must-Haves:
- Medium saucepan (preferably non-stick)
- Wooden spoon or silicone spatula
- Measuring cups and spoons
- Whisk (optional but helpful)
- A glass jar or airtight container for storage
Optional (but helpful):
- Fine-mesh strainer (if you use flavorings or want extra-smooth texture)
- Candy thermometer (for consistency control)
- Funnel (for easy pouring into jars)
Having the right tools on hand makes the whole process smoother and more enjoyable. Now that your kitchen is ready, it’s time to move on to the actual method.
How to Make Sweetened Milk at Home
Making sweetened milk at home is simple and satisfying. The process involves simmering milk with sugar until it reduces slightly and thickens. What’s amazing is that you get to adjust everything—how sweet it is, how thick it gets, and what flavors it carries.
There are two primary ways to make it:
- Traditional Stove-top Method (best flavor and consistency)
- Microwave Method (quick and convenient)
Let’s dive into the traditional method first—it’s the most reliable and gives you that rich, velvety finish.
Step-by-Step Guide: Traditional Method
This method is the classic way to make sweetened milk and mimics the preparation of homemade condensed milk. It does take a bit more time, but the results are absolutely worth it.
Step 1: Measure Your Ingredients
Get your ingredients lined up before you start cooking:
- 2 cups of whole milk
- ½ cup of granulated sugar
- Optional: ½ teaspoon vanilla extract, a pinch of salt
Using full-fat milk gives the creamiest results. Lower-fat milk will work, but the texture won’t be as rich.
Step 2: Combine and Heat
Pour the milk into a medium saucepan. Place it on the stove over medium heat. Add the sugar and gently stir until it dissolves completely. It’s important to stir frequently so the sugar doesn’t sit at the bottom and start to burn.
If you’re adding any optional ingredients like salt or vanilla, you can add them at this stage or wait until the milk has thickened slightly.
Step 3: Simmer and Stir
Once the mixture starts to bubble gently (not boil), lower the heat to medium-low. This is where patience comes in. Let the milk simmer for 35 to 40 minutes, stirring every few minutes. Stirring prevents a skin from forming on top and helps avoid scorching at the bottom.
You’ll notice the milk slowly thickening and reducing in volume. It should reduce by about ⅓ of its original volume.
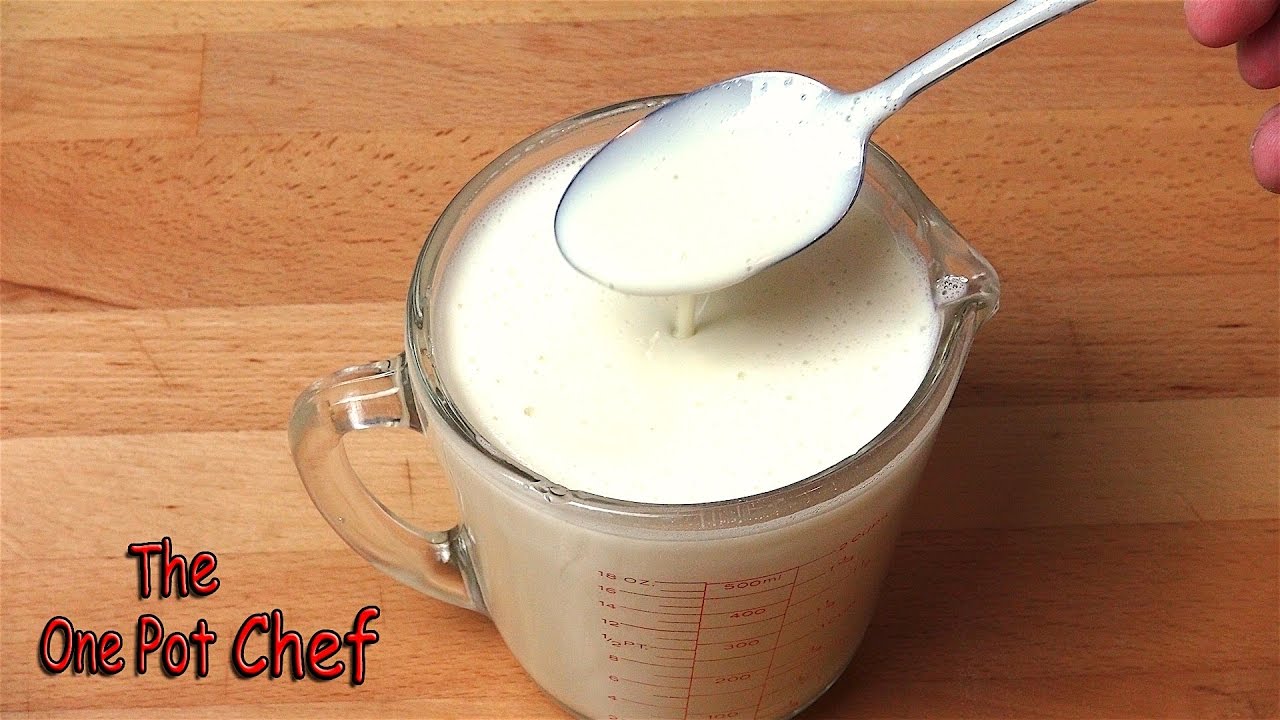
Step 4: Check for Consistency
To test if your sweetened milk is ready, dip a spoon into the mixture. The back of the spoon should be coated with a silky layer of milk. It won’t be super thick yet—it continues to thicken as it cools.
This is also the perfect time to stir in any flavorings you’ve held off on. Vanilla, cinnamon, or even a bit of cocoa powder can add a whole new depth.
Step 5: Cool and Store
Remove the saucepan from heat and let the milk cool to room temperature. Stir occasionally while cooling to avoid a skin forming on top.
Once cooled, pour the sweetened milk into a glass jar or airtight container. It can be stored in the refrigerator for up to 7 days.
Tip: Use a fine-mesh strainer if you added any spices or want an ultra-smooth finish.
Step-by-Step Guide: Microwave Method
Pressed for time? The microwave method is your friend. While it won’t be quite as thick or flavorful as the stovetop version, it’s great for quick fixes.
Ingredients:
- 1 cup milk
- ¼ cup sugar
Instructions:
- Pour milk and sugar into a large microwave-safe bowl (milk will bubble, so don’t use a small bowl).
- Stir well to dissolve the sugar.
- Microwave on high for 2 minutes, then stir.
- Repeat in 2-minute bursts, stirring each time, for a total of 10-12 minutes.
- Keep an eye out to avoid boiling over.
- When reduced and slightly thickened, remove and cool before storing.
Fast, easy, and still delicious!
Tips for Perfect Sweetened Milk
Whether you’re using a stove or microwave, these pro tips will help ensure every batch of sweetened milk turns out just right:
1. Stir Frequently
Especially during the simmering process. This prevents burning and keeps the sugar evenly distributed.
2. Don’t Rush the Process
Low and slow is the key. High heat will cause the milk to boil too fast and may ruin the flavor or burn the bottom.
3. Use a Heavy-Bottomed Pan
A thicker pot ensures even heating and less risk of scorching.
4. Add Flavor at the Right Time
Wait until the milk has reduced a bit before adding extracts or spices. This keeps the flavors from becoming too intense or cooked off.
5. Adjust Sweetness to Taste
Start with the base ratio, then tweak as needed. Everyone’s sweetness preference is different.
By keeping these simple tips in mind, you’ll master sweetened milk in no time.
Variations of Sweetened Milk
One of the best things about making sweetened milk at home is that you can get creative with the recipe. Want to make it dairy-free? Add a flavor twist? Lower the sugar? No problem! Here are some popular variations you can try:
1. Vegan Sweetened Milk
Don’t consume dairy? You can still enjoy rich, sweet milk with plant-based ingredients.
Try this combo:
- 2 cups oat milk (or almond, soy, or coconut milk)
- ¼ to ½ cup maple syrup, coconut sugar, or agave nectar
- Optional: a pinch of salt and a splash of vanilla
Simmer it just like you would with dairy milk, stirring frequently. Coconut milk gives the creamiest results, especially for desserts.
2. Flavored Sweetened Milk
Want to level up the flavor? These variations can turn your homemade milk into something extra special:
- Vanilla Sweetened Milk: Add ½ tsp vanilla extract or scrape a vanilla bean pod into the milk.
- Cardamom or Cinnamon Milk: Add a pinch of ground cardamom or a small cinnamon stick during simmering. Strain before storing.
- Chocolate Sweetened Milk: Stir in 1 tablespoon of cocoa powder and a little extra sugar to create a sweet chocolate milk base.
- Coffee or Mocha Milk: Add a teaspoon of instant coffee or espresso powder for a mocha-style mix—perfect for pouring into your morning brew.
3. Sugar-Free Version
Cutting back on sugar? Try using stevia, monk fruit sweetener, or erythritol. Keep in mind these behave differently during cooking, so you might need to adjust the amount and cooking time. Always taste and tweak.
These variations make sweetened milk far more versatile and customizable for any lifestyle or preference.
How to Store Sweetened Milk
Once you’ve made your batch, proper storage is key to keeping it fresh and safe.
Short-Term Storage:
- Store your sweetened milk in a clean glass jar or airtight container.
- Keep it in the refrigerator.
- It will stay fresh for up to 7 days.
Freezer Storage:
Want to make a bigger batch and save some for later?
- Let the milk cool completely.
- Pour it into freezer-safe containers, leaving room for expansion.
- Freeze for up to 2 months.
- Thaw in the fridge overnight before use. Stir well after thawing to restore the texture.
Pro Tip: Freeze in ice cube trays, then transfer to a ziplock bag. That way, you can defrost just a little at a time!
Common Mistakes to Avoid
Even simple recipes can go sideways if you’re not careful. Here are a few common pitfalls and how to avoid them:
1. Overheating the Milk
High heat may seem like a shortcut, but it usually leads to scorched milk, a burnt flavor, and a ruined batch. Keep it low and slow.
2. Using the Wrong Milk Type
Skim milk will work, but it won’t deliver the creamy texture you expect. Go with whole milk or at least 2% for best results.
3. Not Stirring Often Enough
If you forget to stir while it simmers, you risk developing a skin on top and burning the bottom. Stir every few minutes.
4. Over-reducing
If you cook it down too much, it might turn into a thick paste. Remember, it thickens more as it cools!
5. Adding Flavors Too Early
Extracts like vanilla or almond can lose their impact if added too early. Stir them in at the end for the best flavor.
Avoiding these mistakes ensures a smooth, sweet, and successful batch every time.
Sweetened Milk vs. Condensed Milk
You might be wondering—is sweetened milk just condensed milk? Well, yes and no. Let’s break it down.
| Feature | Sweetened Milk | Sweetened Condensed Milk |
|---|---|---|
| Homemade or Store-bought | Usually homemade | Usually store-bought |
| Texture | Slightly thick | Very thick and syrupy |
| Sugar Content | Adjustable | High sugar content |
| Shelf Life | Short (7 days) | Long (canned for months) |
| Ingredients | Milk + Sugar (basic) | Evaporated milk + Sugar |
| Use in Recipes | Versatile | Primarily for desserts and baking |
Sweetened milk is like the lighter, more versatile cousin of condensed milk. It can be used in more drinks, everyday recipes, and even lighter desserts.
Sweetened Milk Recipe Table (Quick Reference)
| Ingredient | Amount | Notes |
|---|---|---|
| Whole milk | 2 cups | Can substitute with plant milk |
| Granulated sugar | ½ cup | Adjust to taste |
| Vanilla extract | ½ tsp (optional) | Add after cooking |
| Pinch of salt | Optional | Enhances overall flavor |
| Butter | 1 tsp (optional) | For richer texture |
| Cooking time | 35–40 minutes | Stir regularly |
| Storage duration | Up to 7 days (fridge) | Store in airtight container |
This table can be your quick reference while preparing sweetened milk any time.
FAQs about Sweetened Milk Recipe
1. Can I use non-dairy milk to make sweetened milk?
Absolutely! Almond, oat, soy, and coconut milk all work. Just note that some plant milks don’t thicken as much as dairy, but they still taste amazing.
2. How long does homemade sweetened milk last?
Stored in the fridge in a sealed jar, it lasts up to 7 days. For longer storage, freeze it for up to 2 months.
3. Can I use sugar substitutes in this recipe?
Yes! Stevia, erythritol, monk fruit, or even maple syrup can be used. Start with small amounts and adjust to taste.
4. Is it cheaper to make sweetened milk at home?
Definitely. Store-bought condensed milk can be pricey, especially if you need it often. Homemade versions are budget-friendly and healthier.
5. Can I can or preserve sweetened milk for longer use?
Traditional home canning isn’t recommended unless you use proper sterilization methods. For safety, freezing is the better option.
Conclusion
Sweetened milk is more than just a mix of milk and sugar—it’s a foundational ingredient in so many comforting dishes and drinks. When you make it at home, you’re not only saving money but also crafting something that fits your personal taste and dietary needs perfectly. Whether you’re stirring it into your morning coffee, pouring it over dessert, or using it in traditional sweets, homemade sweetened milk adds warmth and richness to any recipe.
The process is simple, the ingredients are minimal, and the flavor payoff is huge. Plus, once you’ve tried the variations, you’ll realize how customizable and fun it can be. So why wait? Grab some milk, turn on the stove, and get whisking!