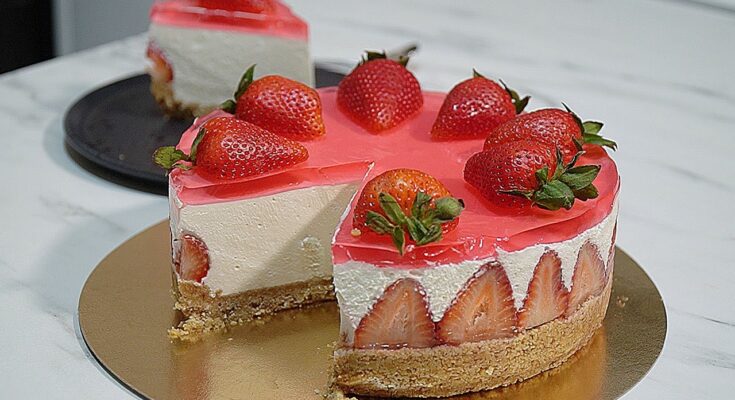
Strawberry Cheesecake Recipe: Cheesecake has earned its place as one of the most loved desserts worldwide. Whether you’re celebrating a special occasion or simply indulging in a sweet craving, this dessert always hits the spot. Among its many variations, Strawberry Cheesecake stands out as a timeless classic—rich, creamy, and topped with vibrant strawberries that add a burst of freshness.
Imagine cutting into a slice of smooth, velvety cheesecake, complemented by a buttery crust and glossy strawberry topping. Sounds irresistible, right? Let’s dive into this step-by-step guide to create the perfect homemade strawberry cheesecake that tastes as good as it looks!
Ingredients Required
For the Crust
- 1 ½ cups graham cracker crumbs
- 2 tablespoons granulated sugar
- ½ cup melted butter
For the Cheesecake Filling
- 24 ounces (3 blocks) cream cheese, softened
- 1 cup granulated sugar
- 1 teaspoon vanilla extract
- 3 large eggs
- ½ cup sour cream
- 2 tablespoons all-purpose flour
For the Strawberry Topping
- 1 ½ cups fresh strawberries, sliced
- ½ cup strawberry jam
- 1 tablespoon lemon juice
- 1 teaspoon cornstarch (optional, for thickening)
Tools and Equipment Needed
- 9-inch springform pan – For easy removal of the cheesecake.
- Mixing bowls – Various sizes for combining ingredients.
- Electric mixer or stand mixer – To create a smooth filling.
- Spatula – For scraping sides and spreading layers evenly.
- Aluminum foil – To wrap the pan for a water bath.
- Baking sheet – For stability during baking.
- Saucepan – For preparing the strawberry topping.
Step 1: Preparing the Crust
- Crush the Graham Crackers – Use a food processor to create fine crumbs. Alternatively, place them in a zip-lock bag and crush with a rolling pin.
- Mix Ingredients – Combine the graham cracker crumbs, melted butter, and sugar in a bowl. Stir until the texture resembles wet sand.
- Press the Crust – Firmly press the mixture into the base of a 9-inch springform pan using the back of a spoon or a flat-bottomed glass.
- Bake the Crust – Preheat your oven to 350°F (175°C) and bake the crust for 8–10 minutes. Let it cool completely before adding the filling.
Tip: For extra flavor, add a pinch of cinnamon to the crust mixture.
Step 2: Making the Creamy Cheesecake Filling
- Beat the Cream Cheese – Use an electric mixer to beat softened cream cheese until smooth and creamy (about 2–3 minutes).
- Add Sugar and Vanilla – Gradually add the sugar and vanilla extract, continuing to beat until well combined.
- Incorporate Eggs – Add the eggs one at a time, beating on low speed to avoid incorporating too much air, which can cause cracks.
- Mix in Sour Cream and Flour – Blend in the sour cream and flour until smooth. Scrape down the sides of the bowl as needed.
Tip: Avoid overmixing the batter to maintain a dense and creamy texture.
Step 3: Baking the Cheesecake
- Prepare the Water Bath – Wrap the bottom of the springform pan in aluminum foil to prevent water leakage. Place the pan in a larger baking dish and fill the dish with hot water until it reaches halfway up the sides of the cheesecake pan.
- Bake the Cheesecake – Pour the filling onto the cooled crust and smooth the top. Bake at 325°F (163°C) for 55–65 minutes or until the edges are set but the center still jiggles slightly.
- Cool Gradually – Turn off the oven and let the cheesecake sit inside with the door slightly open for about an hour.
Tip: A water bath prevents cracks and ensures even baking.
Step 4: Preparing the Strawberry Topping
- Cook the Sauce – Combine sliced strawberries, strawberry jam, and lemon juice in a saucepan over medium heat. Stir continuously until the strawberries soften and the mixture thickens (about 5–7 minutes).
- Optional Thickening – Add cornstarch mixed with water if you prefer a thicker topping. Cook for another 2 minutes.
- Cool Completely – Let the topping cool to room temperature before spreading it over the cheesecake.
Tip: For a fresher taste, use whole strawberries as decoration instead of cooking them.
Step 5: Assembling the Cheesecake
- Spread the Topping – Pour the cooled strawberry sauce evenly over the cheesecake. Use a spatula to smooth it out.
- Decorate – Garnish with fresh strawberry slices or whipped cream for an elegant finish.
- Chill Before Serving – Refrigerate the cheesecake for at least 4–6 hours or overnight to set completely.
Chilling and Setting the Cheesecake
After assembling the cheesecake with its rich strawberry topping, the next crucial step is allowing it to chill and set properly. Refrigeration is essential to firm up the layers, ensuring the cheesecake slices cleanly without falling apart.
- Cooling at Room Temperature – Once baked, let the cheesecake cool to room temperature for 1–2 hours. Avoid placing it directly into the refrigerator while it’s still warm, as sudden temperature changes can cause cracks.
- Refrigerate for Best Results – Cover the cheesecake with plastic wrap or foil and refrigerate it for at least 4–6 hours, although overnight chilling is highly recommended for optimal texture and flavor.
- Freezing Option – If you need to make the cheesecake ahead of time, you can freeze it. Wrap it tightly in plastic wrap and then in aluminum foil. It will last for up to 2 months in the freezer. Before serving, allow it to thaw in the refrigerator overnight.
Tip: Avoid opening the refrigerator too often during chilling, as it may affect the setting process.
Serving Suggestions
A beautifully prepared strawberry cheesecake deserves an equally delightful presentation. Here’s how you can enhance the serving experience:
- Fresh Fruits – Add extra slices of strawberries, blueberries, or raspberries as a garnish for a colorful touch.
- Whipped Cream – Pipe whipped cream around the edges for a bakery-style finish.
- Chocolate Drizzle – For a more indulgent twist, drizzle melted chocolate or caramel sauce over the cheesecake.
- Mint Leaves – Add a sprig of fresh mint for a refreshing contrast to the sweetness.
- Powdered Sugar Dusting – A light dusting of powdered sugar can give the cheesecake an elegant look.
Tip: Use a warm, sharp knife to cut clean slices. Dip the knife in hot water and wipe it dry between cuts.
Storage Tips
Proper storage ensures your cheesecake remains fresh and delicious for days.
- Refrigerator Storage – Cover the cheesecake tightly with plastic wrap or store it in an airtight container. It can last for 4–5 days in the fridge without losing its texture.
- Freezing for Longer Shelf Life – For longer storage, freeze the cheesecake without the topping. Wrap it securely in plastic wrap and foil. Thaw it in the refrigerator and add the topping before serving.
- Single-Serving Freezing – If you want to store individual slices, wrap each piece in plastic wrap and freeze them separately. This allows for easy portioning later.
Tip: Label the storage containers with dates to keep track of freshness.
Common Mistakes to Avoid
Even seasoned bakers can face challenges while making cheesecake. Here are some common pitfalls and how to avoid them:
- Overbaking – Cheesecake should be slightly jiggly in the center when removed from the oven. Overbaking can result in a dry texture.
- Cracks on the Surface – Avoid overmixing the batter, and always use a water bath during baking. Cooling the cheesecake slowly also helps prevent cracks.
- Not Greasing the Pan – Grease the sides of the springform pan to ensure smooth removal after baking.
- Skipping the Chill Time – Rushing the cooling process can lead to a runny cheesecake. Always refrigerate it for several hours or overnight.
- Using Cold Ingredients – Bring cream cheese, eggs, and sour cream to room temperature before mixing to achieve a smooth batter.
Tip: If cracks do form, you can easily hide them with the strawberry topping!
Tips for Making the Perfect Cheesecake
To take your cheesecake to the next level, consider these professional tips:
- Room Temperature Ingredients – Always use softened cream cheese and room-temperature eggs to create a smooth, lump-free batter.
- Avoid Overmixing – Beating the batter too much can incorporate excess air, leading to cracks during baking.
- Water Bath Essentials – Ensure the foil around the pan is tightly wrapped to prevent water from seeping in.
- Testing for Doneness – Use the jiggle test. The center should wiggle slightly but not appear wet.
- Let It Rest – Cooling the cheesecake gradually in the oven, then chilling it overnight, improves flavor and texture.
Tip: If you’re short on time, consider making mini strawberry cheesecakes for faster baking and chilling.
Healthier Alternatives for Strawberry Cheesecake
If you’re looking for a healthier version of this dessert, here are some substitutions:
- Low-Fat Cream Cheese – Use reduced-fat or fat-free cream cheese for a lighter filling.
- Greek Yogurt Instead of Sour Cream – Swap sour cream with Greek yogurt to reduce calories while maintaining creaminess.
- Almond Flour Crust – For a gluten-free option, replace graham crackers with almond flour mixed with a little honey and butter.
- Natural Sweeteners – Substitute granulated sugar with honey, maple syrup, or a sugar-free sweetener.
- Fresh Fruit Puree Topping – Replace the strawberry jam with a homemade fruit puree without added sugar.
Tip: Add chia seeds to the strawberry topping for extra fiber and nutrients.
FAQs about Strawberry Cheesecake Recipe
What ingredients are needed for a strawberry cheesecake?
A typical strawberry cheesecake requires cream cheese, sugar, eggs, and vanilla extract for the filling. The crust is usually made from crushed graham crackers mixed with melted butter. For the topping, fresh strawberries and either strawberry jam or fresh strawberry glaze are needed.
How long does it take to make a strawberry cheesecake?
The preparation time can vary, but generally, it takes about 20 minutes to prepare the ingredients and crust. Baking time is around 45 minutes to 1 hour. Additionally, it’s best to allow the cheesecake to chill in the refrigerator for at least 4 hours, or overnight, for the best texture and flavor development.
Can I make strawberry cheesecake without an oven?
Yes, you can make a no-bake version of strawberry cheesecake. This involves a crust that doesn’t require baking and a filling that sets in the refrigerator. The no-bake filling typically uses whipped cream and gelatin to set, instead of eggs.
Is it possible to make a vegan strawberry cheesecake?
Absolutely! For a vegan version, you can use vegan cream cheese and a plant-based thickener instead of eggs. The crust can be made with vegan biscuits and plant-based butter, while the topping remains the same, utilizing fresh strawberries.
How do I prevent cracks in my baked strawberry cheesecake?
To prevent cracks, ensure that all ingredients are at room temperature before mixing, and avoid overmixing the batter. Baking the cheesecake in a water bath can also help regulate the temperature and reduce the likelihood of cracking.
Can strawberry cheesecake be frozen for later use?
Yes, strawberry cheesecake can be frozen. Wrap it tightly in plastic wrap and aluminum foil to prevent freezer burn. It can be stored for up to two months. Thaw in the refrigerator overnight before serving.
Conclusion
Making a homemade strawberry cheesecake might sound intimidating, but with this detailed step-by-step guide, it becomes an enjoyable and rewarding process. From the buttery graham cracker crust to the creamy cheesecake filling and glossy strawberry topping, this dessert is sure to impress.
Whether you’re preparing it for a party, holiday celebration, or simply treating yourself, this cheesecake guarantees to delight every bite. Follow the tips and tricks provided to avoid common mistakes, and you’ll have a professional-quality cheesecake ready to serve!


