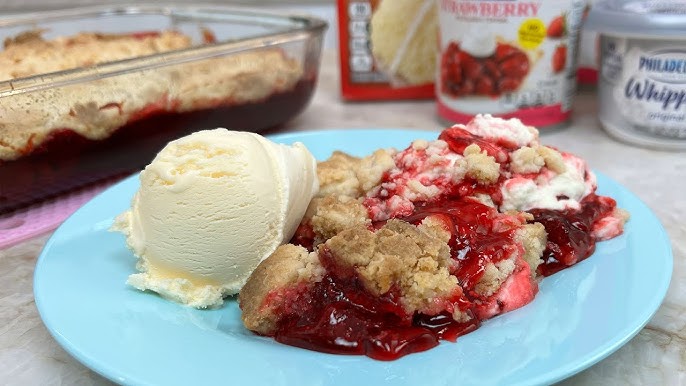
Strawberry Cheesecake Dump Cake Recipe: Dump cakes are the underrated heroes of easy, crowd-pleasing desserts. If you’ve never made one, you’re in for a treat. This Strawberry Cheesecake Dump Cake recipe combines the sweet, juicy flavor of strawberries with the creamy richness of cheesecake and the buttery goodness of a classic dump cake. It’s the kind of dessert that requires minimal prep but delivers maximum flavor and texture. And yes—it’s as good as it sounds.
Unlike traditional cakes that require multiple bowls, mixers, and a whole lot of effort, dump cakes simplify everything. You literally dump ingredients into a baking dish, bake, and devour. What makes this version extra special is the creamy cheesecake layer that elevates the entire dish to gourmet level with almost no extra work.
Whether you’re hosting a family gathering, need a last-minute potluck dessert, or just want something sweet without the hassle, this recipe is a lifesaver. It’s nostalgic, comforting, and just the right amount of indulgent. Plus, it’s super easy to customize—add some nuts, drizzle on chocolate, or go full whipped cream crazy.
Ingredients You’ll Need
This Strawberry Cheesecake Dump Cake comes together with just a handful of simple ingredients, most of which you probably already have in your pantry or fridge.
For the Strawberry Layer
- Canned Strawberry Pie Filling (2 cans, 21 oz each): This is the fastest route to flavor-packed fruitiness. It’s already sweetened and thickened, which means you can skip the extra sugar and cornstarch.
- Optional – Fresh Strawberries (1 cup, chopped): If you love texture, fold these into the canned filling or sprinkle them on top for a little extra freshness and tartness.
For the Cheesecake Layer
- Cream Cheese (2 blocks, 8 oz each, softened): You want this soft so it mixes easily and bakes into that creamy, dreamy layer.
- Granulated Sugar (½ cup): This sweetens the cream cheese without overpowering the tangy flavor.
- Vanilla Extract (1 tsp): A touch of vanilla brings warmth and complexity to the cheesecake flavor.
For the Cake Layer
- Boxed Yellow Cake Mix (1 box, 15.25 oz): You’ll be using this dry—don’t mix it with anything. Just sprinkle it over the top.
- Unsalted Butter (1 cup or 2 sticks, melted): This soaks into the cake mix and helps form a rich, golden crust. Use high-quality butter if you can.
Optional Add-ins & Toppings
- Chopped Pecans or Walnuts (½ cup): Add a satisfying crunch to contrast the creamy and gooey layers.
- White Chocolate Chips (¼ cup): Melt slightly into the cake and add a touch of extra sweetness.
- Whipped Cream or Ice Cream (for serving): Because everything’s better with a scoop on top.
Kitchen Tools You’ll Need
This isn’t a complicated dessert, and that’s part of its magic. Still, having the right tools will make the process even smoother.
- 9×13-inch Baking Dish: Glass or ceramic works best for even heating.
- Mixing Bowls: You’ll need at least one medium bowl for the cheesecake mixture.
- Spatula or Spoon: For spreading the layers evenly.
- Microwave-Safe Bowl or Small Saucepan: To melt the butter.
- Electric Mixer (Optional): Handy for making the cream cheese mixture super smooth.
There’s no need for cake pans, parchment paper, or a stand mixer. Everything happens right in one dish, and cleanup is minimal—just one of the many reasons dump cakes are a weeknight favorite.
Step-by-Step Instructions
Let’s break it down step by step. This method ensures each layer bakes perfectly into the next, creating a heavenly dessert with every bite.
Step 1: Preheat and Prep the Pan
Start by preheating your oven to 350°F (175°C). Grease your 9×13 baking dish lightly with non-stick spray or a thin layer of butter. This prevents sticking and makes cleanup easier.
You don’t need to line the pan with parchment—this is meant to be a rustic, no-fuss dessert. While the oven heats, gather your ingredients and melt the butter. You can use a microwave or stovetop, just make sure it’s fully melted but not bubbling hot.
Step 2: Spread the Strawberry Layer
Open your canned strawberry pie filling and pour it into the prepared baking dish. Spread it out evenly using a spatula or the back of a spoon. If you’re using fresh strawberries, now’s the time to add them in. Scatter the chopped pieces evenly across the filling.
This fruity layer acts as the juicy base for the entire dump cake. Make sure it’s spread smoothly so that every scoop later on delivers that perfect strawberry punch.
Step 3: Add the Cheesecake Layer
In a medium bowl, combine your softened cream cheese, sugar, and vanilla extract. Mix until smooth—this can take a few minutes if you’re doing it by hand, but it’s totally doable.
Once combined, drop dollops of the cream cheese mixture over the strawberry layer. You don’t need to spread it into a single layer; the dollops will melt and settle into pockets of creamy goodness as it bakes.
For a marbled effect, you can lightly swirl it with a butter knife—but don’t overdo it. We want distinct layers, not a full blend.
Step 4: Sprinkle the Cake Mix
Now comes the signature move of a dump cake—sprinkling the dry cake mix right over the top. Do not mix it with any liquid or eggs. Just open the boxed yellow cake mix and evenly shake it across the entire surface of the cheesecake and strawberry layers.
Be sure to cover all areas so that there are no gaps. If you find little clumps of cake mix, gently break them up with your fingers or a spoon. The dry mix will absorb the butter in the next step and create a golden, crumbly topping that’s the ultimate textural contrast to the creamy, gooey layers below.
Pro tip: If you want a bit more color and flavor, you could use a strawberry or white cake mix instead of yellow, but yellow gives that classic buttery taste most people love.
Step 5: Top with Butter and Bake
Here’s where the magic happens. Pour your melted butter slowly and evenly over the entire surface of the cake mix. Try to drizzle it across as much of the top as possible. The goal is for the butter to soak through the cake mix and help it bake into that crispy, golden topping.
If there are a few dry spots left after pouring, don’t stress. Those bits will still crisp up and add a nice texture contrast.
Once buttered, place the dish into your preheated oven and bake for 45–55 minutes, or until the top is golden brown and the edges are bubbly. Keep an eye on it during the last 10 minutes. If it starts to brown too quickly, you can loosely tent it with foil to prevent overbaking.
Let the cake cool for at least 15 minutes before serving—it thickens as it sits and the flavors become more cohesive. Serve warm with a scoop of vanilla ice cream or a dollop of whipped cream for the ultimate comfort dessert.
Tips for the Perfect Dump Cake
While this is a pretty foolproof recipe, a few insider tricks can take your dump cake from good to unforgettable.
- Use room temperature cream cheese: Cold cream cheese won’t mix smoothly and can leave lumps.
- Even butter distribution matters: The more evenly you drizzle the melted butter, the more consistent your topping will bake.
- Don’t over-swirl: While it’s tempting to make it pretty by swirling the layers together, resist! You want distinct layers, not a mushy mess.
- Let it cool slightly before serving: Straight out of the oven, it’ll be too gooey to hold its shape. A short rest time lets everything settle.
- Make it your own: Feel free to toss in white chocolate chips, chopped nuts, or even a drizzle of caramel sauce before baking.
Want it richer? Add more butter. Want it tangier? Go heavier on the cheesecake layer. This recipe is wonderfully adaptable.
Substitutions and Variations
This Strawberry Cheesecake Dump Cake is wildly flexible. You can swap ingredients based on your preferences, pantry staples, or dietary needs without sacrificing that dreamy flavor or texture.
1. Switch Up the Fruit
- Blueberries: Swap strawberry pie filling for blueberry for a slightly tart, deep flavor.
- Mixed Berry: Combine strawberry, raspberry, and blueberry fillings for a vibrant twist.
- Peach or Apple: Go totally different with warm spiced fruit layers like peach or cinnamon apple.
2. Change the Cake Mix Flavor
- White Cake Mix: For a lighter, sweeter base that lets the strawberries shine.
- Strawberry Cake Mix: Double the berry flavor for a pink, festive dessert.
- Butter Pecan or Spice Cake: Adds warm, rich notes—perfect for fall gatherings.
3. Cheesecake Twists
- Flavored Cream Cheese: Try strawberry or honey vanilla cream cheese for a subtle upgrade.
- Add Lemon Zest: Brightens up the cheesecake layer and pairs beautifully with strawberries.
- Greek Yogurt Substitute: Swap part of the cream cheese with Greek yogurt for tang and a slight protein boost.
4. Dietary Swaps
- Gluten-Free Cake Mix: Works just as well as regular—just be sure the pie filling is gluten-free too.
- Vegan Butter and Cream Cheese: Ideal for plant-based diets (and still totally delicious).
- Sugar-Free Options: Use sugar-free pie filling and erythritol in the cheesecake mix for a low-sugar version.
This recipe is a blank canvas for creativity. Try it once as written, then let your culinary instincts take over.
Serving Suggestions
Dump cake is the kind of dessert that feels just as right at a backyard barbecue as it does at a holiday dinner. But how you serve it can totally change the vibe.
Warm & Gooey (Right Out of the Oven)
- With Ice Cream: Vanilla is classic, but strawberry, cheesecake, or even chocolate swirl ice cream are great too.
- Drizzle with Chocolate Syrup: Adds richness and turns it into a more indulgent dessert.
- Caramel Sauce: A buttery caramel drizzle blends beautifully with the fruit and cheesecake.
Chilled & Firm
- Serve Cold from the Fridge: The cheesecake firms up, and you get cleaner slices. Great for potlucks or brunch spreads.
- With Fresh Berries on Top: Adds brightness and a fresh burst of flavor.
- Whipped Cream or Cool Whip: Keeps it light and fluffy while balancing the sweetness.
Serving Size Suggestions
- For a Crowd: This recipe serves 12 easily. Double it for larger parties—just use a second pan.
- As a Mini Dessert: Bake it in muffin tins or ramekins for single-serve portions.
Storing and Reheating Tips
Don’t worry if you have leftovers—this cake stores beautifully and reheats like a dream.
Refrigerator Storage
- Store Covered: Use plastic wrap or an airtight lid. Keeps fresh for up to 5 days.
- Cool Before Storing: Let it come to room temp before sealing to avoid condensation (and a soggy top).
Freezer Friendly
- Yes, You Can Freeze It: Freeze cooled slices in airtight containers for up to 3 months.
- Thaw Overnight: Let it thaw in the fridge, then warm it up slightly before serving.
How to Reheat
- Microwave (for Individual Slices): 30–45 seconds does the trick.
- Oven (for Larger Portions): Reheat at 325°F for about 10–15 minutes until warmed through.
- Avoid Overheating: It can dry out the topping or make the cheesecake rubbery. Warm, not hot, is the goal.
Pro tip: Add a fresh drizzle of cream or a dollop of whipped topping before serving to revive the richness after reheating.
Nutritional Information (Approximate)
Here’s a rough estimate of what you’re eating per serving (based on 12 servings total):
| Nutrient | Per Serving |
|---|---|
| Calories | 370–420 kcal |
| Total Fat | 21g |
| Saturated Fat | 11g |
| Carbohydrates | 45–50g |
| Sugars | 28–32g |
| Protein | 4–6g |
| Sodium | 250–300mg |
Note: These numbers can vary based on the brands and ingredients you use, especially if you add toppings or substitutions.
For a lighter version:
- Use reduced-fat cream cheese
- Choose sugar-free pie filling
- Replace part of the butter with unsweetened applesauce (though texture may change)
Gluten-Free and Vegan Options
This recipe is naturally adaptable for dietary restrictions, and you don’t have to sacrifice flavor to make it work.
Gluten-Free Version
- Use Gluten-Free Yellow Cake Mix: Brands like Betty Crocker or King Arthur have great options.
- Double-Check Your Pie Filling: Some canned fillings use wheat-based thickeners.
- Layer the Same Way: No changes needed in prep or baking time.
Vegan-Friendly Version
- Dairy-Free Cream Cheese: Use almond or coconut-based options.
- Vegan Butter Substitute: Earth Balance or other plant-based brands work well.
- Cake Mix Check: Some boxed cake mixes contain dairy—read the label carefully.
If you’re also avoiding refined sugars, look for naturally sweetened pie fillings or make your own with fruit and maple syrup.
FAQs about Strawberry Cheesecake Dump Cake Recipe
1. Can I use frozen strawberries instead of canned pie filling?
Yes, but you’ll need to cook them down first. Add sugar and cornstarch to help thicken them into a jammy consistency similar to pie filling.
2. How long does dump cake last in the fridge?
Stored properly in an airtight container, it will last up to 5 days. Reheat individual portions in the microwave for 30–45 seconds.
3. Can I make this in advance for a party?
Definitely. Bake it the day before, refrigerate it, and reheat before serving. Or assemble it the night before and bake it fresh the day of.
4. Do I need to mix the cake mix with eggs or milk?
No. Just sprinkle the dry mix right on top of the cheesecake layer and drizzle melted butter over it. That’s it!
5. Can I freeze dump cake?
Yes. Once baked and cooled, wrap it tightly and freeze for up to 3 months. Thaw in the fridge overnight and reheat before serving.
Conclusion
The beauty of a dump cake is that it’s forgiving. Forgot to soften the cream cheese? It’ll still work. Don’t have pie filling? Cook down fresh berries. Want to veganize it? Easy peasy. The layers of juicy strawberries, tangy cheesecake, and buttery cake crumble come together like magic—no stand mixer or fancy skills required.
So next time you need a no-fail dessert that tastes like you spent hours in the kitchen, give this dump cake a go. You’ll be shocked at how something so simple can taste so decadent.