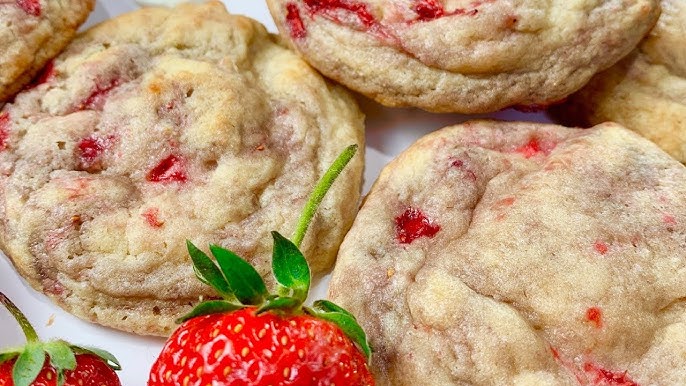
Strawberry Cheesecake Cookies Recipe: There are cookie recipes, there are cheesecake recipes, and then there are those rare dessert mashups that feel like they were made to steal the spotlight. Strawberry cheesecake cookies belong in that last category.
They bring together the soft, buttery comfort of a bakery-style cookie and the creamy tang of cheesecake in one bite. Add a bright strawberry flavor, and you get a dessert that feels playful, rich, and just a little bit fancy without being hard to make.
Whether you are baking for a party, a family dessert table, a holiday tray, or just a weekend craving, these cookies feel special enough to impress and simple enough to repeat. That sweet spot is what makes this recipe worth saving.
What Strawberry Cheesecake Cookies Actually Are
At first glance, strawberry cheesecake cookies sound like a trendy bakery item with a long ingredient list and an even longer prep time. In reality, they are a soft strawberry-flavored cookie built around a rich cheesecake-style center. Think of them as stuffed cookies with personality. The dough is usually buttery, slightly thick, and flavored with strawberry through freeze-dried strawberries, strawberry jam, or both. The filling is made from cream cheese, sugar, and vanilla, giving you that classic cheesecake taste without needing a springform pan or water bath.
The beauty of this dessert is how it captures the key elements of traditional strawberry cheesecake in a handheld form. Cheesecake normally gives you a creamy filling, a sweet tang, and a dessert that feels indulgent from the first bite. A good cookie, on the other hand, offers warmth, chewiness, and that irresistible homemade feel. When the two come together, the result is rich but not overwhelming. The cookie shell acts like the crust and body, while the cheesecake filling gives the middle its signature creamy bite. The strawberry flavor ties everything together and keeps the overall dessert lively and fresh.
These cookies are also a smart choice for anyone who loves cheesecake but does not always want the fuss of slicing and chilling a whole cake. They travel well, portion easily, and look beautiful on a tray. They can be made pink and pretty for spring gatherings, romantic for Valentine’s Day, or bright and cheerful for birthdays and brunches. Even better, they taste like something from a specialty dessert shop while still feeling homemade. That is part of their charm. They look polished, taste luxurious, and still carry the warmth and comfort that only a freshly baked cookie can deliver.
Ingredients You’ll Need
Below, the ingredients are divided into clear groups so you can shop and prep without guesswork. That keeps the process cleaner and easier, especially if you are making these for the first time. You will also notice a few optional ingredients.
Dry Ingredients
Here are the dry ingredients that create the cookie’s base and structure:
- 2 3/4 cups all-purpose flour
- 1 teaspoon cornstarch
- 1 teaspoon baking powder
- 1/2 teaspoon baking soda
- 1/2 teaspoon salt
- 3/4 cup freeze-dried strawberries, crushed into a powder with a few small bits left for texture
The flour gives the dough body and helps the cookies hold their shape around the cheesecake filling. Cornstarch is a quiet hero here because it softens the crumb and helps create that tender bakery-style texture. Baking powder and baking soda work together to give the cookies enough lift without making them cakey. The salt sharpens the sweetness and keeps the flavor from falling flat. A cookie without enough salt can taste oddly dull, even when it is loaded with sugar and vanilla.
The most important dry flavor ingredient is the freeze-dried strawberries. They are much better than fresh strawberries for this recipe because fresh berries add too much moisture and can make the dough soggy. Freeze-dried strawberries deliver concentrated fruit flavor without watering down the dough. They also help create that natural strawberry taste people actually want, instead of the artificial candy-like flavor that some pink desserts end up with. Crush them in a food processor or place them in a zip-top bag and gently roll with a rolling pin. You want mostly powder with a few tiny bits for texture and color.
Wet Ingredients
These wet ingredients bring richness, sweetness, and the soft texture that makes these cookies irresistible:
- 1 cup unsalted butter, softened
- 1 cup granulated sugar
- 1/2 cup light brown sugar
- 2 large eggs
- 2 teaspoons vanilla extract
- 1 to 2 tablespoons strawberry jam for extra flavor and color, optional but recommended
The butter is the foundation of flavor, so use real unsalted butter and let it soften naturally before mixing. Butter that is too cold will not cream properly, and melted butter will make the dough too loose. The combination of granulated sugar and light brown sugar is important because it creates both sweetness and chewiness. Granulated sugar helps the cookies spread slightly and bake with cleaner edges, while brown sugar adds moisture and depth with a faint caramel note.
The eggs bind everything together and give the dough structure. The vanilla extract rounds out the flavors and makes both the strawberry and cheesecake notes taste fuller. The optional strawberry jam boosts fruitiness and adds a subtle rosy tint to the dough. It is especially useful if your freeze-dried strawberries are flavorful but pale. Just do not overdo it, because too much jam adds moisture and can soften the dough too much. Used carefully, it adds that little extra layer that makes people pause after the first bite and ask what exactly makes the cookie taste so good.
Cheesecake Filling Ingredients
Here is what you need for the creamy center:
- 8 ounces cream cheese, softened
- 1/4 cup powdered sugar
- 1/2 teaspoon vanilla extract
This filling is simple, but it completely transforms the cookie. The cream cheese brings that unmistakable cheesecake tang and creamy mouthfeel. It needs to be softened enough to mix smoothly, but not warm or runny. Powdered sugar works better than granulated sugar here because it blends fast and keeps the filling silky instead of grainy. The small amount of vanilla extract helps make the center taste like a true cheesecake filling rather than plain sweetened cream cheese.
The filling needs to be chilled or even briefly frozen before assembly. That step matters because cold filling is much easier to wrap in dough. If it is too soft, it will squish out the sides when you shape the cookies. When properly chilled, it stays tucked inside and melts into a luscious center while baking. That hidden pocket of creamy filling is what gives these cookies their wow factor. Without it, you would still have a nice strawberry cookie. With it, you get a dessert that feels layered, surprising, and memorable.
Optional Mix-Ins and Toppings
These extras are not required, but they can elevate the final result:
- 1/2 cup white chocolate chips
- Extra crushed freeze-dried strawberries for topping
- A light drizzle of melted white chocolate
- Crushed graham crackers for a cheesecake-inspired finish
- A pinch of pink food coloring, only if you want a brighter color
Here is a quick comparison of optional flavor boosters:
| Optional Add-In | What It Adds | Best Use |
|---|---|---|
| White chocolate chips | Sweet, creamy richness | Mixed into dough or drizzled on top |
| Extra freeze-dried strawberries | Stronger fruit flavor and color | Rolled on top before baking |
| Crushed graham crackers | Classic cheesecake vibe | Sprinkled after baking |
| Strawberry jam | Deeper berry flavor | Mixed into dough |
| Pink food coloring | Brighter visual appeal | Only for presentation |
These extras let you steer the cookies in different directions. White chocolate makes them taste more dessert-like and rich. Graham crackers give a subtle nod to cheesecake crust. Extra strawberry pieces on top make the flavor more obvious and the presentation more eye-catching. None of these are essential, but they are useful when you want the cookies to look bakery-worthy or fit a specific occasion. The base recipe is strong on its own, and these options simply help tailor it to your style.
Kitchen Tools for Success
You do not need a commercial kitchen or fancy pastry gadgets to make these cookies, but the right tools will absolutely make the process easier. A good recipe can still go sideways when the tools are awkward, inaccurate, or poorly matched to the job. Since this is a stuffed cookie recipe, there are a few items that help with consistency and reduce the chances of the filling leaking or the dough becoming hard to handle. Think of your tools as the backstage crew. They do not get the applause, but the show goes smoother because they are there.
At minimum, you will want a large mixing bowl, a hand mixer or stand mixer, measuring cups and spoons, a rubber spatula, a baking sheet, and parchment paper. A mixer helps cream the butter and sugars properly, which is one of the keys to getting a soft cookie texture. You can mix by hand, but it takes more effort and it is harder to get that light, fluffy base. Parchment paper prevents sticking and also helps the bottoms bake more evenly. A cookie scoop is another helpful tool because it keeps the dough portions uniform, which means the cookies bake at the same rate.
A small spoon or mini scoop is useful for portioning the cheesecake filling, especially if you freeze it in little mounds before wrapping with dough. A cooling rack helps the cookies set properly after baking so the bottoms do not steam and become soggy. If you are crushing freeze-dried strawberries, a food processor works fastest, but a zip-top bag and rolling pin do the job too. None of this is glamorous, but it matters. Good tools remove friction from the process. That means you can focus less on fighting sticky dough and more on enjoying the part where your kitchen starts smelling like a strawberry dessert dream.
How to Prepare the Cheesecake Filling
The cheesecake filling is the heart of this recipe, and preparing it properly can make the difference between cookies that look polished and cookies that collapse into a gooey mess. Thankfully, the filling itself is simple. In a medium bowl, combine the softened cream cheese, powdered sugar, and vanilla extract. Mix until the texture is smooth, creamy, and lump-free. You do not want to whip too much air into it. Just blend it until everything is evenly combined and silky. The goal is a thick, pipeable filling, not something loose or mousse-like.
Once mixed, scoop small portions of the filling onto a parchment-lined plate or tray. About 1 to 1 1/2 teaspoons per mound works well for medium to large cookies. Try to keep the mounds fairly even in size so each cookie gets a similar amount of filling. After portioning, place the tray in the freezer for about 20 to 30 minutes, or until the filling is firm enough to handle. This is one of those little steps that feels optional until you skip it and regret it. Cold filling is much easier to wrap inside dough without smearing or leaking.
Why freeze instead of just refrigerate? Because you need the filling to hold its shape during assembly. The dough will soften as you handle it, and warm cream cheese can quickly turn slippery. A frozen filling gives you a clear center to build around. It also slows the melting process once the cookies hit the oven, which helps preserve that creamy pocket inside. Think of it like placing an ice cube into warm dough, not because it stays frozen, but because it gives the structure a head start. That head start is exactly what helps these cookies keep their stuffed, bakery-style form.
How to Make the Strawberry Cookie Dough
Making the dough is where the cookie begins to take on its personality. Start by whisking together the dry ingredients in a separate bowl: all-purpose flour, cornstarch, baking powder, baking soda, salt, and crushed freeze-dried strawberries. This step spreads the leavening and strawberry flavor evenly throughout the flour, which helps prevent uneven mixing later. In a large mixing bowl, cream the softened butter, granulated sugar, and brown sugar until the mixture looks pale and fluffy. This usually takes about 2 to 3 minutes with an electric mixer. Do not rush it. Proper creaming builds air into the dough and affects texture more than many people realize.
Next, add the eggs one at a time, mixing well after each addition. Stir in the vanilla extract and the optional strawberry jam. The dough may look slightly rosy at this stage, and the smell already starts leaning toward strawberry shortcake territory. Gradually add the dry ingredients to the wet ingredients, mixing on low speed just until combined. Overmixing at this point can make the cookies tough, and nobody wants a cookie that feels like it trained for a marathon. If using white chocolate chips, fold them in at the very end with a spatula so they stay evenly distributed.
The finished dough should be soft, thick, and slightly tacky but not runny. If it feels too sticky to shape, chilling will solve that, which is why the next step is important. The dough should also have visible pink speckles from the freeze-dried strawberries. That natural look is a good sign. It says real fruit instead of fake flavoring. At this point, you have the two essential parts ready: the creamy filling and the strawberry cookie dough. The recipe is no longer an idea on paper. It is becoming a real dessert, and the most satisfying part is just ahead.
How to Chill the Dough Properly
Chilling the dough is not a throwaway instruction here. It is a structural step, and it makes the entire recipe easier to manage. Once the dough is mixed, cover the bowl and refrigerate it for at least 45 to 60 minutes. This gives the butter time to firm back up and allows the flour to hydrate fully. The result is a dough that is easier to scoop, shape, and wrap around the cheesecake filling. Warm dough spreads too quickly in the oven, which increases the chance of the filling leaking out or the cookies flattening too much.
There is also a flavor benefit to chilling. Even a short rest gives the ingredients time to settle and deepen. The strawberry flavor becomes more integrated, the vanilla softens into the dough, and the overall cookie tastes less like separate ingredients and more like one finished dessert. It is similar to letting soup sit overnight and noticing it tastes better the next day. Time gives flavor a chance to come together. In cookies, that extra rest often means a richer taste and a better texture.
When the dough is properly chilled, it should scoop cleanly and feel pliable rather than sticky. If it gets too firm after a long chill, let it sit at room temperature for a few minutes before shaping. You do not want rock-hard dough, just dough that cooperates. This is one of the easiest ways to improve your results without changing a single ingredient. Bakers often focus on fancy add-ins, but temperature control is where a lot of the magic lives. Chill the dough, and the cookies reward you with thicker centers, better shape, and a much smoother assembly process.
Step-by-Step Guide to Assembling the Cookies
Step 1: Prepare the Cookie Dough
Start by making sure your strawberry cookie dough is chilled and easy to handle. If the dough feels too soft, place it in the fridge for about 20 to 30 minutes. This helps the cookies keep their shape during baking. A firmer dough also makes assembly much easier and less messy.
Step 2: Make the Cheesecake Filling
In a small bowl, mix the cream cheese, sugar, and vanilla until smooth and creamy. The filling should be thick, not runny. If needed, chill it for a few minutes so it becomes easier to scoop. This creamy center is what gives the cookies their rich cheesecake-style surprise.
Step 3: Scoop and Flatten the Dough
Scoop out equal portions of cookie dough and flatten each piece gently in your palm. Try to create a small round disc shape without making it too thin. You want enough dough to wrap around the filling completely. This step is key to getting that perfect stuffed-cookie look.
Step 4: Add the Filling and Seal
Place a small spoonful of the cheesecake filling in the center of one flattened dough piece. Cover it with another small piece of dough or fold the dough around it, then pinch the edges closed. Roll it gently between your hands to form a smooth ball. Make sure the filling is fully sealed inside so it does not leak while baking.
Step 5: Arrange and Get Ready to Bake
Place each assembled cookie ball on a lined baking tray, leaving enough space between them for spreading. Press a few extra strawberry pieces or crumbs on top if desired for a prettier finish. Once all the cookies are assembled, chill them briefly before baking for the best texture. Now they are ready for the oven.
Baking Instructions and Timing
Preheat your oven to 350°F (175°C) and line your baking sheets with parchment paper. Place the cookie dough balls on the prepared sheet, leaving enough space between them for gentle spreading. About 2 to 3 inches apart is usually enough. Bake one tray at a time if possible, especially if your oven runs unevenly. That gives you more control and helps the cookies bake consistently. Stuffed cookies benefit from steady heat, and crowding the oven can sometimes throw that off.
Bake the cookies for about 12 to 15 minutes, depending on their size. The edges should look lightly set and just barely golden, while the tops may still appear soft in the center. That is exactly what you want. Overbaking is the fastest way to lose the soft, creamy contrast that makes these cookies special. Remember, the cookies continue to set on the baking sheet after they come out of the oven. Pulling them when they still look slightly underdone in the middle is often the right call, not a mistake.
Let the cookies rest on the baking sheet for 10 minutes before moving them to a cooling rack. This cooling period allows the structure to firm up while keeping the center tender. If you move them too early, they may break apart because the cheesecake filling is still soft and warm. Once cooled slightly, you can drizzle them with melted white chocolate or sprinkle with graham cracker crumbs for a more decorated finish. Fresh out of the oven, these cookies smell like a strawberry bakery and a cheesecake shop collided in the best possible way. The hardest part is waiting long enough not to burn your tongue on the molten center.
How to Tell When the Cookies Are Perfect
One of the trickiest parts of baking cookies is knowing when they are actually done. With stuffed cookies, that challenge becomes even more real because the center naturally stays softer than the edges. The key sign is the outer structure. The edges should look set and lightly golden, not dark brown. The tops should appear puffed and mostly dry, with maybe a slight softness in the center. That softness is good. It means the cookie will stay tender once cooled instead of turning dry or crumbly.
Another clue is how the cookies settle after baking. When they first come out, they may look slightly domed. As they rest on the baking sheet, they flatten just a little and firm up around the edges. That is the sweet spot. If they come out very pale and collapse immediately, they probably needed another minute or two. If they are deeply golden all over, they have likely crossed into overbaked territory. These cookies are supposed to feel rich and soft, almost like a hybrid between a cookie and a dessert bar. A crunchy result usually means too much time in the oven.
Texture matters just as much as appearance. Once cooled for a bit, the cookie should be soft enough to break cleanly with your fingers while still holding together. Inside, the cream cheese center should be creamy and slightly dense, not raw or runny. The outer cookie should taste buttery and fruity, not floury. Learning this visual timing comes with practice, but the good news is that even slightly imperfect batches are usually still delicious. That is one of the kindest things about homemade baking. Even when they are not picture-perfect, they often still disappear from the plate faster than expected.
Flavor Variations to Try
Once you make the classic version, it becomes obvious how flexible this recipe can be. That is part of the fun. The base is strong enough to support small changes without losing its charm. You can swap the strawberry profile slightly, add texture, or lean harder into the cheesecake theme. For example, mixing graham cracker crumbs into the dough or sprinkling them on top creates a closer nod to actual cheesecake crust. It is a small tweak, but it instantly makes the flavor more layered and recognizable.
You can also play with the fruit side of things. A little lemon zest in the dough or cheesecake filling brightens everything and gives the cookies a fresher edge. White chocolate can be folded into the dough for extra sweetness, or you can drizzle it over the cooled cookies for a polished finish. Want more texture? Add finely chopped strawberry pieces from freeze-dried fruit or a few crushed golden cookies on top. You can even turn the cookies more decadent with a cream cheese glaze, although the stuffed center already does most of that work beautifully.
Here are a few easy variations to consider:
| Variation | Flavor Profile | Best For |
|---|---|---|
| Strawberry Lemon Cheesecake Cookies | Bright, tangy, fresh | Spring and summer baking |
| Strawberry White Chocolate Cheesecake Cookies | Rich and dessert-like | Parties and gifting |
| Graham Cracker Strawberry Cheesecake Cookies | Classic cheesecake-inspired | Dessert platters |
| Mixed Berry Cheesecake Cookies | Fruity and vibrant | Seasonal variations |
The smartest way to experiment is to keep the structure intact. Do not overload the dough with wet ingredients, and do not make the filling too loose. Work within the recipe’s texture rules, and you can get creative without risking a collapse. That balance is what allows the cookie to stay both sturdy and indulgent. It is like customizing a favorite outfit. You can change the accessories, but the fit still needs to work.
Common Mistakes to Avoid
Even a strong recipe has a few pressure points, and knowing them ahead of time saves frustration. One of the biggest mistakes is using fresh strawberries in the dough. It sounds logical because they are real strawberries, but they release too much moisture and can ruin the texture. The dough becomes wet, the cookies spread too much, and the final result can taste more watery than fruity. Freeze-dried strawberries are the better choice because they pack flavor without that extra liquid. It is one of those substitutions that seems minor but changes everything.
Another common issue is skipping the chilling steps. Warm cream cheese filling and soft dough are hard to shape and much more likely to leak. If the filling squishes out during assembly or the cookies flatten too much while baking, temperature is usually the reason. Overmixing the dough can also create problems. Once the flour goes in, the dough should be mixed only until combined. Too much mixing develops the gluten and makes the cookies tougher than they should be. These cookies are supposed to be soft and tender, not chewy in a heavy way.
Baking them too long is the final trap. Because they are stuffed, people often assume they need extra time. In reality, the centers should stay soft. The cookies finish setting as they cool, so trust the edges more than the middle. Also, avoid making the filling mounds too large, or the cookie shells too thin, because that can cause bursting. Think of balance at every step. Enough dough to protect the center, enough chill to support the shape, and enough patience to pull them at the right moment. Most mistakes in baking are really just tiny timing or texture issues wearing a disguise.
Storage, Freezing, and Make-Ahead Tips
These cookies store surprisingly well, especially considering they contain cream cheese filling. Once fully cooled, place them in an airtight container and store them in the refrigerator for up to 5 days. Because of the cheesecake center, chilled storage is the safest option. The texture straight from the fridge will be firmer, but after sitting at room temperature for about 10 to 15 minutes, the cookies soften nicely and the filling becomes creamier again. That brief wait makes a difference in both flavor and texture.
For longer storage, freeze the baked cookies in a single layer until firm, then transfer them to a freezer-safe container or bag. They can usually be kept frozen for up to 2 months. To serve, thaw them overnight in the refrigerator or for a short time at room temperature. You can also warm them gently for a few seconds in the microwave, though not too much, because overheating can make the filling too loose. Freezing works especially well with this recipe because the structure holds up and the flavor stays strong.
Make-ahead options are also excellent here. You can prepare the cheesecake filling mounds and freeze them in advance, then keep them ready for assembly later. The cookie dough can be chilled overnight, or the fully assembled unbaked cookie balls can be frozen and baked directly from cold with just a minute or two added to the baking time. That flexibility makes the recipe perfect for holidays, parties, or busy weeks when you want homemade dessert without doing everything in one go. Good recipes do not just taste good. They fit into real life, and this one absolutely does.
FAQs About Strawberry Cheesecake Cookies Recipe
1. Do strawberry cheesecake cookies need to be refrigerated?
Yes, they usually should be refrigerated because of the cream cheese filling. After the cookies cool completely, store them in an airtight container in the fridge. This helps keep the filling fresh and safe to eat for several days.
2. Can I use fresh strawberries instead of freeze-dried strawberries?
You can, but freeze-dried strawberries often work better in cookie dough because they add strong strawberry flavor without too much moisture. Fresh strawberries may make the dough softer and can affect the texture. If you use fresh strawberries, chop them very small and pat them dry first.
3. How do I keep the cheesecake filling from leaking out?
The best way is to chill the filling before stuffing the cookies and make sure the dough fully seals around it. Pinch the edges closed well and roll gently into a smooth ball. Cold dough also helps the cookies hold their shape during baking.
4. Can I make strawberry cheesecake cookies ahead of time?
Yes, you can prepare the dough and filling ahead of time and keep them chilled until ready to bake. You can also freeze the assembled cookie dough balls for later use. This makes it easy to bake fresh cookies whenever you want.
5. Why are my cookies spreading too much?
Cookies usually spread too much when the dough is too warm or soft. Chilling the assembled cookies before baking helps a lot. Using the right amount of flour and avoiding overly wet strawberries can also improve the final texture.
Conclusion
There is something deeply satisfying about a dessert that feels impressive without being impossible, and strawberry cheesecake cookies deliver exactly that. They combine the familiarity of homemade cookies with the indulgent surprise of a cheesecake center, all wrapped in sweet strawberry flavor. The result is soft, creamy, fruity, and rich in a way that feels balanced rather than heavy. They are pretty enough for celebrations, comforting enough for casual baking days, and memorable enough that people will ask for the recipe after the first bite.
So whether you are baking for a special event or just want to make an ordinary afternoon taste a lot better, this recipe earns a spot in your collection. Keep the filling cold, chill the dough, bake just until set, and let the flavors do the rest. In the end, these cookies are more than a trend or a pretty dessert photo. They are the kind of sweet treat that feels joyful, generous, and just a little irresistible, which is honestly what the best homemade desserts should be.