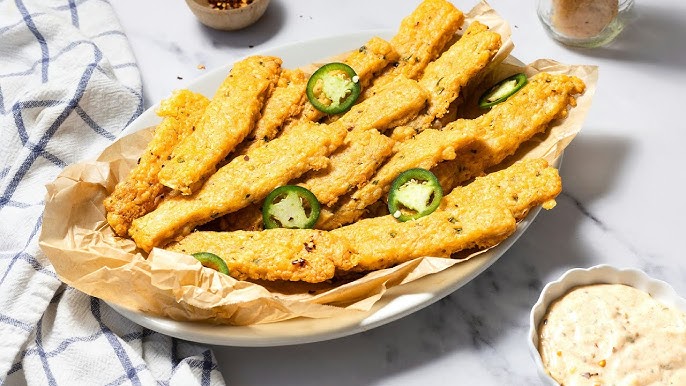
Spicy Cheese Straws Recipe: There is something almost unfairly addictive about spicy cheese straws. They are crisp, buttery, cheesy, and just fiery enough to wake up your taste buds without knocking you over. One bite gives you that flaky snap, then the savory richness of cheese rolls in, and right behind it comes a warm little kick from the spices. It is the kind of snack that disappears from the plate faster than you planned, especially when guests are around. You set them out thinking they will last through the evening, and somehow all that is left is a trail of crumbs and a few people asking for the recipe.
This guide walks you through the full process in a practical, professional way while keeping things simple. You will get a clear ingredients list, a full step-by-step guide, and plenty of tips to help you avoid common mistakes. Whether this is your first time making them or you want to sharpen your technique, this recipe is built to help you make crispy, flavorful spicy cheese straws that taste as good as they look.
Why This Recipe Works So Well
Some recipes sound great on paper but fall apart in the kitchen. This one works because it is built around the little details that matter. The ratio of cheese to flour is generous enough to give bold flavor, but not so heavy that the dough collapses or turns oily. The butter is included in just the right amount to create a tender, flaky texture while still allowing the straws to hold their shape. The spice level is assertive but balanced, which means the heat complements the cheese instead of covering it up.
Another reason this recipe succeeds is that it is designed for texture as much as taste. A great cheese straw should not be soft and bread-like. It should have that lovely crisp edge and delicate crumble when you bite into it. To make that happen, the dough needs to be handled with a light touch. Overmixing can make the straws tough, and too much liquid can turn them dense. This method avoids both problems by keeping the dough simple and controlled from the beginning. You are not wrestling with a sticky mess or trying to rescue dry crumbs. You are building a dough that is easy to shape and bakes beautifully.
The spice blend also plays a major role. Many cheese straw recipes use only a little paprika or cayenne and stop there. That can work, but it often leaves the flavor feeling one-dimensional. Here, the seasoning is layered, so the finished straws taste deeper and more rounded. A pinch of black pepper gives warmth, cayenne adds punch, and smoked paprika can bring a subtle earthy edge. It is a small adjustment, but it transforms the final result from ordinary to memorable.
The recipe is also flexible without being vague. You can swap cheeses, adjust the heat, or make the straws thinner or thicker depending on your style. Still, the base method remains reliable. That is what makes it a strong home recipe and a smart worthy kitchen staple: it gives you structure, but it leaves room for personality. Once you bake a batch and hear that crisp crackle as they cool, you will understand why this version keeps earning a spot in the snack rotation.
Ingredients You’ll Need
Here is the full ingredients list you will need for this spicy cheese straws recipe:
- 2 cups all-purpose flour
- 1/2 teaspoon salt
- 1/2 teaspoon freshly ground black pepper
- 1 teaspoon smoked paprika
- 1/4 to 1/2 teaspoon cayenne pepper depending on how spicy you want them
- 1/2 teaspoon garlic powder
- 1/4 teaspoon onion powder
- 1 teaspoon baking powder
- 1/2 cup cold unsalted butter, cut into small cubes
- 2 cups sharp cheddar cheese, freshly grated
- 2 to 4 tablespoons cold water or milk, as needed to bring the dough together
- 1 egg, beaten, for brushing
- Optional: a pinch of chili flakes or sesame seeds for topping
That list gives you a strong savory foundation. The flour creates the body of the straw, while the baking powder adds a bit of lift so the texture is crisp instead of heavy. Butter is the secret to tenderness and flaky bite, and freshly grated cheddar brings the bold cheese flavor that defines the recipe. The seasonings do the rest of the heavy lifting, turning a plain cheese snack into something lively and layered.
One of the best things about these ingredients is that they are familiar and easy to find. You do not need specialty flour or gourmet pantry items. Still, quality matters. Freshly grated cheese melts and bakes differently from pre-shredded packaged cheese, which often contains anti-caking agents that affect texture. Cold butter matters too, because it helps create small pockets in the dough that bake up crisp and delicate. Even the water should be added slowly, because a dough that is too wet will spread and soften instead of baking into neat straws. In other words, each ingredient is simple, but each one has a purpose.
The Best Cheese to Use
Cheese is the star of the show, so choosing the right one matters more than almost anything else. For classic spicy cheese straws, sharp cheddar is the gold standard. It has the salty depth and strong flavor needed to stand up to the spices and still be clearly recognizable after baking. Mild cheddar can work, but it often fades into the background, especially once the heat from cayenne and pepper comes in. Sharp or extra sharp cheddar gives the straws their identity. It is the difference between a snack that tastes pleasantly cheesy and one that makes people stop mid-bite and go, “Wait, these are really good.”
Texture matters as much as flavor here. Always grate the cheese fresh if you can. Pre-shredded cheese is convenient, but it is coated with anti-caking powders that can make the dough feel drier and prevent the cheese from melting as smoothly into the mixture. Freshly grated cheddar blends more naturally with the flour and butter, creating a richer dough and a better finished texture. A box grater works perfectly, and although it adds an extra step, it pays you back in flavor and consistency.
You can also mix cheeses if you want a more nuanced result. A blend of sharp cheddar and Parmesan can add a deeper savory note, almost like a little whisper of nuttiness in the background. Pepper Jack can increase the heat, while Gruyère adds a more sophisticated, mellow richness. The trick is not to get too fancy for the sake of it. Cheese straws should still taste bold, familiar, and snackable. Think of the cheese choice like choosing the lead singer for a band. You want someone with presence, not someone so dramatic that they overpower the whole performance.
The biggest takeaway is this: use a cheese with character. The spices are there to highlight the flavor, not rescue it. When your cheese is rich, sharp, and freshly grated, the whole recipe starts from a much stronger place. That one decision alone can turn your batch from decent to unforgettable.
Spices and Seasonings That Add Heat
Heat is what gives this recipe its edge, but “spicy” should never mean reckless. The goal is warmth, depth, and a little excitement, not a mouth-on-fire situation that drowns everything else out. That is why the seasoning blend in this recipe is layered instead of one-note. Cayenne pepper is the main source of heat, and even a small amount goes a long way. Start with a quarter teaspoon for a gentler kick or move up to half a teaspoon if you want a stronger punch. Either way, the cheddar keeps it grounded, so the spice feels bold rather than aggressive.
Smoked paprika adds another dimension that many recipes miss. It does not just bring color; it adds a subtle smoky richness that makes the cheese taste deeper and the whole straw more complex. Then there is black pepper, which does something quieter but equally useful. It gives a dry, peppery warmth that fills in the gaps between the cheddar and the cayenne. Garlic powder and onion powder round things out, adding savory depth without stealing the spotlight. They work like background musicians making the lead sound better.
The reason this mix works is because the heat arrives in stages. First you get the buttery crunch, then the cheese, then the spice slowly builds. That progression makes the straws feel satisfying instead of harsh. It also means you can adjust the blend based on your audience. For a milder version, cut back on cayenne and keep the smoked paprika. For a hotter batch, add chili flakes on top before baking. You can even experiment with a touch of mustard powder for an extra tangy kick if you like your savory bakes with a little attitude.
Seasoning also depends on your cheese. If your cheddar is especially salty or sharp, you may want to keep the extra salt modest. Always taste your grated cheese mentally before you season the dough, so to speak. You are not building flavor from zero; you are stacking on top of what is already there. When the balance is right, the result is a straw that tastes alive, vibrant, and impossible to leave alone.
Flour, Butter, and Other Essentials
Flour and butter may sound like supporting characters next to all that glorious cheese and spice, but in truth, they are doing a huge amount of work behind the scenes. All-purpose flour is the structural backbone of the recipe. It gives the dough enough strength to be rolled, cut, and twisted without tearing apart, but it is still tender enough to bake into a crisp, delicate straw. Too little flour and the dough becomes greasy and shapeless. Too much and the result turns dry and stiff. That is why measured flour, not guessed flour, makes such a difference here.
Then there is the butter, which is absolutely essential. Cold unsalted butter is what creates the crumbly, flaky quality that makes cheese straws feel elegant rather than dense. When you rub cold butter into the flour, you create tiny pockets throughout the dough. As the straws bake, those little bits of butter melt and release steam, which helps create layers and a crisp bite. If the butter is too warm, that magic gets lost. The dough becomes too soft, and the finished straws can spread more than they should. It is a bit like trying to build a sandcastle with wet soup instead of damp sand. The structure just will not hold.
The other essentials matter too. Baking powder gives a slight lift so the straws are not heavy. Cold water or milk helps the dough come together, but it must be used carefully. Add only enough to bind the mixture. Too much liquid is one of the fastest ways to lose that clean, crisp texture. The egg wash is not mandatory for flavor, but it gives the tops a polished golden finish that makes the straws look professionally baked. A sprinkle of sesame seeds or chili flakes on top can add a bit of visual texture and extra flavor if you want a more decorative tray.
This is what makes baking satisfying: small ingredients doing big jobs. Flour, butter, leavening, and liquid might not get the same applause as the cheddar and cayenne, but they are the reason the whole recipe works. Ignore them, and the straws struggle. Respect them, and the final bake has that crisp, rich, irresistible texture people remember.
Kitchen Tools That Make the Process Easier
You do not need an elaborate kitchen setup to make excellent spicy cheese straws, but a few basic tools make the process cleaner, faster, and more consistent. A large mixing bowl is the obvious starting point, because you need enough room to combine the flour, spices, butter, and cheese without ingredients flying everywhere. A pastry cutter helps if you want to cut the butter into the flour quickly, though your fingertips work perfectly well too. The main thing is to avoid warming the butter too much while mixing.
A rolling pin is one of the most useful tools in this recipe because even thickness matters. If some straws are thick and others are thin, they will not bake evenly. The thinner ones may overbrown before the thicker ones crisp up. A ruler is not necessary, but it can help if you want especially neat, uniform straws. A sharp knife, pizza cutter, or pastry wheel is useful for slicing the dough into clean strips. If you love tidy presentation, a fluted pastry wheel can give the edges a decorative finish, which looks especially nice for party platters.
You will also need a baking tray lined with parchment paper. This prevents sticking and makes cleanup easier, but it also helps the straws bake more evenly. A pastry brush is handy for applying the beaten egg wash, which gives the tops that lovely golden sheen. Cooling racks are another small but helpful extra because they allow air to circulate around the straws once they come out of the oven. That helps preserve crispness and prevents steam from softening the bottoms.
None of these tools are fancy, and that is part of the charm of this recipe. It is approachable. You are not working with complicated equipment or specialty gadgets. A bowl, a tray, a cutter, and a rolling pin are enough to get the job done. Still, when the right basic tools are in place, the process feels smoother and more enjoyable. Less fuss, more confidence, and a much better chance of getting those beautifully shaped, crunchy homemade cheese straws you were hoping for.
Before You Start: Key Prep Tips for Better Cheese Straws
Before you jump into mixing and rolling, a little preparation can save you from the most common cheese straw mistakes. The first and most important tip is to keep your ingredients cool, especially the butter. Warm butter turns the dough soft and greasy, which makes it harder to handle and can lead to flat, less crisp straws. If your kitchen is warm, you can even chill the bowl or pop the dough into the fridge for a few minutes during the process. It sounds fussy, but it works like a charm.
Another helpful habit is to grate your cheese before you start measuring everything else. Fresh cheese can clump a bit, and getting it ready ahead of time keeps the mixing process more relaxed. You should also line your baking tray and preheat the oven fully before shaping the dough. Cheese straws benefit from going into a properly hot oven because that helps set their shape quickly and encourages a crisp, golden finish. A half-heated oven often leads to uneven texture, and nobody wants a tray of straws that taste good but look tired.
Rolling the dough evenly is another make-or-break factor. Aim for a consistent thickness so the straws bake at the same rate. If the dough starts cracking around the edges, do not panic. Press it back together gently. This dough is forgiving as long as you do not overwork it. If it feels too soft to cut cleanly, chill it briefly. Cold dough is easier to slice into neat strips and twist without stretching awkwardly or sticking to the counter. Lightly flour your surface, but do not overdo it, because too much extra flour can dry out the dough.
The final prep tip is mental more than technical: do not rush. Cheese straws are simple, but they reward a calm hand. Think of it like tying a ribbon rather than wrestling a rope. A gentle approach gives you better texture, cleaner shapes, and more even baking. Once those small prep steps are in place, the whole recipe starts to feel easier, and the final result becomes much more reliable.
Step-by-Step Guide for Spicy Cheese Straws
Step 1: Preheat the Oven and Prepare the Baking Tray
Start by preheating your oven to 375°F (190°C) and lining a baking tray with parchment paper. This helps prevent sticking and makes cleanup easier. A hot oven from the beginning is important because it helps the cheese straws bake evenly and develop that crisp, golden finish. Getting the tray ready first also makes the whole process feel smoother.
Step 2: Combine the Dry Ingredients
In a mixing bowl, add the flour, a pinch of salt, and your chosen spices, such as cayenne pepper, paprika, or chili powder. Stir everything together well so the heat is evenly spread through the mixture. This step gives the cheese straws their spicy kick and makes sure every bite has flavor.
Step 3: Rub in the Butter and Add the Cheese
Add cold butter to the flour mixture and rub it in with your fingertips until it looks like fine crumbs. Then mix in the grated cheese until evenly combined. The butter creates a light, flaky texture, while the cheese brings the rich, savory taste that makes these straws so addictive.
Step 4: Bring the Dough Together
Add a little cold water, just enough to bring the mixture into a firm dough. Be careful not to add too much. You want the dough to hold together without becoming sticky. Once it comes together, gently press it into a ball.
Step 5: Roll, Cut, and Twist the Straws
Roll out the dough on a lightly floured surface, then cut it into thin strips. Twist each strip gently and place them on the baking tray. This is where they start to look like real cheese straws.
Step 6: Bake Until Crisp and Golden
Bake until the straws are golden, crisp, and slightly puffed. Let them cool briefly before serving so they firm up properly and develop their full crunch.
Serving Ideas for Spicy Cheese Straws
One of the best things about spicy cheese straws is how easily they fit into different occasions. They are casual enough for snacking straight from the cooling rack, but they also look polished enough to serve at holiday parties, brunch tables, or drinks nights. Place them in a tall glass, arrange them around a cheese board, or serve them beside bowls of olives and nuts for a simple but elegant spread. Their crisp texture makes them especially good with dips, though they are flavorful enough to stand on their own.
They also pair beautifully with soups and salads. A tomato soup, roasted red pepper soup, or creamy potato soup gets an instant upgrade when served with a couple of spicy cheese straws on the side. It is like swapping regular crackers for something with personality. The same goes for salads, especially those with sharp greens, vinaigrettes, or roasted vegetables. The rich, cheesy crunch gives contrast and makes the whole meal feel more complete.
For entertaining, cheese straws are a gift because they can be made ahead and served at room temperature. That means one less last-minute task when guests arrive. They also play well with drinks. Sparkling water, lemonade, iced tea, wine, and even a cold beer can all pair nicely depending on the mood of the gathering. The salt, cheese, and spice make them particularly appealing alongside something crisp and refreshing.
There is also something charming about serving them simply. No elaborate board, no fancy styling, no dramatic garnish. Just a plate of golden, twisted straws and the smell of cheese and spice still lingering in the room. Sometimes that is all it takes. Good snacks do not need a speech. They just need to be delicious enough that hands keep reaching back for another.
Storage, Freezing, and Make-Ahead Tips
If you somehow manage not to eat them all on the day they are baked, spicy cheese straws store quite well. Once completely cool, place them in an airtight container and keep them at room temperature for up to 4 days. The key is making sure they are fully cooled before storing. Any trapped warmth creates condensation, and condensation is the sworn enemy of crisp snacks. It softens them quickly and steals that lovely snap.
If the straws lose a bit of crispness after a day or two, you can refresh them in a low oven for a few minutes. Just spread them on a tray and warm them gently at around 300°F (150°C) until they regain their crunch. Let them cool again before serving. It is a small rescue trick, but a very useful one. Homemade cheese straws are worth reviving.
For longer storage, the dough freezes well. Shape it into a disc or roll it into a rectangle, wrap it tightly, and freeze for up to 2 months. Thaw it in the refrigerator until workable, then roll, cut, and bake as usual. You can also freeze the cut, unbaked strips on a tray, then transfer them to a freezer-safe bag. That way, you can bake a smaller batch whenever you want fresh cheese straws without starting from scratch. It is like leaving a future version of yourself a very thoughtful present.
Make-ahead baking is especially useful during busy seasons like holidays or when preparing for parties. You can make the dough a day ahead and keep it chilled until ready to use. The flavors settle nicely, and the cold dough is often even easier to shape. That flexibility is another reason this recipe earns a place in a regular baking rotation. It tastes special, but it is practical too.
FAQs about Spicy Cheese Straws Recipe
1. What cheese works best for spicy cheese straws?
A strong, flavorful cheese like sharp cheddar works best because it gives the straws a rich taste and bakes well. You can also mix in Parmesan for a deeper savory flavor.
2. How do I make spicy cheese straws hotter?
You can increase the heat by adding more cayenne pepper, chili flakes, paprika, or a pinch of hot chili powder. Add a little at a time so the spice does not overpower the cheese.
3. Why are my cheese straws not crisp?
This can happen if the dough is too wet or the straws are underbaked. Bake them until they are golden and firm, then let them cool fully because they become crispier as they rest.
4. Can I make spicy cheese straws ahead of time?
Yes, they are great for making ahead. Once baked and cooled, store them in an airtight container to help keep them crisp and fresh.
5. Can I freeze the dough?
Yes, the dough can be wrapped well and frozen before baking. When ready to use, thaw it in the refrigerator, then roll, cut, and bake as usual.
6. What can I serve with spicy cheese straws?
They are perfect as a snack, party appetizer, or side for soups and dips. They also pair nicely with simple spreads and savory platters.
7. How long do spicy cheese straws stay fresh?
If stored properly in an airtight container, they usually stay fresh for several days. Keeping them dry is the key to maintaining their crunch.
Conclusion
What makes this recipe especially satisfying is how adaptable it is. You can keep it classic with sharp cheddar and cayenne, or adjust the heat and cheese blend to suit your own style. You can serve the straws with drinks, soups, salads, or as a snack that steals the spotlight all by itself. Once you make them once, they stop feeling like a “special occasion only” bake and start becoming one of those reliable savory recipes you remember whenever you need something easy, impressive, and genuinely delicious.
Most of all, these cheese straws prove that homemade snacks can have both personality and polish. They are not fussy, but they do feel thoughtful. They bring that wonderful homemade quality that store-bought snacks rarely match: the aroma, the fresh-baked crispness, the real cheese flavor, the heat that feels lively instead of artificial. Bake a batch, serve them warm or cooled, and watch how quickly they disappear. That is usually the clearest sign that a recipe is worth keeping.