Spatchcock Chicken Recipe: Spatchcock chicken might sound fancy, but it’s simply a cooking technique that turns your everyday roast chicken into something magical. It’s a culinary hack that gets your bird evenly cooked, crispy-skinned, and super juicy. The word “spatchcock” refers to the method of removing the backbone of the chicken so it can lay flat during cooking. This little trick helps reduce cooking time and ensures even roasting or grilling.
Now, if you’re someone who loves crispy skin and juicy meat, spatchcocking is going to be your new favorite trick. This method is not only practical but also impressive when serving guests. The bird cooks faster, the skin gets crispier, and it’s much easier to carve. Think about it—no more guessing if the thigh is done while the breast is dry. Spatchcocking solves that issue beautifully.
What is Spatchcocking?
Spatchcocking, sometimes called butterflying, involves removing the chicken’s backbone so it can be opened up and laid flat. This method is not new—it dates back centuries and has roots in Irish and English culinary history. The term might sound quirky, but the results are anything but. It turns a standard roast chicken into a masterpiece.
Why is this technique so great? Well, when the chicken is flattened, it has a uniform thickness, meaning it cooks evenly. There’s no guessing when the thighs are done or worrying that the breast will dry out. Everything finishes around the same time, and you get golden, crispy skin across the entire surface.
Why Spatchcock a Chicken?
There are several reasons to spatchcock your chicken instead of roasting it whole in a traditional way:
- Faster Cooking Time: Flattening the bird cuts cooking time by up to 30%.
- Even Cooking: No more dry breasts and undercooked thighs.
- Crispy Skin: More skin surface exposed to heat equals more crispiness.
- Easier Carving: Once cooked, cutting the chicken is way simpler.
Whether you’re roasting in the oven or grilling outdoors, spatchcocking gives you an edge in both flavor and texture. Plus, it’s a great way to impress your family or guests with a whole chicken that looks gourmet but is easy to prepare.
Ingredients You’ll Need
Basic Ingredients
Before you start spatchcocking, make sure you have the following essentials ready:
- 1 whole chicken (3-4 lbs)
- 2 tablespoons olive oil
- Salt (preferably kosher salt)
- Freshly ground black pepper
- 1 teaspoon garlic powder
- 1 teaspoon paprika (smoked for extra depth)
- 1 lemon (for zest and juice)
These ingredients form the backbone (pun intended) of a simple yet flavorful recipe. Olive oil helps crisp up the skin, while salt and pepper form the base of any good seasoning mix. Garlic powder and paprika bring out that irresistible savory aroma that’ll have your neighbors wondering what you’re cooking.
Optional Add-ons for Extra Flavor
Want to take things up a notch? Here are some flavor boosters you can include:
- Fresh herbs like rosemary, thyme, or parsley
- Crushed red pepper flakes for heat
- Dijon mustard for a tangy glaze
- Honey or maple syrup for a sweet-savory finish
- Soy sauce for an umami kick
Don’t be afraid to get creative! These add-ons let you customize your chicken to match any cuisine—Mediterranean, Asian, Southern-style BBQ—you name it.
Tools Required for Spatchcocking
Must-Have Kitchen Tools
To spatchcock a chicken properly, you’ll need a few kitchen tools:
- Sharp Kitchen Shears: The MVP of this process. A good pair makes cutting through bones a breeze.
- Cutting Board: Use a large one with a groove to catch any juices.
- Paper Towels: To pat the chicken dry—critical for crispy skin.
- Roasting Pan or Cast Iron Skillet: Either works well for oven-roasting.
- Meat Thermometer: Ensures your bird is perfectly cooked without guesswork.
Having the right tools on hand makes all the difference. Trust me, trying to use a dull knife instead of shears is a frustrating, slippery mess. Don’t risk it—invest in good kitchen scissors.
Safety Tips When Using Sharp Tools
When you’re dealing with raw chicken and sharp shears, safety is key. Here are a few pointers:
- Always use a clean, dry cutting board.
- Keep your fingers away from the cutting path.
- Disinfect your tools and work area after cutting.
- Wash your hands thoroughly before and after handling raw chicken.
These simple precautions help prevent cross-contamination and keep your cooking space safe and sanitary. A safe cook is a happy cook.
Step-by-Step Guide to Spatchcocking a Chicken
Step 1 – Preparing the Chicken
Start by removing the chicken from its packaging and patting it dry with paper towels. Dry skin is your ticket to crispiness. If your bird is wet or slimy, the seasoning won’t stick and the skin won’t crisp up properly.
Lay the chicken breast-side down on your cutting board. You should be looking at the back of the bird, with the legs pointing toward you. Take a moment to locate the spine—that’s what you’re going to remove.
Ready to move on?
Step 2 – Removing the Backbone
This is where the magic of spatchcocking really begins. Grab your sharp kitchen shears and start cutting along one side of the chicken’s backbone. Start from the tail and work your way up to the neck. Repeat the process on the other side of the spine to completely remove it. Don’t worry if you hear a few crunches—that’s normal. You’re cutting through small bones and cartilage, not butchering a dinosaur.
Once the backbone is out, you can either discard it or save it for making a rich chicken stock later. Waste not, want not, right?
A quick tip here: if the bones are tough to cut through, rotate the chicken a little for better leverage. And make sure your shears are up to the task—this is not the time to be using old craft scissors.
Step 3 – Flattening the Bird
With the backbone removed, flip the bird over so it’s breast-side up. Place both palms on the breastbone and press down firmly. You should hear a satisfying crack—that means the breastbone has split, and your chicken is now officially spatchcocked.
The bird should lay flat like a butterfly. Tuck the wing tips under the breasts so they don’t burn during cooking. This step ensures the entire surface gets even heat, leading to that perfect crispy skin we’re chasing.
Now your chicken is prepped and ready for seasoning or marinating. It’s amazing how a simple technique can transform the entire bird, isn’t it?
Marinating and Seasoning
Best Marinade Ideas
Marinades are the flavor bomb that elevate your spatchcock chicken from good to unforgettable. A great marinade penetrates the meat, adds moisture, and builds complexity. Here are a few marinade options to try, depending on your mood or occasion:
Garlic-Herb Marinade
- Olive oil
- Lemon juice
- Fresh garlic
- Chopped rosemary and thyme
- Salt and pepper
Asian-Inspired Marinade
- Soy sauce
- Sesame oil
- Ginger and garlic paste
- Rice vinegar
- Brown sugar
Spicy BBQ Marinade
- BBQ sauce
- Apple cider vinegar
- Hot sauce
- Smoked paprika
- Honey
For best results, marinate your chicken in the fridge for at least 2 hours—overnight is even better. Place the chicken in a zip-top bag or a large dish covered with plastic wrap. Make sure every part of the bird is coated with the marinade.
Dry Rub vs. Wet Marinade
Not in the mood to wait for a marinade to do its thing? No problem. A dry rub is the fast-track route to flavor town. Just mix up your favorite spices, pat them all over the bird, and it’s ready for the oven or grill.
Pros of Dry Rubs:
- No wait time
- Intense flavor on the skin
- Better for crispy results
Pros of Wet Marinades:
- More moisture in the meat
- Layers of flavor throughout
- Easier to infuse with herbs and citrus
You can even combine both methods—marinate the chicken first, then add a dry rub right before cooking for a double hit of flavor. Think of it like putting on cologne after showering: extra, but effective.
Cooking Methods for Spatchcock Chicken
Oven Roasting Instructions
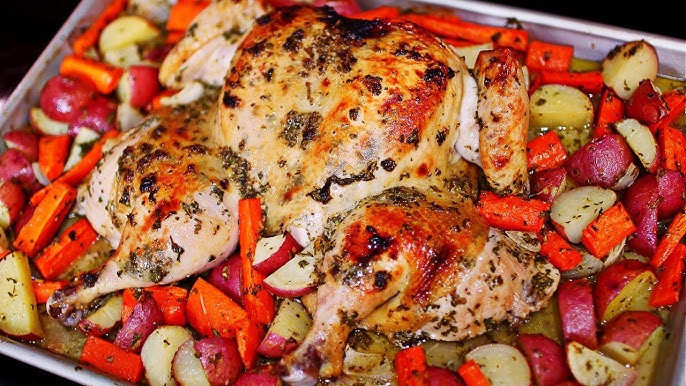
Roasting a spatchcock chicken in the oven is probably the easiest and most reliable method. It’s great for beginners and pros alike. Preheat your oven to 425°F (220°C)—this high heat is crucial for getting that golden, crispy skin while keeping the meat tender and juicy.
Here’s how to do it:
- Line a baking tray or cast-iron skillet with parchment paper or foil for easier cleanup.
- Place the chicken breast-side up, splayed out nice and flat.
- Tuck the wing tips underneath the breasts to prevent burning.
- Drizzle with olive oil and sprinkle with salt, pepper, and any other herbs you love.
- Roast for about 40 to 50 minutes, depending on the size of the bird.
Check for doneness using a meat thermometer. Insert it into the thickest part of the thigh without touching the bone. You’re looking for an internal temperature of 165°F (74°C). Let it rest for 10 minutes before carving—that allows the juices to redistribute for maximum flavor.
Grilling the Spatchcock Chicken
If you’re a fan of smoky, charred flavors, grilling is where it’s at. A spatchcocked chicken is perfect for the grill because it lies flat, meaning even heat and more surface area for those delicious grill marks.
Here’s a quick grilling guide:
- Preheat your grill to medium-high heat (about 400°F or 200°C).
- Create a two-zone fire by pushing the coals to one side or turning off one burner if you’re using gas.
- Place the chicken skin-side up on the cooler side of the grill.
- Cover and cook for about 35–45 minutes.
- Finish by flipping it skin-side down over direct heat for 5–10 minutes to crisp up the skin.
Use a thermometer to check doneness (again, 165°F in the thigh). Let it rest a few minutes before cutting.
The result? Smoky, charred, crispy, and juicy chicken that’s backyard BBQ perfection.
Air Fryer Method for Smaller Chickens
Short on time and love convenience? The air fryer is your new best friend. If your chicken fits in the basket, this method gives you crispy skin and juicy meat with minimal effort.
Here’s how to do it:
- Preheat air fryer to 375°F (190°C).
- Lightly oil the basket and place the chicken inside, breast side up.
- Cook for about 30–40 minutes, flipping once halfway through.
The skin crisps up beautifully, and the meat stays moist. Just make sure to check internal temp with a thermometer to be safe.
Serving Suggestions
What to Serve with Spatchcock Chicken
Spatchcock chicken is versatile and pairs well with just about anything. Here are some delicious side dish ideas:
- Roasted vegetables: Think carrots, Brussels sprouts, and potatoes tossed in olive oil and garlic.
- Mashed or roasted potatoes: Classic comfort food.
- Grilled corn on the cob: Perfect if you’re already using the grill.
- Fresh salads: A light arugula or Caesar salad complements the rich chicken flavor.
- Rice or couscous: Add herbs and lemon zest for a Mediterranean twist.
For sauces, consider a zesty chimichurri, creamy garlic aioli, or a smoky BBQ dip. They add a gourmet touch without much effort.
How to Carve and Serve Like a Pro
Once your chicken has rested, it’s time to carve. Here’s how to do it like a pro:
- Cut between the legs and body to separate the thighs and drumsticks.
- Slice off the wings at the joint.
- Slice the breast down the center, then cut each breast in half for manageable portions.
Arrange the pieces on a platter, garnish with lemon wedges and herbs, and drizzle with a little extra virgin olive oil. It’s rustic, elegant, and downright drool-worthy.
FAQs about Spatchcock Chicken Recipe
1. What is spatchcock chicken?
Spatchcock chicken is a whole chicken that has been butterflied by removing the backbone so it can be flattened. This technique allows for even cooking and crispier skin.
2. Why should I spatchcock a chicken?
Spatchcocking helps the chicken cook faster and more evenly. It also exposes more skin to the heat, resulting in a crispier and more flavorful finish.
3. How do I spatchcock a chicken at home?
Use kitchen shears to cut along both sides of the backbone and remove it. Then press down on the breastbone to flatten the bird. There are plenty of video tutorials if you’re a visual learner.
4. Can I marinate spatchcock chicken?
Yes! Marinating adds flavor. You can marinate it for at least 2 hours or overnight in the fridge for the best results.
5. What’s the best way to cook spatchcock chicken?
It can be roasted in the oven, grilled, or even cooked in a smoker. Oven-roasting at high heat (around 425°F or 220°C) is popular for juicy meat and crispy skin.
6. How long does it take to cook a spatchcock chicken?
A 3.5 to 4-pound chicken typically takes 40–50 minutes in a 425°F oven. Always use a meat thermometer—165°F (74°C) in the thickest part is done.
7. Can I use this method for other poultry?
Absolutely. Spatchcocking works great for turkey, Cornish hens, and even ducks.
8. Do I need any special tools?
A sharp pair of kitchen shears and a sturdy cutting board are your best friends. A meat thermometer is also helpful to ensure perfect doneness.
9. Should I season under the skin?
Yes, seasoning under the skin enhances flavor. You can also use compound butter or rubs directly on the meat for maximum taste.
10. How do I store leftovers?
Refrigerate leftovers in an airtight container for up to 3–4 days. Reheat in the oven or enjoy cold in salads and sandwiches.
Conclusion
Spatchcocking a chicken might sound intimidating at first, but once you try it, you’ll wonder why you didn’t start sooner. It’s faster, juicier, and way more delicious than traditional roasting methods. Whether you’re roasting in the oven, firing up the grill, or even using an air fryer, this method guarantees crispy skin and perfectly cooked meat every time.
So next time you’ve got a whole bird in the fridge, skip the old-school roast. Go spatchcock—it’s a game changer.