Sourdough Hamburger Bun Recipe: If you’ve ever bitten into a store-bought hamburger bun and thought, “This is kind of… boring,” you’re not alone. Commercial buns are often full of preservatives and lack that rich, artisan flavor that homemade bread offers. That’s where sourdough comes in—it’s tangy, fluffy, and naturally leavened, giving you buns with personality and a serious punch of flavor. Making sourdough buns at home might seem like a long process, but once you try it, you’ll wonder why you ever settled for less.
And let’s not forget: homemade means control. You decide what goes in, from organic flours to your choice of toppings. Plus, it’s a great way to use up that sourdough starter you’ve been nurturing. Whether you’re crafting the perfect burger or making breakfast sandwiches, these buns are going to upgrade your meals, guaranteed.
What Makes Sourdough Buns Special?
Sourdough buns are different from typical yeast buns in a few important ways. First, they’re made using wild yeast and bacteria, which means fermentation happens more slowly. This slow fermentation brings out deeper flavor and makes the buns easier to digest. The result? A light, airy crumb and a subtle tang that complements everything from classic beef patties to vegan burgers.
But here’s where it really shines—texture. A good sourdough bun is slightly chewy on the outside and soft on the inside, holding up to juicy burgers without turning to mush. And unlike many supermarket buns, these aren’t packed with sugar or unnecessary fillers. With just a few wholesome ingredients, you get that bakery-quality result without leaving your kitchen.
Ingredients You’ll Need
Let’s get into the good stuff—the ingredients. Everything here is basic, but the quality matters. Organic, unbleached flour and a healthy, active sourdough starter will make all the difference.
Core Ingredients:
- Active sourdough starter – 150g (fed and bubbly)
- All-purpose flour – 400g
- Whole wheat flour – 100g (optional for a heartier bun)
- Warm water – 250g
- Egg – 1 (for richness)
- Butter – 50g, softened (or olive oil for dairy-free)
- Sugar or honey – 25g (optional for a slightly sweet bun)
- Salt – 10g
- Milk – for brushing before baking
Optional Add-ins:
- Sesame seeds or poppy seeds – for topping
- Cheese – shredded, mixed into dough for extra flavor
- Herbs – rosemary, thyme, or garlic powder for savory variation
You likely already have most of these at home, which makes this an accessible and budget-friendly recipe.
Tools and Equipment
You don’t need fancy tools to make sourdough buns, but a few key items will make your life easier.
Essentials:
- Mixing bowls (at least two)
- Kitchen scale (seriously, accuracy matters)
- Dough scraper or spatula
- Baking sheet or tray
- Parchment paper
- Oven
Recommended Extras:
- Stand mixer (for easier kneading)
- Proofing basket or bowl with towel
- Digital thermometer (for perfect baking temperature)
- Lame or sharp blade (for scoring)
Most of these items are kitchen staples, so you won’t have to run out and buy anything new.
Step-by-Step Guide to Make Sourdough Hamburger Buns
Let’s break this down into detailed steps so you don’t miss anything. Sourdough takes time, but we’ll walk you through it from starter to sandwich-ready buns.
Step 1: Preparing the Starter
Ensure your sourdough starter is active and bubbly. Feed it 4–6 hours before baking so it’s at peak strength. An active starter helps the buns rise well and gives them a mild sourdough flavor.
Step 2: Mixing the Dough
In a large bowl, combine active starter, warm milk or water, sugar, melted butter or oil, salt, and flour. Mix until a soft, slightly sticky dough forms. The dough should be smooth and elastic, not dry or stiff.
Step 3: Bulk Fermentation
Cover the dough and let it ferment at room temperature for 3–5 hours, or until doubled in size. Perform one or two gentle stretch-and-folds during the first hour to strengthen the dough.
Step 4: Shaping the Buns
Turn the dough onto a lightly floured surface and divide into equal portions for even buns. Shape each piece into a smooth ball by tucking the edges underneath. Place on a lined baking tray, leaving space between each bun.
Step 5: Proofing the Dough
Cover the shaped buns loosely and let them proof for 1–2 hours, until puffy and slightly springy when touched. Proper proofing ensures soft, fluffy hamburger buns.
Step 6: Preparing for Baking
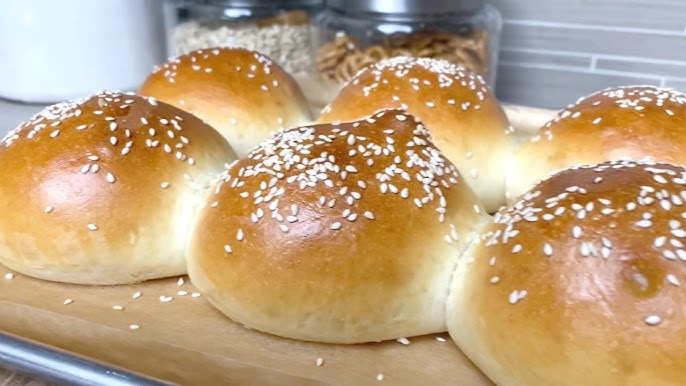
Preheat the oven to 190°C (375°F). Brush the tops with egg wash or milk for a golden finish. Sprinkle sesame seeds on top if desired.
Step 7: Baking the Buns
Bake for 18–22 minutes, or until the buns are lightly golden brown on top and sound hollow when tapped underneath.
Step 8: Cooling and Storing
Transfer buns to a wire rack and allow them to cool completely. Store at room temperature for up to 2 days, or freeze for longer storage. Slice only when fully cooled for best texture. 🍔🍞
Pro Tips for Perfect Sourdough Buns
Want to level up your baking game? These pro tips will ensure your sourdough buns turn out great every single time:
- Use a kitchen scale. Baking by weight ensures consistent results. Eyeballing flour leads to dry buns.
- Hydration matters. If your dough feels dry, add a little water. If it’s too wet, let it rest longer between stretches to absorb the moisture.
- Don’t rush fermentation. Sourdough needs time. If your starter is sluggish or the dough is slow to rise, be patient. A warm environment helps.
- Cover buns well during proofing. This prevents them from drying out, which can lead to cracks or a tough crust.
- Use steam when baking. Steam improves oven spring and gives your buns a soft, glossy finish.
- Bake in batches if needed. Don’t crowd your tray—space allows the buns to bake evenly.
Even if your first batch isn’t perfect, don’t worry. Sourdough is a learning process, and each bake teaches you something new.
Why Sourdough Is Healthier than Store-Bought Buns
Aside from tasting way better, sourdough buns also offer some nutritional benefits that store-bought buns just can’t match.
- No commercial yeast – These buns rely on wild fermentation, which is slower and more natural.
- Lower gluten content – The fermentation process partially breaks down gluten, making it easier to digest.
- Better nutrient absorption – Sourdough fermentation helps release nutrients like magnesium, iron, and zinc from the flour.
- No preservatives – You control every ingredient, which means no additives, chemicals, or hidden sugars.
Sourdough isn’t just for hipster bakers—it’s a return to the way bread was meant to be made: naturally, slowly, and with care.
Ways to Customize Your Sourdough Buns
Don’t want plain buns every time? No problem. Sourdough is super versatile, and you can get creative with it.
Savory Twists:
- Add shredded cheddar or parmesan into the dough.
- Mix in chopped herbs like rosemary, thyme, or chives.
- Sprinkle garlic salt or everything bagel seasoning before baking.
Sweet Variations:
- Add cinnamon and raisins to the dough for a morning sandwich bun.
- Mix in dried cranberries and orange zest for a zesty kick.
- Sprinkle coarse sugar on top before baking.
These buns can do more than hold a burger. Use them for breakfast sandwiches, pulled pork sliders, or even grilled cheese. Once you have the base recipe, the sky’s the limit.
How to Store and Freeze Sourdough Buns
One of the best parts about making a batch of sourdough hamburger buns is that you can store them for later and always have delicious buns on hand. Here’s how to keep them fresh without losing that soft, fluffy texture.
Short-Term Storage:
- Store cooled buns in an airtight container or zip-top bag.
- Keep them at room temperature for up to 3 days.
- To retain softness, wrap them in a clean kitchen towel inside a bread box or bag.
Avoid refrigerating them, as that can make the bread go stale faster due to the starch retrogradation process.
Freezing Instructions:
- Let the buns cool completely.
- Wrap each bun individually in plastic wrap or foil to prevent freezer burn.
- Place wrapped buns in a zipper freezer bag or airtight container.
- Label the bag with the date and use within 2–3 months for best quality.
To reheat:
- Thaw at room temperature for 1–2 hours.
- Warm in a 350°F (175°C) oven for 5–7 minutes or toast lightly just before serving.
They’ll come out soft and warm, just like freshly baked!
Best Dishes to Pair with Sourdough Buns
Sourdough buns are incredibly versatile, and you’re definitely not limited to burgers. Here are some delicious meal ideas to pair with your homemade buns:
Burger Ideas:
- Classic Cheeseburgers – Let the sourdough bun’s tang contrast with melty cheddar and juicy beef.
- BBQ Pulled Pork Sandwiches – The slight sour flavor pairs beautifully with smoky meat.
- Veggie Burgers – Try black bean or mushroom patties for a plant-based option.
- Fried Chicken Sandwiches – Crispy chicken and fluffy buns are a match made in food heaven.
Non-Burger Uses:
- Breakfast Sandwiches – Add eggs, bacon, avocado, and cheese for a gourmet start to your day.
- Sliders – Make mini buns and serve with shredded chicken or brisket for parties.
- Soup Companion – Slice and toast the buns to dip in tomato or French onion soup.
- Panini or Grilled Cheese – Flatten slightly and grill with mozzarella, pesto, or ham.
These buns elevate any meal and offer more satisfaction than store-bought alternatives.
Sourdough Starter Maintenance Tips
Your sourdough starter is the heart of every successful sourdough bake. Taking care of it ensures that your buns—and all future sourdough creations—turn out just right.
Feeding Schedule:
- Feed your starter daily if it lives at room temperature.
- If you bake less often, store it in the fridge and feed it once a week.
A typical feeding ratio is:
- 50g starter
- 50g flour
- 50g water (adjust consistency as needed)
Signs of a Healthy Starter:
- Bubbly and active within 4–6 hours of feeding.
- Doubles in size consistently.
- Has a pleasant, tangy smell (not foul or moldy).
Storage Tips:
- Keep in a glass jar with a loose-fitting lid to allow gas to escape.
- Clean the sides occasionally to prevent dried buildup.
- If a dark liquid forms on top (called “hooch”), it means your starter is hungry. Pour it off and feed again.
With good care, your starter can live indefinitely and be passed down like a family heirloom.
FAQs about Sourdough Hamburger Bun Recipe
1. Can I use sourdough discard for this recipe?
You can, but the rise may not be as strong. For best results, use an active, recently fed starter.
2. What if I don’t have whole wheat flour?
No worries! You can replace it with more all-purpose flour. It will still work great.
3. Can I double or halve this recipe?
Absolutely. Just make sure you adjust fermentation and baking times slightly based on batch size.
4. My dough is too sticky. Should I add more flour?
Try letting it rest longer first. If it’s still sticky after several folds, add just a small amount of flour.
5. Can I make the buns vegan?
Yes. Replace the egg with a flax egg and use olive oil instead of butter. Skip the milk wash or use plant-based milk.
Conclusion
Making sourdough hamburger buns at home might sound like a labor of love—but once you taste the results, it’s all worth it. From the depth of flavor to the satisfying texture and the healthy ingredients, these buns are in a class of their own. They’re soft, slightly tangy, and sturdy enough to hold up to any burger or sandwich you throw at them.
With just a few ingredients and some patience, you can create something truly special right in your own kitchen. Whether you’re meal prepping for the week, hosting a cookout, or just treating yourself to the ultimate sandwich experience, these buns are the way to go.
So roll up your sleeves, get your starter ready, and start baking!