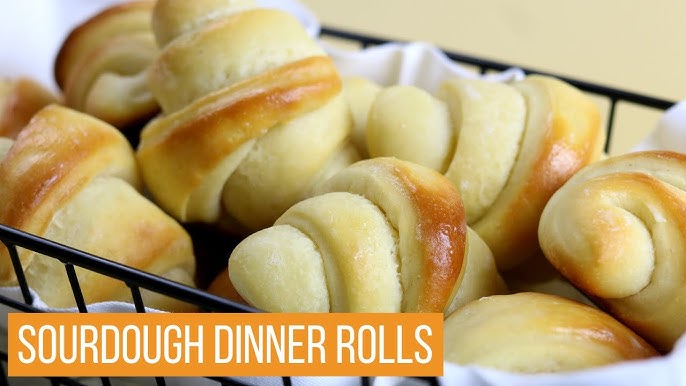
Sourdough Dinner Rolls Recipe: If you’ve ever torn into a warm, fluffy dinner roll that’s slightly tangy, soft inside, and golden brown on top, you know why sourdough dinner rolls are so beloved. They’re the perfect combination of rustic flavor and comforting texture, making them ideal for weeknight dinners, holiday feasts, or even as a snack with butter and jam. Unlike regular rolls that rely on commercial yeast, these rolls use a naturally fermented sourdough starter, giving them a depth of flavor you simply can’t replicate with store-bought yeast.
What makes this recipe stand out is that it’s approachable—even if you’re new to sourdough baking. Many people assume sourdough bread takes forever and is complicated, but dinner rolls are a fantastic place to start. The process is straightforward, and once you understand the steps, you’ll realize that most of the time is simply letting the dough rest and rise. The hands-on time is surprisingly short. Plus, you’ll end up with rolls that not only taste incredible but also look impressive on your dinner table.
Imagine serving these soft, golden rolls at your next family dinner. The smell of fresh sourdough baking fills the kitchen, and when you break one open, steam escapes from its fluffy center. You spread a little butter on top, and it melts instantly into the warm dough. That first bite is pure comfort. Sounds tempting, right? By the end of this guide, you’ll know exactly how to make this a reality in your own kitchen.
Why Choose Sourdough for Dinner Rolls?
Sourdough isn’t just a baking trend—it’s one of the oldest forms of bread-making in history, dating back thousands of years. The magic of sourdough lies in its starter, a living culture of wild yeast and beneficial bacteria that leaven the bread naturally. But why should you choose sourdough for dinner rolls over traditional yeast rolls?
First, there’s the flavor. Sourdough has a unique tanginess that ranges from mild to strong, depending on your starter and fermentation time. When incorporated into dinner rolls, that tang is balanced beautifully with a soft, slightly sweet crumb. The result is a roll that isn’t just a side dish—it’s a highlight of the meal.
Second, sourdough offers health benefits. Because the fermentation process breaks down gluten and phytic acid, sourdough bread is often easier to digest than commercial yeast bread. Some people who struggle with regular bread find that sourdough sits better in their stomach. The fermentation also increases the availability of nutrients like iron, magnesium, and zinc.
Finally, sourdough dinner rolls boast an amazing texture. They’re fluffy, soft, and light while still holding that slightly chewy bite sourdough is famous for. The natural fermentation develops gluten slowly, which results in a better structure and consistency compared to quick-rise yeast rolls. In short, sourdough dinner rolls bring together the best of both worlds: they’re healthy, flavorful, and irresistibly soft.
Ingredients You’ll Need
Making sourdough dinner rolls requires only a handful of ingredients, most of which you probably already have in your kitchen. Here’s a detailed look at what you’ll need:
Core Ingredients for Sourdough Dinner Rolls
- All-purpose or bread flour – Provides the structure for the rolls. Bread flour gives a chewier texture, while all-purpose makes them softer.
- Active sourdough starter – The star of the recipe. Make sure it’s bubbly, doubled in size, and active before you begin.
- Water – Hydrates the flour and helps gluten formation.
- Salt – Enhances flavor and controls fermentation.
- Sugar or honey – Adds a slight sweetness and helps with browning.
- Butter or olive oil – Creates a soft, tender crumb and rich flavor.
Optional Ingredients for Extra Flavor
- Milk – For a creamier, richer texture.
- Herbs (rosemary, thyme, parsley) – Add an aromatic twist.
- Garlic – Roasted or powdered for garlic rolls.
- Seeds (sesame, poppy, flax) – Sprinkled on top for crunch.
- Cheese (parmesan, cheddar, mozzarella) – Folded inside for gooey, cheesy rolls.
One of the joys of sourdough is its versatility. You can stick to the basics for classic dinner rolls, or you can get creative with add-ins and toppings to suit your personal taste.
Tools and Equipment Required
Having the right tools can make your sourdough baking experience smoother and more enjoyable. While you don’t need a professional kitchen setup, a few essentials will help you achieve consistent results.
- Mixing bowls – Large enough to allow the dough to expand during fermentation.
- Dough scraper – Makes handling sticky sourdough much easier.
- Stand mixer (optional) – If you prefer not to knead by hand, a stand mixer with a dough hook is perfect.
- Kitchen scale – Accuracy matters in baking; measuring by weight is far more reliable than cups.
- Measuring spoons – For smaller ingredients like salt and sugar.
- Baking sheet or cast iron skillet – Depending on whether you prefer individual rolls or pull-apart rolls.
- Plastic wrap or damp towel – To cover your dough while it rises, preventing it from drying out.
- Oven thermometer (optional but useful) – Ensures your oven is at the correct temperature.
These simple tools make a big difference in the outcome of your rolls. For example, a dough scraper helps you work with sticky dough without adding too much extra flour, which can toughen the rolls. A kitchen scale ensures your flour-to-water ratio is perfect every time, giving you consistent results.
Preparing the Sourdough Starter
Before you start mixing dough, your sourdough starter needs to be active and ready to work. A healthy starter is bubbly, doubles in size after feeding, and has a slightly tangy, yeasty smell. If your starter has been sitting in the fridge, take it out at least a day before baking and give it a couple of feedings.
To feed your starter, combine equal parts flour and water with your existing starter and let it sit at room temperature for 4–6 hours. You’ll know it’s ready when it’s doubled in volume and passes the “float test” (a small spoonful dropped into water should float).
If your starter isn’t rising well, it may need more frequent feedings or a warmer environment. Weak starters can lead to dense, heavy rolls, so don’t rush this step. Think of your starter as the engine of your bread—it needs fuel (flour and water) and the right conditions to perform at its best.
Once your starter is strong, you’re ready to begin mixing the dough and bringing your sourdough dinner rolls to life.
Step-by-Step Guide to Making Sourdough Dinner Rolls
Now that your sourdough starter is bubbling with life and you’ve gathered all your ingredients, it’s time to dive into the process of making the most pillowy, golden sourdough dinner rolls. The key here is patience. Unlike quick-rise rolls made with instant yeast, sourdough thrives on slow fermentation. But don’t worry—the steps are simple, and most of the work happens while the dough is resting.
Step 1 – Mixing the Dough
Start by combining your active sourdough starter, flour, water, sugar (or honey), and salt in a large mixing bowl. If you’re using a stand mixer, attach the dough hook and let it knead the dough for about 5–7 minutes until it becomes smooth and elastic. If you prefer hand-kneading, use a dough scraper to fold the dough over itself multiple times until it comes together.
At first, the dough may feel sticky and shaggy, but resist the temptation to add too much flour. Sourdough benefits from higher hydration levels, which result in softer rolls. If it feels overly wet, lightly oil your hands and continue kneading. Once the dough has formed into a soft, elastic ball, cover the bowl with a damp towel and let it rest for 30 minutes. This short resting phase, called “autolyse,” allows the flour to fully hydrate and makes the dough easier to handle.
Think of this stage as planting seeds—you’re setting the foundation for the gluten structure that will hold in all that beautiful fermentation later on.
Step 2 – Bulk Fermentation
This is where the magic happens. Bulk fermentation is the period when your dough sits and ferments, allowing the wild yeast and bacteria in your starter to do their work. Depending on the temperature of your kitchen, this process can take anywhere from 4 to 8 hours. A warm room speeds it up, while a cooler space slows it down.
During bulk fermentation, you’ll want to perform stretch-and-folds every 30–45 minutes during the first 2–3 hours. To do this, grab one edge of the dough, stretch it upward, and fold it over itself. Rotate the bowl and repeat on all four sides. This strengthens the gluten network, builds structure, and helps trap gas for airy, fluffy rolls.
How do you know bulk fermentation is complete? The dough should have roughly doubled in size, look puffy, and feel airy when you handle it. If you poke it gently, the indentation should slowly bounce back. If it springs back too quickly, it needs more time; if it doesn’t bounce back at all, it’s likely over-proofed. Timing and observation are your best friends here.
Step 3 – Shaping the Rolls
Once your dough has finished bulk fermenting, gently turn it out onto a lightly floured surface. Avoid punching it down—you don’t want to knock out all that precious air. Using a kitchen scale, divide the dough into equal portions (about 60–70 grams each for dinner rolls).
To shape each roll, tuck the edges underneath to create surface tension, forming a smooth, round ball. Place each ball seam-side down on a greased baking pan, leaving a little space between them. If you want pull-apart rolls, place them close together so they’ll rise into each other as they bake. For individual rolls, space them farther apart.
This step is where you transform your dough from a rustic mass into neat little puffy rolls. Take your time—shaping is as much about feel as it is about technique. A well-shaped roll will bake more evenly and look beautiful on your dinner table.
Step 4 – Proofing the Dough
Proofing is the final rise before baking, and it determines the final texture of your rolls. Cover the shaped rolls with a damp cloth or plastic wrap and let them rise for 2–4 hours at room temperature. If your kitchen is cooler, it may take longer. Alternatively, you can place them in the fridge overnight for a slower, more flavorful fermentation.
You’ll know your rolls are ready to bake when they look puffy and jiggle slightly when you shake the pan. Press a finger gently into the dough: if the indentation springs back slowly but not completely, they’re proofed perfectly. If it springs back too quickly, give them more time. If it doesn’t spring back at all, they may be over-proofed, but they’ll still bake up soft (just less airy).
This stage is like letting the dough take a deep breath before going into the oven. Patience here pays off in fluffy, light, cloud-like rolls.
Step 5 – Baking the Rolls
Preheat your oven to 375°F (190°C) about 20 minutes before you’re ready to bake. If you like a golden, shiny top, brush the rolls with an egg wash (1 egg mixed with a tablespoon of water or milk). For a softer crust, brush them with melted butter instead. You can also sprinkle sesame or poppy seeds on top for extra texture.
Bake the rolls for 20–25 minutes until they’re golden brown on top and sound hollow when tapped on the bottom. If you want to ensure they’re fully baked, use a kitchen thermometer—the internal temperature should be around 190–200°F (88–93°C).
The smell that fills your kitchen at this point will be heavenly—warm, slightly tangy, and rich with buttery goodness. Once baked, remove the rolls from the oven and brush with a final coat of melted butter for that irresistible glossy finish.
Step 6 – Cooling and Serving
It’s tempting to tear into the rolls immediately, but let them cool for at least 15–20 minutes on a wire rack. This resting time allows the crumb to set, ensuring the inside stays fluffy instead of gummy. Once cooled slightly, serve them warm with butter, honey, or alongside soups, stews, or holiday roasts.
Leftovers can be stored in an airtight container for up to 3 days, but let’s be honest—these rolls rarely last that long. They’re just too good to resist.
Tips for Perfect Sourdough Dinner Rolls
Even if you’re new to sourdough baking, these tips will help you achieve bakery-quality results every single time:
- Handle sticky dough with care – Instead of adding more flour, use slightly wet or oiled hands. This prevents sticking without compromising hydration.
- Mind the fermentation time – Warmer kitchens speed up fermentation, while cooler spaces slow it down. Always judge by dough appearance rather than the clock.
- Don’t rush proofing – A well-proofed roll will always taste and feel better than an under-proofed one. Give it time to rise properly.
- Use strong starter – Weak starter equals dense rolls. Make sure it’s bubbly and active before mixing.
- Add flavor with toppings – A sprinkle of flaky sea salt, sesame seeds, or garlic butter glaze takes these rolls to the next level.
Think of baking sourdough like gardening—it requires patience, observation, and care. The reward is a batch of warm, golden rolls that taste far better than anything store-bought.
Flavor Variations You Can Try
One of the best things about sourdough dinner rolls is how versatile they are. Once you master the base recipe, you can easily tweak the flavors to suit different occasions. Whether you’re hosting a cozy family dinner or putting together a festive holiday spread, these variations will keep your rolls exciting and unique every time you bake.
- Garlic Butter Rolls
For a savory twist, brush your rolls with garlic butter before and after baking. Mix melted butter with minced garlic and a sprinkle of parsley, then brush it generously over the dough. These rolls pair beautifully with pasta dishes, soups, and roasted meats. - Honey-Glazed Sourdough Rolls
If you enjoy a sweeter roll, drizzle warm honey over the rolls right after they come out of the oven. The honey soaks into the crust, creating a glossy, slightly sticky finish. These are wonderful served with ham, roasted chicken, or even for breakfast with butter. - Cheese-Filled Rolls
Before shaping your dough into rolls, tuck a small cube of cheddar, mozzarella, or parmesan inside each portion. As the rolls bake, the cheese melts into the center, giving you a gooey surprise when you bite into them. - Herb-Infused Rolls
Add chopped fresh herbs like rosemary, thyme, or chives into the dough during mixing. The herbs bake into the rolls, infusing them with a fragrant, earthy aroma that complements hearty stews and roasted vegetables. - Seed-Crusted Rolls
Roll the tops of your dough balls in sesame, poppy, sunflower, or pumpkin seeds before baking. This not only adds crunch but also gives the rolls a rustic, artisan look.
Experimenting with flavors is like giving your rolls a new personality each time. It keeps baking fun and lets you surprise your family and guests with something fresh.
Common Mistakes to Avoid
Even experienced bakers occasionally run into trouble with sourdough rolls. The good news? Most issues come down to a few common mistakes that are easy to fix once you know what to watch for.
- Under-Proofing the Dough
If your rolls come out dense or gummy inside, they likely didn’t proof long enough. Always check for the “finger poke test”: press your finger gently into the dough—if it springs back too fast, it’s not ready yet. - Over-Proofing the Dough
On the flip side, letting your dough proof for too long can make it collapse in the oven, leaving flat rolls with poor texture. If the dough doesn’t spring back at all when poked, it may have gone too far. - Adding Too Much Flour
Because sourdough dough tends to be sticky, many beginners add extra flour to make it easier to handle. Unfortunately, this often results in tough rolls. Instead, work with oiled or wet hands to manage stickiness. - Baking at the Wrong Temperature
Too low, and your rolls won’t brown properly. Too high, and the crust will burn before the inside is fully baked. Stick to 375°F (190°C) for golden, fluffy rolls. - Weak Starter
A sluggish starter leads to poor rise and heavy rolls. Always ensure your starter is bubbly, doubled in size, and passes the float test before using it in dough.
By being mindful of these pitfalls, you’ll save yourself the frustration of disappointing rolls and instead enjoy consistently light, fluffy, and flavorful results.
Storing and Freezing Sourdough Rolls
Freshly baked sourdough dinner rolls are irresistible, but sometimes you’ll have leftovers—or you may want to bake ahead for a special occasion. Luckily, these rolls store and freeze beautifully if handled properly.
- Short-Term Storage
Keep your rolls in an airtight container or bread bag at room temperature for up to 3 days. To maintain softness, wrap them in a clean kitchen towel before storing. - Freezing
For longer storage, place cooled rolls in a freezer-safe bag or airtight container and freeze for up to 3 months. To prevent freezer burn, wrap each roll in plastic wrap before placing them in the bag. - Reheating
To enjoy frozen rolls, thaw them at room temperature and then reheat in a 325°F (160°C) oven for 10 minutes. For an extra boost of freshness, brush with melted butter before serving.
Proper storage ensures your hard work doesn’t go to waste, and it means you can always have sourdough rolls ready for last-minute dinners or gatherings.
Serving Suggestions
Sourdough dinner rolls are incredibly versatile, making them a perfect addition to almost any meal. Here are a few ways to enjoy them:
- Classic Pairings – Serve warm with butter at dinner alongside roasted chicken, turkey, or beef.
- Soup & Stew Companion – Their soft, chewy texture makes them ideal for dipping into soups and stews.
- Holiday Meals – A must-have for Thanksgiving or Christmas spreads, complementing turkey, ham, and all the trimmings.
- Breakfast Rolls – Toast and spread with jam, honey, or cream cheese for a quick and hearty breakfast.
- Sandwich Base – Slice rolls in half and fill with meats, cheese, and veggies for mini sandwiches or sliders.
Leftovers don’t have to be boring. You can transform them into garlic bread, bread pudding, or even croutons for salads. In fact, these rolls might be the most versatile item you ever bake.
Nutritional Value of Sourdough Dinner Rolls
While sourdough rolls are a treat, they also come with some nutritional perks compared to traditional yeast rolls. Thanks to the fermentation process, sourdough often has lower gluten content and better digestibility.
On average, one medium sourdough dinner roll (about 60g) provides:
| Nutrient | Approx. Amount |
|---|---|
| Calories | 140–160 |
| Carbohydrates | 28–30g |
| Protein | 4–5g |
| Fat | 2–3g |
| Fiber | 1–2g |
The slow fermentation breaks down phytic acid, which means your body can absorb minerals like iron, zinc, and magnesium more easily. Plus, sourdough has a lower glycemic index than many other breads, so it won’t spike your blood sugar as quickly.
Of course, if you add cheese, honey, or butter, the calories go up—but that’s all part of the indulgence!
FAQs about Sourdough Dinner Rolls Recipe
1. Can I make these rolls gluten-free?
Yes, but with adjustments. Traditional sourdough relies on gluten for its structure, so swapping in gluten-free flour requires using a blend that mimics gluten’s elasticity. You’ll also need to create or buy a gluten-free sourdough starter. The texture won’t be identical—gluten-free rolls tend to be denser—but they can still be delicious.
2. How long do sourdough rolls stay fresh?
At room temperature, they’ll stay soft and tasty for about 2–3 days when stored in an airtight container. Beyond that, they begin to dry out. For longer storage, freezing is the best option—you can keep them frozen for up to 3 months.
3. Can I use instant yeast instead of sourdough starter?
Technically yes, but you’ll lose the flavor and health benefits of sourdough. If you’re short on time, add 1 teaspoon of instant yeast to your dough along with a small amount of sourdough starter. This speeds up fermentation while still giving you a hint of sourdough flavor.
4. Why are my rolls turning out dense?
The two most common culprits are weak starter and under-proofing. Make sure your starter is bubbly and active before using it. Also, allow enough time for both bulk fermentation and final proofing—dense rolls are almost always the result of rushing the process.
5. Can I prepare the rolls ahead of time?
Absolutely! You can shape the rolls, cover them, and let them proof in the fridge overnight. The next day, bring them to room temperature for about 30–45 minutes, then bake as directed. This method not only saves time but also enhances flavor.
Conclusion
These rolls are versatile enough to accompany a holiday feast, a hearty stew, or even your morning coffee with butter and jam. The flavor is richer, the texture softer, and the aroma unlike anything you’ll get from a store-bought roll. Once you’ve tried making them yourself, it’s hard to go back.
So, the next time you want to impress your family or guests—or simply treat yourself—pull out your starter, gather your ingredients, and get baking. Your kitchen will smell incredible, and your taste buds will thank you.