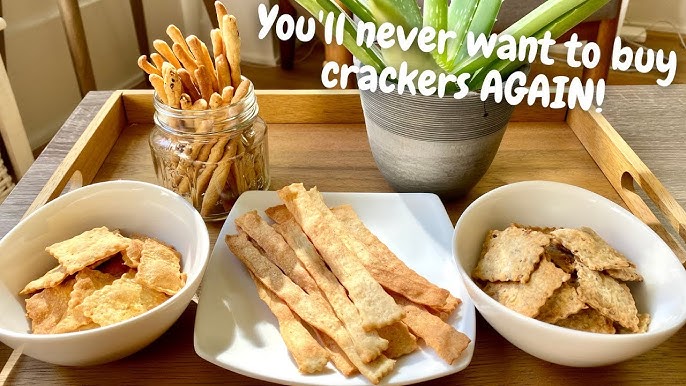
Sourdough Cracker Recipe: Sourdough crackers are the ultimate blend of crunchy, tangy, and savory goodness packed into a bite-sized snack. If you’ve ever made sourdough bread, you know the pain of discarding part of your starter during feedings. But what if that discard could be turned into something incredible? That’s exactly where these crackers come in.
Sourdough crackers offer a smart, no-waste solution for using up your sourdough discard, all while treating yourself (and your guests) to a crunchy, addictive snack. They’re perfect for charcuterie boards, lunch boxes, or snacking straight from the jar. Think of them as the sourdough lover’s secret weapon—easy to make, endlessly customizable, and absolutely delicious.
Why Make Sourdough Crackers at Home?
Let’s be real: store-bought crackers are convenient, but they often lack that deep, satisfying flavor that homemade versions can offer. When you make sourdough crackers at home, you’re in control of everything—ingredients, flavor, texture, and thickness.
Here’s why homemade sourdough crackers win every time:
- No preservatives or artificial additives.
- Utilize sourdough discard, reducing waste.
- Tailor the flavors exactly to your preference.
- Achieve that crisp, golden crunch you can’t find in packaged crackers.
- Add your own flair with spices, herbs, seeds, or cheese.
Plus, it’s shockingly easy. Once you get the hang of it, it’ll become part of your weekly sourdough routine. Whether you’re new to sourdough or a seasoned baker, these crackers will become your new favorite go-to.
What Makes These Crackers Unique and Delicious?
The secret lies in the sourdough starter. Even when used as discard (i.e., not recently fed), it brings a depth of flavor you just can’t replicate with regular dough. The natural fermentation gives the crackers a subtle tang, while a simple mix of flour, fat, and seasonings rounds out the profile.
These aren’t your average dry, lifeless crackers. When done right, they’re:
- Crispy but not too hard.
- Rich with a slightly nutty, tangy note.
- Packed with flavor, even in their simplest form.
- Just begging to be dipped in hummus, topped with cheese, or eaten plain by the handful.
They’re also perfect for batch cooking. You can double the recipe, store them in an airtight container, and enjoy a healthy, satisfying snack all week.
Ingredients You’ll Need
Sourdough Starter (Active or Discard)
The heart of this recipe is sourdough starter. And the best part? You don’t need to use your freshly fed starter—discard works perfectly. In fact, many bakers prefer using discard for crackers because of its slightly stronger tang and no need for a rise.
Here’s what you need to know:
- Use unfed/discard starter straight from the fridge.
- You can also use active starter if you want a lighter texture.
- The starter should be 100% hydration (equal parts flour and water).
Using discard helps reduce kitchen waste and adds a complex, fermented flavor that sets these crackers apart from anything else you’ve had.
Pantry Staples You Likely Already Have
This recipe is surprisingly simple. Most of the ingredients are probably sitting in your pantry right now. Here’s the basic list:
- All-purpose flour – for structure and crispiness.
- Olive oil or melted butter – adds richness and helps create that perfect crunch.
- Salt – essential for flavor.
- Optional sugar or honey – just a pinch can balance the tang from the starter.
You can easily make this recipe your own. Swap in other types of flour (whole wheat, rye, spelt) for different flavors and textures. Add spices or herbs to create your signature flavor.
Optional Add-ins for Extra Flavor
Want to take things up a notch? These optional ingredients will elevate your sourdough crackers from good to gourmet:
- Herbs (rosemary, thyme, oregano)
- Grated cheese (Parmesan, cheddar, Asiago)
- Seeds (sesame, poppy, flax, sunflower)
- Spices (garlic powder, onion powder, smoked paprika)
- Chili flakes or black pepper for a kick
You can sprinkle these on top before baking or mix them directly into the dough. Get creative—this is where you make the recipe your own.
Tools You’ll Need for This Recipe
Basic Kitchen Equipment
You don’t need fancy tools to make sourdough crackers. In fact, a simple setup works great:
- Mixing bowl – for combining ingredients.
- Rolling pin – to get your dough nice and thin.
- Sharp knife or pizza cutter – for cutting the dough into squares or shapes.
- Baking sheet – lined with parchment paper or silicone baking mat.
- Oven – set to the right temperature, even heating is key.
No stand mixer, food processor, or dough hook required. This recipe is wonderfully hands-on, and you’ll enjoy the process as much as the final product.
Optional Tools for Enhanced Results
Want to make the process even easier or more precise? Consider these extras:
- Pasta roller – for getting the dough ultra-thin and uniform.
- Pastry wheel – adds decorative edges to your crackers.
- Cookie cutters – make shaped crackers for holidays or parties.
- Mandoline or rolling guides – to ensure even thickness.
These tools aren’t essential, but they can make your crackers look more professional and bake more evenly.
Preparing Your Sourdough Starter
Using Discard vs. Active Starter
One of the most common questions is: Can I use sourdough discard? Absolutely. Discard is ideal because the crackers don’t need to rise. You’re not relying on the yeast for lift—just the flavor.
Discard Starter Pros:
- No waste
- Stronger sour flavor
- Ready to use from the fridge
Active Starter Pros:
- Milder flavor
- Airier texture if that’s your preference
The choice depends on the flavor and texture you’re going for. Both work beautifully, so feel free to experiment.
Tips for Best Flavor and Texture
To get the most out of your sourdough crackers:
- Let the dough rest in the fridge – this improves texture and deepens flavor.
- Use chilled butter or oil – helps create flakier crackers.
- Roll the dough thin – aim for 1/8 inch or less.
- Bake until deeply golden – don’t underbake; the crispness comes from proper baking.
Now that we’ve got everything prepped…
Step-by-Step Guide to Making Sourdough Crackers
Step 1: Mix the Dough
In a medium bowl, combine 1 cup of sourdough starter (discard or active) with 1 cup of all-purpose flour, 2 tablespoons of olive oil or melted butter, and ½ teaspoon of salt. Stir until the mixture comes together into a soft, slightly sticky dough. You can customize the flavor here — add herbs like rosemary or thyme, garlic powder, or even a pinch of chili flakes for a savory twist. Once mixed, knead the dough lightly until smooth, about 1–2 minutes.
Step 2: Chill the Dough
Form the dough into a disc, wrap it tightly in plastic wrap or parchment paper, and refrigerate for at least 30 minutes. This rest period allows the flour to hydrate and makes the dough easier to roll out later. If you prefer a stronger tangy flavor, you can let it chill for up to 24 hours — the sourdough continues to ferment gently, deepening the taste.
Step 3: Roll It Out Thin
Preheat your oven to 350°F (175°C) and line a baking sheet with parchment paper. On a lightly floured surface (or between two sheets of parchment), roll the dough out as thin as possible — about 1⁄16 inch. The thinner the dough, the crispier your crackers will be. If you like rustic edges, keep it freeform; if you want neat shapes, use a rolling cutter or knife to trim the sides.
Step 4: Cut and Season
Cut the rolled dough into squares, rectangles, or fun shapes using a pizza cutter or knife. Transfer them to the baking sheet, spacing them slightly apart. Brush lightly with olive oil or melted butter, then sprinkle with flaky sea salt, sesame seeds, or everything bagel seasoning. For a cheesy twist, dust with grated Parmesan before baking.
Step 5: Bake to Perfection
Bake for 18–22 minutes, or until the crackers are golden brown and crisp. Keep an eye on them near the end — thin edges can brown quickly. Once baked, let them cool completely on a wire rack to firm up. If you want extra crunch, turn off the oven and let them sit inside with the door cracked open for 5 minutes.
Store your Sourdough Crackers in an airtight container at room temperature for up to a week. Light, tangy, and delightfully crisp, they’re perfect for snacking, dipping, or pairing with cheese and wine. Simple, rustic, and absolutely addictive.
Flavor Variations to Try
Craving something beyond plain crackers? Here are three must-try flavor twists that will upgrade your snack game instantly.
Cheddar and Chive
This savory combination is a hit at any gathering.
To make:
- Add ½ cup shredded sharp cheddar to your dough.
- Mix in 1 tablespoon chopped fresh chives.
- Sprinkle extra cheese on top before baking for extra cheesiness.
You get sharp, melty cheddar with a mild onion bite from the chives—perfect for dipping or snacking solo.
Rosemary Sea Salt
An elegant, herbaceous cracker that’s perfect with wine or on a charcuterie board.
To make:
- Mix 2 teaspoons finely chopped fresh rosemary into your dough.
- Top with a light brush of olive oil and a generous sprinkle of flaky sea salt.
The rosemary’s fragrance comes alive in the oven, and the salt gives it a gourmet finish.
Spicy Chili Garlic
For those who like a little heat, this version packs a flavorful punch.
To make:
- Add ½ teaspoon chili flakes and ½ teaspoon garlic powder to the dough.
- Brush with oil and sprinkle extra chili flakes before baking.
It’s got just enough heat to keep things interesting—great with creamy dips like hummus or tzatziki.
Storage and Shelf Life
Let’s talk longevity. Once your sourdough crackers are fully cooled, store them right to keep that crispy crunch.
How to Store for Maximum Freshness
- Use an airtight container or glass jar with a tight lid.
- Store at room temperature, away from moisture and sunlight.
- Crackers stay fresh and crispy for up to 2 weeks (though they’ll probably be gone long before that).
For best results, let them cool completely before storing. Any residual heat can cause condensation and soften your crackers.
Freezing Options and Tips
Want to make a big batch and save some for later? Freezing is totally doable.
- Freeze unbaked dough: Wrap tightly in plastic and freeze for up to 3 months. Thaw overnight in the fridge before rolling.
- Freeze baked crackers: Place in a single layer on a baking sheet, freeze until solid, then store in a freezer bag.
To re-crisp frozen crackers, pop them in a 300°F (150°C) oven for 5 minutes.
Serving Suggestions
Dips and Spreads That Pair Well
Crackers are great on their own, but they truly shine with a good dip. Here are some tasty ideas:
- Hummus (classic, roasted red pepper, or garlic)
- Guacamole or avocado mash
- Spinach and artichoke dip
- Herbed cream cheese
- Baba ganoush
Pairing flavors can make your homemade crackers the centerpiece of any appetizer table.
Charcuterie Board Ideas
Build a next-level charcuterie board using your sourdough crackers as a base. Include:
- Cured meats like prosciutto or salami
- Soft cheeses (brie, goat cheese)
- Hard cheeses (aged cheddar, gouda)
- Pickles or olives
- Dried fruits and nuts
- Fresh grapes or berries
Your crackers bring the crunch and tang that ties everything together beautifully.
Nutritional Information
Let’s be honest—crackers aren’t meant to be a superfood. But sourdough crackers are often more nutritious than store-bought versions, especially when you control the ingredients.
Caloric Breakdown
Here’s a rough estimate per serving (about 8–10 crackers):
- Calories: 120–150
- Carbs: 18–22g
- Protein: 2–3g
- Fat: 6–8g
- Fiber: 1–2g
This depends on the type of flour and fats used, as well as add-ins like cheese or seeds.
Tips for Healthier Versions
Want to make your crackers a little lighter or more nutrient-dense? Try these tweaks:
- Use whole wheat flour for more fiber.
- Add ground flax or chia seeds for omega-3s.
- Cut down on salt or use low-sodium add-ins.
- Replace butter with olive oil for heart-healthier fats.
These small changes can make a big difference in both flavor and nutrition.
Troubleshooting Common Issues
Making sourdough crackers is pretty straightforward, but occasionally, things can go sideways. Don’t worry—we’ve got you covered with solutions to the most common issues.
Dough Too Sticky or Dry
Sticky dough: If your dough is too wet and sticks to everything, it likely needs a bit more flour. Add it gradually—just a tablespoon at a time—until it’s soft but manageable.
Other tips:
- Make sure your sourdough discard isn’t too runny.
- Chill the dough before rolling; it firms up and becomes easier to handle.
Dry or crumbly dough: On the flip side, if your dough is cracking or won’t come together, it may be too dry.
Fix it by:
- Adding a teaspoon of water at a time while kneading.
- Ensuring you’re using oil or butter as stated in the recipe.
Balance is key here. A well-hydrated dough will be smooth, soft, and easy to roll out.
Crackers Not Crispy Enough
If your crackers come out soft or chewy instead of crisp, it’s usually due to one of the following:
- Dough too thick: Make sure you’re rolling the dough thin enough—aim for 1/8 inch or less.
- Underbaking: They may need a few more minutes in the oven. Don’t be afraid to let them get golden brown.
- Oven temperature too low: Double-check that your oven is fully preheated.
If you’ve already baked them and they aren’t crispy, you can still save them:
- Place the crackers back in the oven at 300°F (150°C) for 5–10 minutes.
- Let them cool completely to test crispness again.
Crispy crackers rely on both thin dough and sufficient baking time—dial those in and you’ll get perfect results every time.
Expert Tips for Perfect Crackers
Let’s level up your sourdough cracker game with some pro techniques and little-known hacks.
Rolling Techniques
- Use a rolling pin with thickness rings to get even dough.
- Place the dough between two sheets of parchment paper to avoid sticking and tearing.
- Roll in multiple directions to ensure even thickness across the entire sheet.
Crackers bake evenly and crisp up better when they’re all the same thickness.
Baking Sheet vs. Parchment Paper
- Parchment paper is your best friend. It prevents sticking, promotes even baking, and makes cleanup a breeze.
- A silicone baking mat also works well but may require a slightly longer baking time.
- Avoid greasing your pan—added oil can make the crackers soggy instead of crispy.
Also, don’t crowd your pan. Spread the crackers in a single layer, with a bit of space between each. This ensures even heat circulation.
FAQs about Sourdough Cracker Recipe
1. Can I ferment the dough overnight for deeper flavor?
Yes! Resting the dough in the fridge overnight allows the flavors to mature. It enhances the sourdough tang and improves the texture, giving you a slightly more complex cracker.
2. Why do my crackers have bubbles after baking?
Bubbles form when steam gets trapped in the dough. It’s harmless and can even make the texture better! For a more uniform appearance, dock the dough (prick with a fork) before baking.
3. Can I make these crackers without oil or butter?
Yes, though the texture will change. Without fat, the crackers will be harder and less rich. You can substitute with applesauce or Greek yogurt for a lighter option.
4. How do I add seeds without them burning?
Press the seeds lightly into the dough with a rolling pin before baking. This helps them adhere and prevents burning. You can also mix them into the dough itself for better distribution.
5. Can kids help with this recipe?
Definitely! Kids love cutting shapes, sprinkling toppings, and brushing on oil. It’s a fun, hands-on way to get them involved in the kitchen—and the results are snackable for everyone.
Conclusion
Sourdough crackers are one of those homemade recipes that once you try, you’ll wonder how you ever lived without. They’re crunchy, flavorful, and endlessly customizable—not to mention a brilliant way to use up sourdough discard. Whether you enjoy them plain or loaded with herbs, seeds, or cheese, they’ll quickly become a favorite in your kitchen.
And let’s not forget the satisfaction of making something so delicious with simple, wholesome ingredients. No preservatives, no waste—just pure, crunchy joy.
So grab that discard, roll up your sleeves, and bake a batch today. Your snack game will never be the same.