Sourdough Ciabatta Recipe: Ciabatta, which means “slipper” in Italian, is well-loved for its flat shape and its light, open crumb. Now, imagine that same delightful texture and chewy crust, but with the depth of flavor and improved digestibility that comes from using a sourdough starter instead of yeast. That’s the beauty of sourdough ciabatta—it brings together two iconic bread traditions for something truly next-level.
Unlike regular ciabatta made with commercial yeast, the sourdough version relies on wild natural yeasts and lactic acid bacteria, which create complex flavors, enhance the crust, and improve the nutritional profile. You get the same signature air pockets and chewy center, but with a tangy twist that only sourdough can offer.
Sourdough baking is more of a journey than a sprint. It’s slow, mindful, and incredibly rewarding. Don’t worry—this step-by-step guide will break it all down in simple language so even beginner bakers can follow along and bake an amazing sourdough ciabatta from scratch.
Benefits of Sourdough Bread
So, why all the hype around sourdough? There are several good reasons why people are ditching commercial yeast and going old-school with their bread baking.
- Better Digestibility: The fermentation process breaks down gluten and phytic acid, making the bread easier on your gut.
- Lower Glycemic Index: Thanks to slower digestion, sourdough bread doesn’t spike your blood sugar like typical white bread.
- More Flavor: Fermentation develops rich, nuanced flavors you just can’t get with instant yeast.
- Longer Shelf Life: The natural acids in sourdough act as preservatives, so your bread stays fresher longer.
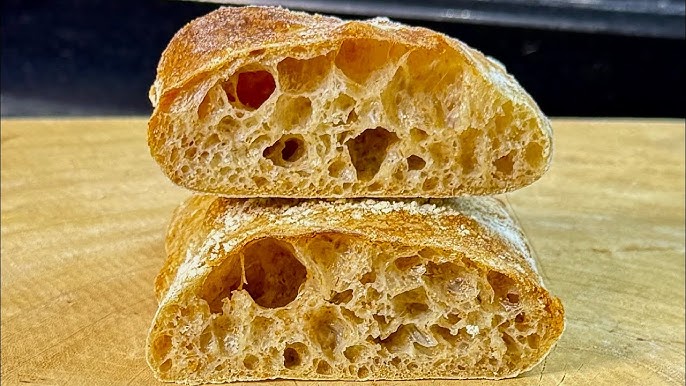
- Crust and Crumb Quality: Sourdough ciabatta has a delightfully chewy crust and those perfect holes that make it ideal for sandwiches.
Whether you’re into baking for health reasons or just want to level up your homemade bread game, sourdough ciabatta is a must-try.
Essential Ingredients You’ll Need
To make authentic sourdough ciabatta, you don’t need a long list of fancy ingredients. In fact, it’s the simplicity that makes it so special. Here’s what you’ll need:
- 500g Bread Flour – High protein flour is best for developing strong gluten.
- 375g Water (75% Hydration) – This gives you a high-hydration dough, which is essential for ciabatta’s open crumb.
- 100g Active Sourdough Starter (100% hydration) – Make sure it’s bubbly and fed within the last 4–6 hours.
- 10g Salt – Enhances flavor and controls fermentation.
Optional Add-ins:
- A splash of olive oil (for a softer crust)
- Chopped olives, herbs, or shredded cheese for flavor variations
Pro Tips:
- You can use a blend of whole wheat and white flour, but stick to no more than 20% whole wheat to keep the texture light.
- Don’t use all-purpose flour—it doesn’t develop enough gluten structure for this bread.
Required Tools and Equipment
Although you can make sourdough ciabatta with basic kitchen items, having a few helpful tools makes life a lot easier. Here’s what you’ll want:
- Digital Scale – Accuracy is everything in baking.
- Large Mixing Bowl – For bulk fermentation.
- Bench Scraper – To help handle sticky dough.
- Dough Whisk or Sturdy Spoon – For mixing without overworking.
- Proofing Container or Tray – To let the dough rest and rise properly.
- Baking Stone or Steel – For better oven spring and crust.
- Parchment Paper – Helps transfer dough to the oven.
- Spray Bottle (Optional) – Adds steam during baking to help form a crispy crust.
If you have a stand mixer, great! But it’s absolutely not required—this recipe is 100% hand-mix friendly.
Understanding Your Sourdough Starter
Before you dive in, make sure your sourdough starter is active and ready to go. Here’s how to tell:
- It doubles in size within 4–6 hours of feeding.
- It’s bubbly, with a slightly tangy smell (not foul).
- It passes the float test (a small spoonful floats in water).
Feed your starter about 4–6 hours before mixing your dough so it’s at its peak strength.
Feeding tip: A 1:1:1 ratio (starter:flour:water by weight) works well for most starters. Use unbleached flour and filtered water if possible.
Keep your starter in a warm spot (around 75°F or 24°C) to stay active, especially during colder months.
Step-by-Step Sourdough Ciabatta Recipe
Let’s roll up our sleeves and bake some bread. Here’s the full breakdown, step by step.
Step 1: Mixing the Dough
In a large bowl, combine bread flour, water, and active sourdough starter. Mix gently until all the flour is hydrated. The dough will be very wet and sticky—this is normal for ciabatta. Cover and let it rest.
Step 2: Autolyse Process
Allow the dough to rest for 30–45 minutes. This autolyse stage helps the flour absorb water fully and begins gluten development, improving the final texture and structure of the bread.
Step 3: Adding Salt and Stretch & Folds
Sprinkle salt over the dough and gently mix it in using your fingers or a folding motion. Perform stretch-and-folds every 20–30 minutes for about 1½–2 hours. This strengthens the dough without kneading and helps trap air.
Step 4: Bulk Fermentation
Cover the dough and let it ferment at room temperature for 3–4 hours, or until it has doubled in size and shows bubbles on the surface. A lively, airy dough is key to ciabatta’s open crumb.
Step 5: Shaping the Ciabatta
Turn the dough onto a well-floured surface. Handle gently to avoid deflating it. Dust the top with flour and divide into rectangular portions. Do not over-shape—ciabatta relies on minimal handling.
Step 6: Proofing the Dough
Transfer the shaped dough to a floured cloth or parchment paper. Cover loosely and proof for 45–75 minutes, until slightly puffy. The dough should still feel light and jiggly.
Step 7: Baking the Bread
Preheat the oven to 230°C (450°F). Slide the ciabatta onto a hot baking stone or tray. Bake for 20–25 minutes until golden brown with a crisp crust. Cool completely before slicing for best texture.
Tips for Success
- Hydration is Key: Ciabatta dough is known for being wet—don’t be tempted to add too much flour.
- Use Wet Hands: When doing stretch and folds, water is your friend. Wet hands won’t stick to the dough like dry hands will.
- Be Gentle: Always handle your dough delicately to preserve those beautiful air pockets.
- Steam Is Essential: That initial steam helps create a thin, crackly crust while allowing the bread to expand fully.
- Practice Patience: Sourdough takes time. Trust the process and resist the urge to rush.
How to Store Your Sourdough Ciabatta
Once your ciabatta has cooled completely (this is important!), you can store it in several ways:
- At Room Temperature: Keep in a bread bag or wrapped in a clean towel for up to 2 days. Avoid plastic, which can make it soggy.
- Freezing: Wrap in foil and place in a freezer-safe bag. Keeps for up to 3 months. To thaw, leave at room temp or reheat in the oven at 350°F (175°C) for 10–15 minutes.
If it starts to get stale, don’t toss it—ciabatta makes amazing croutons, bruschetta, or toasted sandwiches.
Troubleshooting Common Issues
Let’s face it—sourdough isn’t always smooth sailing. Here are a few common hiccups and how to fix them:
- Flat Loaves: Could be from over-proofing or weak gluten development. Next time, make sure your starter is strong and do all your stretch and folds.
- Tight Crumb: Not enough hydration or too much handling. Ciabatta thrives with high water content and gentle shaping.
- Sticky Dough: Normal! Use floured surfaces and wet hands. Avoid adding extra flour unless absolutely necessary.
- Crust Too Hard: If it’s like a rock, try storing with a cloth or adding a pan of water during baking for more moisture.
Serving Suggestions
Sourdough ciabatta is versatile and oh-so-tasty. Here are a few delicious ways to enjoy it:
- Sandwiches: The airy crumb and sturdy crust make it ideal for grilled sandwiches or paninis.
- Dipping Bread: Serve with olive oil and balsamic vinegar.
- Garlic Bread: Slice, butter, garlic, and broil—perfection.
- Bruschetta Base: Toast slices and top with tomatoes, basil, and balsamic glaze.
- Soup Sidekick: Nothing beats dipping ciabatta into a bowl of hot soup.
Nutritional Information (Per Slice – Approximate)
| Nutrient | Amount |
|---|---|
| Calories | 160 |
| Carbs | 30g |
| Protein | 5g |
| Fat | 1g |
| Fiber | 1g |
| Sugar | 0g |
| Sodium | 220mg |
Keep in mind—this varies depending on loaf size and flour type.
Sourdough Ciabatta Variations
Once you’ve nailed the classic version, it’s time to get creative. Sourdough ciabatta is a fantastic base for all kinds of flavor combinations. Here are a few tasty twists to try:
1. Olive Ciabatta
Add 100–150g of chopped, pitted olives (kalamata or green) to your dough during the second stretch and fold. The briny flavor adds an amazing Mediterranean kick.
2. Cheese & Herb Ciabatta
Mix in:
- 100g shredded cheddar or parmesan
- 1–2 tablespoons chopped fresh rosemary, thyme, or basil
Add these during the last stretch and fold so the herbs don’t get crushed too early.
3. Whole Wheat Ciabatta
Replace 100–150g of the white bread flour with whole wheat flour. This will give you a slightly nuttier flavor and a denser texture while still maintaining those signature air pockets. You may need to increase the water slightly (by 10–15g) to keep the dough soft.
4. Garlic Ciabatta
Roast a whole head of garlic, mash it, and mix it into the dough during the final mix. It creates a rich, savory loaf that’s perfect for sandwiches or serving with pasta.
Note:
When adding extras to high-hydration dough, fold them in gently and space them evenly to avoid tearing the gluten structure.
Cleaning Up and Care Tips
Anyone who’s worked with sticky dough knows: clean-up can be brutal if you’re not prepared. Here’s how to make it easier:
- Use Cold Water: Warm water makes flour gluey and harder to remove. Rinse bowls and tools in cold water first.
- Bench Scraper = Best Friend: Scrape off dough from counters before wiping.
- Let Dough Dry on Tools: Instead of trying to wash sticky whisks and scrapers immediately, let them dry and then peel off the dough.
- Use a Plastic Tub: Fermenting in a plastic container makes cleanup faster than sticky metal or glass bowls.
Once you’re done, give everything a good clean, dry it well, and store your tools in a dry spot to avoid rust or mold buildup.
FAQs about Sourdough Ciabatta Recipe
1. Can I make sourdough ciabatta without a sourdough starter?
Not really. The sourdough starter is what gives this bread its flavor, texture, and rise. If you don’t have one, you can make a quick poolish or biga with commercial yeast, but it won’t be a true sourdough.
2. How long does it take from start to finish?
Expect the full process to take 24 hours, including resting times. Most of that is hands-off, though. You’ll spend about 1–2 hours total doing actual work.
3. My dough is too sticky—what should I do?
Don’t panic. High-hydration dough is supposed to be sticky. Use wet hands and a bench scraper to handle it. Avoid adding flour unless the dough is completely unmanageable.
4. Can I cold-proof the dough overnight?
Absolutely. After shaping, you can refrigerate the loaves for 8–12 hours. Just let them come to room temp for about 1 hour before baking.
5. Why didn’t my ciabatta get those big holes?
Open crumb depends on:
- A well-fed starter
- Proper hydration
- Gentle handling
- Full fermentation
If you overmix, degas, or under-proof the dough, your crumb will be tighter.
Conclusion
Baking sourdough ciabatta at home might seem intimidating at first—but once you understand the process, it becomes second nature. From the bubbly starter to the stretchy dough and golden, airy loaves, every step is a labor of love. The reward? That crackly crust, light-as-air crumb, and tangy flavor that puts store-bought bread to shame.
With this step-by-step guide, you’ve got everything you need to bake bakery-style sourdough ciabatta right in your own kitchen. Stick with it, be patient, and remember: even your “failures” still taste amazing. The more you practice, the better your loaves will become.
Happy baking—and don’t forget to share your masterpiece with friends and family. They’ll be amazed you made it yourself!