Sourdough Bread Starter Recipe: Making sourdough bread starts with one key ingredient: the starter. This bubbling mixture of flour and water is the soul of sourdough baking.
Unlike commercial yeast, which comes in a packet, a sourdough starter is alive—it’s a culture of wild yeast and friendly bacteria that you nurture over time. Once it’s strong and active, you can use it to bake bread that’s flavorful, airy, and easier to digest.
In this guide, we’ll walk through everything you need to know: the ingredients, tools, step-by-step process, troubleshooting, and maintenance. Whether you’re a complete beginner or someone who’s tried before and struggled, this step-by-step guide will set you up for sourdough success.
What is a sourdough starter?
A sourdough starter is a natural leavening agent made from just two ingredients: flour and water. When combined, these simple ingredients attract wild yeast from the air and from the flour itself. Over several days, the mixture begins to bubble, rise, and develop a tangy aroma, signaling that fermentation is taking place. This living culture becomes your natural yeast source for baking bread. Unlike commercial yeast, which produces a predictable but uniform result, sourdough starter brings unique flavors and textures to your bread depending on your environment, flour type, and feeding routine. It’s like having your own little bakery in a jar.
Why is sourdough starter important?
Without a starter, you can’t make sourdough bread. It’s the heart of the recipe, giving bread its signature rise and complex flavor. Commercial yeast works fast but lacks depth in taste. A sourdough starter, on the other hand, develops slowly, allowing lactic acid bacteria to produce rich, tangy flavors. It also improves the bread’s texture, making it chewy, airy, and rustic. More importantly, the slow fermentation process makes sourdough easier to digest and may even help your body absorb nutrients better. For many bakers, the starter isn’t just an ingredient—it’s a cherished companion that grows stronger with care.
Benefits of making your own starter at home
Making your own sourdough starter is not just about baking; it’s about building a connection with your food. Here are a few reasons why you should try it:
- Healthier bread – The natural fermentation helps break down gluten and phytic acid, making bread easier on the stomach.
- Cost-effective – A starter is essentially free to make. Flour and water are inexpensive compared to buying yeast repeatedly.
- Unique flavor – Every starter is different, influenced by your local environment. Your bread will taste like nowhere else in the world.
- Sustainable baking – Once you have a starter, you can keep it alive indefinitely with regular feeding. Some families pass down starters through generations.
If you’ve ever wanted bread that smells incredible, tastes complex, and feels truly homemade, then starting your own sourdough starter is the perfect first step.
Ingredients You’ll Need
Essential ingredients for a sourdough starter
The magic of sourdough is that you only need two ingredients: flour and water. That’s it. But while it sounds simple, the quality of these ingredients can make a big difference. Flour provides food for the wild yeast and bacteria, while water hydrates the mixture and activates fermentation. Choosing the right flour and water is the foundation of a successful starter.
Best types of flour to use
Not all flours are created equal when it comes to sourdough. Here are some good choices:
- Whole wheat flour – Packed with nutrients and naturally occurring yeast, it kickstarts fermentation quickly.
- Rye flour – Another great option for beginners, as rye ferments faster and creates a strong starter.
- All-purpose flour – Works well once your starter is established, but may be slower to get going at first.
Many bakers start with a mix of whole wheat or rye flour for the first few days, then switch to all-purpose for daily feeding. This combination provides the best of both worlds: strong fermentation and a lighter texture in your bread.
Water quality and why it matters
Water might seem straightforward, but it plays a crucial role. Tap water often contains chlorine, which can slow down or even kill the wild yeast in your starter. If your tap water smells strongly of chlorine, let it sit uncovered overnight before using, or use filtered or bottled water instead. Room temperature water is ideal—too cold slows fermentation, and too hot can kill your yeast. Think of water as the lifeline of your starter: clean, gentle, and supportive.
Tools and Equipment Required
Basic kitchen tools for creating a starter
You don’t need fancy equipment to create a sourdough starter. Here are the must-haves:
- A clean glass jar or container (at least 1 liter capacity)
- A kitchen scale for accurate measurements (highly recommended)
- A spoon or spatula for mixing
- A clean cloth or loose lid to cover the jar
These simple tools are enough to get you started and keep your starter healthy.
Optional tools that make the process easier
While not strictly necessary, these can make life easier:
- Rubber bands or jar markers – to track how much your starter has risen
- Thermometer – to monitor room temperature if your kitchen fluctuates
- Bench scraper – useful once you start baking bread
Storing and maintaining your starter
Your sourdough starter will live in its jar on the countertop (or fridge once it’s established). Always use a non-metal container, as acidity from the starter can react with metal. Cover it loosely—you want to keep out dust but still allow airflow. Think of the jar as your starter’s little home. Treat it well, and it will reward you with years of delicious bread.
Step-by-Step Guide to Making Sourdough Starter
Day 1 – Mixing flour and water
On the first day, mix equal parts flour and water by weight. A common ratio is 100 grams flour + 100 grams water. Stir until smooth, then cover loosely and leave at room temperature (around 70–75°F or 21–24°C). Don’t expect much to happen yet—this is just the beginning of the fermentation journey.
Day 2 – Checking for bubbles
By the second day, you may notice a few small bubbles forming in the mixture. Don’t worry if it still looks quiet—fermentation can be slow to start. Stir the mixture once or twice to help distribute the yeast and bacteria. At this point, you don’t need to discard anything; simply let the culture rest again at room temperature. The bubbles are a sign that wild yeast and bacteria are beginning to wake up and feed on the flour. If there’s no visible activity yet, don’t panic—sometimes it takes an extra day or two depending on your environment, flour choice, and temperature. Patience is the secret ingredient in sourdough baking.
Day 3–4 – Feeding the starter
By day three, you should see more consistent bubbling and maybe even notice a slightly tangy aroma. This is when you’ll start a feeding routine. To feed your starter:
- Discard about half of the mixture (around 100 grams).
- Add 100 grams of fresh flour + 100 grams of water.
- Stir thoroughly until smooth.
This process gives your yeast and bacteria fresh food to grow stronger. The discard isn’t wasted—you can use it in recipes like pancakes, muffins, or crackers. By day four, your starter should be rising and falling within 24 hours. If you see bubbles, smell a pleasant sour aroma, and notice slight growth, your starter is on the right track.
Day 5–7 – Growing strength and activity
At this stage, your starter should be lively. You’ll see more bubbles, the mixture will rise and double in size, and it will have a pleasant sour smell. Continue with the daily feedings (discard + fresh flour + water). By day five or six, you should notice that your starter becomes predictable: it rises to its peak a few hours after feeding and then falls back down. This rhythm shows that your yeast colony is strong.
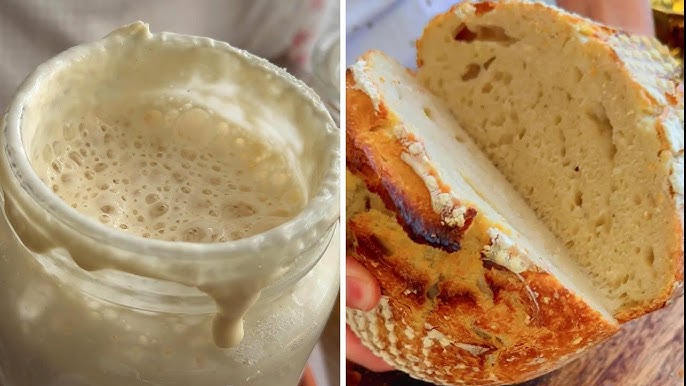
If your starter doubles in size within 4–6 hours after feeding, congratulations—it’s ready to use. Some starters take a full week, others may take up to 10 days depending on temperature and flour. Keep observing, feeding, and being patient. Once it passes the “float test” (a spoonful of starter floats in water), it’s active enough for bread baking.
How to know when your starter is ready
A starter is ready for baking when:
- It doubles in volume within 4–8 hours of feeding.
- It has a pleasant, slightly tangy smell (not unpleasant or moldy).
- It shows lots of bubbles throughout, not just on the surface.
- It passes the float test (a spoonful floats in water).
If your starter doesn’t meet these signs yet, keep feeding daily until it does. Remember, every starter has its own personality—some are fast learners, others take their time.
Common Mistakes and Troubleshooting
Even experienced bakers run into issues with sourdough starters. Let’s look at some common problems and how to fix them.
Why your starter isn’t bubbling
If your starter looks flat and lifeless after several days, it could be due to:
- Low temperature – Yeast is sluggish in cold environments. Try moving your jar to a warmer spot (around 75°F / 24°C).
- Poor water quality – Chlorinated water can kill yeast. Switch to filtered or bottled water.
- Flour choice – Whole wheat or rye flour kickstarts fermentation better than plain white flour.
How to fix a weak starter
A weak starter may rise a little but collapse quickly. To strengthen it:
- Feed it twice a day instead of once.
- Use whole grain flour for a few feedings.
- Make sure you’re discarding enough before each feed (keep the ratio balanced).
Within a few days of consistent care, a weak starter usually bounces back stronger.
Preventing mold and bad smells
Mold is a sign that your starter is contaminated. It often happens if the jar isn’t clean or if the starter sits too long without feeding. If you see fuzzy spots, pink streaks, or smell anything rancid, it’s best to discard and start over. A healthy starter should smell tangy, fruity, or yeasty—never rotten. Cover your jar properly and stick to a regular feeding schedule to avoid this issue.
How to Maintain and Feed Your Sourdough Starter
Once your starter is active, maintaining it is simple, but your feeding schedule depends on how often you plan to bake.
Feeding schedule for daily bakers
If you bake every day or every other day, keep your starter at room temperature. Feed it once or twice a day with equal parts flour and water. A room-temperature starter is always active and ready to use whenever inspiration strikes. Think of it like having a pet—you feed it daily, and it rewards you with great bread.
Feeding schedule for occasional bakers
If you bake once a week or less, store your starter in the fridge. Cold temperatures slow down fermentation, so your starter can rest between feedings. To maintain:
- Store it in the fridge in a loosely covered jar.
- Once a week, take it out, discard half, and feed with fresh flour and water.
- Leave it at room temperature for a few hours before putting it back in the fridge.
When you’re ready to bake, remove it a day in advance and feed it twice at room temperature to wake it up.
How to store in the fridge or freezer
- Fridge storage is best for medium-term use (up to a few weeks).
- Freezer storage is possible for long-term backup. To freeze, feed your starter, let it bubble, then freeze in a sealed container. To revive, thaw at room temperature and resume regular feedings.
A well-maintained starter can last for decades—some bakeries use starters that are over 100 years old!
Using Your Starter in Bread Recipes
Once your sourdough starter is active and bubbly, it’s time for the exciting part—baking bread. But before diving into recipes, it’s important to understand how to use your starter effectively.
How much starter to use in a recipe
Most sourdough bread recipes call for anywhere between 20%–30% of starter relative to the total flour weight. For example, if your recipe has 500 grams of flour, you’ll typically use 100–150 grams of starter. Using more starter speeds up fermentation, resulting in a milder flavor and quicker rise. Using less starter slows things down, leading to deeper flavor development. Finding the right balance depends on your taste preference and baking schedule.
Tips for achieving the perfect rise
- Use your starter at its peak activity – This is usually 4–6 hours after feeding, when it’s doubled in size and full of bubbles.
- Control the temperature – Dough rises faster in warmer conditions. If your kitchen is cold, let the dough rise longer or use a proofing box.
- Be patient – Unlike commercial yeast, sourdough needs more time. A good rise can take 4–12 hours, depending on conditions.
Flavor development and fermentation time
The longer your dough ferments, the stronger the sour flavor becomes. For a mild loaf, keep the fermentation short. For a tangier loaf, extend the bulk rise and use less starter. Remember, sourdough is a dance between time, temperature, and starter activity. With practice, you’ll learn to adjust these variables to get the flavor you love most.
Variations and Creative Uses
Your sourdough starter isn’t limited to bread alone. In fact, once you start experimenting, you’ll find endless ways to use it.
Whole wheat starter
If you prefer hearty, rustic bread, try maintaining a starter with whole wheat flour. Whole wheat encourages a strong rise and imparts a nutty, earthy flavor. It’s also richer in nutrients, giving your bread more character.
Rye starter
Rye flour is naturally high in sugars and nutrients, making it one of the most active flours for sourdough. A rye starter ferments quickly and gives bread a bold, deep flavor. Many bakers prefer rye starters for their reliability and unique taste.
Using starter for pancakes, waffles, and more
One of the best-kept secrets of sourdough baking is the versatility of the starter discard. Instead of throwing it away, you can use it to make:
- Pancakes – Fluffy with a tangy twist.
- Waffles – Crispy on the outside, airy on the inside.
- Pizza dough – Chewy and flavorful crust.
- Crackers – Thin, crispy, and addictive.
- Muffins or quick breads – Moist with a subtle sour edge.
This not only reduces waste but also expands your sourdough adventures beyond bread.
Tips for Success with Sourdough Starter
Sourdough baking is part science, part art. Here are some expert tips to keep your starter thriving:
Temperature control
Your starter loves warmth. The ideal range is 70–78°F (21–26°C). Too cold, and it becomes sluggish; too hot, and it may die. If your home is chilly, place the jar near a warm appliance or wrap it in a towel. Consistent temperature is key for predictable fermentation.
Hydration levels
Most starters are kept at 100% hydration (equal parts flour and water by weight). This makes them easy to maintain and versatile for recipes. However, you can experiment with thicker or thinner starters to see how they affect rise and flavor.
Consistency in feeding
Think of your starter as a living pet—it thrives on routine. Feed it at the same time each day, discard regularly, and watch how it responds. Inconsistent feeding leads to unpredictable results. A happy, consistent starter will reward you with reliable baking outcomes.
FAQs about Sourdough Bread Starter Recipe
How long does it take to make a sourdough starter?
Most starters are ready in 5–7 days, but some may take up to 10 days depending on conditions. Patience is essential.
Can I use tap water?
Yes, if your tap water is not heavily chlorinated. If chlorine is an issue, let the water sit overnight or use filtered water.
What do I do if I forgot to feed my starter?
If it’s been a day or two, just feed it normally. If it’s been weeks and it looks or smells bad, you may need to revive it with multiple feedings—or start fresh.
Can I revive a dead starter?
If your starter has dried out or gone dormant, you can often bring it back by feeding with whole wheat or rye flour twice daily. However, if mold appears, it’s best to start over.
How long can I keep a starter?
Indefinitely! With proper care, a sourdough starter can live for decades. Some are passed down through generations, making them family treasures.
Conclusion
Creating a sourdough starter is more than just mixing flour and water—it’s about nurturing a living culture that becomes the heart of your bread. From the first bubbles on day two to the joy of baking your first loaf, the process is rewarding and surprisingly simple. Once established, your starter will provide endless opportunities to bake delicious bread, pancakes, waffles, and more. With patience, consistency, and a little care, you can keep your starter alive for years, creating loaves filled with flavor, tradition, and love.
So, roll up your sleeves, grab some flour and water, and start your sourdough journey today. Your kitchen will never be the same again!