Sour Dough Bread Recipe: Sourdough bread has been around for centuries, known for its unique tangy flavor, chewy crust, and soft crumb. Unlike commercial bread, it uses a natural fermentation process that enhances both taste and nutrition.
So, why should you make sourdough bread at home? Simple! It’s healthier, free from artificial preservatives, and deeply satisfying to bake. Plus, nothing beats the aroma of freshly baked sourdough filling your kitchen!
If you’re new to sourdough, don’t worry. This guide will take you step by step through the entire process, from making your starter to baking your perfect loaf.
Understanding Sourdough Starter
A sourdough starter is a natural leavening agent made from just flour and water. Over time, wild yeast and beneficial bacteria develop, creating the perfect environment for fermentation.
How to Make a Sourdough Starter from Scratch
- Day 1: Mix ½ cup of whole wheat flour with ¼ cup of filtered water in a jar. Cover loosely and leave at room temperature.
- Day 2-5: Feed your starter daily with equal parts flour and water, discarding half of the mixture before each feeding.
- Day 6-7: Your starter should be bubbly, slightly tangy-smelling, and ready to use!
Feeding and Maintaining Your Starter
- Feed it daily if kept at room temperature or once a week if stored in the fridge.
- Use a 1:1:1 ratio (starter, flour, water) to keep it active.
- A healthy starter will double in size within 4-6 hours of feeding.
Ingredients Needed
Basic Ingredients for Sourdough Bread
- 500g (4 cups) bread flour
- 100g (½ cup) active sourdough starter
- 10g (2 tsp) salt
- 350g (1½ cups) water
Optional Ingredients for Added Flavor
- Seeds (sunflower, sesame, flax)
- Herbs (rosemary, thyme)
- Dried fruits (raisins, cranberries)
Tools Required
Essential Baking Tools
- Mixing bowl
- Kitchen scale (for accuracy)
- Dough scraper
- Dutch oven or baking stone
- Banneton (proofing basket)
Nice-to-Have Tools for Better Results
- Lame (scoring tool)
- Digital thermometer
- Stand mixer (optional)
Step 1: Mixing the Dough
- Combine Flour and Water: In a large bowl, mix 500g bread flour with 350g water until no dry flour remains. Let it sit for 30 minutes.
- Add Starter and Salt: Mix in 100g active starter and 10g salt, kneading gently until well combined.
- Rest: Cover and let it sit for another 30 minutes before proceeding to the next step.
Step 2: Autolyse – Resting the Dough
Autolyse is a simple resting period where the flour fully absorbs the water, allowing gluten to develop naturally. This step improves the dough’s elasticity and texture.
- Let the mixed dough rest for 30-60 minutes before kneading.
- This process makes the dough easier to handle and enhances the final bread structure.
Step 3: Stretch and Fold Technique
Stretch and fold is a gentle kneading method that strengthens the dough without overworking it.
- Grab one side of the dough, stretch it upward, then fold it over itself.
- Rotate the bowl and repeat on all four sides.
- Perform this process 3-4 times, spaced 30 minutes apart.
This technique improves gluten development, leading to a better rise and structure.
Step 4: Bulk Fermentation
Bulk fermentation is the first long rise where the dough ferments and develops flavor.
- Let the dough rise at room temperature for 4-6 hours until it doubles in size.
- Warmer temperatures speed up fermentation, while cooler temperatures slow it down.
- If your kitchen is cold, allow more time for fermentation.
Step 5: Shaping the Dough
After bulk fermentation, the dough needs to be shaped to create surface tension.
- Pre-shape: Lightly shape the dough into a ball and let it rest for 20 minutes.
- Final shaping: Tuck the edges under and create a tight, round shape.
- Place in a banneton (or a bowl with a towel) for the second proofing.
Step 6: Second Rise (Proofing)
Once the dough is shaped, it undergoes a second rise, also known as proofing. This step allows the dough to develop its final structure before baking.
Cold vs. Room Temperature Proofing
- Room temperature proofing: Takes about 2-4 hours. The dough should slightly increase in size but not double.
- Cold proofing (retardation): Placing the dough in the refrigerator for 12-24 hours slows fermentation, enhancing flavor and texture.
How to Know When Proofing is Done
- The poke test: Gently press a finger into the dough. If it springs back slowly, it’s ready to bake.
- Overproofed dough will collapse when poked, while underproofed dough will bounce back too quickly.
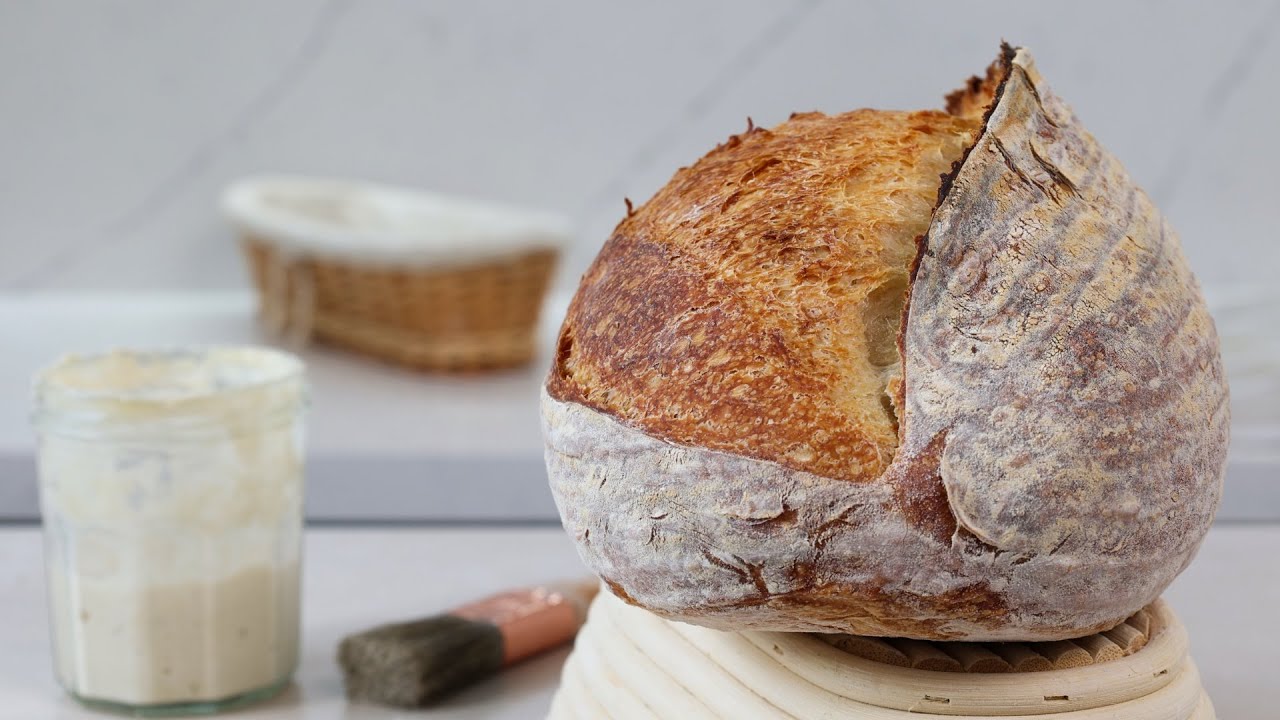
Step 7: Scoring the Dough
Scoring the dough is essential to control how it expands in the oven. Without scoring, the bread might burst unevenly.
Why Scoring is Important
- Helps steam escape for even baking.
- Creates beautiful patterns on the crust.
- Prevents random cracks in the bread.
Different Scoring Patterns
- Basic slash: A single deep cut down the middle.
- Leaf pattern: Several diagonal cuts resembling a leaf.
- Crosshatch: A crisscross pattern for decorative effect.
Use a lame (bread razor) or a sharp knife to make clean cuts.
Step 8: Baking the Bread
Baking in a Dutch Oven vs. Baking Stone
- Dutch oven: Traps steam inside, mimicking professional steam ovens. Ideal for a crispy crust.
- Baking stone: Creates a more even heat but requires adding steam manually (placing a tray of water in the oven).
Baking Temperature and Time
- Preheat oven to 475°F (245°C) for at least 30 minutes before baking.
- Bake with lid on (if using Dutch oven) for 20-25 minutes to trap steam.
- Remove lid and bake for another 15-20 minutes until golden brown.
- Internal temperature should be around 208-212°F (98-100°C) when fully baked.
Step 9: Cooling and Storing the Bread
Why Cooling is Important
- Cutting into hot bread can make the inside gummy.
- Let it cool for at least 1 hour on a wire rack for the best texture.
Best Ways to Store Sourdough Bread
- Room temperature: Store in a paper bag or wrap in a towel for up to 3 days.
- Freezing: Slice and freeze in an airtight bag for up to 3 months.
- Reviving stale bread: Reheat in the oven at 350°F (175°C) for 10 minutes to restore crispiness.
Troubleshooting Common Issues
1. Dense or Gummy Crumb
Possible causes:
- Underproofing
- Too much moisture
- Cutting the bread too soon
Solution:
- Allow a full proofing time.
- Bake longer to remove excess moisture.
2. Lack of Oven Spring
Possible causes:
- Weak gluten structure
- Overproofing
Solution:
- Use strong bread flour.
- Score the dough properly to guide expansion.
3. Overproofing vs. Underproofing
Signs of overproofing: Dough collapses when poked.
Signs of underproofing: Dough is too tight and doesn’t rise well.
Solution: Find the right proofing time by doing the poke test.
FAQs about Sourdough Bread Recipe
1. What is sourdough bread?
Sourdough bread is a naturally leavened bread made using a fermented starter instead of commercial yeast. This process gives it a unique tangy flavor, chewy texture, and crisp crust.
2. How do I make a sourdough starter?
A sourdough starter is made by mixing flour and water and letting it ferment over several days. Natural wild yeast and bacteria develop, creating the fermentation needed to make the bread rise.
3. How long does it take to make sourdough bread?
The entire process can take 24 to 48 hours, depending on fermentation time. While it requires patience, the results are well worth it!
4. What type of flour is best for sourdough bread?
Bread flour or whole wheat flour works best for a strong dough structure. Organic and unbleached flours are recommended for better fermentation.
5. Why is my sourdough bread too dense?
A dense loaf is usually due to under-proofing, weak starter activity, or not enough gluten development. Ensure your starter is bubbly and active before using it.
6. Can I make sourdough bread without a Dutch oven?
Yes! While a Dutch oven helps create a crispy crust, you can also bake sourdough on a baking stone with a pan of water in the oven for added steam.
7. How do I store sourdough bread?
Store it in a paper bag or wrapped in a clean kitchen towel at room temperature. Avoid plastic bags, as they trap moisture and soften the crust. For long-term storage, slice and freeze the bread.
8. Can I use sourdough starter straight from the fridge?
For the best results, feed your starter and let it become active at room temperature before baking.
9. Why is sourdough bread healthier?
Sourdough fermentation breaks down gluten and phytic acid, making the bread easier to digest and improving nutrient absorption.
10. Can I make sourdough bread gluten-free?
Yes! Use a gluten-free starter and flour blend designed for baking bread. The process is similar but may require adjustments to hydration and fermentation times.
Conclusion
Making sourdough bread is an art that takes patience and practice, but the results are well worth it. From creating your own starter to baking a golden, crispy loaf, each step contributes to the delicious final product. With time, you’ll develop a feel for the dough and be able to experiment with different flours, flavors, and scoring designs.
Now that you have a step-by-step guide, it’s time to bake your first sourdough loaf! Happy baking!