S’mores Cookie Recipe: When you think about campfires, cozy nights, and the sweet smell of roasted marshmallows, one treat instantly comes to mind—s’mores. Traditionally, a s’more is made by sandwiching roasted marshmallows and melty chocolate between two graham crackers. It’s gooey, sweet, and comforting, a dessert that brings back childhood memories. But what if you could take that same nostalgic flavor and transform it into a cookie? That’s exactly what s’mores cookies do, and trust me—they’re every bit as magical as they sound.
S’mores cookies combine the best of both worlds: the chewy, rich texture of homemade cookies and the iconic taste of the classic campfire snack. Imagine biting into a warm cookie where pockets of melted chocolate and gooey marshmallows ooze out, while crunchy graham cracker crumbs add just the right amount of texture. It’s indulgent, irresistible, and surprisingly easy to make at home.
Why should you try this recipe? First, it’s perfect for when you crave s’mores but don’t want to light a campfire. Second, these cookies are showstoppers—great for parties, bake sales, or family gatherings. And finally, they’re versatile. You can make them as large bakery-style cookies or smaller bite-sized treats for snacking. Once you try these, you’ll wonder why you didn’t combine cookies and s’mores sooner.
So grab your mixing bowls, roll up your sleeves, and get ready. We’re about to dive into the ultimate step-by-step guide to making the best s’mores cookies you’ll ever taste.
Ingredients You’ll Need
Before you get started, let’s make sure your kitchen is fully stocked. Baking is all about preparation, and the right ingredients can make or break your recipe. S’mores cookies require a balance of classic cookie dough ingredients and the signature trio of chocolate, marshmallows, and graham crackers.
Core Ingredients for the Cookie Dough
Every great cookie begins with a well-made dough. For this recipe, you’ll need:
- Butter (1 cup, softened): Adds richness and helps create a soft, chewy cookie. Always use unsalted butter so you can control the saltiness.
- Brown sugar (1 cup, packed): Gives cookies their chewy texture and deep caramel flavor.
- Granulated sugar (½ cup): Balances the sweetness and helps with browning.
- Eggs (2 large): Essential for structure and binding the dough.
- Vanilla extract (2 teaspoons): Enhances all the flavors and gives a warm undertone.
- All-purpose flour (2 ½ cups): The backbone of the cookies. Too much flour makes cookies dry, too little makes them flat.
- Baking soda (1 teaspoon): Helps the cookies rise and become fluffy.
- Salt (½ teaspoon): Balances the sweetness.
Classic S’mores Add-Ins (Chocolate, Marshmallows, Graham Crackers)
This is where the magic happens:
- Chocolate (1 ½ cups): Semi-sweet chocolate chunks or chips work best. If you want a more authentic s’mores taste, use Hershey’s chocolate bars broken into pieces.
- Mini marshmallows (1 cup): The heart of s’mores. They melt into gooey pockets inside the cookies.
- Graham crackers (1 cup, crushed): Adds crunch and the signature s’mores flavor. Don’t crush them into powder—leave some chunks for texture.
Optional Ingredients for Extra Flavor
Want to level up your cookies? Try adding:
- A pinch of cinnamon for warmth.
- Nutella swirls for extra gooeyness.
- Sea salt flakes on top for a sweet-salty finish.
Tools and Equipment You’ll Need
Don’t overlook the tools—they make baking easier:
- Mixing bowls (one large, one medium).
- Hand mixer or stand mixer.
- Rubber spatula.
- Baking sheets lined with parchment paper.
- Measuring cups and spoons.
- Cooling rack.
Once you have everything ready, it’s time to start baking.
Step-by-Step Guide to Making S’mores Cookies
Now that we’ve got all the ingredients, let’s move on to the fun part—the baking! Follow these steps carefully, and you’ll have bakery-worthy cookies in no time.
Step 1 – Preparing the Cookie Dough
Start with the base. In a large mixing bowl, cream together the softened butter, brown sugar, and granulated sugar until smooth and fluffy. This step is crucial because creaming introduces air into the mixture, making your cookies light and soft. Next, beat in the eggs one at a time, followed by vanilla extract.
In a separate bowl, whisk together the flour, baking soda, and salt. Slowly add this dry mixture into your wet mixture, mixing until just combined. Be careful not to overmix—overworking the dough can lead to tough cookies. At this stage, your dough should be thick and sticky, the perfect foundation for your s’mores magic.
Step 2 – Mixing in the S’mores Ingredients
Here’s where things get exciting. Gently fold in the chocolate chunks, crushed graham crackers, and mini marshmallows. Make sure each scoop of dough has a good mix of all three so every cookie has that perfect balance. If you like big marshmallow gooey spots, reserve a few to press on top later before baking.
The dough will be chunky and loaded with goodies—that’s exactly what you want. Don’t be tempted to add too many marshmallows; they expand a lot during baking and could cause your cookies to spread too much. A balance is key here.
Step 3 – Shaping the Cookies
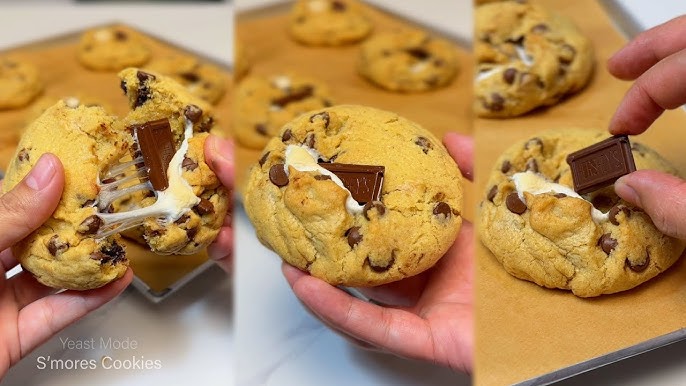
Using a cookie scoop or spoon, portion out the dough into balls about 2 tablespoons each. Place them on a parchment-lined baking sheet, leaving about 2 inches of space between each cookie (they spread a little). For picture-perfect cookies, press a few extra chocolate chunks, graham pieces, and marshmallows on top of each dough ball. This trick makes them look bakery-style once baked.
Step 4 – Baking to Golden Perfection
Now comes the part where your kitchen transforms into a bakery—baking the cookies. Preheat your oven to 350°F (175°C) and let it heat fully before sliding in the tray. An accurate oven temperature is crucial; too hot, and the marshmallows may burn before the dough cooks through, too low, and you’ll end up with undercooked, doughy centers.
Place your tray of cookie dough balls in the oven and bake for 10–12 minutes. Keep an eye on them around the 9-minute mark. You’ll know they’re ready when the edges turn golden brown, but the centers still look a little soft. Remember, cookies continue baking on the tray even after they’re out of the oven, so don’t wait until they look fully set.
If you notice marshmallows oozing too much, don’t panic—that’s part of the charm of s’mores cookies. In fact, those gooey caramelized bits that crisp on the edges are often the best bites. To avoid sticking, make sure you’ve lined your tray with parchment paper or a silicone baking mat.
Step 5 – Cooling and Serving
Once baked, remove the tray from the oven and let the cookies sit for 5 minutes before transferring them to a cooling rack. This resting time helps them firm up so they don’t fall apart when moved. The marshmallows inside will be molten-hot right out of the oven, so a few minutes of patience saves you from sticky fingers—or worse, a burnt tongue.
When the cookies are cool enough, serve them warm with a glass of milk, hot cocoa, or even coffee. The gooey marshmallows and melty chocolate are at their best when the cookies are still a little warm. If you’re planning to serve them later, you can reheat them in the microwave for about 10–15 seconds to restore that freshly baked gooeyness.
These cookies also make an impressive dessert spread. Stack them on a platter, drizzle with melted chocolate, or sprinkle with graham cracker crumbs for presentation. If you’re going for a fun twist, sandwich two cookies with extra marshmallow fluff in the middle—it’s a double s’mores experience!
Pro Tips for Perfect S’mores Cookies
Making cookies may seem straightforward, but s’mores cookies come with their own set of challenges. Follow these expert tips to get bakery-worthy results every time:
How to Keep Marshmallows from Melting Too Much
One of the most common struggles when baking with marshmallows is that they tend to completely dissolve or melt into the dough, leaving sticky gaps. To avoid this:
- Use mini marshmallows rather than large ones.
- Mix most of them into the dough but reserve a few to press on top just before baking. This way, you get visible gooey marshmallows that don’t vanish into the cookie.
- Chill your dough for at least 30 minutes before baking. This keeps the marshmallows from spreading too fast.
Achieving the Perfect Chewy-Crispy Balance
Everyone loves that chewy center with slightly crispy edges. To achieve this:
- Don’t overbake—pull the cookies out when they still look a little underdone in the middle.
- For extra chewiness, add an extra egg yolk to your dough.
- Swap half of the all-purpose flour for bread flour, which has more protein and gives a chewier bite.
Variations of S’mores Cookies
One of the best things about this recipe is how versatile it is. Once you’ve mastered the classic version, try experimenting with these fun variations:
Peanut Butter S’mores Cookies
For peanut butter lovers, this twist is heavenly. Add ½ cup of peanut butter to your cookie dough before mixing in the dry ingredients. The nutty flavor complements the chocolate and marshmallow beautifully. You can also use Reese’s peanut butter cups chopped into chunks instead of regular chocolate for an even richer flavor.
Nutella-Stuffed S’mores Cookies
Want next-level gooeyness? Scoop a tablespoon of cookie dough, flatten it, add a teaspoon of Nutella in the center, then cover with more dough. Seal the edges and bake. The result? A s’mores cookie with a molten Nutella core that oozes with every bite.
Mini S’mores Cookie Bites
Perfect for parties or snacking, these bite-sized cookies are made by using just one tablespoon of dough per cookie. Bake them for about 7–8 minutes, and you’ve got poppable little treats that are ideal for kids (or adults who want just a taste).
Each variation still keeps the essence of s’mores intact—sweet, gooey, chocolatey—but adds a personal twist.
Storing and Freezing Your Cookies
S’mores cookies are so delicious they rarely last long, but if you manage to have leftovers, proper storage is key.
How to Store at Room Temperature
Keep your cookies in an airtight container at room temperature for up to 4–5 days. To prevent them from sticking together (especially with marshmallows inside), place a piece of parchment paper between layers. If you want them to stay extra soft, add a slice of bread inside the container—the cookies will absorb moisture from the bread and stay fresh longer.
Freezing Cookie Dough vs. Baked Cookies
If you love fresh cookies on demand, freezing the dough is a great trick. Simply scoop the dough into balls, place them on a baking sheet, and freeze until solid. Transfer to a freezer bag, and they’ll last up to 3 months. When you’re ready, just bake straight from frozen—add 2–3 extra minutes to the bake time.
You can also freeze baked cookies. Wrap them individually in plastic wrap and store in a freezer-safe container for up to 2 months. Reheat in the microwave or oven for that just-baked taste.
Pairing Ideas with S’mores Cookies
S’mores cookies are already a decadent treat, but pairing them with the right drink or dessert can elevate the experience even more. Imagine enjoying the gooey sweetness alongside a warm beverage or combining them with other desserts for a show-stopping platter.
Drinks That Go Well with S’mores Cookies
- Classic Milk: Nothing beats the timeless combo of cookies and milk. The creaminess balances out the sweetness of chocolate and marshmallows.
- Hot Chocolate: Double the chocolatey goodness by sipping hot cocoa with your s’mores cookies. Add whipped cream or a drizzle of caramel for extra indulgence.
- Coffee or Espresso: The slight bitterness of coffee cuts through the sweetness and makes the cookies feel more grown-up. A latte or cappuccino works especially well.
- Cold Brew or Iced Coffee: If you prefer chilled drinks, cold brew adds a refreshing contrast to the warm, chewy cookies.
- Milkshakes: For kids (and kids at heart), pair cookies with a vanilla or chocolate milkshake. Dip the cookies straight in for fun!
Dessert Combinations to Try
- Ice Cream Sandwiches: Use two s’mores cookies as the base and sandwich a scoop of vanilla or chocolate ice cream in the middle. Roll the edges in graham cracker crumbs for a crunchy finish.
- Brownie & Cookie Platter: Pair your cookies with fudgy brownies for a dessert spread everyone will rave about.
- Cheesecake Topping: Crumble s’mores cookies over a slice of cheesecake for an easy, no-bake topping that adds crunch and gooeyness.
Pairings aren’t just about taste—they create an entire dessert experience. Whether you’re hosting guests or just treating yourself, these combinations take your cookies to the next level.
Common Mistakes to Avoid
Even the best recipes can go wrong if you miss some small details. Here are common pitfalls when making s’mores cookies and how to avoid them:
Overbaking Issues
One of the biggest mistakes is overbaking. Remember, cookies should come out slightly underdone in the center. They’ll firm up as they cool. If you wait until they look fully baked in the oven, they’ll end up hard and dry once cooled. Solution: take them out when the edges are golden but the middle still looks soft.
Ingredient Substitution Mistakes
Not all substitutions work the same in baking. For example:
- Using margarine instead of butter can make your cookies greasy and less flavorful.
- Large marshmallows cut into chunks don’t melt as nicely as mini ones.
- Skipping brown sugar will make cookies less chewy and more crumbly.
If you need substitutions, research carefully or stick to tried-and-true swaps like gluten-free flour blends or dairy-free chocolate chips for dietary needs.
Crowding the Baking Sheet
Another mistake is placing cookie dough balls too close together. These cookies spread while baking, especially with all the marshmallows and chocolate inside. If they’re too close, they’ll melt into one giant cookie. (Although let’s be honest—sometimes that’s not a bad thing!)
By avoiding these pitfalls, you’ll get consistently perfect cookies every time.
Nutritional Breakdown
While s’mores cookies aren’t exactly diet food, it’s still useful to know what you’re indulging in. Here’s a rough estimate for one average-sized cookie (made with the recipe above, yielding about 24 cookies):
Calories Per Serving
- Calories: 220–250
- Total Fat: 10–12g
- Saturated Fat: 6g
- Carbohydrates: 32g
- Sugar: 20g
- Protein: 2–3g
Healthier Ingredient Swaps
If you want to lighten things up without sacrificing too much flavor, try these swaps:
- Use whole wheat flour for part of the all-purpose flour to add fiber.
- Replace some butter with unsweetened applesauce for fewer calories.
- Choose dark chocolate instead of milk chocolate for less sugar and added antioxidants.
- Use sugar-free marshmallows or reduce the sugar in the dough slightly.
Of course, s’mores cookies are meant to be a treat—so enjoy them guilt-free once in a while!
FAQs about S’mores Cookie Recipe
1. Can I make s’mores cookies without marshmallows?
Yes, but they won’t have the same gooey texture. You can replace them with marshmallow fluff swirls in the dough for a similar effect.
2. Can I use store-bought cookie dough for this recipe?
Absolutely! Take plain cookie dough, mix in chocolate chunks, marshmallows, and graham crackers, and bake as directed.
3. How do I prevent marshmallows from sticking to the pan?
Always line your baking sheet with parchment paper or use a silicone baking mat. It saves you from a sticky mess.
4. What type of chocolate works best for s’mores cookies?
Semi-sweet chocolate chunks or Hershey’s bars are classic choices. Dark chocolate is also a great option for a less-sweet version.
5. Can these cookies be made gluten-free?
Yes! Use a gluten-free flour blend and gluten-free graham crackers. Everything else stays the same.
Conclusion
S’mores cookies are the ultimate comfort dessert, blending everything we love about the classic campfire treat with the irresistible charm of homemade cookies. They’re chewy, gooey, chocolatey, and crunchy all at once—a true flavor explosion in every bite.
What makes this recipe special is its simplicity. With basic pantry ingredients and a few extra touches, you can create cookies that look bakery-worthy and taste unforgettable. From the step-by-step baking process to clever tips and delicious variations, you now have all the tools you need to whip up a batch that will wow family, friends, or even just yourself on a cozy night in.
So, grab your apron, preheat your oven, and get baking—because life’s too short not to enjoy cookies that taste like a campfire in every bite.