Smoked Brisket Recipe: Smoking brisket isn’t just cooking. It’s patience, precision, and passion all rolled into one cut of beef. It’s about low and slow heat transforming a tough piece of meat into something buttery, tender, and unforgettable. Think of it like turning coal into a diamond—it takes time, but the payoff is worth every minute.
In this complete step-by-step guide, you’ll learn everything you need to master smoked brisket like a professional pitmaster. From choosing the right cut of meat to managing your smoker temperature, from seasoning techniques to slicing like a pro—nothing is left out. Whether you’re using a pellet smoker, charcoal grill, or offset smoker, the principles remain the same.
This guide is written in a clear, conversational way so you can follow along easily—even if it’s your first time smoking brisket. By the end, you’ll feel confident enough to host your own backyard BBQ and impress everyone at the table.
Let’s fire up the smoker and get started.
Why Smoked Brisket Is the King of BBQ
Ask any true barbecue enthusiast what the crown jewel of BBQ is, and the answer will almost always be brisket. Ribs are great. Pulled pork is delicious. But brisket? Brisket is royalty.
Why? Because brisket demands respect.
Unlike tender cuts like ribeye or filet mignon, brisket comes from the cow’s lower chest—a hardworking muscle packed with connective tissue. That means you can’t just throw it on a grill and hope for the best. Cook it wrong, and it’s tough and chewy. Cook it right, and it melts in your mouth like savory butter.
That transformation is what makes brisket special.
When smoked low and slow, the collagen breaks down into gelatin, giving the meat that rich, silky texture. The exterior forms a flavorful crust called “bark,” while the inside stays moist and tender. Add the smoky aroma from hardwood like oak or hickory, and you’ve got layers of flavor that simply can’t be rushed.
Brisket also carries cultural significance. In Texas BBQ culture, brisket isn’t just food—it’s tradition. It’s gatherings, family, and weekend cookouts. It’s waking up before sunrise to light the smoker. It’s stories shared over sliced meat and cold drinks.
And here’s the truth: mastering brisket feels like earning a badge of honor. It separates casual grillers from serious pitmasters. But don’t worry—you don’t need decades of experience. You just need the right guidance.
And that’s exactly what you’re getting here.
Choosing the Perfect Brisket
Before you even think about seasoning or smoking, you need to choose the right brisket. This step can make or break your entire cook. A great brisket starts at the butcher counter.
Not all briskets are created equal. Some are leaner, some are fattier, and some have better marbling. Understanding what to look for gives you a serious advantage.
When shopping, aim for a whole “packer brisket.” This includes both the flat and the point muscles. It may look intimidating—it’s a large cut, often weighing 10–18 pounds—but it gives you the best flavor and texture balance.
Look for:
- Even thickness across the flat
- Good white marbling throughout the meat
- Flexible meat (pick it up—if it bends easily, that’s a good sign)
- Creamy white fat, not yellow
Avoid briskets that feel stiff or have very thin edges on the flat. Thin areas can dry out quickly during smoking.
Also, pay attention to weight. Larger briskets often cook more evenly because they retain moisture better. If you’re cooking for a crowd, plan for about ½ pound per person after trimming and shrinkage.
Choosing brisket is like choosing a good watermelon—you want quality from the start. Take your time. Inspect it carefully. This is the foundation of everything that follows.
Understanding Brisket Cuts: Flat vs. Point
A whole brisket has two main muscles: the flat and the point. Knowing the difference helps you cook and slice properly.
The flat, also called the “first cut,” is leaner and more uniform in shape. It slices beautifully and is often used for presentation. If you’ve seen neat brisket slices fanned out on a cutting board, that’s usually the flat.
The point, sometimes called the “deckle,” sits on top of the flat. It’s thicker, fattier, and more marbled. This is where you get those juicy, flavorful burnt ends everyone raves about.
Think of the flat as the elegant side of brisket and the point as the bold, flavorful cousin. Together, they create balance.
When smoking a whole packer brisket, both muscles cook at the same time. But because they have different fat contents, they behave slightly differently. The point can handle more heat and time, while the flat requires careful attention to avoid drying out.
Understanding these two cuts sets you up for slicing success later.
Prime, Choice, or Select: Which Grade Is Best?
Beef grading matters more than many people realize.
- Prime: Highest marbling, most tender, most expensive
- Choice: Great balance of quality and affordability
- Select: Leaner, less marbling, more challenging to keep moist
If your budget allows, Prime brisket delivers incredible results thanks to its rich marbling. That fat melts during cooking and keeps the meat juicy.
Choice brisket is a fantastic middle ground and widely available. Many competition BBQ teams use Choice with amazing results.
Select can still work, but it requires extra attention. You may need to inject or wrap earlier to retain moisture.
If brisket is the king of BBQ, marbling is the crown. The more internal fat, the better your chances of juicy success.
Essential Ingredients You’ll Need
You don’t need a long grocery list for authentic smoked brisket. In fact, simplicity is part of its charm.
Here’s what you’ll need:
- 1 whole packer brisket (10–15 pounds)
- Kosher salt
- Coarse black pepper
- Garlic powder (optional)
- Paprika (optional)
- Mustard or olive oil (binder)
- Wood chunks or pellets (oak, hickory, or mesquite)
That’s it.
Traditional Texas-style brisket uses just salt and pepper—often called a 50/50 blend. Simple. Classic. Powerful. The smoke and meat do most of the talking.
Some pitmasters add garlic powder or paprika for depth and color. A thin layer of mustard or olive oil helps the seasoning stick but won’t affect flavor after cooking.
When it comes to wood, oak is balanced and versatile. Hickory is stronger and slightly sweet. Mesquite is bold and intense—use it carefully.
Remember: brisket isn’t about overpowering flavors. It’s about enhancing the natural richness of beef with smoke and seasoning.
Recommended Tools and Equipment
You don’t need a professional competition rig, but having the right tools makes the process smoother and more enjoyable.
At minimum, you’ll need:
- A smoker (pellet, charcoal, offset, or electric)
- Meat thermometer (instant-read and probe)
- Sharp slicing knife
- Butcher paper or aluminum foil
- Large cutting board
- Heat-resistant gloves
A reliable thermometer is non-negotiable. Guessing temperature is like driving without a speedometer—it rarely ends well.
Types of Smokers
Different smokers offer different experiences:
- Pellet Smokers: Easy to use, consistent temperature, great for beginners
- Offset Smokers: Traditional, strong smoke flavor, requires skill
- Charcoal Smokers: Affordable and flavorful
- Electric Smokers: Convenient but milder smoke profile
Choose one that fits your comfort level and lifestyle.
Must-Have BBQ Accessories
Small tools make a big difference:
- Spray bottle (for apple cider vinegar or water spritzing)
- Chimney starter (for charcoal)
- Cooler (for resting brisket)
- Disposable gloves
Think of these as your pitmaster toolkit.
How to Trim a Brisket Properly
Trimming brisket might feel intimidating, but it’s essential. Proper trimming ensures even cooking and better bark formation.
Start by placing the brisket fat-side up on a large cutting board. You’ll notice a thick fat cap on top. Trim this down to about ¼ inch thick. Too much fat prevents seasoning from penetrating and blocks smoke absorption.
Next, remove any hard, waxy fat between the point and flat. This fat won’t render properly, so it’s better to trim it away.
Square the edges slightly to prevent thin parts from burning. Don’t go overboard—just clean it up.
Trimming is like sculpting. You’re shaping the brisket for optimal cooking performance. Take your time. Use a sharp knife. And remember: you can always trim more, but you can’t put it back.
Proper trimming sets the stage for even cooking, better bark, and more beautiful slices.
Preparing the Perfect Brisket Rub
Now that your brisket is trimmed and ready, it’s time to build flavor. And here’s where many people overcomplicate things. The truth? Brisket doesn’t need a complicated spice cabinet explosion. It needs balance.
At its core, a classic smoked brisket rub is beautifully simple:
- ½ cup kosher salt
- ½ cup coarse black pepper
- 1 tablespoon garlic powder (optional)
- 1 tablespoon paprika (optional for color)
That’s it.
The salt penetrates deep into the meat, enhancing natural beef flavor. The coarse black pepper forms part of that iconic crust—known as “bark.” Garlic powder adds subtle depth, while paprika boosts color without overpowering.
Why coarse pepper? Because fine pepper can burn and turn bitter during a long smoke. Coarse grains hold up better and create texture in the bark.
Mix everything thoroughly in a bowl. Keep it dry—no need to add liquid directly to the rub.
Now here’s a key point: brisket can handle seasoning. It’s a big, thick cut of meat. Don’t be shy. A light dusting won’t cut it. You want an even, generous coat across the entire surface.
Think of the rub as armor. It protects, flavors, and transforms during the smoking process. As the brisket cooks, the rub interacts with smoke and rendered fat to create that dark, flavorful crust everyone loves.
Simple ingredients. Powerful results.
How to Season Brisket for Maximum Flavor
Before applying the rub, you need a binder. A binder helps the seasoning stick evenly and creates a uniform coating.
Common binders include:
- Yellow mustard
- Olive oil
- Worcestershire sauce
Don’t worry—you won’t taste the mustard after cooking. It simply disappears into the meat.
Spread a thin layer across the entire brisket—top, bottom, and sides. You don’t need to drench it. Just enough to create a tacky surface.
Next, apply your rub evenly. Sprinkle from above rather than rubbing it in aggressively. Let it fall naturally and coat every inch. Gently pat it into place without pressing too hard.
Make sure you season the sides thoroughly. Those edges matter.
Once seasoned, you have two options:
- Smoke immediately.
- Let it rest in the refrigerator for 2–12 hours.
Letting it rest allows the salt to start penetrating the meat, enhancing flavor from within. If you refrigerate it, keep it uncovered to help form a dry surface—this promotes better bark development.
Seasoning brisket isn’t complicated. But it’s deliberate. Every inch matters. This is where flavor begins.
Setting Up Your Smoker the Right Way
A well-prepared smoker is just as important as a well-seasoned brisket. Temperature control is everything in low-and-slow barbecue.
Preheat your smoker to 225°F–250°F (107°C–121°C). This is the sweet spot. Low enough to break down connective tissue slowly, but hot enough to keep the cooking process moving.
Clean grates before placing the brisket inside. Residue from previous cooks can affect flavor.
Fill your water pan (if your smoker has one). This helps stabilize temperature and adds moisture to the cooking chamber.
Make sure your vents are adjusted properly:
- More airflow = hotter fire
- Less airflow = cooler fire
If you’re using charcoal, light it with a chimney starter for even ignition. For pellet smokers, simply set your desired temperature and allow it to preheat fully before adding meat.
Consistency is the goal. Wild temperature swings create uneven cooking. Think of your smoker like an oven that needs steady attention.
A stable smoker equals predictable results.
Choosing the Best Wood for Smoking
Wood choice shapes flavor more than most people realize.
Here are the best options for brisket:
- Oak – Balanced, classic Texas flavor
- Hickory – Stronger, slightly sweet and bold
- Mesquite – Intense, earthy, use in moderation
- Post Oak – Traditional Texas BBQ favorite
Oak is often considered the gold standard. It gives a rich smoke flavor without overpowering the beef.
Avoid softwoods like pine—they produce unpleasant flavors.
Use clean-burning wood. Thin, blue smoke is ideal. Thick white smoke can turn bitter.
Smoke should kiss the meat, not choke it.
Managing Temperature Like a Pro
Temperature management separates beginners from seasoned pitmasters.
Place a probe thermometer in the thickest part of the flat. Avoid touching fat pockets.
Expect the internal temperature to rise steadily until it hits around 150–165°F. Then something curious happens—it slows down. This is called “the stall.”
Don’t panic. It’s normal.
The stall occurs because moisture evaporating from the surface cools the meat, similar to sweating. Stay patient. Maintain steady smoker temperature and trust the process.
Opening the lid too often drops heat and extends cooking time. If you’re looking, you’re not cooking.
Steady heat. Minimal peeking. Maximum patience.
Step-by-Step Guide to Smoking Brisket
Let’s put it all together.
Step 1: Preheat Smoker
Bring your smoker to 225°F–250°F.
Step 2: Place the Brisket
Put the brisket fat-side down (common for pellet smokers) or fat-side up (common for offset smokers). Position depends on heat source location.
Step 3: Smoke Uncovered
Let the brisket cook undisturbed for 3–5 hours. During this phase, bark begins forming.
Step 4: Monitor Internal Temperature
Watch for 150–165°F. This is where the stall typically begins.
Step 5: Wrap (Optional)
Wrap in butcher paper or foil once bark is set and internal temperature hits around 165°F.
Step 6: Continue Cooking
Return wrapped brisket to smoker until internal temperature reaches 195–205°F.
Step 7: Probe for Tenderness
Insert a thermometer probe. It should slide in like butter. That’s your real indicator—not just temperature.
Total cook time usually runs 1 to 1.5 hours per pound, but always cook to tenderness, not the clock.
Low and slow wins the race.
Understanding the Stall and How to Beat It
The stall frustrates many first-timers. The temperature plateaus. Hours pass. You start doubting everything.
Relax.
The stall happens because evaporating moisture cools the brisket surface. It’s physics, not failure.
You have two choices:
- Wait it out (traditional method)
- Wrap to power through (Texas Crutch)
Waiting produces thicker bark. Wrapping speeds up cooking and preserves moisture.
Neither method is wrong. It depends on your goal and timeline.
Patience is your secret weapon here.
Wrapping Brisket: Texas Crutch vs. No Wrap
Wrapping brisket changes the outcome slightly.
Butcher Paper
- Breathable
- Preserves bark texture
- Traditional choice
Aluminum Foil
- Speeds cooking
- Traps moisture
- Softer bark
If you want firm bark, choose butcher paper. If you’re short on time, foil helps push through the stall faster.
Wrap tightly to prevent steam pockets.
Wrapping isn’t mandatory—but it’s helpful.
How to Know When Brisket Is Done
Forget exact numbers for a moment.
Yes, brisket usually finishes around 195–205°F internal temperature, but tenderness matters more.
Insert your thermometer probe into the thickest part of the flat. If it slides in effortlessly—like warm butter—the brisket is ready.
If there’s resistance, keep cooking.
Each brisket is different. Fat content, thickness, and smoker conditions all affect timing.
Temperature guides you. Tenderness decides.
Resting the Brisket: The Secret to Juicy Slices
Resting isn’t optional—it’s critical.
Once the brisket reaches perfect tenderness, remove it from the smoker but keep it wrapped.
Let it rest for at least 1–2 hours in a cooler or warm oven (around 150°F).
Why rest?
During cooking, juices move toward the surface. Resting allows them to redistribute throughout the meat.
Slice too early, and juices spill everywhere. Wait patiently, and they stay inside.
Resting is like letting a story sink in before telling it. It completes the process.
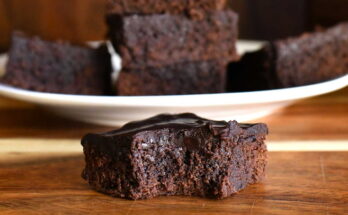
How to Slice Brisket Correctly
Slicing incorrectly can ruin hours of work.
Always slice against the grain.
The flat and point have different grain directions, so you’ll need to adjust when transitioning between muscles.
Use a long, sharp slicing knife. Cut pencil-thick slices—about ¼ inch thick.
Proper slices should:
- Hold together
- Bend without breaking
- Pull apart easily
Slicing is the final presentation. Take your time.
Common Mistakes to Avoid When Smoking Brisket
- Cooking too hot
- Skipping trimming
- Under-seasoning
- Constantly opening the lid
- Not resting long enough
- Slicing with the grain
Avoid these, and you’re ahead of most beginners.
Serving Suggestions and Side Dishes
Brisket shines brightest with classic BBQ sides:
- Coleslaw
- Baked beans
- Potato salad
- Cornbread
- Pickles and onions
Simple sides balance rich meat.
Storing and Reheating Smoked Brisket
Store leftovers in airtight containers for up to 4 days.
For longer storage, vacuum seal and freeze.
Reheat gently at low temperature (250°F) with a splash of beef broth to retain moisture.
Avoid microwaving—it dries out the meat.
FAQs about Smoked Brisket Recipe
1. How long does it take to smoke a brisket?
Typically 1 to 1.5 hours per pound at 225°F–250°F, but always cook to tenderness, not time.
2. Should I smoke brisket fat side up or down?
It depends on your smoker’s heat source. Fat side down protects from bottom heat; fat side up works well in offset smokers.
3. What is the best wood for brisket?
Oak is the most traditional and balanced choice.
4. Can I smoke brisket the day before serving?
Yes. Reheat gently while wrapped to maintain moisture.
5. Why is my brisket dry?
Common causes include undercooking, overcooking, not resting, or using low-grade beef with minimal marbling.
Conclusion
Smoking brisket is a journey. It requires patience, attention, and respect for the process. But when you slice into that perfectly smoked brisket—dark bark on the outside, juicy and tender inside—you realize it was worth every hour.
Master the basics. Trust the temperature. Rest properly. Slice correctly.
Do that, and you won’t just cook brisket—you’ll create barbecue worth remembering.