Smoked Beef Brisket Recipe: Brisket isn’t just a cut of meat—it’s a rite of passage for BBQ enthusiasts. Known for its rich flavor, challenging cook, and tender payoff, it’s the crown jewel of Texas barbecue. You can smoke a pork shoulder, grill a ribeye, or roast a chicken, but a perfectly smoked brisket? That’s how legends are born. It’s a cut that demands respect, patience, and passion. But once you nail it, you’ll become the star of every backyard BBQ.
The Magic of Low and Slow Cooking
Brisket comes from the breast section of the cow, meaning it’s packed with connective tissue. That’s why low and slow cooking is the name of the game. This technique slowly melts the fat and breaks down collagen, resulting in juicy, flavorful meat with that signature bark on the outside. It’s not a quick fix—it’s an art. You’ll need a smoker, some wood, a few key tools, and the willingness to babysit your brisket over the long haul. But trust us: the end result is worth every minute.
Choosing the Right Brisket
Understanding Brisket Grades
To get that tender, mouthwatering texture, you need a quality piece of meat. Briskets are graded by the USDA based on marbling, with “Prime” offering the most fat (and flavor), followed by “Choice” and then “Select.” For backyard smoking, aim for at least a Choice grade brisket. Prime is better, especially if you’re cooking for guests or special occasions, as the extra marbling helps keep the meat juicy during long cooking sessions.
Flat vs. Point – Know Your Cuts
A whole brisket, often called a “packer,” consists of two parts: the flat and the point. The flat is leaner and slices up nicely, making it great for presentation. The point is fattier and more flavorful, ideal for chopped brisket or burnt ends. Some people smoke just the flat, but if you’re going all in, get the full packer brisket. It’ll give you the best of both worlds—tender slices and juicy, fall-apart bites.
Essential Tools and Equipment
Smokers – Which One to Use
Whether you have a pellet smoker, offset smoker, Kamado grill, or electric smoker, the key is consistent temperature control. Pellet smokers are user-friendly and great for beginners. Offset smokers give you that authentic flavor and experience but require more babysitting. Choose what works best for your lifestyle and level of commitment—because once you go brisket, there’s no going back.
Must-Have Accessories
Here’s your brisket toolbox:
- Meat thermometer: For internal temp checks
- Probe thermometer: For constant monitoring
- Spray bottle: For spritzing during the cook
- Butcher paper or foil: For wrapping during the stall
- Sharp carving knife: For smooth slicing
Having these on hand can mean the difference between a decent brisket and a backyard masterpiece.
Ingredients You’ll Need
Simple and Flavorful Rub
You don’t need a long list of ingredients to make brisket shine. In fact, most pitmasters swear by the classic combo:
- ¼ cup kosher salt
- ¼ cup coarse black pepper
- 1 tbsp paprika (for color)
- Optional: garlic powder, onion powder, cayenne
This simple rub lets the beef flavor stand out and forms that coveted bark. Don’t overthink it—simplicity is your best friend here.
Optional Marinades or Injections
While not essential, some pitmasters like to inject their brisket with beef broth, Worcestershire sauce, or a mix of apple juice and vinegar to add moisture. If you do inject, go light—too much liquid can mess with your bark formation. Marinades can also be used overnight, especially if you want extra layers of flavor. Just remember, the star of the show is the brisket itself.
Preparing the Brisket
Trimming the Fat
Before you even fire up the smoker, you’ve got some trimming to do. Most briskets come with a thick fat cap, and while fat equals flavor, too much will block your rub from penetrating. Aim to leave about ¼ inch of fat on top. Also, trim off any hard fat or silver skin that won’t render down during cooking. Clean edges help the brisket cook evenly and look more appealing when sliced.
Applying the Rub
Once trimmed, pat your brisket dry with paper towels. Apply a binder if you want—yellow mustard or olive oil works well. Then generously apply your rub, making sure to coat all sides evenly. Don’t be shy—this is where your bark comes from. Once seasoned, let it sit at room temperature for 30–60 minutes while you prep your smoker.
Prepping the Smoker
Choosing the Right Wood
The wood you use for smoking brisket plays a massive role in the flavor profile. For a traditional Texas-style brisket, stick with oak—it’s strong enough to stand up to the rich meat but not overpowering. Hickory is also a favorite, offering a slightly stronger smoke flavor. Want something a little sweeter? Try pecan or mix in some fruit woods like apple or cherry for a milder, nuanced flavor. Whatever you choose, make sure it’s seasoned and free of sap or chemicals. Clean wood = clean smoke.
Setting Up the Temperature
Now, for the magic number—225°F to 250°F. This is the sweet spot for low and slow smoking. Preheat your smoker and make sure it holds steady at this range before placing your brisket inside. Use a reliable thermometer (built-in dials are often inaccurate) and aim for indirect heat. Place a water pan inside the smoker to help maintain humidity and keep the meat moist throughout the cook.
Smoking Process – The Low and Slow Method
Placing the Brisket
Fat side up or fat side down? This question sparks a lot of debate. Here’s the deal: if your heat source is coming from below, place the fat side down to shield the meat. If the heat is coming from the top or it’s a pellet smoker, fat side up can help self-baste the meat. Either way, place the brisket on the grate with the thicker end (the point) closer to the heat source. This ensures even cooking since the point can handle more heat than the leaner flat.
Monitoring Temps and Times
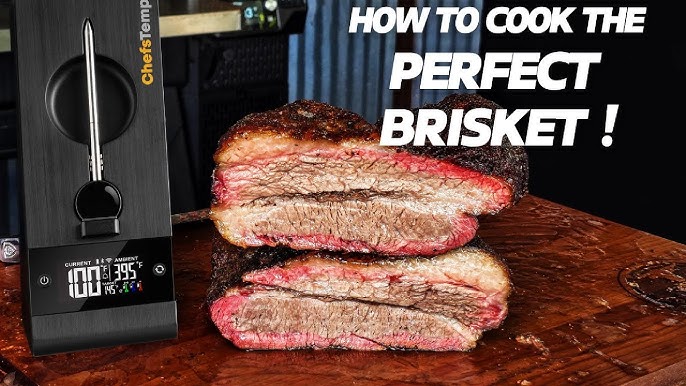
Smoking a brisket isn’t about the clock—it’s about internal temperature. A rough guide is 1 to 1.5 hours per pound, but always go by temp, not time. Use a probe thermometer and aim for an internal temperature of 165°F before wrapping. After wrapping, continue smoking until the brisket hits 200–205°F. That’s the range where connective tissues break down and the meat becomes tender.
Keep an eye on the smoker temp, adding wood or adjusting airflow as needed. Every smoker behaves differently, so this part requires some hands-on monitoring. Use a spray bottle to spritz your brisket every hour or so with apple cider vinegar, beef broth, or water to help form a gorgeous, flavorful bark.
The Stall – What It Is and How to Handle It
What Causes the Stall
Ah, the dreaded stall. Around 150°F to 170°F, your brisket may stop climbing in temp—or even drop. This is totally normal and is caused by evaporation from the surface of the meat cooling it down, just like sweating. The stall can last hours, and this is where many first-timers panic. Don’t worry—you’ve got options.
Wrapping Techniques (Texas Crutch)
To beat the stall, many pitmasters use the Texas Crutch—wrapping the brisket in butcher paper or aluminum foil. This locks in moisture and speeds up the cook by pushing the meat through the stall. Butcher paper is preferred by purists because it breathes, allowing some smoke to still reach the meat and keeping the bark from going soggy. Foil works too, and it’s great for speeding things up if you’re short on time. Once wrapped, put the brisket back on the smoker and continue cooking until it hits that magic 200–205°F internal temp.
Finishing the Brisket
Knowing When It’s Done
Temperature is one indicator, but feel is just as important. When your brisket hits 200–205°F, it should feel like poking a stick of warm butter with your thermometer probe. No resistance means it’s ready. If it still feels tough, give it a bit longer. Some briskets need a few extra degrees. Don’t rush—this is the final step before the rest, and patience pays off.
Resting the Meat
Once done, remove your brisket and let it rest. This is non-negotiable. Wrap it in a towel and place it in a cooler (without ice) for at least 1 hour, preferably 2 to 4 hours. This resting period allows the juices to redistribute and ensures a juicy slice every time. Cutting into a brisket too soon will let all those delicious juices escape, leaving you with a dry, disappointing result.
Slicing and Serving
Cutting Against the Grain
When it comes to slicing brisket, technique matters just as much as cooking. Always slice against the grain—this shortens the muscle fibers and results in more tender bites. The flat and point have different grain directions, so you’ll need to adjust as you cut through the brisket. A long, sharp slicing knife (or brisket knife) is essential for clean, smooth cuts. Start with the flat for uniform slices, then switch to the point for juicier, chunkier portions. If you wrapped your brisket in butcher paper or foil, make sure to let any juices from the wrap drizzle back over the slices for added flavor.
What to Serve With Brisket
Brisket is rich and hearty, so you’ll want sides that complement without overpowering. Classic BBQ sides include:
- Macaroni and cheese
- Baked beans
- Coleslaw
- Potato salad
- Cornbread
- Pickles and onions
Want to impress your guests? Add some homemade BBQ sauce on the side. Whether it’s tangy vinegar-based, tomato-sweet, or spicy mustard-style, a good sauce can elevate each bite—but a perfectly smoked brisket should stand tall even without it.
Common Mistakes to Avoid
Rushing the Cook
This isn’t a weeknight dinner. Brisket is a time investment, and trying to speed things up is a surefire way to end up with tough, dry meat. Don’t crank up the heat to get it done faster. Stick with low and slow, and plan ahead. Some briskets can take 12 to 16 hours or more depending on size. Use that time wisely—prep sides, clean the backyard, or just enjoy a cold drink while babysitting the smoker.
Over or Under Seasoning
Too much seasoning can overwhelm the natural beefy flavor; too little and the bark will be bland. Stick to the basics—salt, pepper, maybe a dash of garlic or paprika—and apply evenly. The key is balance. Remember, a good bark comes from proper seasoning and smoke, not just spice rubs.
Tips and Tricks from Pitmasters
Want to elevate your brisket game? Here are a few nuggets from the pros:
- Let the brisket come to room temp before smoking – it helps with even cooking.
- Use a binder like yellow mustard to help the rub stick and build bark.
- Monitor internal and ambient temps constantly – don’t rely on your smoker’s dial.
- Rest your brisket for several hours – it only gets better.
- Don’t cut until you’re ready to serve – sliced brisket dries out fast.
- Save the juices from the wrap and drizzle them back over the slices for extra flavor.
Practice makes perfect. No two briskets cook exactly the same, so keep notes and tweak your process each time.
Storage and Reheating Leftovers
Keeping It Moist
Got leftovers? Lucky you. Store brisket in an airtight container or vacuum-sealed bag with a bit of reserved juice or broth to keep it moist. You can also wrap slices in foil and refrigerate for up to 5 days. For longer storage, freeze brisket in sealed bags—it keeps well for up to 3 months.
Best Reheating Methods
To reheat without drying it out:
- Oven method: Wrap in foil and warm at 250°F until heated through.
- Sous-vide style: Place vacuum-sealed brisket in hot water (~160°F) for 1-2 hours.
- Steam it: Great for chopped brisket or sandwiches.
Microwaves are a last resort. If you use one, add moisture and cover tightly to prevent drying.
FAQs about Smoked Beef Brisket Recipe
1. How long does it take to smoke a brisket?
Depending on the size, expect 1 to 1.5 hours per pound at 225–250°F. A 12-pound brisket can take 12–16 hours.
2. What temperature should brisket be when it’s done?
200–205°F internal temp is ideal for a tender, juicy brisket.
3. Can I smoke a brisket in advance?
Yes. Smoke it a day ahead, let it rest, and reheat in the oven or sous-vide before serving.
4. What’s the best wood for smoking brisket?
Oak, hickory, or a mix of fruitwoods like apple or cherry are top choices.
5. Should I wrap brisket during smoking?
Yes, especially when it hits the stall (around 165°F). Use butcher paper or foil to speed up the cook and retain moisture.
Conclusion
Smoking beef brisket isn’t just about cooking—it’s about mastering a tradition. It takes patience, attention, and a little bit of heart. From selecting the right cut to resting and slicing, every step matters. When done right, smoked brisket delivers an unforgettable eating experience—tender, juicy, smoky, and full of flavor. Whether you’re feeding your family or hosting a backyard BBQ, this step-by-step guide sets you up for brisket greatness. Fire up that smoker, pour yourself a drink, and embrace the brisket journey—you’ve got this.