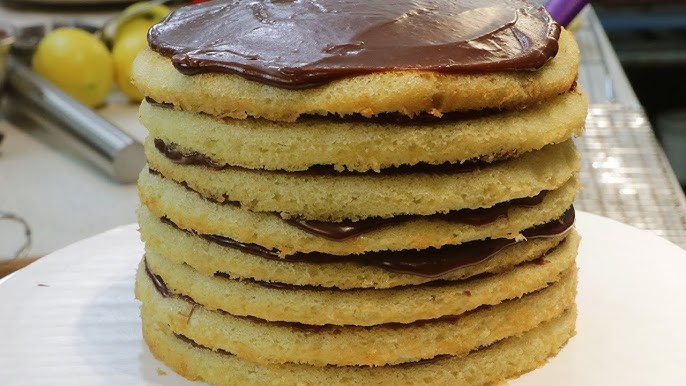
Smith Island Cake Recipe: Ever heard of a cake that’s as legendary as it is delicious? Let me introduce you to the iconic Smith Island Cake—a dessert so cherished, it’s been declared the official state dessert of Maryland. This impressive cake isn’t just about looks; it’s about layers—literally. With 8 to 12 super-thin, moist cake layers stacked with rich fudge frosting in between, it’s a treat that turns heads and wins hearts.
But where did it come from? Smith Island is a small, remote island in the Chesapeake Bay, and this cake has been a staple of their community events for generations. The women of the island made it for church socials and holidays, carefully layering the thin cakes and spreading fudge that would hold up during long boat rides.
Today, we’re bringing this tradition right into your kitchen. Whether you’re a seasoned baker or just love a good baking challenge, this step-by-step Smith Island Cake recipe is going to walk you through everything—from gathering your ingredients to slicing into that perfect, fudge-filled layer cake.
So roll up your sleeves, preheat the oven, and let’s bake one of America’s most unique and beloved desserts.
Ingredients You’ll Need
Before we jump into the process, let’s make sure your kitchen is stocked with everything required to make this magical, multi-layered cake. Don’t worry, the ingredient list may look long, but most items are common baking staples.
Basic Ingredients for Cake Layers
- 2 cups granulated sugar
- 1 stick (1/2 cup) unsalted butter, softened
- 1/2 cup vegetable oil
- 5 large eggs
- 1 cup evaporated milk
- 2 teaspoons vanilla extract
- 2 1/2 cups all-purpose flour
- 1/2 teaspoon salt
- 2 1/2 teaspoons baking powder
- 1/4 teaspoon baking soda
- 1 cup warm water
These ingredients will give you that signature soft, tender crumb in each thin layer.
Ingredients for Traditional Fudge Frosting
- 2 cups granulated sugar
- 1 cup evaporated milk
- 5 ounces unsweetened chocolate (or 100% cocoa baking bars), chopped
- 1 stick (1/2 cup) unsalted butter
- 1 teaspoon vanilla extract
This is the deep, glossy fudge frosting that makes Smith Island Cake unforgettable. It sets up nicely between layers without being too stiff or too runny.
Optional Add-ins and Flavor Variations
- Instant espresso powder (for a mocha twist)
- Coconut flakes (for tropical layers)
- Peanut butter chips or fruit preserves (for unique fillings)
- Lemon or almond extract (to swap out vanilla)
These aren’t traditional, but they’re fun ways to make it your own.
Tools and Equipment Required
- 9-inch round cake pans (you’ll want at least 2, preferably 4 or more)
- Stand mixer or hand mixer
- Offset spatula (for frosting)
- Cooling racks
- Mixing bowls
- Measuring cups and spoons
- Saucepan (for frosting)
Got everything? Perfect. Let’s bake.
Step-by-Step Guide to Make Smith Island Cake
Before you begin, make sure your baking area is clean and prepped. Set out all your ingredients and tools. You’ll be rotating several thin cake layers in and out of the oven, so organization is key here. Pre-measure your ingredients to avoid rushing between steps. Trust me—it’ll save you from stress (and spills).
Step 1: Preheat and Prepare Cake Pans
Preheat your oven to 350°F (175°C). Grease your cake pans with butter or cooking spray, then line the bottoms with parchment paper for easy release. Dust the pans lightly with flour or cocoa powder (if you’re making a chocolate version). Since you’re baking thin layers, you’ll be reusing the pans several times—so prep them well.
Pro tip: If you don’t have 8+ pans, bake 2 or 3 layers at a time and keep the rest of the batter covered at room temp.
Step 2: Mixing the Cake Batter
Cream the butter, sugar, and oil in a large bowl until light and fluffy. This step is crucial—it traps air and gives the cake its lift. Add the eggs one at a time, beating well after each. Stir in vanilla and evaporated milk, blending until smooth.
In another bowl, whisk together the flour, baking powder, baking soda, and salt. Gradually add the dry ingredients to the wet mixture, alternating with warm water, and beat until the batter is smooth and slightly thin. You’re aiming for a pourable batter—not too thick.
Step 3: Baking the Thin Cake Layers
Pour about 1/3 to 1/2 cup of batter into each prepared pan and spread evenly. The layers should be thin—about 1/4 inch high. Bake for 8 to 10 minutes or until the edges are lightly golden and a toothpick comes out clean.
Rotate pans in the oven if you’re baking multiple at once to ensure even baking. Once done, remove the layers and cool on wire racks for a few minutes before gently turning them out.
Continue this process until all layers are baked—traditionally 8 to 12 layers total.
Step 4: Cooling and Stacking Layers
Now that your thin layers are baked to perfection, it’s time to let them cool properly. This part might feel a bit delicate, but it’s totally manageable if you take your time.
Once the cake layers are out of the pans, allow them to cool for about 10–15 minutes on wire racks. These layers are thin, so they’ll cool faster than standard cake layers. Still, don’t rush it—warm layers can break or stick together when you try to stack them.
To prevent sticking, place sheets of parchment paper or wax paper between each layer as they cool. If you’re short on space, you can stack them gently, but make sure they’ve cooled enough that the fudge frosting won’t melt or soak in too quickly when you start assembling.
A few cooling and stacking tips:
- Avoid putting layers in the fridge at this stage; they might dry out.
- If a layer cracks slightly, don’t panic—you can still use it. The fudge frosting acts like edible glue and will hold everything together.
- If you want to prep ahead, you can bake and cool the layers, then wrap them in plastic wrap and refrigerate overnight.
This step sets the stage for flawless assembly—think of it like stacking playing cards. Every layer matters, and a steady hand goes a long way.
Step 5: Making the Fudge Frosting
Here comes the part that makes Smith Island Cake so incredibly rich—the fudge frosting. Unlike buttercream, this is more like a soft, glossy ganache that sets firm enough to hold the cake together, but still melts in your mouth.
In a medium saucepan, combine the granulated sugar, chopped unsweetened chocolate, evaporated milk, and butter. Stir constantly over medium heat until the chocolate and butter are completely melted, and the mixture starts to simmer.
Once it begins boiling gently, reduce the heat to low and stir continuously for about 10–12 minutes until the frosting thickens. It should coat the back of your spoon and begin to look like a shiny, pourable fudge sauce.
Remove the pan from heat and stir in the vanilla extract. Let the frosting cool slightly—just enough that it’s still spreadable but not runny. It will continue to thicken as it sits, so work quickly during assembly.
Frosting Tips:
- If it thickens too much before you’re done, just warm it gently and stir.
- Use an offset spatula or the back of a spoon for even spreading.
- Don’t worry if it drips over the sides—imperfections are part of the charm.
Step 6: Assembling the Cake
This is the moment where everything comes together. Place your first layer on a cake plate or serving platter. Spread about 2–3 tablespoons of fudge frosting over the surface, smoothing it out to the edges. Then, carefully place the next layer on top.
Repeat this process, layering cake and frosting until you’ve stacked all your layers. Apply even pressure so the cake stays level—don’t press too hard or the layers might slide or break.
As you build the cake, you’ll notice the fudge frosting beginning to seep slightly between layers. That’s exactly what you want. It helps bind everything into a single, cohesive dessert.
Assembly Reminders:
- Save enough frosting to cover the top and sides of the finished cake.
- If your cake starts to lean, gently reposition the layers.
- Use a long spatula to smooth the frosting all around for that signature “homemade fudge” look.
Step 7: Final Frost and Chill Time
With all your layers in place, use the remaining fudge frosting to coat the top and sides of the cake. Don’t stress about getting it perfectly smooth—Smith Island Cake is known for its rustic, luscious appearance. The more homemade it looks, the better.
Once frosted, transfer the cake to the refrigerator and let it chill for at least 1 hour before slicing. This helps the fudge set fully and makes the cake easier to cut without sliding apart.
You can also make this cake a day ahead and chill it overnight. In fact, many fans of the cake say it tastes even better the next day as the flavors settle.
Expert Tips for the Perfect Smith Island Cake
Want to take your cake from great to unforgettable? Here are some expert-level baking tips that can make a big difference:
- Weigh your batter. If you want even layers, weigh the full amount of batter and divide it evenly by the number of layers.
- Use parchment circles. They make removing layers from pans much easier, especially since the cakes are thin and delicate.
- Rotate pans in the oven. Most home ovens have hot spots. Rotating halfway through ensures even browning.
- Use a cake turntable. It helps with smooth frosting application and even stacking.
- Don’t skip the chill. Chilling the cake sets the frosting and makes slicing clean and neat.
These little touches may not seem like much at first, but they’re the difference between “good cake” and “can I get the recipe?!”
Common Mistakes to Avoid
Even seasoned bakers make a misstep now and then. Here are the most common mistakes—and how to steer clear:
- Overmixing the batter
This can lead to tough, rubbery cake. Mix until just combined once you add the flour. - Not greasing pans properly
Thin layers stick easily. Always grease, flour, and use parchment. - Baking layers too thick
Smith Island Cake is all about those ultra-thin layers. Don’t pour too much batter! - Rushing the frosting process
If your fudge is too hot or too cool, it won’t spread evenly. Wait for the right texture. - Skipping cool time
Warm layers can cause the frosting to melt and the cake to collapse.
Avoid these, and your cake will be a showstopper every time.
Flavor Variations to Try
One of the best things about Smith Island Cake is how versatile it can be. While the original recipe features golden cake layers with rich fudge frosting, you can definitely get creative with flavors without losing the magic of this traditional dessert.
Here are some delicious variations worth trying:
Chocolate Lovers’ Dream
Swap out half the flour in the cake batter for unsweetened cocoa powder to create rich chocolate layers. Pair it with the classic fudge frosting, or go double-chocolate with a dark chocolate ganache. It’s bold, rich, and absolutely decadent.
Peanut Butter and Chocolate
Make the original yellow cake layers, but between each one, alternate with thin spreads of peanut butter before adding the fudge frosting. Or whip up a light peanut butter buttercream and use it between layers, then finish the outside with fudge. Think Reese’s, but as a towering layer cake!
Coconut Cream Delight
Add shredded sweetened coconut to your batter and sprinkle some between the frosted layers for texture. A light coconut cream frosting or glaze pairs beautifully with the richness of the fudge.
Lemon Zest Twist
Add fresh lemon zest and a bit of lemon extract to your cake batter. Then, between layers, add a thin layer of lemon curd beneath the chocolate frosting. The tangy flavor cuts through the sweetness for a refreshing finish.
Mocha Madness
Dissolve a tablespoon of instant espresso powder into your warm water when making the batter, and also add some to the fudge frosting. Coffee deepens the chocolate flavor and gives the whole cake a grown-up twist.
Berry Beautiful
Mix raspberry or strawberry jam between the layers along with the fudge frosting. It adds a fruity burst of flavor and looks gorgeous when you cut the cake.
No matter which variation you choose, remember to keep the layers thin and the frosting rich. That’s what gives Smith Island Cake its irresistible charm.
Serving and Storage Tips
Now that you’ve baked a masterpiece, let’s make sure it gets the star treatment it deserves when serving—and that the leftovers (if there are any!) stay fresh.
How to Cut It Properly
Use a sharp serrated knife and wipe it clean between cuts. Because of the many layers, it’s important to slice gently with a sawing motion instead of pressing down. If your cake is chilled, let it sit out for about 15 minutes for the ideal slicing texture.
Serving Suggestions
Smith Island Cake is rich, so serve thin slices. It pairs perfectly with a cup of coffee, black tea, or even a scoop of vanilla ice cream if you’re feeling indulgent.
Want to impress guests? Serve it on a cake stand with some fresh berries or a dusting of powdered sugar for that wow factor.
Storage Tips
- Refrigerator: Store the cake covered in the fridge for up to 5 days. It tastes even better the next day as the layers meld together.
- Freezer: You can freeze the cake (whole or sliced) for up to 2 months. Wrap tightly in plastic wrap and foil. Let it thaw overnight in the fridge before serving.
Keep it airtight to maintain moisture and prevent it from drying out. If you’re storing slices, layer parchment paper between them so they don’t stick together.
FAQs about Smith Island Cake Recipe
1. Why is Smith Island Cake so thin-layered?
The cake comes from a tradition of durability and transportability. The many thin layers with fudge frosting helped the cake stay moist and intact during long boat rides across the Chesapeake Bay.
2. Can I make it a day ahead?
Yes, and you should! Smith Island Cake actually tastes better the next day because the layers have time to settle, and the flavors deepen. Just store it in the fridge and let it come to room temperature before serving.
3. How many layers is traditional?
A traditional Smith Island Cake usually has 8 to 12 layers, though some bakers go up to 15. As long as each layer is thin and evenly frosted, you’re doing it right.
4. Can I use boxed cake mix?
While homemade batter is ideal, you can use boxed yellow cake mix in a pinch. Just make sure it’s a light, fluffy mix and don’t overbake the layers. The frosting, however, is best made from scratch.
5. What’s the best frosting alternative?
If you’re not a fan of fudge, try a rich chocolate ganache, cream cheese frosting, or even caramel glaze. Just make sure the consistency is spreadable and not too runny.
Conclusion
There you have it—a complete, step-by-step journey to creating one of America’s most unique and cherished desserts. The Smith Island Cake isn’t just a treat; it’s a tradition. With its paper-thin layers and luscious fudge frosting, it’s a labor of love that pays off with every single bite.
Whether you’re making it to impress guests, celebrate something special, or just challenge yourself in the kitchen, this cake delivers every time. Once you’ve mastered the base recipe, the variations are endless—and that’s part of what makes it so fun to bake.
So go ahead—bake your layers, spread your fudge, and experience a slice of sweet history.


