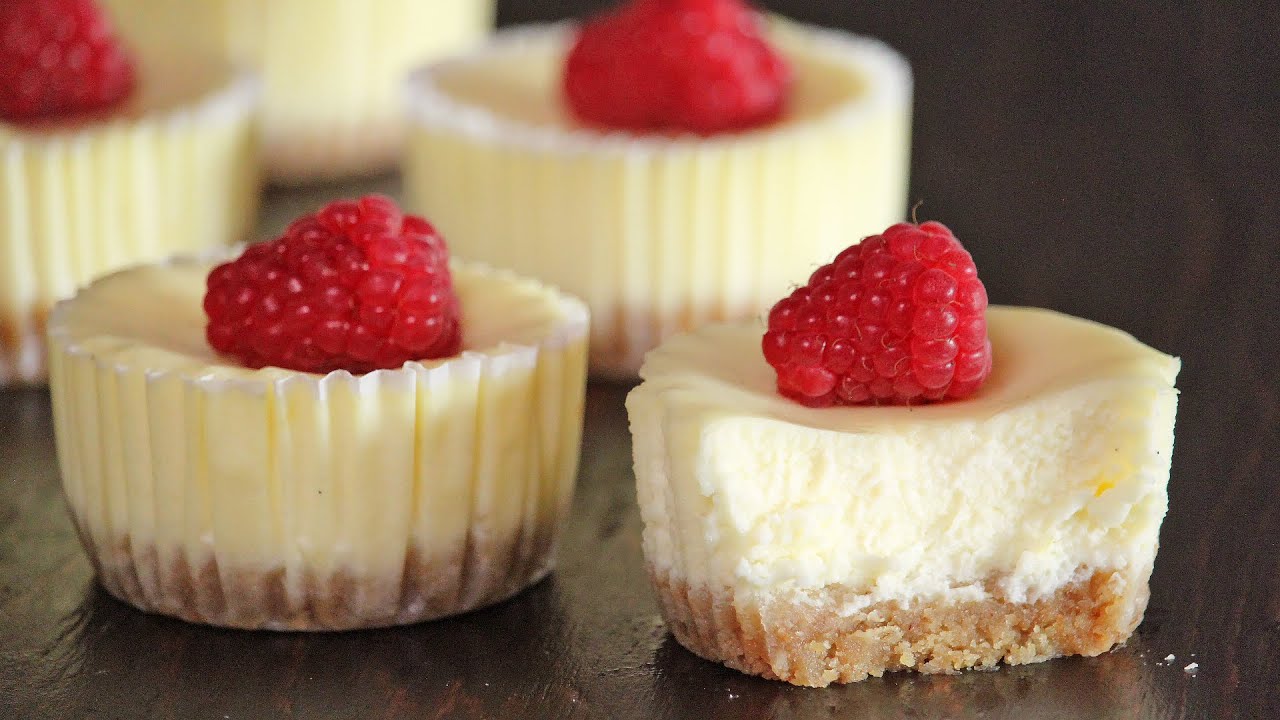
Small Cheesecake Recipe: Who doesn’t love a rich, creamy cheesecake? But baking a full-sized cheesecake isn’t always practical—especially if you’re just cooking for yourself or a small group. That’s where this small cheesecake recipe comes in handy!
Whether you want a sweet treat for a quiet weekend or you’re testing out a new flavor combo, this guide will walk you through every step of making a perfect small cheesecake from scratch. No fancy equipment, no stress—just delicious results every time.
Ingredients You’ll Need
Let’s break down everything you need for both the crust and the filling, plus a few optional toppings that can take your cheesecake to the next level.
Crust Ingredients
The crust is the base of your cheesecake and gives it that irresistible buttery crunch. Here’s what you’ll need:
- ¾ cup graham cracker crumbs – You can crush your own or buy them pre-crushed.
- 2 tablespoons granulated sugar – Helps sweeten and bind the crust.
- 3 tablespoons melted butter – This brings everything together and adds flavor.
You can swap the graham crackers for Oreo crumbs or digestive biscuits if you want something a bit different.
Filling Ingredients
This is where the magic happens—creamy, tangy, sweet, and melt-in-your-mouth goodness.
- 8 oz (1 block) cream cheese, softened – Always use full-fat for the best texture.
- ¼ cup granulated sugar – Adjust based on your sweetness preference.
- ¼ cup sour cream – Adds that signature tang and smooth texture.
- 1 large egg – Helps bind and give structure.
- 1 teaspoon pure vanilla extract – For that warm, bakery-style flavor.
- 1 teaspoon lemon juice (optional) – Brightens up the flavor.
Optional Toppings
Toppings are totally optional but highly recommended! Try any of these:
- Fresh strawberries or blueberries
- Chocolate ganache or sauce
- Caramel drizzle
- Whipped cream
- Crushed nuts or cookie crumbs
Tools & Equipment You’ll Need
Before you get started, gather these basic kitchen tools:
- Mixing bowls – One for the crust, one for the filling.
- Electric mixer or whisk – A hand mixer works great.
- Muffin tin or small springform pan (4 to 6 inches) – Perfect for a small batch.
- Cupcake liners (if using muffin tin) – Makes cleanup and serving easier.
- Rubber spatula – For scraping the bowl clean.
- Measuring cups and spoons – Accuracy is key in baking.
- Oven – Preheated and ready to go.
You don’t need any fancy tools—this recipe is beginner-friendly and flexible!
Why Make a Small Cheesecake?
Sometimes, bigger isn’t better—especially when it comes to desserts. Small cheesecakes are ideal for:
- Portion control – A little goes a long way with rich desserts.
- Less waste – No leftovers sitting in your fridge for a week.
- Faster baking and cooling time – Because who wants to wait hours?
- Perfect for two – Or just one, if you’re treating yourself!
- Flavor testing – Try out different combinations without committing to a large cake.
It’s also a great starting point for beginner bakers who want to dip their toes into cheesecake baking without the pressure of a large, multi-hour project.
Step-by-Step Guide to Making a Small Cheesecake
Alright, now we’re getting into the fun part. Let’s walk through this step-by-step so you end up with a rich, creamy, bakery-quality cheesecake—even if it’s your first time baking one!
Step 1: Preheat Your Oven
Preheat the oven to about 325°F (160°C). Make sure the rack is in the center for even baking.
Step 2: Prepare the Crust
Mixing graham cracker crumbs: Combine crumbs with melted butter and a little sugar.
Pressing into pan: Firmly press the mixture into the bottom of a small springform pan.
Pre-baking (optional): Bake 8–10 minutes to set the crust and deepen flavor, then cool slightly.
Step 3: Make the Creamy Cheesecake Filling
Creaming the cheese and sugar: Beat softened cream cheese and sugar until smooth with no lumps.
Adding eggs and flavorings: Add eggs one at a time, then vanilla or lemon zest.
Tips for smooth texture: Use room-temperature ingredients and avoid overbeating to prevent cracks.
Step 4: Assemble the Cheesecake
Pour the filling over the crust and gently tap the pan to release air bubbles. Smooth the top with a spatula.
Step 5: Bake the Cheesecake
Temperature and time: Bake at 300–325°F (150–160°C) until the center is slightly wobbly.
Water bath method (optional): Place the pan in a larger pan with hot water to reduce cracking and keep it extra creamy.
Step 6: Cool and Chill
Let the cheesecake cool in the oven with the door slightly open, then on the counter. Refrigerate for at least 4 hours, preferably overnight, to set fully.
Step 7: Add Toppings (Optional)
Add toppings just before serving—fruit compote, chocolate ganache, whipped cream, or caramel. Choose flavors that complement your cheesecake’s base, like berries with lemon or chocolate with vanilla.
Tips for Perfect Small Cheesecake Every Time
Even simple recipes can go wrong without the right techniques. Keep these tips in mind:
- Use room temperature ingredients – Cold cream cheese leads to lumps.
- Don’t overmix the batter – Incorporating too much air causes cracks.
- Use a water bath – It keeps baking gentle and prevents dryness.
- Cool slowly – Sudden temperature changes cause splitting and sinking.
- Refrigerate fully – Patience = perfect texture.
If you’re short on time, you can speed up chilling in the freezer (30–45 minutes), but the texture won’t be as perfect as an overnight chill.
Serving Ideas & Variations
Want to spice things up? Here are some fun ways to customize your cheesecake:
Crust Variations
- Oreo Crust – Use crushed Oreos with the filling removed
- Gingersnap Crust – Perfect for a spiced twist
- Nutty Base – Crushed almonds or pecans with butter and sugar
Filling Variations
- Swirls – Raspberry jam, Nutella, or peanut butter for visual flair
- Citrus Zest – Add lemon or orange zest for brightness
- Flavor Extracts – Try almond, coconut, or even maple extract
Mini Cheesecake Bites
- Make the recipe in a mini muffin tin for bite-sized treats—perfect for parties.
Nutritional Info (Approximate per serving)
| Nutrient | Amount (per small slice) |
|---|---|
| Calories | 280–320 kcal |
| Total Fat | 22g |
| Saturated Fat | 13g |
| Sugar | 14g |
| Protein | 5g |
| Carbohydrates | 20g |
Note: These values may vary based on your ingredients and portion size.
Storage & Freezing Instructions
Got leftovers? Here’s how to store them:
- Fridge – Keep in an airtight container for up to 5 days.
- Freezer – Wrap tightly in plastic wrap and foil, then freeze for up to 1 month. Thaw overnight in the fridge.
Tip: Freeze individual slices for easy grab-and-go desserts.
Troubleshooting Common Problems
Even with the best intentions, cheesecakes can be a little temperamental. Here’s how to fix (or avoid) common issues:
Problem: Cracked Top
- Solution: Avoid overbaking and always cool gradually. Use a water bath if possible.
Problem: Lumpy Filling
- Solution: Make sure your cream cheese is fully softened before mixing.
Problem: Runny Texture
- Solution: Don’t skip the chill time, and ensure the cheesecake is baked until the center jiggles, not sloshes.
Problem: Overbrowned Top
- Solution: Tent loosely with foil during the last 10 minutes of baking.
FAQs about Small Cheesecake Recipe
1. Can I make this without eggs?
Yes! You can substitute ¼ cup of full-fat Greek yogurt or 2 tablespoons of cornstarch mixed with 2 tablespoons of water for each egg. Keep in mind the texture may be slightly different.
2. How do I know my cheesecake is done?
Give it a gentle shake—if the center jiggles slightly but the edges are set, it’s done. Don’t wait until it’s firm in the center—that’s overbaked!
3. Can I make this ahead of time?
Absolutely. Cheesecakes are best after a full overnight chill. You can make it 1–2 days in advance and just add toppings before serving.
4. What if I don’t have a muffin tin or mini pan?
Use any small oven-safe dish or ramekin. Just line it with parchment and watch the bake time—it might vary slightly.
5. How long will this cheesecake last?
In the fridge, it lasts up to 5 days. In the freezer, up to 1 month if well-wrapped.
Conclusion
And there you have it—a small cheesecake recipe that’s big on flavor and satisfaction. Whether you’re a baking newbie or a seasoned dessert enthusiast, this easy guide will have you whipping up rich, creamy cheesecakes in no time. With simple ingredients, minimal effort, and endless topping possibilities, there’s really no reason not to indulge in this timeless treat.
So go ahead—try it today. You might just find that this small cheesecake becomes your go-to dessert for every occasion.


