Simple Custard Recipe: Custard is one of those timeless desserts that feels like a warm hug. Whether spooned over a slice of pie, poured into a tart shell, or eaten straight from the bowl, custard always delivers comfort in the most delicious way. But here’s the kicker: despite its luxurious texture and rich taste, custard is incredibly simple to make at home with just a few pantry staples. That’s right—no fancy culinary degree required.
This guide is here to walk you through every detail with clear steps and tips that make custard-making foolproof, even for beginners. We’ll cover everything from the ingredients you need to how to avoid common pitfalls (like ending up with scrambled eggs instead of silky custard).
Ready to dive in?
What is Custard?
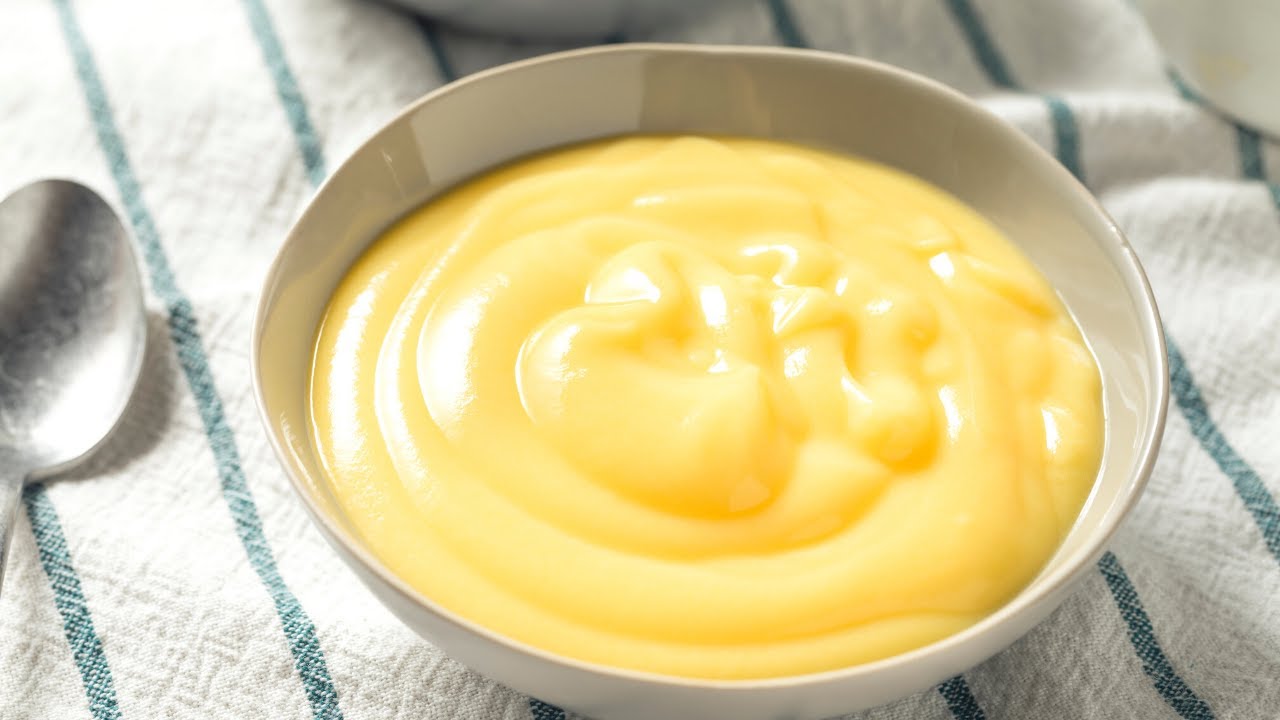
Custard is a creamy, sweet dessert made primarily from milk (or cream), egg yolks, and sugar. The magic happens when the egg proteins gently cook, thickening the liquid into that rich, velvety texture we all love.
There are many forms of custard around the world—from the French crème anglaise to the classic British custard served with puddings. Some versions are poured, while others are thick enough to hold their shape in a pie. The consistency depends on the ratio of eggs to milk, as well as how it’s cooked.
In essence, custard is the definition of simple elegance. Few ingredients, big reward.
Different Types of Custard
Stirred Custard
Also known as crème anglaise, stirred custard is cooked on the stovetop and stirred constantly until it thickens. It stays pourable and is perfect as a sauce or a base for other desserts like ice cream.
Baked Custard
Think of flan or crème brûlée. This custard is thicker and set by baking in a water bath. It has a more solid structure and is usually eaten on its own.
Both types use the same basic ingredients—just cooked in different ways. In this guide, we’re focusing on a simple stirred custard that’s incredibly versatile.
Why You’ll Love This Simple Custard Recipe
- Easy for beginners – Clear, step-by-step instructions make it practically impossible to mess up.
- Only 5 ingredients – All pantry staples, no specialty items required.
- Versatile – Use it as a dessert sauce, filling, or eat it by the spoonful.
- Customizable – Add different flavors like vanilla, nutmeg, or citrus zest.
- Deliciously creamy – The perfect balance of rich and light.
List of Ingredients You’ll Need
Basic Ingredients for Classic Custard
Here’s what you’ll need to make a smooth, rich custard:
| Ingredient | Quantity |
|---|---|
| Whole Milk | 2 cups (500ml) |
| Egg Yolks | 4 large |
| Sugar | 1/3 cup (65g) |
| Cornstarch (optional) | 1 tbsp |
| Vanilla Extract | 1 tsp |
| Salt | Pinch (optional) |
Optional Add-Ins for Flavor
- Nutmeg or cinnamon
- Lemon or orange zest
- Almond extract
- A splash of rum or brandy
You don’t need these extras, but they can give your custard an extra kick depending on the dish you’re serving it with.
Tools and Equipment Needed
Before you get started, gather your tools:
- Medium saucepan
- Mixing bowl
- Whisk
- Measuring cups and spoons
- Fine mesh strainer
- Rubber spatula
- Glass or ceramic bowl (for chilling)
Having everything ready will make the cooking process smooth and stress-free.
Tips Before You Begin
- Use room temperature eggs: They combine more easily with the sugar and milk.
- Whisk constantly: This helps prevent curdling.
- Use low to medium heat: Custard needs gentle cooking. High heat can ruin the texture.
- Strain the custard: This removes any cooked bits for a silky finish.
- Chill thoroughly: Custard thickens more as it cools.
Step-by-Step Guide to Making Custard
Let’s get into the nitty-gritty. Follow these steps closely and you’ll have perfect custard every time.
Step 1: Prepare Your Ingredients
Start by measuring out your ingredients. Separate your egg yolks into a mixing bowl, measure the sugar, milk, and vanilla. If using cornstarch, mix it with a tablespoon of cold milk to avoid clumps later.
Why do this? Because custard requires constant attention once it’s on the stove. If you’re scrambling to grab ingredients mid-process, you risk overcooking it.
Step 2: Heat the Milk
In a medium saucepan, gently heat the milk over medium-low heat. You want it warm and steamy, not boiling. If it starts to bubble, reduce the heat immediately.
Heating the milk helps it blend smoothly with the egg yolks later, and brings everything up to temperature without shocking the eggs (which could cause curdling).
Step 3: Whisk the Egg Yolks and Sugar
While the milk is heating, whisk the egg yolks and sugar in a bowl until the mixture turns pale and slightly thick. This takes about 2–3 minutes of vigorous whisking. If you’re using cornstarch, mix it in now.
This step isn’t just mixing—it’s essential for dissolving the sugar and creating a stable emulsion. When the eggs lighten in color, you know the sugar has begun to dissolve.
Step 4: Temper the Eggs
Now here’s the critical moment: tempering. Slowly pour about 1/3 of the warm milk into the egg mixture while whisking constantly. This gradually raises the temperature of the eggs so they don’t scramble.
Then, pour the tempered egg mixture back into the saucepan with the remaining milk. Keep whisking!
Tempering is like introducing a shy cat to a new room—slow and gentle works best. Do it too fast, and the eggs will seize up.
Step 5: Combine and Cook
Place the saucepan back on low heat. Stir constantly with a rubber spatula, scraping the bottom of the pan to prevent sticking or burning.
Cook until the mixture thickens enough to coat the back of a spoon. This usually takes about 5–8 minutes. Be patient here. If you turn up the heat to rush it, the eggs might curdle.
A quick test: dip a spoon in the custard and run your finger across the back. If it leaves a clean line, it’s ready.
Step 6: Strain and Cool
Immediately remove the custard from heat and pour it through a fine mesh strainer into a clean bowl. This catches any bits of cooked egg and ensures a silky texture.
Let it cool for about 10–15 minutes at room temperature, stirring occasionally to prevent a skin from forming.
You’re almost there!
Step 7: Chill and Serve
Cover the custard with plastic wrap, pressing it directly onto the surface to avoid a skin. Refrigerate for at least 2 hours—or until fully chilled.
Serve it as a sauce, filling, or on its own. Once chilled, it’ll be thicker and easier to spoon or spread.
How to Store Custard
Homemade custard is best enjoyed fresh, but if you have leftovers (lucky you!), proper storage is key to keeping that luscious texture and taste.
- Refrigerate promptly: As soon as your custard cools to room temperature, cover it tightly and refrigerate. A layer of plastic wrap pressed directly onto the surface will prevent a skin from forming.
- Use within 3 days: Custard doesn’t last forever—aim to eat it within 2–3 days for the best flavor and texture.
- Avoid freezing: While tempting, freezing custard can cause it to split or become grainy due to the eggs and milk. If you really need a frozen version, you’re better off making a custard-based ice cream instead.
Want to reheat it? Gently warm the custard on the stovetop over low heat while stirring constantly. Add a splash of milk if it’s too thick.
Common Mistakes to Avoid
Custard is simple, but there are a few common traps that can ruin the final result. Let’s dodge those, shall we?
- Cooking over high heat: This is the number one custard killer. High heat cooks the eggs too quickly, causing curdling or a scrambled-egg texture.
- Not tempering the eggs: Pouring hot milk directly into the yolks will shock them and create lumps. Always temper slowly!
- Not straining the custard: Even if you’re a pro, straining ensures ultra-smooth results. Don’t skip it.
- Forgetting to stir: Custard must be stirred constantly while on heat. The moment you stop, the bottom can scorch or the eggs can overcook.
- Overcooking: Once it coats the back of a spoon, take it off the heat. Custard thickens further as it cools.
Remember, custard isn’t forgiving with shortcuts—but if you’re patient, the reward is worth every stir.
Ways to Use Homemade Custard
Sure, custard is delightful on its own, but it’s also a superstar ingredient in tons of desserts. Here are some delicious ideas:
- Fruit tart filling: Pour it into a baked tart shell and top with fresh berries.
- Trifle layer: Spread it between sponge cake and fruit for a layered British trifle.
- Crepe filling: Spoon it into warm crepes for a fancy breakfast or dessert.
- Cake accompaniment: Serve warm custard alongside chocolate cake, brownies, or sticky toffee pudding.
- Banana pudding base: Layer it with bananas and vanilla wafers for a Southern-style treat.
Custard is a blank canvas. Whether you keep it classic or go creative, it’s guaranteed to elevate any dessert.
Variations You Can Try
Once you’ve nailed the basic custard, it’s time to experiment! Here are a few tasty twists:
- Chocolate Custard: Stir in 1/2 cup of chopped dark chocolate once the custard thickens, then whisk until smooth.
- Lemon Custard: Add lemon zest during heating and a splash of lemon juice at the end for a citrusy zing.
- Coconut Custard: Replace some of the milk with coconut milk for a tropical flavor.
- Spiced Custard: Add a pinch of cinnamon, nutmeg, or cardamom for cozy vibes.
- Caramel Custard: Use caramelized sugar instead of white sugar for a deeper, toffee-like sweetness.
These variations can be used for different moods, seasons, or even to match specific desserts.
Nutrition Information (Per Serving)
Here’s a rough breakdown of the nutrition per 1/2 cup serving of classic custard:
| Nutrient | Amount |
|---|---|
| Calories | 220 |
| Protein | 5g |
| Fat | 10g |
| Saturated Fat | 3.5g |
| Carbohydrates | 26g |
| Sugar | 20g |
| Cholesterol | 130mg |
| Sodium | 60mg |
Note: This is an estimate and can vary based on exact ingredients and quantities.
FAQs about Simple Custard Recipe
1. Can I use cream instead of milk for custard?
Yes! Using cream makes the custard even richer and silkier. You can substitute half or all of the milk with heavy cream, depending on how decadent you want it to be.
2. What should I do if my custard curdles?
Don’t panic! Quickly remove it from the heat and blend it with an immersion blender or regular blender. It may not be perfect, but it can help smooth it out. Next time, use lower heat and stir constantly.
3. Can I make custard without eggs?
Yes, but it won’t be traditional custard. Eggless versions typically use cornstarch or custard powder as thickeners. They’re tasty and smooth, but have a slightly different flavor and texture.
4. How do I know when the custard is done cooking?
The spoon test is your best friend. Dip a spoon into the custard and swipe your finger across the back. If it leaves a clean line, it’s ready! Don’t wait for it to become pudding-thick while cooking—it will thicken more as it cools.
5. Is it safe to eat custard with raw eggs?
In this recipe, the eggs are gently cooked to a safe temperature (around 160°F or 71°C). As long as you follow the cooking instructions, there’s no risk. If you’re concerned, use pasteurized eggs.
Conclusion
And there you have it—a simple, silky-smooth custard recipe that anyone can make at home. With just a handful of ingredients and a little patience, you can whip up a rich dessert that tastes like it came from a gourmet bakery. The beauty of custard is in its versatility. Whether you spoon it over cake, pour it into a tart, or savor it by itself, it never disappoints.
The key is to take your time. Follow each step closely, keep that whisk moving, and don’t rush the heat. Once you master the basics, the door opens to all kinds of variations and creative desserts. So go ahead—make a batch, share it (or don’t), and bask in the sweet, creamy glory.