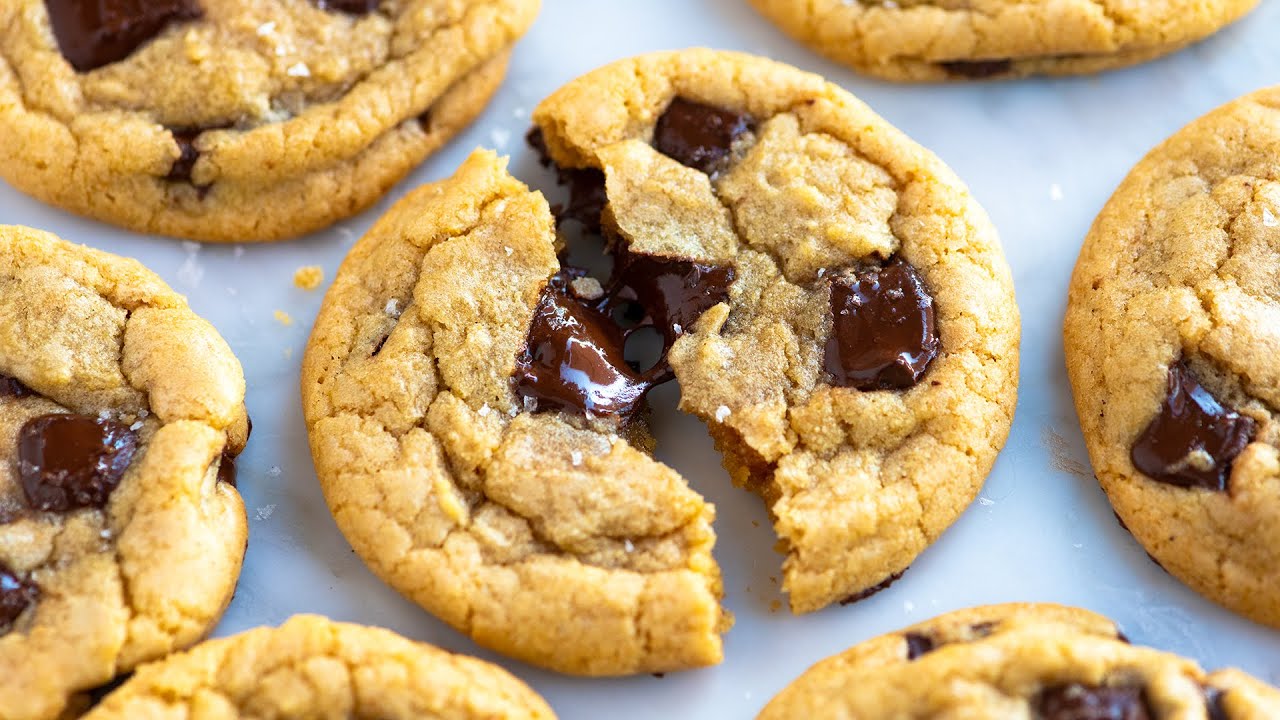
Simple Chocolate Chip Cookie Recipe: Who doesn’t love the smell of fresh-baked chocolate chip cookies wafting through the house? There’s something comforting, nostalgic, and downright delicious about biting into a warm, gooey cookie with melty chocolate chips. Whether you’re baking for a family gathering, a cozy night in, or just a snack attack, a good chocolate chip cookie never disappoints.
This isn’t just any cookie recipe—it’s a foolproof, easy-to-follow, step-by-step guide to make soft, chewy, bakery-style chocolate chip cookies right in your own kitchen. Even if you’re a complete newbie in the world of baking, this guide will walk you through every step to cookie perfection. No fancy equipment or hard-to-find ingredients—just classic, delicious cookies made from scratch.
Ingredients You’ll Need
Before you start mixing things up, make sure you’ve got everything on hand. Here’s what you’ll need:
Basic Ingredients:
- 1 cup (2 sticks) unsalted butter, softened
- 3/4 cup granulated sugar
- 3/4 cup packed brown sugar
- 2 large eggs
- 1 teaspoon vanilla extract
- 2 1/4 cups all-purpose flour
- 1 teaspoon baking soda
- 1/2 teaspoon salt
- 2 cups semi-sweet chocolate chips
These are the tried-and-true components of a classic chocolate chip cookie. The combination of white and brown sugar helps create that perfect balance of chewy and crisp. Brown sugar brings moisture and richness, while white sugar helps with spread and crispiness.
Optional Add-ins and Substitutes:
- Chopped nuts (walnuts or pecans)
- White chocolate or dark chocolate chips
- A sprinkle of sea salt on top before baking
- Swap vanilla for almond extract for a twist
Feel free to get creative! Just don’t go overboard—too many additions can weigh the dough down and mess with the texture.
Tools and Equipment
Don’t worry—you won’t need a professional kitchen setup for this recipe. Here’s what you should have on hand:
Essential Tools:
- Large mixing bowls
- Hand or stand mixer (or even a strong spoon and elbow grease)
- Measuring cups and spoons
- Baking sheet(s)
- Parchment paper or silicone baking mat
- Cooling rack
Helpful Extras:
- Cookie scoop (for even sizing)
- Rubber spatula (for scraping and folding)
- Sifter (for dry ingredients)
Having these tools ready before you start makes everything run smoother. Trust me, it’s better than scrambling to find your baking soda mid-mix!
Preparing Your Ingredients
This might seem like an unnecessary step, but prepping your ingredients properly can make or break your cookies.
Room Temperature Butter and Eggs: Butter that’s too cold won’t cream properly, and eggs straight from the fridge can cause your batter to curdle. Let them sit out for about 30 minutes before you start. Room temp ingredients mix more evenly and give your cookies a better texture.
Measure with Precision:
- Spoon flour into your measuring cup, then level it off with a knife—don’t scoop directly from the bag!
- Pack your brown sugar tightly to get an accurate amount.
- Level off your baking soda and salt to avoid bitterness or weird textures.
These little details ensure your cookies come out just right every time. A little precision goes a long way in baking!
Step-by-Step Instructions
Step 1 – Preheat the Oven
Before you even crack an egg, get that oven going. Set it to 350°F (175°C). Preheating is super important—cookies need a hot oven to spread and rise properly. If your oven isn’t hot enough, they’ll come out flat and sad.
Pro Tip: Use an oven thermometer if you’ve got one. Some ovens run hotter or cooler than the dial says, and that can really mess with your bake.
Step 2 – Mix Dry Ingredients
In a medium bowl, combine:
- 2 1/4 cups all-purpose flour
- 1 teaspoon baking soda
- 1/2 teaspoon salt
Whisk these together or sift them if you want to be fancy. This step ensures that your baking soda is evenly distributed and prevents salty or bitter bites in your cookies.
Why it Matters: Mixing dry ingredients first helps everything incorporate smoothly later, especially when you’re adding wet ingredients. No one wants to bite into a clump of baking soda.
Step 3 – Cream Butter and Sugars
In a large mixing bowl, combine:
- 1 cup unsalted butter (softened)
- 3/4 cup granulated sugar
- 3/4 cup packed brown sugar
Use a mixer on medium speed to beat them together until the mixture is light and fluffy—this usually takes about 3-4 minutes. This step traps air in the dough and helps your cookies rise beautifully while baking.
Texture Tip: Don’t skimp on creaming time! It’s what gives you that soft middle and slightly crispy edge.
Step 4 – Add Eggs and Vanilla
Now that your butter and sugars are light and fluffy, it’s time to introduce the wet ingredients.
Add:
- 2 large eggs, one at a time
- 1 teaspoon vanilla extract
Mix well after each egg, making sure everything is fully incorporated before adding the next. The batter should look smooth and a bit silky at this point.
Why It’s Important: Adding eggs one at a time ensures the mixture doesn’t curdle and keeps everything smooth. Eggs add structure and moisture, while vanilla gives that irresistible aroma and classic cookie flavor.
You might notice a slight change in texture—don’t panic, that’s totally normal. Once all the wet ingredients are in, you’re ready for the next step.
Step 5 – Combine Wet and Dry Mixtures
Now, take your bowl of dry ingredients and gradually add it to the wet mixture. Do this in batches—about 1/3 of the dry mix at a time. Mix on low speed or fold by hand using a spatula.
Key Tips:
- Don’t overmix! Overworking the dough can make the cookies tough instead of tender.
- Stop mixing as soon as there are no visible streaks of flour.
The dough should be thick and slightly sticky—firm enough to hold its shape but soft enough to scoop easily.
Step 6 – Fold in Chocolate Chips
It’s time for the star of the show: the chocolate chips.
Add:
- 2 cups semi-sweet chocolate chips
Using a spatula or spoon, gently fold the chips into the dough until they’re evenly distributed. Don’t use the mixer for this step—it’ll break the chips and overwork the dough.
Bonus Tip: If you like your cookies extra chocolatey, save a few chips to press on top of the dough balls before baking. It makes them look amazing and adds more melty goodness.
You can also mix in other goodies here—like chopped nuts or a sprinkle of cinnamon—if you’re feeling adventurous.
Step 7 – Scoop and Shape the Dough
Line your baking sheets with parchment paper or a silicone baking mat. Then, using a cookie scoop or a tablespoon, portion out even balls of dough.
Spacing Matters: Place the dough balls about 2 inches apart—they’ll spread as they bake. You don’t want a cookie blob mess!
Shape Tips:
- For uniform size and shape, use a medium cookie scoop.
- If you like picture-perfect cookies, roll the dough balls gently with your hands before baking.
This step not only helps with even baking but also gives your cookies that professional, round shape everyone loves.
Step 8 – Bake to Perfection
Slide your tray into the preheated oven and bake for 9–11 minutes, depending on your oven and how soft or crispy you like your cookies.
Look For:
- Golden brown edges
- Slightly soft and puffed centers
The cookies will continue to bake a little after you take them out, thanks to residual heat—so don’t wait for the whole cookie to be brown or you’ll overdo them.
Pro Tip: If baking multiple trays, rotate them halfway through for even baking. And don’t bake more than two trays at once—it affects airflow and results.
Step 9 – Cool and Enjoy
Once out of the oven, let the cookies sit on the baking sheet for 5 minutes. Then transfer them to a wire rack to cool completely. This step ensures they set properly and don’t fall apart.
Final Flavor Boost: If you love the sweet-salty combo, sprinkle a touch of flaky sea salt on top right after baking. It takes them to the next level.
Now, grab a glass of cold milk (or oat milk if you’re fancy), take a bite, and enjoy the warm, gooey center, crispy edges, and melty chocolate magic you just created.
Storage and Freezing Tips
Made a big batch? No worries—chocolate chip cookies store well.
For Storage:
- Keep them in an airtight container at room temperature for up to 5 days.
- Add a slice of bread to the container to keep cookies soft.
For Freezing:
- Freeze cookie dough balls on a tray, then transfer to a freezer bag.
- Bake straight from frozen—just add 2-3 minutes to the baking time.
Freezing dough is a game-changer. You can bake a fresh cookie or two whenever a craving hits—no need to do the whole process again.
Common Mistakes to Avoid
Even with simple recipes, a few missteps can lead to disappointing cookies. Watch out for these:
- Using cold butter: Won’t cream properly, results in dense cookies.
- Overmixing: Leads to tough, dry cookies. Mix just until combined.
- Wrong flour measurement: Too much flour = cakey cookies. Spoon and level!
- Skipping the cooling rack: Cookies can overbake if left on the hot tray too long.
- Overbaking: Pull them out when they still look slightly underdone—they’ll finish cooking outside the oven.
Avoid these common errors and you’ll be on your way to cookie greatness every time.
Customization Ideas
Want to put your own twist on the classic chocolate chip cookie? Here are some tasty variations and creative tweaks that’ll help you level up your cookie game:
1. Chocolate Variations:
- Swap semi-sweet chips for dark chocolate or milk chocolate.
- Mix in white chocolate for a sweeter touch.
- Use chocolate chunks instead of chips for big gooey bites.
2. Nut Add-Ins:
- Walnuts and pecans are popular picks for a little crunch.
- Toast the nuts before adding for enhanced flavor.
- Peanut butter chips + crushed peanuts? A peanut butter lover’s dream.
3. Flavor Twists:
- A pinch of cinnamon or nutmeg adds a warm spice.
- Add a dash of espresso powder for a deeper, more complex chocolate taste.
- Use almond extract instead of vanilla for a subtle twist.
4. Texture Tweaks:
- Want chewier cookies? Chill the dough for 30 minutes to an hour before baking.
- Like them crispier? Flatten the dough balls slightly before baking.
- Love gooey centers? Underbake by a minute or two and enjoy that molten middle.
5. Fancy Finishes:
- Sprinkle sea salt flakes on top before baking.
- Drizzle with melted chocolate or dip half the cookie in chocolate for extra indulgence.
- Sandwich ice cream between two cookies for the ultimate summer treat.
Cookies are a canvas for creativity, and this simple recipe is your starting point. Don’t be afraid to play around and find your favorite flavor combo!
FAQs about Simple Chocolate Chip Cookie Recipe
What ingredients do I need for a simple chocolate chip cookie recipe?
To whip up some delightful chocolate chip cookies, you’ll need the basics: all-purpose flour, baking soda, salt, butter, sugar (both granulated and brown), an egg, vanilla extract, and of course, chocolate chips.
How long does it take to bake chocolate chip cookies?
Chocolate chip cookies typically bake in the oven for about 8-10 minutes at 375°F (190°C). Keep an eye on them until the edges are just turning golden brown for that perfect chewy texture!
Can I make chocolate chip cookies without brown sugar?
Yes, you can make them without brown sugar by substituting it with an equal amount of granulated sugar. However, remember that brown sugar adds moisture and flavor, so cookies made only with white sugar may be crisper and less rich.
Is it necessary to chill the cookie dough before baking?
While not strictly necessary, chilling the dough for at least 30 minutes (or even overnight) can help in controlling the spread of cookies and enhances the flavors.
Can I use baking powder instead of baking soda in a cookie recipe?
It’s best to stick with baking soda as it helps the cookies spread out properly. Baking powder can cause the cookies to rise too much, making them cakey rather than chewy.
How can I keep my chocolate chip cookies chewy?
For chewy cookies, make sure not to overbake them. Pull them out when they’re just set and still soft in the center. Storing them in an airtight container with a piece of bread can also help keep them chewy longer.
Can I add nuts or other ingredients to my chocolate chip cookies?
Absolutely! Feel free to stir in nuts, dried fruit, or even a dash of cinnamon to customize your batch to your taste preferences.
Conclusion
Baking chocolate chip cookies is more than just making a treat—it’s creating a cozy moment, a warm memory, a sweet experience you’ll want to revisit again and again. With this step-by-step guide, you’ve got everything you need to whip up cookies that are golden, gooey, chewy, and full of chocolatey joy.
The beauty of this recipe is in its simplicity and flexibility. Whether you’re baking for the first time or the hundredth, this classic cookie never fails to bring smiles. So grab your mixing bowl, preheat that oven, and treat yourself (and your loved ones) to the magic of homemade cookies.
Happy baking!