Simple Banana Pudding Recipe: Banana pudding isn’t just a dessert—it’s a nostalgic comfort food, a taste of home, and often the star of Southern gatherings. From its creamy texture to the sweet, subtle tang of ripe bananas paired with vanilla wafers and pudding, it’s a combination that never goes out of style. Whether you’ve had it at a summer barbecue or a cozy winter dinner, banana pudding brings back memories and makes new ones. And the best part? It’s incredibly simple to make.
Why Choose a Simple Recipe?
Let’s face it—life gets busy. Between work, family, and everything else, spending hours in the kitchen isn’t always an option. That’s where a simple banana pudding recipe shines. No baking, no complex steps, and no fancy equipment. Just pure, easy-to-make deliciousness. This guide will walk you through a foolproof, step-by-step method to get that perfect banana pudding without the hassle. You’ll feel like a dessert pro, even if you’re a beginner in the kitchen.
Ingredients You’ll Need
Basic Ingredients for Classic Banana Pudding
Before you dive in, make sure your kitchen is stocked with the essentials. For a classic banana pudding, you’ll need:
- 1 box (5.1 oz) instant vanilla pudding mix
- 3 cups cold milk (whole milk for creaminess)
- 1 can (14 oz) sweetened condensed milk
- 1 tablespoon vanilla extract
- 1 container (8 oz) whipped topping (like Cool Whip), thawed
- 4-5 ripe bananas (firm but not overripe)
- 1 box vanilla wafers (Nilla Wafers are the go-to)
These basic ingredients blend together to create a dessert that’s creamy, sweet, and full of banana goodness. The pudding mix offers a shortcut while still tasting homemade, and the sweetened condensed milk adds richness that you just can’t get from milk alone.
Optional Add-ons to Elevate Flavor
Want to level up your pudding? Consider adding:
- A pinch of sea salt to enhance sweetness
- A splash of banana liqueur for adults
- Crushed nuts like pecans for a bit of crunch
- Shaved chocolate or caramel drizzle on top
These extras aren’t necessary, but they’ll add a unique twist to your traditional banana pudding.
Tools and Equipment Required
Kitchen Tools to Make Your Life Easier
You don’t need a professional kitchen setup, but having the right tools can make the process smooth and stress-free. Here’s what you’ll need:
- Mixing bowls (preferably medium and large sizes)
- A whisk or electric hand mixer
- Measuring cups and spoons
- A rubber spatula for folding in whipped topping
- A sharp knife for slicing bananas
- A trifle dish or 9×13 inch glass baking dish
Each tool has a purpose. The electric mixer helps whip the pudding to the perfect consistency without lumps. The rubber spatula gently folds in the whipped topping without deflating it, keeping the texture light and fluffy. Using a glass dish lets you show off those beautiful layers—because we all eat with our eyes first.
Step-by-Step Guide to Making Banana Pudding
Step 1: Preparing the Vanilla Pudding
Start by pouring the cold milk into a large mixing bowl. Add the vanilla pudding mix and whisk for about 2-3 minutes, until it thickens slightly. This step is crucial—make sure the pudding isn’t too runny or your final dish will be a soggy mess. Once it’s thick, stir in the sweetened condensed milk and vanilla extract. Keep mixing until everything is fully blended and smooth. Chill it in the refrigerator for 10-15 minutes to firm up.
Step 2: Slicing the Bananas
While your pudding chills, take your ripe bananas and slice them into thin, even rounds—about ¼-inch thick. You want them firm enough to hold their shape but ripe enough to offer sweetness. Pro tip: to prevent browning, you can lightly brush the banana slices with a bit of lemon juice. Just don’t overdo it, or you’ll taste the citrus in the final product.
Step 3: Layering the Ingredients
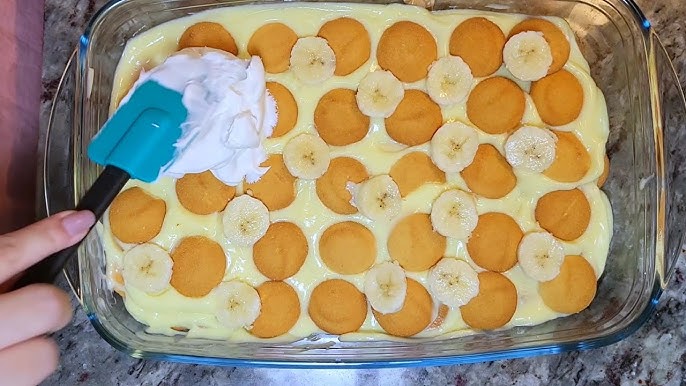
Now comes the fun part—layering! In your dish, start with a layer of vanilla wafers at the bottom. Add a layer of banana slices, then spoon over a layer of your creamy pudding mixture. Repeat these layers until the dish is filled, finishing with a pudding layer on top. Finally, gently fold the whipped topping into the remaining pudding and spread that over the top layer for a dreamy, cloud-like finish.
Step 4: Chilling and Serving
Cover your pudding dish with plastic wrap and refrigerate for at least 4 hours, or overnight for best results. Chilling allows the flavors to meld and the wafers to soften slightly—creating that perfect, melt-in-your-mouth texture. When you’re ready to serve, garnish with a few wafer cookies or banana slices on top, and dig in!
Pro Tips for the Best Banana Pudding
Preventing Bananas from Browning
One of the biggest banana pudding letdowns is opening the fridge to find your lovely dessert tinged with brown spots. To avoid this, timing and technique are everything. Start by slicing the bananas just before you’re ready to layer them. Don’t prep them hours ahead—oxidation starts fast. If you want a little insurance, lightly coat the banana slices with lemon or pineapple juice. Use just a light brush or a quick dip; you don’t want to overpower the banana flavor. Another pro tip? Cover the final pudding layer completely with whipped topping to keep air away from the bananas. This helps seal in freshness and keeps the top looking photo-ready.
Getting the Perfect Texture
Banana pudding is all about the texture—creamy, soft, but not mushy. Achieving this requires balance. Make sure your pudding is chilled before layering; if it’s too runny, it won’t set properly. Don’t go overboard with the bananas or stack them too thick; even layers give you consistent bites. And when it comes to wafers, some people love the crunch of freshly layered cookies, while others prefer them softened from overnight chilling. You can control this by adjusting the chill time—shorter for crunch, longer for that classic, cakey texture.
Common Mistakes to Avoid
Overmixing the Pudding
It might seem harmless to stir the pudding until your arm falls off, but overmixing can ruin the texture. You want a smooth, creamy consistency—not a runny mess. Once the pudding mix has thickened and blended with the sweetened condensed milk and vanilla, stop. If you’re using an electric mixer, stick to low speed and watch it closely. Over-whipping the whipped topping, too, can cause it to deflate and turn soupy. Gentle folding is key.
Using Overripe Bananas
There’s a fine line between ripe and too ripe. Overripe bananas might be perfect for banana bread, but not so much for pudding. They tend to get mushy and overpower the dessert with an overly sweet, sometimes fermented taste. You want bananas that are yellow with a few spots—soft, but still firm enough to slice without squishing. If your bananas are too ripe, save them for a smoothie instead.
Creative Variations to Try
Banana Pudding with Cream Cheese
Want to add a rich, tangy twist? Mix an 8 oz block of softened cream cheese into the pudding mixture before folding in the whipped topping. It gives the pudding an extra layer of depth and turns it into something almost cheesecake-like. This version is especially loved by those who prefer desserts that aren’t too sweet but still indulgent.
Chocolate Banana Pudding Twist
Chocolate lovers, this one’s for you. Add a layer of chocolate ganache or chocolate pudding between the banana layers for a dessert that’s truly decadent. You can also sprinkle chocolate chips or cocoa powder between layers. Another great idea? Use chocolate wafers instead of vanilla for a flavor twist that pairs beautifully with banana and cream.
Serving and Presentation Ideas
Best Ways to Serve for Guests
If you’re entertaining, presentation matters. Consider serving banana pudding in individual mason jars or dessert cups. This not only looks adorable but also makes serving a breeze. You can prepare them ahead of time and keep them chilled until ready to serve. Another tip: garnish each cup with a mini wafer or a banana slice right before serving.
Garnishing for a Touch of Elegance
Don’t underestimate the power of garnish. A sprinkle of crushed vanilla wafers, a drizzle of caramel sauce, or even a few mint leaves can take your banana pudding from simple to stunning. For a Southern touch, add a dash of nutmeg or cinnamon on top. Want to go bold? Top it with toasted coconut flakes or candied pecans for texture and flavor that wows.
Storage and Shelf Life
How to Store Banana Pudding
Once your banana pudding is made, proper storage is crucial for maintaining its taste and texture. Always cover it tightly with plastic wrap or transfer it into an airtight container before placing it in the fridge. This keeps moisture and fridge odors out while preserving the freshness. Ideally, banana pudding should be consumed within 3 to 4 days. After that, the bananas tend to get overly soft and the wafers may become too mushy for an enjoyable bite.
If you’re storing it in individual servings, mason jars with lids work wonders—they’re stylish and functional. For a large dish, use a glass container with a tight-fitting lid or wrap it thoroughly. The key here is to prevent exposure to air which accelerates banana browning and flavor loss.
Can You Freeze It?
Technically, yes—you can freeze banana pudding, but should you? That depends on your expectations. Freezing affects the texture of both the pudding and bananas. When thawed, the consistency might become watery or grainy, and the bananas could turn mushy and dark. If you must freeze, do it in small, airtight containers and consume within a month. Thaw it in the fridge overnight, not at room temperature.
However, banana pudding is best enjoyed fresh or refrigerated. So unless you’re planning on blending it into a milkshake later, freezing isn’t recommended for optimal texture and flavor.
Healthier Alternatives
Low-Sugar and Dairy-Free Options
Watching your sugar intake or dealing with dairy intolerance doesn’t mean you have to skip out on banana pudding. There are plenty of tweaks you can make to create a healthier version of this classic dessert.
For a low-sugar option:
- Use sugar-free instant pudding mix.
- Swap sweetened condensed milk with unsweetened almond milk or oat milk thickened with a bit of cornstarch.
- Replace vanilla wafers with sugar-free cookies or graham crackers.
For dairy-free needs:
- Use plant-based milk (almond, soy, or oat) to make the pudding.
- Opt for dairy-free whipped topping (like Cocowhip).
- Use vegan-friendly cookies and skip cream cheese if using any.
You can also add layers of fruit like strawberries or blueberries to enhance flavor without loading on extra sugar. These swaps keep the pudding indulgent but far more friendly to your dietary goals.
FAQs about Banana Pudding Recipe
1. Can I make banana pudding the night before?
Yes! In fact, making it the night before allows the flavors to blend beautifully. Just be sure to cover it tightly and store it in the refrigerator.
2. What can I use instead of vanilla wafers?
Shortbread cookies, graham crackers, or even sponge cake slices work great as substitutes. Each brings its own twist in texture and flavor.
3. Why is my pudding runny?
This often happens if the pudding wasn’t chilled long enough or if it was overmixed. Make sure to allow proper chilling time and fold ingredients gently.
4. Can I use homemade pudding instead of instant?
Absolutely! Homemade pudding adds a rich, authentic flavor. Just ensure it’s completely cooled before layering with bananas and wafers.
5. How do I keep banana pudding from turning watery?
Use ripe, but not overripe bananas, don’t overlayer fruits, and always chill adequately before serving. These steps help maintain the perfect texture.
Conclusion
Banana pudding is more than just a dessert—it’s a crowd-pleaser, a family tradition, and an easy-to-make dish that brings joy with every bite. Whether you’re making it for a party, a potluck, or just because you’re craving something sweet, this step-by-step guide makes it simple. From selecting the right bananas to mastering the perfect layer, each step is designed to help you create a pudding that’s creamy, delicious, and unforgettable.
So grab your ingredients, follow the process, and enjoy the delicious results. And remember, whether you keep it classic or get creative with variations, banana pudding is all about savoring the little moments and sweetening life’s simple pleasures.